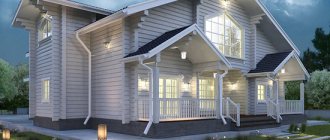
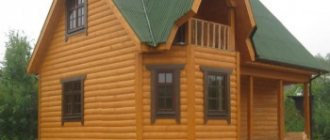
One of the most popular services in the construction market today is the assembly of a log house. This technology is used to build not only private houses, but also bathhouses, as well as utility buildings. They turn out warm and attractive to look at.
If you want to make the walls warmer, you can install a ventilated facade. But some people prefer to leave the walls in their original form. So they look very beautiful and correspond to old Russian traditions. If you have the appropriate skills, you can assemble a house from profiled timber with your own hands. However, first you need to familiarize yourself with the technology.
Main stages
When assembling a house, you need to remember about its shrinkage. This rule is especially relevant if the construction is carried out using the technology of installing natural humidity units. Shrinkage will be approximately 15 cm if a material of natural moisture is used. The dried log shrinks by about 9 cm.
The assembly is divided into several stages. At first, a project is drawn up, then the foundation is built. The main stage is the assembly of the log house. The final work is the installation of the roof. After shrinkage, external and internal work is carried out.
The most important first crown
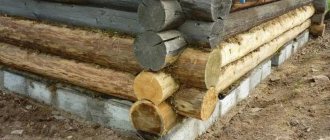
The technology for assembling a house from profiled timber involves paying special attention to the first crown. It represents one of the vulnerable points. This node will form the outline of the house. It is located closer to the surface of the earth and is in contact with the foundation, which draws water from the ground into the water.
The first crown is shielded; this work involves separating it from the foundation with a layer of waterproofing. It is usually roofing material laid on a layer of bitumen mastic. There is a 100 mm lining beam on top, this is exactly its thickness. As for the width, it should not be less than the corresponding value of the profiled beam. The latter will become an intermediate link between the foundation and wall material.
The backing beam must be made of larch, which is characterized by high resistance to rotting. In this case, the material must be treated with an antiseptic. When the kit for assembling a house made of profiled timber is delivered to the construction site, you can begin work. After erecting the foundation and laying the first crown, you can begin installing the lower crown, which is a beam with one profiled side. The horizontal plane must be coated with an antiseptic, and after the mixture has dried, a layer of jute sealant is placed on top. Its thickness should be 5 mm.
The floor beams must be embedded into the first crown. But it is better to lay them in such a way that they rest on the foundation grillage. If the lower crown rots, there will be fewer problems with replacing it. It is better to make the first two crowns from larch.
Foundation preparation
For building a house, the optimal foundation is considered to be a strip foundation. To arrange it, stones and vegetation are removed, mounds and holes are leveled. When the site is leveled, the territory is marked. After this, a trench is dug, the depth of which depends on the height of the future building and the soil, the width is at least 25 cm. The profiled beam is quite light, so for a one-story building you can use a shallow foundation.
For multi-story construction or construction on unstable soil, the foundation must correspond to the freezing level of the soil. On average, this figure reaches 1.2-1.5 m.
The following materials are needed for the foundation:
- concrete, sand, crushed stone;
- formwork;
- reinforcing rods.
Any house begins with preparing the foundation Source penza-press.ru
The trench is filled with sand and crushed stone, and a mesh is laid with rods to reinforce the foundation. It is recommended to use tying wire rather than welding to connect the rods. The formwork is laid out, and then everything is filled with concrete. To make concrete mortar, cement, sand and crushed stone are used - all components are thoroughly mixed. The ratio of materials is 1:3:4, cement grade is at least 400. The foundation stands for about 2 weeks.
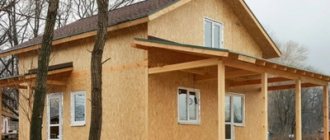
The need to process timber
Work on assembling houses from profiled timber is necessarily accompanied by treating the material with antiseptics. At the same time, you must take into account that after construction you will only have the opportunity to process accessible sections of the walls.
Before laying the profiled timber, it is necessary to protect the remaining surfaces. This must be done before assembling the house. Antiseptic compounds can be “Senezh” and “Tikurilla”.
Results
The process when you build a log house yourself is not something very complicated. Of course, it is advisable to have at least minimal construction experience. However, even a complete beginner can easily construct such a building.
The main thing is patience, determination, and adherence to the basic rules for building houses made of timber.
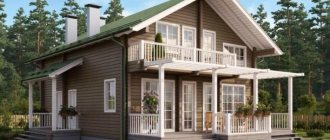
If you use high-quality building materials, and also carefully approach the smallest details, then the finished house will turn out not only beautiful and comfortable, but also durable.
Carrying out insulation
After studying the instructions for assembling a house from profiled timber, you will learn that compaction is a mandatory step. Ideally, it is better to use jute, which is laid in corner joints - the most vulnerable places. Some types of Finnish-style profiles involve laying jute tape along the beam, in its central part. The main function of the jute seal is to reduce the air flow through the walls. To achieve the result, a layer of 5 mm will be enough.
Types of profiled beams
Profiled timber can be glued or natural moisture. These varieties differ in manufacturing method and technical characteristics. For example, in the production of laminated veneer lumber, carefully dried boards are used, which can be of various types. They are glued together until the required profile section is formed. This technology provided this profiled building material with:
- increased accuracy of geometric parameters,
- lightness,
- the possibility of simple implementation of internal (hidden) placement of communications,
- presentable appearance.
To produce profiled timber with natural humidity, coniferous wood (spruce, cedar, pine) is used. The process of its manufacture involves processing a single log using milling and other woodworking equipment. The result is a building material that provides:
- reduction of production costs,
- uniform shrinkage of the frame,
- reduction in the cost of finishing work,
- environmental friendliness.
Using dowels as a connection
Self-assembly of a house from profiled timber requires the use of dowels. They are spikes and pins for fastening structural elements. The products are oblong in shape and have a round or square cross-section. The basis may be:
- plastic;
- metal;
- wood.
If the walls are assembled from profiled timber, then wooden dowels are better than others. This fastening is used when the moisture content of the timber is more than 20%. This is done so that when the material dries, it does not deform and cracks do not form between the rims. The dowel will work on bending and will not allow the beam to bend.
Material selection
It is not possible to create this type of house from every type of tree. If you want this structure to stand for many decades, you need to select tree species that are especially durable and not very expensive. Coniferous trees such as pine, larch, as well as linden, willow, oak, aspen and birch have such measurements.
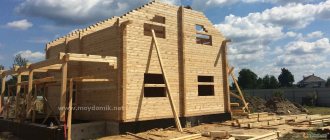
Installation of timber frame crowns.
Here it is necessary to take into account the fact that the construction of a log house will be carried out from logs whose diameter is not less than 20 cm, but not more than 26 cm. You must use even logs, of the same thickness along the entire length and without cracks.
You can make a log house from timber from 2 materials:
- profiled timber;
- rounded logs.
The creation of a rounded log is made by processing an ordinary log into a shape in the form of an ideal cylinder. In this case, a special machine is used. It is capable of removing the very top, not very durable layer of the log.
Making log houses from timber with your own hands begins with the development of a project and the choice of material. And if we leave the building plan to your discretion, since everything depends on specific wishes, then regarding the timber it is quite possible to give a number of general recommendations.
Structure and advantages of laminated veneer lumber
The difference in the functional parameters of these materials is also quite significant:
smooth parts that are cut from logs in the shape of a square or rectangle are cheaper, but do not provide proper tightness when connecting the crowns. So if you want to get maximum thermal insulation of walls even without finishing, choose profiled timber with special locks on the connecting surfaces;
Please note! Some models of profiled timber even have a special selection for laying inter-crown insulation. The use of this thermal insulation technology significantly increases the level of energy saving of the wall. As for the structure, the most common is solid material
However, when drying, long beams can become deformed, so sometimes timber glued together from lamellas with multidirectional wooden fibers is used for construction. Of course, the price of such products will be higher, but by choosing glued blanks, we practically guarantee that their geometry will remain unchanged;
As for the structure, the most common is solid material. However, when drying, long beams can become deformed, so sometimes timber glued together from lamellas with multidirectional wooden fibers is used for construction. Of course, the price of such products will be higher, but by choosing glued blanks, we practically guarantee that their geometry will remain unchanged;
Any of these combinations can be successfully used to build a log house. And yet, lately craftsmen have given preference to solid profiled products that have undergone air drying. According to most experts, it is these raw materials that have the optimal combination of cost and operational parameters.
We invite you to familiarize yourself with the thickness of timber for bath walls: the correct choice of material size
Recommendations for using dowels
If you decide to use dowels as fasteners, you can use some tips that will simplify the work. No more than two beams should be connected to each other. The pins are arranged in a checkerboard pattern. The step between them should not be more than 1,500 mm.
The dowels should have approximately the same moisture content as the timber. Holes for installing fasteners are drilled vertically at 1.5 beams. The diameter of the holes can be 1 mm larger than the diameter of the fasteners. It is better if this parameter is the same. The dowel is hammered in with a mallet and sunk into the timber. When assembling a house from profiled timber, you should choose dowels whose length will be 30 mm less than the length of the hole. This requirement is due to shrinkage compensation.
Roof of the house
After the height of the walls has been brought to the desired level, you can begin to cut the roof with your own hands. This is a difficult process, which you can see with your own eyes in the video. The roof structure for a log house or bathhouse can be of any type. The best and most common option is a gable roof. It consists of two elements - the rafter structure and the roof.
The rafter structure is the basis of the roof. Rafters are its constituent components, the fastening of which is carried out using staples and nails. If you plan to install heating or gas in the house, then you need to provide holes for the pipes.
The next step is laying a vapor barrier film, on top of which you need to sew counter battens, after which the sheathing is installed. Afterwards, the material from which the roof will be made is selected, and then the process of laying it begins.
Assembly nuances: instructions for work
By purchasing a ready-made home assembly kit, you can install it yourself. Each link will be in its place, and glass slots will be made in the products. The work must be carried out according to the principle of assembling a classic log structure. Each link is marked, and during installation you must follow the diagram.
During the process, you must take into account the grooves and tenons of each piece. When laying, each edge must coincide with the profile. If the grooves and tenons are not very complex, then sealing material is laid between the links. This increases the thermal insulation characteristics of the walls.
When assembling a house from profiled timber, it is important to ensure that the links are tightly connected to each other. If this rule is not followed, the walls will rot. If there are products with tongues and grooves in the form of a comb, there is no need to lay insulation. The beams will have bowl cuts that connect the links to each other into an even masonry. If there are no bowls, you can cut them out using a mobile bowl cutter.
How long should a log bathhouse dry?
After completing the installation, I installed the rafters and built a temporary roofing material roofing material so that the bathhouse frame would dry out within a year. I spent exactly three weeks on all this work (the log house for the bathhouse and its temporary shelter), even though the autumn weather was not always conducive to fruitful work.
Ahead was a winter with frosts, which should have properly dried the wood of the log house, and a hot summer, which should have completed the drying.
Log shrinkage compensator
Important point. When wood shrinks along the grain, it shrinks much less than across the grain. If the structure of the log house has vertical posts, as I have on the terrace of the bathhouse, it is necessary to provide expansion joints. I made them from threaded rods with a diameter of 14 mm and nuts with washers. As the log house shrinked, I reduced the height of the racks by adjusting the length of the compensator.
I returned to working with wood again after just over a year. Of course, it would be possible to buy a log house ready-made and not waste time on installation and drying, but then the price for a log house would be 2-3 times higher. A finished bathhouse made of timber measuring 6 x 4 m can cost up to 500-600 thousand rubles.
But for me, the year of drying was not lost, since during this time I built a roof , built a sauna stove inside the log house, and also installed and insulated the ceiling. If you plan the work correctly, you can avoid downtime and save a lot of money. Is not it?
If my story was interesting to you, share a link to it using the social media buttons.
Perhaps the information will be useful to someone and they will be grateful to you. To receive information about site news, subscribe to them or join groups on social networks. Everything about the construction of a bathhouse from the foundation to the roof is in the section “Bathhouse made of timber. How I built it with my own hands"
Completion of construction
After shrinkage, you can begin roughing and finishing, as well as constructing the roof. At the same stage, entrance doors and windows are installed. The subfloor is being installed. If the walls have a thickness of 195 mm or more, then they do not need additional insulation and cladding. They will retain heat perfectly.
Whereas protective impregnation must be applied. This will keep the wood in excellent condition for many years. If you wish, you can purchase a composition that will perform two functions at once - protective and decorative. With this mixture you can emphasize the structure of the wood and give it a rich shade.
Caulking crowns
For caulking can be used:
- Tow.
- Moss.
- Hemp hemp.
- Jute.
- Linen felt.
The main task: to seal the gaps between the beams through which the wind will blow. Caulking work should ideally be carried out in several stages, at different times after construction:
- Immediately after completion of construction, before final exterior finishing. Newly built walls have not yet settled, so the gaps may be very small or not noticeable at all.
- 1-1.5 years after completion of construction. During this time, the walls will have already settled down, and cracks will definitely appear. They need to be caulked tightly, without leaving any hanging seal.
- 5-6 years after completion of construction. The cracks that appear are caulked, and the seal is also refilled where it spilled out or was pulled out by birds. This step is skipped if the house is covered with siding.
The process of filling the seal is simple, but labor-intensive and time-consuming. You need:
- Walking around the perimeter of the house, look for every crack.
- Using a narrow spatula (or just a narrow and thin strip of metal), tightly hammer it in with a sealant.
Arrangement of window and door openings
Openings (both door and window) can be made in one of the following ways:
- Where windows and doors will be located, the beams are laid out at a distance from each other. The distance should be equal to the width of the opening. On both sides of the opening, the beams are fastened with dowels.
- The beams are laid around the perimeter without preparing openings (that is, a “blind” perimeter without holes is obtained). After completing the construction of the walls, openings are cut out in the right places.
The first option allows for more rational use of building material. But it will take more time to adjust, and you can still make a mistake.
The second option is simpler, faster and more accurate. But this way you will waste more material: the sawn pieces are unlikely to be used for construction.
Arrangement of floor and ceiling
Floors are made in the form of flooring, which is laid on logs or beams. To attach the logs, holes are cut in the first or second crown (this is done at the stage of laying the timber). The process of laying the floor is standard: thermal insulation and waterproofing are performed, a subfloor is laid, and the top is finished with the selected material.
The ceiling is installed during interior finishing. The options are:
- Leave the hanging beams as decoration;
- Mount a suspended plasterboard ceiling on the beams and finish it (paint/hang wallpaper);
- Install siding onto the beams.
Roof selection
The roof (both the material and the type of roof) is selected based on the budget and the desired appearance. There are no rules or restrictions for houses made of timber.
Exterior works
After completion of construction work, you can begin exterior finishing. For this:
- The cracks are caulked (how and with what – discussed in the section “Caulking crowns” above).
- The surface is polished.
- The wood is varnished or painted.
You can also install siding or sandwich panels on the outside. There are no restrictions or prohibitions on such options; they will additionally protect the tree from direct contact with moisture and wind. But on the other hand, log houses are good for their “natural” appearance, and modern finishing will hide it. Therefore, the exterior decoration is chosen at the discretion of the owner.
Features of insulation
After assembling a house from profiled timber, you can also insulate it. This process usually involves:
- tow;
- glass wool boards;
- mineral wool;
- linen jute fabric.
Glass wool is laid with a foil vapor barrier layer. This will help reflect heat indoors. The presence of vapor insulation will reduce the evaporation of moisture, which steals heat.
It is better not to use polystyrene foam as thermal insulation, as it will prevent the evaporation of moisture from the wood, which will ultimately cause it to rot. For the same reasons, you should not insulate walls with roofing felt, as well as glassine, or plastic film. It is better to use a vapor-permeable membrane material.
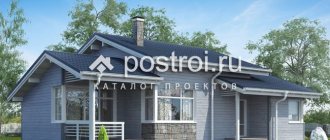
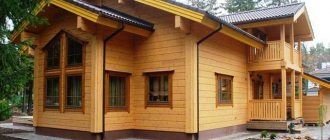
Finishing a timber house
Finishing a house or bathhouse from a log house is an essential part of the DIY construction process. There are only two options for the development of events - leave the outer walls unchanged, treating them only with protective varnish or covering them with decorative elements. This is a difficult choice, because the wood texture looks beautiful and attractive, but I also want to try modern finishing options. For decoration, you can use clapboard, siding or block house.
The interior decoration of a log house comes down to two processes - mandatory and additional. The first option includes flooring, as well as installation of windows and doors. Additional features include the design of a certain interior and style in the house.