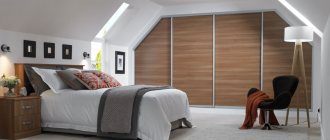
Along with topics describing the details of the construction of large country cottages, reports are very popular on FORUMHOUSE, where portal users share their experience of remodeling small houses. In this article we will tell you how, having about 600 thousand rubles and a great desire to provide your family with normal housing, you can convert an old house with a “cold” attic into a comfortable cottage with a residential attic. Namely:
- How to expand your living space with an attic floor.
- How to properly reconstruct and insulate an old house.
- Why is there a double ventilated gap on an insulated roof covered with metal tiles?
- What are the features of installing a ventilated facade?
How to remodel the roof of a house: turning an attic into a cozy attic
Converting the roof into an attic is the only way to cheaply expand the living space of a country house. After all, there is no need to build a second floor or build an extension next to the house, for which you will have to spend quite a lot of money. And if the volume of the attic space allows, this mainly concerns the height, then the reconstruction process is reduced several times. So, in this article we will tell you how you can remodel the roof of a house, what materials are used for this, and what technologies are used to carry out the entire process.
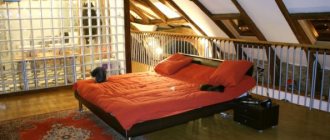
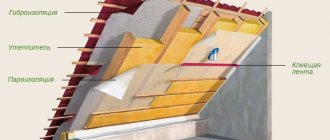
How to convert a cold roof into a cozy attic Source legkovmeste.ru
Degree of damage to the country roof
Often, repairing the roof of a country house does not require a complete replacement of the entire covering; instead, they are limited to applying patches. In the event that such measures do not help and it is necessary to perform more effective work on the roof, then replace the damaged sheets with new elements.
If the roof of your dacha is leaking, then the slate, even with minor chips and cracks, must be replaced and at the same time make sure that there are no other reasons why the roof is leaking precipitation.
Scheme of a warm attic (or attic) ↓
To insulate attics and mansard roofs, mineral wool thermal insulation is used - products made from basalt (ROCKWOOL - Russia-Denmark, NOBASIL - Slovakia, PAROC - Finland, LINEROCK - Saint-Gobain group, ISOROC and TechnoNikol - both Russia, and others) or glass fiber (ISOVER - international concern "Saint-Gobain"; URSA - Spanish concern URALITA, Knauf Insulation - international company, and others). Retail price range – $20-$70 / cubic meter. meter (from $1 per m2). Sold in packages (packs) and rolls.
Stone insulation is special slabs, fiberglass insulation is mats or slabs. Mineral wool thermal insulation materials are durable, do not burn, are resistant to various external influences, and are vapor permeable. Basalt wool is characterized by stability of shape - it does not cake or shrink over time. In addition, it increases the fire safety of the house. The stone heat insulator prevents the spread of fire, withstanding temperatures up to 1000 ºC.
Fiberglass products are characterized by increased elasticity, due to which they perfectly adapt to the characteristics of the installation site. In addition, mats and slabs are compressed when packed. In its compact form, the material takes up less space, which has a positive effect on the estimated cost of construction (transport and storage costs are reduced). When unpacked, the fiberglass insulation returns to its original shape. In addition to insulating the roof slopes and installing inclined windows in the attic, you should take care of utilities: electrical wiring, heating, plumbing, etc.
↑ Options for insulating the attic of a house: with and without waterproofing.
How to insulate?
Typically, the roof is insulated with mineral wool based on molten basalt or quartz.
| Basalt insulation | Quartz insulation |
Which material to choose?
Both insulation materials are similar in their performance properties. They are environmentally friendly and fireproof, retain heat well and provide good sound insulation.
Basalt is denser. But it is resistant to chemical influences.
Melted quartz insulation is more elastic. It is optimal for roofs of complex shapes, because... takes the shape of almost any surface. It is also lighter than basalt.
Quartz insulation is produced in the form of rolls and slabs. Their working properties are the same. Just choose the material that is more convenient to install.
| Insulation in the form of a roll | Insulation in the form of plates |
Thermal insulation of attic roof
Insulation of the roof attic is an obligatory and primary step in its design. It is not recommended to save on this process, since the attic loses heat faster than the floors below due to greater contact with the external environment. The roof hardly retains heat in the winter, and does not protect from the heat in the summer.
To insulate the roof, it is best to use heat-insulating, vapor-tight and non-flammable materials, based on glass wool or stone wool. In order to avoid “cold bridges,” these slabs must be installed without gaps or cracks in the spacer between the rafters. It is worth noting that the thickness of this insulation should be at least 250 mm (for Russian climatic conditions).
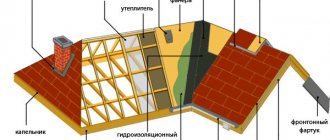
Thermal insulation diagram of the attic: 1-2 and 5-6 – vertical racks; 2-3 and 4-5 – roof slope.
A ventilation gap (2-5 cm thick) must be made between the sheathing and the insulation layer in order to prevent the accumulation of moisture in the heat-insulating layer. The air that will penetrate through the vents at the base of the roof will remove moisture from the under-roof space and the insulation layer and exit through the ventilation holes in the ridge.
It turns out that all layers of the roof and wooden structures (sheathing and rafters) will remain dry, regardless of weather conditions. In addition, the roofing material is covered on the side of the ventilated layer with a special vapor-proof waterproofing membrane in order to protect the slabs of heat-insulating material from getting wet.
There is no “thermal cushion” above the attic floor, unlike the lower floors. The attic has a large common surface that is in contact with the external environment. For reasons of economy and comfort, careful and effective thermal insulation should be carried out.
Design features of attic insulation
For free movement of air from the overhang to the ridge of the roof, a gap of 50 mm is sufficient between the insulation and the roof.
The outer part of the roof covering is a waterproofing layer that does not allow water vapor to pass through and contributes to the formation of condensation moisture on the inside. The consequences of this are the saddest. As a result, mold and wet spots appear, the quality of the insulation decreases, and droplets of water fall from the ceiling. Considering that moisture has a negative effect on the thermal insulation characteristics, the insulation must be protected with a vapor barrier material, for which it should be located on the side of the room. When moisture, for unknown reasons, gets into the thermal insulation material, to remove it, you need to lay a ventilated air layer between the waterproofing layer and the insulation.
Often, when converting attic non-residential premises into an attic, the existing rafter system is retained. Moreover, the load on the supporting structures of the house is reduced to a minimum. Why is lightweight insulation with low density used?
Step-by-step instruction
Before installing an attic roof, you need to make sure that the wooden roof frame and attic floors have sufficient load-bearing capacity. Structures must be able to support the weight of skylights, insulation materials, roofing, as well as occupants, furniture and decoration.
Attention! You also need to take into account the bearing capacity of the foundation. If it is not designed for heavy loads, then such modifications should be abandoned.
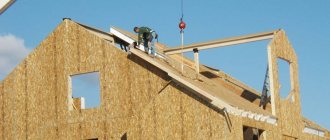
We will consider the process of rebuilding an ordinary attic roof into a mansard structure using the example of a traditional gable system, since it is the simplest and most often used in private houses. The remodeling process includes several stages:
- First, you need to think through the layout of the attic floor and decide where you need to install the stairs, in which places to install attic windows so as not to affect the rafter system. It is also necessary to provide for the installation of heating and lighting networks that will be linked to the main systems of the house. If there are bathrooms on the attic floor, then it is necessary to install water and sewerage for them, and think over a ventilation system.
- Now you can begin to inspect the rafter system. If damaged or rotten elements are found, they must be replaced with new ones. At this stage, you can insert the skylights.
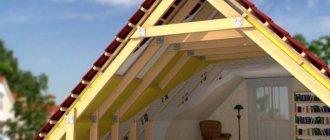
- Next we move on to insulating the roof structure. This is the most important and responsible step to keep the room warm and make living on the attic floor as comfortable as possible. The selected thermal insulation material, such as mineral wool, is laid between the rafters. In this case, the width of the insulation should be slightly larger than the pitch of the rafter system for a tight fit and elimination of cracks. It is important not to forget about the insulation of frame gables made of lightweight materials.
- After this, the rafters and thermal insulation material are covered with a layer of vapor barrier on the inside. It is needed to protect roof structures from condensation accumulation. The vapor barrier material is attached to the rafters using a construction stapler, overlapping the strips and gluing the joints with tape.
Important: around window openings, the vapor barrier film is placed behind the insulation.
- Even if you are satisfied with the existing roof, you need to take care of ventilation of the under-roof space. If your roofing is laid over sheathing fixed to counter battens, which must be nailed to the rafters on top of the waterproofing carpet, then no additional action on your part will be required. If there is no ventilation gap under the roofing, then it will have to be dismantled and redone by installing 4 cm high counter-battens under the sheathing. The roof will need to be redone if the waterproofing carpet is worn out and needs to be replaced. In this case, your actions will be as follows:
- First, we dismantle the roofing and sheathing.
- If counter-battens are nailed on top of the waterproofing carpet, remove them too.
- After this, we replace the roofing waterproofing material by laying strips of new waterproofing across the direction of the rafters with an overlap of 150 mm.
- Next we nail the counter-battens back. If they were not there before, then it is worth correcting this deficiency and creating a ventilation gap by filling 40 mm thick slats over the waterproofing in the direction of the rafters.
- Now you can attach the sheathing and return the roofing to its place.
- Next, you can begin finishing work on the attic floor.
It is worth adding that if you plan to carry out work to replace the roofing or waterproofing carpet, then it is better to carry it out in dry, windless weather. Otherwise, replacement is carried out in small areas of the roof using plastic film to protect the insulation from rain.
Positive and negative aspects of remodeling
As a rule, owners decide to convert the roof of a house into an attic if they need additional living space without significant investments in new construction or the construction of a second full floor. However, it is worth taking into account both the positive and negative aspects of such a restructuring.
If owners rebuild the roof into an attic floor, they receive the following benefits:
- Expansion of living space by adding one more or even several rooms.
- Savings compared to building a full second floor or a new building.
- There is an opportunity to admire the beautiful view from the windows of the attic roof.
However, if we are converting the attic into an attic, we also need to take into account the negative aspects, which include the following:
- You need not only to insulate the roof, but also install attic windows, carry out planning and finishing inside, and arrange a comfortable staircase to the second floor. In addition, a staircase with a standard slope can take up a considerable part of the area of the lower floor.
- Utilities must be installed under the attic roof (lighting, heating, water and sewerage, if you plan to equip a bathroom), and this can affect not only the attic space, but also the living space on the underlying floor.
- It may happen that standard furniture does not fit in the attic, so you will have to order it or make it yourself.
As you can see, re-roofing has as many disadvantages as advantages, and many of them have to do with financial issues. But in any case, an attic will cost less than new construction and the construction of a full second floor.
Construction technology
The technology for constructing an attic roof for a private house depends primarily on what type you choose. If you are just starting to build a house from SIP panels, then there are no problems when choosing an attic. You simply include it in the construction project and implement it without difficulty. But if you already have a house, then you should choose the roof option that will minimally affect the foundation, that is, will not exceed the permitted load. In the first case, the weight of the attic will already be taken into account when choosing the foundation.
In the second option, it is worth considering not only the weight of additional beams and furniture, but also wind and snow, and also think about how you will insulate the additional room.
Attic with a broken slope configuration
This situation often occurs during construction when the design configuration of the room is difficult to fit into the triangular dimensions. Therefore, they choose a roof with a broken slope shape.
The main advantages of this attic configuration are a reduction in the amount of unused space, as well as an increase in the area of the attic. There are also disadvantages in the rise in cost of design work and in the complex installation of the roof.
The sloping roof configuration consists of two slopes in different directions with a certain angle that turns into a sharp slope. This roof design significantly increases the usable area, making the room spacious. Particular attention is paid to the angle of the roof slope; by reducing its value, we increase the area under the attic.
It is necessary to properly waterproof and thermally insulate the living room, since this area is intended for living, and certain conditions must be created for this. For these types of work, only materials of non-combustible origin are used.
An important factor during construction is the insulation of such a building. The structure of the attic space consists of a system of rafters installed in steps of six hundred to one thousand millimeters. The free space between them is filled with insulation. Typically these are fiberglass or mineral materials based on basalt fiber. The masonry takes place in stages, in layers, which must be at least two hundred and fifty millimeters thick. The space between the rafters is sheathed with panels, plasterboard, and wooden lining, which is considered the simplest method. They are treated with varnish with an antiseptic composition. The use of plasterboard allows you to create walls and ceilings of the desired configuration. You can glue wallpaper on it, paint it after applying a layer of putty.
First of all, it should be noted that remodeling the roof is the best option for increasing the living area of your home or cottage. When choosing between building an additional floor or converting an attic, you need to be guided by the economic component. Because it is much cheaper to remodel an attic than to build a new floor.
When converting the roof into an attic, it is worth noting that many houses are currently being built with a pitched roof, which makes it possible to build a well-heated and sufficiently lit living room in the shortest possible time. It should be noted that building an attic at the same time as the house allows you to save building materials and money costs; there is no need for additional communications and reconstruction of the attic. Many people neglect the construction, which leads to postponing the construction of the premises for a long time.
Patching procedure
Leaking country houses with a pitched roof or a gable roof made of slate begin to be repaired with a primer, for which they use PVA glue diluted in a ratio of 1:3. After this, the damaged areas are filled with the mixture prepared in advance at least 2 times, and the thickness of the applied layers should exceed 2 millimeters.
Experts advise repairing country houses with a pitched roof or with a different number of slopes when the weather outside is dry and not sunny, which ensures conditions for the mixture to dry out slowly and thus the patch becomes more durable.
A similar method of repairing slate asbestos-cement roofing sheets can be used on shed roofs for garages and other buildings, such as, for example, a country barbecue with a roof or a garden gazebo. Thanks to the application of patches, the service life of the roof is extended by at least 5 years.
Repairing the roof of a country house, expert advice on video:
Positive and negative aspects of remodeling
As a rule, owners decide to convert the roof of a house into an attic if they need additional living space without significant investments in new construction or the construction of a second full floor. However, it is worth taking into account both the positive and negative aspects of such a restructuring.
If owners rebuild the roof into an attic floor, they receive the following benefits:
- Expansion of living space by adding one more or even several rooms.
- Savings compared to building a full second floor or a new building.
- There is an opportunity to admire the beautiful view from the windows of the attic roof.
However, if we are converting the attic into an attic, we also need to take into account the negative aspects, which include the following:
- You need not only to insulate the roof, but also install attic windows, carry out planning and finishing inside, and arrange a comfortable staircase to the second floor. In addition, a staircase with a standard slope can take up a considerable part of the area of the lower floor.
- Utilities must be installed under the attic roof (lighting, heating, water and sewerage, if you plan to equip a bathroom), and this can affect not only the attic space, but also the living space on the underlying floor.
- It may happen that standard furniture does not fit in the attic, so you will have to order it or make it yourself.
As you can see, re-roofing has as many disadvantages as advantages, and many of them have to do with financial issues. But in any case, an attic will cost less than new construction and the construction of a full second floor.
Mineral wool can be used to insulate the attic roof. This is an excellent material that has good thermal insulation properties. Mineral wool slabs are easy to install.
Steam will constantly appear in the attic room. This is harmful to the insulation. Over time, moistened insulation loses its properties and begins to let cold into the room. To prevent this from happening, you should make a high-quality vapor barrier.
Vapor barrier films, for example, WlagoStop and ParoStop, are suitable for these purposes. This film does not allow steam to pass through, the insulation remains dry and retains its properties longer.
Before starting insulation
Before starting work on installing insulation, you should plan the placement of communications and lay the electrical wire.
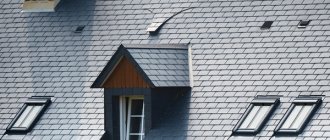
To provide natural light, you will need to cut holes in the roof and install window frames. Windows should be installed before installing insulation. It is advisable to re-cover the roofing near the windows and carefully seal the joints.
We insulate the floor
We recommend insulating not only the slopes, but also the floor. This will provide additional sound insulation. This is especially true if there is a children's room in the attic - the noise will not disturb you.
If the floor is already installed, you will have to remove the top boards. We need to get to the lag.
For the floor we use the same insulation as for the slopes. As a rule, a thickness of 100 mm is sufficient.
- To make sound insulation more effective, we make a multi-layer structure. We install the subfloor - a supporting sheathing (you can use the same boards as for the sheathing on the slopes).
- We install vapor barrier and insulation. We recommend installing thermal insulation in 2 layers (in our case, 50 mm each).
- We lay waterproofing on top of the insulation. We mount it with the logo facing up.
| Floor insulation | Mats are often used for flooring |
Important : do not forget to trim the thermal insulation to the width. We don’t try to compact the insulation between the rafters or joists - it will still straighten out and take its original shape. But in this case, it will not fit tightly to the substructure and will allow cold to pass through.
Also, you should not compress the insulation - it will retain heat worse, because we'll squeeze the air out of it.
Roofing and waterproofing
We have already mentioned roofing materials above. Let us describe just one example for now - covering with metal tiles. This material is galvanized, press-processed metal, 0.5 mm thick, powder-painted or otherwise painted. Everything here is extremely simple. Sheets of metal tiles are overlapped on the external lining and secured with roofing screws with a rubberized skirt, which prevents leakage at the fastening points. It is best to trim the protruding parts of excess material in place with a grinder. This is the easiest way to avoid markup-related errors. The side and ridge parts are covered with corner overlays made of the same material.
Metal tiles are a fairly lightweight and quickly installed material, easy to process, but very large and easily deformed, and this is perhaps its only drawback. After laying the metal tile sheets, you can proceed to waterproofing. Using a construction stapler, we attach the protective membrane to the rafter legs and fastening cross members. The fabric is attached with an overlap. And if we laid the metal tiles from the outside from the bottom up, then here we have to go from top to bottom using the same “ledges”. Correct installation of metal tiles and attic insulation https://www.youtube.com/watch?v=HKkszb91l8Y&t=405s
Pediments
Having protected ourselves from what might drip from above, we proceed to the gables, so that subsequent work can be carried out in more comfortable indoor conditions. As a rule, the gables are “covered” with foam concrete or aerated concrete, whichever you prefer, a material that is relatively light in all respects. This also applies to weight and its mechanical processing. Its thermal insulation characteristics also speak in its favor. Some prefer to see not plaster on the pediment, but wooden paneling, which is also not bad in our opinion. An important part of any pediment is translucent window and door structures. Here you have your choice - you can order windows and doors for existing openings or organize them for ready-made, pre-ordered translucent structures.
Idea! Sometimes you can see completed projects with full glazing of the gable of the house, but this depends on the fullness of each individual’s wallet. When the gable parts of the building are completely filled with translucent structures, the house looks simply enchanting.
Thermal insulation and vapor barrier
Installing thermal insulation for the future attic of a house is generally not a tricky matter. Whether rolled or sheet, it fits tightly into the spaces between the rafters along the entire internal area of the roof and must be at least 100 mm thick. We also do not forget about the thermal insulation of the ceiling between the first and second floors of our almost two-story house. Vapor barrier of a room is as important as waterproofing. It is mounted directly after laying the insulation using the same construction stapler. All that remains is to sew up the interior with DSP or OSB sheets and the conversion of an ordinary roof into a residential attic is almost complete.
Sockets
Sockets, first of all, must be easily accessible to users. They are usually mounted at a height of about 20 cm above the floor. One socket should be placed immediately at the entrance to the room, under the switch. Other sockets, depending on their purpose, should be located in places where electrical appliances are used. In addition, a certain number of sockets must be installed in places that may be useful in the future (for example, when changing the purpose of the roof space). Many manufacturers offer special blocks that can accommodate several connectors for devices of various types - for example, a block that includes 3 sockets, 1 computer output and 1 television cable.
Selection of materials for attic construction
Proper roof design is half the battle. An equally important role is played by the competent choice of materials.
Timber for rafters and sheathing
Typically, softwood is used for rafters - pine, cedar, etc. This material is quite durable, easy to install and process. The thickest timber is used for the mauerlat - the minimum section is 100 * 100 mm, for serious loads 200 * 200 mm are taken.
The section of timber for rafters is usually 50*100mm, 50*150mm. The choice of beam section for the structure should be based on taking into account the final load on the load-bearing walls and foundation. If an attic roof was not initially planned for the construction of a residential attic space, then it is necessary to install the lightest possible rafter system.
Arrangement of counter-lattice and sheathing
Vapor barrier material
The purpose of a vapor barrier is to prevent fumes from inside the attic from penetrating into the “roofing pie.” Today, the most popular material is multilayer foil film. The vapor barrier is placed with foil inside the room, which allows internal heat to be reflected and retained.
Insulation
You should look at materials for roof insulation in more detail. Several types are used:
- Expanded polystyrene (foam plastic).
- Mineral wool.
- Polyurethane foam (PPU).
Polystyrene foam is not the best choice for insulating a rafter system, despite the fact that the price of the material is the most attractive. Firstly, it is inconvenient to attach it to the sheathing. Secondly, its thermal insulation properties are significantly inferior to mineral wool and polyurethane foam.
Mineral wool has excellent insulation properties and is easy to work with. But the material has one significant drawback - it absorbs moisture. As a result, the structure becomes heavier, the wood is exposed to the destructive effects of moisture, and heat is poorly retained inside the attic.
Application of polyurethane foam using a special high-pressure unit
Polyurethane foam is the most modern and undoubtedly the best option. Polyurethane foam is a two-component sprayed material, the structure of which consists of 98% gas cellular phase and 2% solid composition. To apply it, a special high-pressure installation is used.
PU foam comes from the gun in liquid form, practically sticks to any surface, hardens in a minute and grows several times in volume. Polyurethane foam has the lowest thermal conductivity coefficient, high adhesion, non-flammable, and a service life of more than 30 years.
Waterproofing
Waterproofing protects the roof from the penetration of rain and melt moisture. It also protects the insulation from condensation, which inevitably occurs as a result of temperature changes inside and outside the attic.
Films with micro-holes for steam escape are most often used as waterproofing materials. This material prevents moisture from getting inside the “roofing cake”, but at the same time ensures good air exchange.
Roof waterproofing is an important stage in its construction.
Roofing material
- Sheet metal tiles.
- Profiled sheeting.
- Galvanized steel sheets.
- Flexible tiles.
Sheet metal tiles are widely used for roofing due to their ease of installation and low cost. The disadvantage of this material is that it is very noisy. Wind, hail, and rain will be clearly audible inside the attic.
Corrugated sheeting is also easy to install and will last a long time. But due to the structural features, it requires very high-quality waterproofing and additional sealing of sheet joints.
Galvanized steel sheets weigh little, and the laying system prevents moisture from getting between them. Disadvantages: it requires special installation skills and is considered a rather “cold” material.
Flexible tiles are made from fiberglass impregnated with bitumen. It has a wide range of colors, looks very presentable, practically does not allow condensation to accumulate, and is silent. The disadvantages of this type of roofing material are flammability and poor “interaction” with severe frost or heat. It is also necessary to cover the sheathing with plywood or OSB before laying the flexible tiles so that the base is continuous.
Preparatory work
To perform some stages of work, it is recommended to seek help or advice from specialists. For example, it will be quite difficult for an inexperienced person to draw up a drawing of an attic roof. In order for the structure to be reliable, you need to be able to correctly calculate the dimensions and placement of each element.
Before starting construction, it is necessary to calculate the strength of the house, since a large structure will create additional pressure on the foundation. It is better to entrust this stage to a qualified specialist.
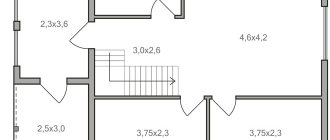
When calculating the attic roof and drawing up the project, the entire area of the room, both useful and blind, is taken into account. The zone in which the height from floor to ceiling exceeds one meter is considered useful.
All other areas of the attic belong to a remote area. In these places it will be convenient to equip places for storing things or household supplies, since they cannot be classified as living space.
Arrangement of a ventilated air layer
The width of the air gap between the roof and the insulation depends on the profile of the coating material. If metal tiles, tiles and other corrugated sheets are used for the roof, then the thickness of the ventilated air layer must be at least 25 mm. When the roofing is made from flat sheets (roll materials, soft bitumen tiles, galvanized steel), the air gap must have a thickness of at least 50 mm. Ventilation of the air gap is done through holes in the ridge and cornice.
The width of the air gap between the roof and the insulation depends on the profile of the coating material.
Protection against blowing of insulation
The thermal insulation material on the side of the ventilated air layer should be protected with a vapor-tight membrane. Under no circumstances should you use polyethylene film or roofing felt as such a material. It is also worth mentioning that membranes, which perfectly allow water vapor to pass through, do not allow liquid water to pass through, which naturally prevents the insulation from getting wet from moisture that condenses inside the roof.
When a new house is built, windproof material is laid on top of the rafters and secured with wooden blocks. And when the attic is installed in an existing attic, the vapor-tight windproof material is secured to the rafters with slats.
§ First we assess the situation
First of all, we need to assess the situation. The thing is, not every attic can be converted. In order for living quarters to be located in the depths of the pitched roof of a house, it must be sufficiently voluminous. It is unlikely that you will like living in cubicles with low, literally oppressive ceilings. Therefore, a room height of at least 2.5 m is required.
It is clear that the inclined ceiling plane limits the full living volume. But there is a limit to everything. If more than half of the attic area has a height of less than 1.8-2 m, it is better to abandon the installation of an attic or decide on a major reconstruction of the pitched roof.
Insulation is laid between the inclined elements of the roof structure (rafters). Its thickness is determined on the basis of thermal engineering calculations, which take into account local climatic conditions and other parameters. If the cross-sectional height of the rafters is insufficient to accommodate thermal insulation, the rafter group is increased.
Wood finishing
Another option is wood finishing. By and large, here you can do without lining with sheets of DSP, OSB and GK. It is enough just to secure the transverse beam between the elements of the rafter frame. A size of 50x50 mm is quite enough. It can be secured using metal corners with holes for self-tapping screws. Having prepared such a frame, you can safely begin sheathing. Usually clapboard finishing is practiced, but you can find other, more interesting options, for example, imitation of a log house. Wood is selected completely differently than for load-bearing structures. Here, the more knots, the better.
Important!
When preparing wood yourself, the required stages are sanding and antiseptic treatment.
If you want to organize a design in an eco-style, then finishing the attic with wood will suit you
Coating with stains and varnishes, as they say, is a matter of taste. Natural wood has been and remains one of the most popular materials for finishing work, especially in country houses. Its natural structure will not leave anyone indifferent, the main thing is to present it correctly.
Has your attic already acquired a residential look? Well, almost residential. Now is the time to do the lighting. We install sockets, switches and lamps in the holes prepared in advance. When the lighting is turned on, the interior decoration of the attic walls will take on a residential and finished look. And, in general, trust your imagination and do everything according to technology. The results will pleasantly surprise you.
Ksenia Skvortsova. Chief Editor. Author. Planning and distribution of responsibilities in the content production team, working with texts. Education: Kharkov State Academy of Culture, specialty “Culturologist.” Teacher of history and cultural theory." Experience in copywriting: From 2010 to present. Editor: from 2021.
Stages of reconstruction of an old house
I decided to make external attic walls 1.2 m high. The height in the center, from the floor to the ridge, is 3.5 m. On the second floor there will be two children's rooms of 16 square meters. m. Roofing - metal tiles. I plan to use stone wool for insulation. Walls from the inside are 15 cm, roofs are 20 cm + counter-insulation of the walls from the outside is 5 cm.
Having spent the entire winter working on calculations (the house began to be remodeled in 2013), at the beginning of spring the user began remodeling and reconstructing the house, for which he hired a team of workers.
Having dismantled the roof, but left the old ceiling, which was supported with supports, because... they live in the house, and after removing the roofing felt, the builders saw a sad picture.
The floor beams sagged.
Expanded clay is used as insulation.
You can evaluate the “quality” of the masonry from the following photograph.
Having removed all the rubbish from the “second” floor, they decided to level the upper part of the walls using brickwork and pouring an armored belt.
I will subsequently disassemble the old ceiling (in parts) and raise it from the original height of 2.3 m to the height of the second floor floor beams of 2.6 m. Having assembled the formwork for the armored belt from cut OSB sheets, the builders laid the “sixteenth” reinforcement in it, after which they inserted studs and poured concrete.
Moreover, the concrete armored belt covers only the front gable and two side walls. On the back wall (on the neighbor's side) a beam was laid together from 3 boards 20x5 cm, which was tied with an armored belt.
The next stage is the installation of columns from a metal pipe with a diameter of 15 cm concreted at the bottom, to which a 22nd channel laid on the “edge” was welded.
Logs (flooring) made from 20x5 cm boards were inserted into the channel.
The logs are laid at a distance of 0.5 m from each other.
Subfloor boards were laid on the resulting “platform”, which, like all wooden frame elements, were treated with an antiseptic and fire retardant.
Having covered the floor from precipitation with banners, the builders began building the walls of the second floor.
The frame will subsequently be covered with OSB boards, 9 mm thick, thereby ensuring its rigidity and resistance to wind loads.
We also left an opening for the rough staircase measuring 1800x1800 mm.
Final touches
Covering the space between the rafters with wall panels, plasterboard sheets or wooden lining is considered the most common and simplest method. Rafters are usually varnished. Experts recommend using antiseptic compounds. It is better to make the attic floor also wooden.
Since drywall is highly resistant to moisture and durable, it can also be used successfully. Moreover, it gives you the opportunity to model the ceiling and walls at your discretion. The surface of the drywall can be covered with wallpaper or painted with oil or water-based paint with preliminary application of putty.
Thus, if you competently convert the attic into an attic at home and follow all the basic recommendations and points, you can get living space and additional usable space in your home, which can become your favorite place to spend time at any time of the year.