When planning the installation of ventilation, you probably thought through and decided how best to install ventilation pipes on the roof of the house. This needs to be done correctly: firstly, so as not to damage the roof and prevent leaks; secondly, so that the output provides maximum traction.
We will talk about how to properly ventilate to ensure regular air exchange. We will introduce you to modern and easy-to-install solutions offered by manufacturers to domestic consumers. We'll show you how best to do this work yourself.
Why is an air exchange system necessary?
Air exchange is not only a matter of comfort, but also of health.
The air in rooms where people are present may contain substances that have a negative effect on the body. One of them is carbon dioxide, which is produced during inhalation/exhalation. This volatile chemical is dangerous in high concentrations. Carbon dioxide also occurs as a result of the operation of stoves, fireplaces, boilers and other heating systems. If the required amount of fresh air is not supplied to the room, the combustion in these devices can produce extremely toxic carbon monoxide.
Another unpleasant substance is the steam that we produce when breathing, cooking, ironing or drying clothes. Its excess leads to constant humidification of the atmosphere in the house, enclosing structures, and finishing materials, which affects the development of mold. In addition, damp surfaces are a breeding ground for dust mites.
The option for arranging the roof penetration is selected based on the efficiency of its operation. Depending on the required performance, it is equipped with a fan, deflector or conventional protective grille.
Ventilation on the roof of a private house should provide conditions for air replacement at a minimum:
- kitchen with gas stove - 65 m³/hour;
- kitchen with electric stove - 55 m³/hour;
- separate toilet - 25 m³/hour;
- utility rooms - 14 m³ / hour;
- separate rooms - 25 m³ / hour.
Fresh air must be supplied to other interiors (bedroom, living room, etc.). In a typical private home this gives about 200 m³/h.
The rules allow reducing ventilation intensity at night, but not by more than 40%. It is also recommended to install additional devices in kitchens that allow you to periodically increase the flow of exhaust air to at least 120 m³/hour.
General characteristics of roof ventilation units
When installing various technical communications, ventilation pipes are traditionally installed on the roof. This approach has specific features and requires scrupulous adherence to installation technology.
In many cases, passage ventilation units have a similar design for different models. They are used for the forced and natural process of removing exhaust air, condensate, and vapors outside the building.
All types of roof penetrations must be impeccably executed and sealed so that atmospheric dust and water do not penetrate into residential and utility rooms. Not only ventilation pipes, but also aerators, chimneys, antennas, and roof hatches are arranged according to the roof passage diagrams
The ventilation pipe of the unit on the roof is located so that the exhaust air can escape unhindered.
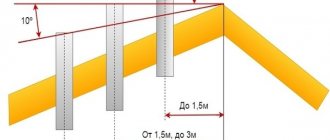
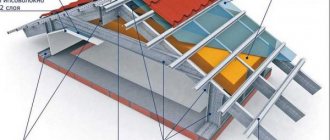
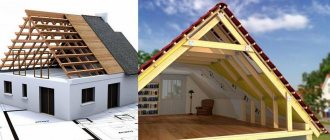
For pitched roofs, a convenient solution would be to install a ventilation pipe near the ridge. This design does not require additional reinforcement or installation of a snow removal system.
When the exhaust pipes are located close to the ridge ridge, the system experiences the least wind pressure. However, to generate normal draft, the ventilation pipe (shaft) must be at least 0.5 m above the ridge. This requirement does not apply to aerators and roof fans that solve the problem of drying the roof pie
The manufacture of passage systems complies with GOST 15150, namely:
- The thickness of the material exceeds 1.9 mm.
- The diameter of the circle is 10-12.7 cm. For nodes with a square cross-section, the dimensions may vary.
- Treated with anti-corrosion mixtures.
- The size of the support ring must exceed the diameter of the pipes.
- The length of the structure should be a maximum of 1 m.
The unit itself can be placed on a reinforced concrete glass or directly on a section of the roof.
The consumer is now offered a wide range of universal and specialized devices for hermetically and quickly sealing roof passages of both the internal ventilation system and drainage of roofing layers
The size and shape of the outlet are influenced by the type of coating, its thickness and the special characteristics of the material, as well as the characteristics of the entire ventilation system. Its choice depends on the conditions created inside the building: degree of humidity; dusty rooms; gas pollution, etc.
Choosing material for the ventilation pipe
The ventilation pipe is made from a variety of materials. Since it will be used in unfavorable street conditions, there are a number of requirements for the material. For example, it must be moisture-resistant and corrosion-resistant. Snow, rain and high humidity are common outdoor occurrences. The material should not deteriorate under the influence of temperature changes, ultraviolet radiation and wind.
There are a number of other important indicators that are taken into account before purchasing:
- Thin walls, thanks to which high penetrating ability is possible.
- To reduce resistance and increase throughput, a smooth pipe surface is needed.
- The product should not have many joints or roughness.
- To simplify the process of system installation and operation, it is advisable to choose lightweight pipes.
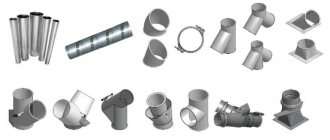
As for the choice of material, the cheapest is galvanized steel. But, ventilation pipes can also be made from the following materials:
- stainless steel;
- PVC pipes (plastic);
- polyester products;
- aluminum.
PVC pipes are often used. They are practical, cheap and easy to install. Aluminum is more expensive, although strong and durable. The choice depends on your own preferences and financial capabilities.
Note! The shape of the pipe that will be routed through the roof is arbitrary. Square, round or other cross-section is allowed.
Now that we have found out what pipes are needed on the ventilation roof, we can begin installing them. It is worth noting that the pipe is brought out through the roof only after ventilation has been designed and installed inside the house.
The principle of the ventilation passage structure?
The design features of the ventilation passage, in addition to the removal of dirty air, make it possible to ensure a strong sealing of the roof and protect against the penetration of precipitation into the attic. Each unit consists of an adapter of a certain diameter that is inserted into a pipe mounted on a concrete glass.
The assembly systems are secured with anchors, which are included in any standard kit. The fastening is also carried out on a metal base, however, instead of a concrete glass, a similar metal one is built in
The support ring, which is part of the structure of the unit, guarantees a perfect connection between the structure and the roof surface. Clutch flanges ensure reliable fastening - the lower one is connected to the air duct, the upper one supports the ventilation hood, which protects the pipe from precipitation. A ring is placed inside the pipe to ensure condensate drainage.
Consequences of poor installation
Do not ignore the rules that apply to roof ventilation. If you neglect the rules of arrangement, you may encounter unwanted processes that can destroy the entire building.
Warm air flows from the living quarters under the roof. Outside, the roof is exposed to cold air masses. Due to the difference in temperature, condensation begins to accumulate under the roof, which can only be removed by ventilation. If a vent is not provided, condensation will accumulate in the attic, destroying the roof.
Concrete roofs are not so susceptible to the effects of condensation, however, harmful fungus can appear on their surface, which negatively affects the human body.
Improper air venting to the roof can also negatively affect soft roofing. In most cases, soft roofing materials are located on a concrete base or continuous sheathing. The presence of excess moisture that penetrates from the inside will cause the material to begin to delaminate. In the future, the roof will leak.
Iron roofs can corrode, reducing the protective properties of the roof. Shedding of hard material from the roof can injure people below.
Types of ventilation
According to building codes, every residential building must be provided with at least three ventilation ducts:
- fan - for removing air from the sewer.
- kitchen, basement, duct for removing air from the bathroom or living rooms - these elements provide ventilation of the house and normalize the microclimate in the rooms, remove exhaust air with a high humidity content, burning or kitchen odors, etc.
- a channel for roof ventilation, which is needed to ventilate the roofing pie and attic space.
Important! The methods and locations for installing ventilation ducts may be different, but most often it is customary to install them on the roof.
It has been established that natural draft will be sufficient to ventilate a house with a pipe height of more than two meters. That is why, most often, pipes are installed on the roofs of houses. In addition to the usual round pipes, square boxes or shafts, flat aerators or compact deflectors can be used - all these elements are needed to enhance air flow.
The correct design of the ventilation system is easily verified by its functionality. High-quality roof ventilation in winter should prevent freezing of the roofing pie, the formation of ice and frost on the inside of the roof, and the penetration of cold air into the house. At the same time, in the summer, a cool microclimate must be maintained in the attic space; every minute the heated air must be replaced by a fresh portion of air masses from the street.
The ventilation of the house and its rooms is checked by normal temperature and humidity - in the summer the house should be cooler than outside, and in the winter it should remain warm.
Important! If mold appears on the walls or ceiling, condensation accumulates, this indicates a violation of normal air circulation, including improper operation of the ventilation system.
Construction of houses
One of the most problematic stages of organizing a ventilation or chimney is their passage through the roof surface. In this matter, there are individual features of installing a chimney or ventilation pipe, which depend primarily on the material from which the ceiling and the roof itself are made. We will learn further about how to make ventilation with your own hands and how to properly install a chimney through the roof.
Table of contents:
- Ventilation of a private house with your own hands - characteristics and features
- Ventilation exit by hand: calculation work for planning passages
- Do-it-yourself ventilation in a private house diagram
- Organizing ventilation in the house with your own hands
- Manual ventilation installation diagram of air duct penetrations
- Do-it-yourself ventilation installation technology in the cellar
Ventilation of a private house with your own hands - characteristics and features
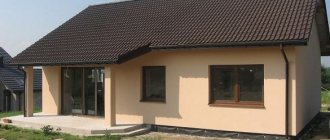
At the design stage of a private brick house, ventilation is installed directly in the walls. In this case, ventilation is vented outside through the roof. Thus, there is always fresh air in the room, and there is no fungus or mold on the walls.
If natural ventilation in the room does not work well enough, then forced exhaust is used to supplement it. However, it is not required if a proper ventilation hole is installed on the roof. The level of ventilation in the room directly depends on the height of the pipe installed in the house. Improperly arranged risers in ventilation shafts above the roof lead to the following unpleasant situations:
- since the ventilation ducts are unevenly combined, the smell from the bathroom and kitchen gets into the bedroom;
- a pipe that is not long enough leads to a decrease in the performance of the ventilation system;
- incorrect installation location of the pipe on the roof leads to reverse and incorrect operation of the hood;
- Lack of proper insulation of the ventilation pipe leads to freezing of the channels.
Modern types of roofs are distinguished by their complex configuration and pie-shaped roofing structure. Therefore, in order to install a ventilation pipe through the roof, you need to work hard. If the installation work is performed poorly, damage to the rafters and sheathing may occur. Where the vent cover is installed, there are often gaps that allow rainwater to enter the attic. Therefore, in order to maintain the tightness of the roof during installation work, it is necessary to use special elements for passage purposes.
Ventilation exit by hand: calculation work for planning passages
You need to start working on the ventilation system of a house by drawing up a project or drawing that describes in detail all the passages of the ventilation shafts. It is recommended to remove ventilation pipes from all rooms in which hoods are located and connect them together. The central pipe exhausts air outside through the roof. However, in this case, it is necessary to install special valves that prevent reverse draft. Otherwise, air from the kitchen will flow through the ventilation holes into the bedroom.
When installing ventilation ducts on a new roof, it is much easier to install the pipe than on a roof that is already equipped. Ventilation passages are installed on the roof to perform the following functions:
- for ventilation of rooms inside the house;
- as drainage pipes for sewerage purposes;
- for ventilation of the under-roof space in the attic.
In addition, in some cases, television antennas and chimney pipes are installed through the roof. The final top element on the duct system has the shape of a previously constructed section of pipe, which is called the ventilation outlet.
Types of assemblies: which duct passage to choose?
Manufacturers recommend using individual roof penetration units for different types of roofing. After consulting with the sellers of specialized stores, you can purchase the necessary passage structure along with the roofing material.
Modern specialized passage units are equipped with advanced air flow control systems. Such equipment more closely meets current comfort requirements. Installing such systems requires more skills than conventional devices.
In arranging a roof passage without a factory-made element, metal or reinforced concrete glasses are used, in which a sleeve is fixed - a piece of pipe with a larger diameter than the ventilation outlet
Before purchasing a high-tech passage unit, evaluate the feasibility of its purchase. If the premises are small, it is better to opt for conventional mechanical models.
The passage unit is a pipe with a plug. But different models may differ in their parameters and appearance.
Table of types of air duct on the roof of a house:
| Design differences | short description |
| Valveless / with valves | The price of designs without valves is cheaper, but there is no provision for adjusting the air outlet to block the flow. It is installed more often in private buildings. Valve samples have a damper to regulate the passage of air. Installed in administrative and industrial premises where regular ventilation is not required. |
| Insulated / without insulation | Insulated options can be equipped with a basalt or glass wool layer. Convenient if the ventilation pipe to the roof of the house is located mainly on the street or is located far from the ridge. Non-insulated models are suitable for mild climates. A layer of insulation helps get rid of excessive condensation that appears due to temperature changes and escaping gases. |
| Mechanical / Automated | Mechanical units are equipped with a special cable that allows you to manually control the air flow. The automatic ones are equipped with a controller that completely controls the ventilation system. |
All models have individual markings, which makes it easier to understand the types of equipment. This is a combination of letters and numbers corresponding to a specific instance, for example UP1-03.
On flat roofs, the passage is equipped with a skirt made of waterproofing carpet and a sealed cap or similar device installed on top
The two numbers at the end indicate the size of the structure. They range from 01 to 10. The first digit indicates the design features of the product.
In this case, the unit demonstrates that the unit is without a valve and a condensate ring. A two indicates that there is no condensate ring, but there is a mechanical valve. The presence of a three indicates a model with a ring + mechanical valve.
Installation diagrams and methods of fastening UP
UP installation options depend on the geometric parameters and type of building materials of the roof structure. This is explained by the fact that the air ducts are a rather massive structure operating in an area of high wind potential and snow load, so the roof must be able to withstand them. And in addition, the location of the pipe must have the best aerodynamic characteristics so that nothing interferes with the free exit of contaminated air flows. In this regard, the angle of the roof slope, the thickness of the ceiling and the characteristics of the under-roof space have the greatest influence on the choice of UP scheme. A flat roof also has an angle of inclination, albeit a small one. This must be taken into account, since it can influence the choice of configuration for the location and fixation of the air duct.
Pitched rigid roof
When installing a passage through a pitched roof, the material does not play a special role: corrugated sheets, ordinary tiles or ondulin. For this roof configuration, the preferred option is a warm UP made of a square sleeve and a low flange for the drain. Around such a sleeve, 4 aprons are installed: top, bottom and 2 side ones.
The top one is placed under the roofing material, the rest on top. Installation begins from the bottom, then the sides and, finally, the top. Often, a special tie is additionally installed - a long roofing gutter - to remove moisture from the area where the unit is located.
Aprons can be factory-made or home-made. In the latter case, galvanized sheet metal 0.5 mm is used for the roof; with larger sizes it will be difficult to bend. It is cut to the size of the wave of the sheet. For example, for metal tiles - vertical - at least 2 waves, and horizontal - 3 full waves. This creates a fairly effective overlap and will prevent rain drops from hitting the pipe.
Aprons are similarly required to overlap each other. There are fewer requirements for the intersection of aprons installed at the top and sides, since they are protected by the roof material, but the overlap of the side and bottom ones must be wide. On 3 sides of them, except for the bottom, a flange is made.
Soft roof
Roofing systems made from roll materials are distinguished by their features in the arrangement of the ventilation passage. This is due to the fact that their slopes are usually built with a slope of 12 degrees. The network is also special when using rolled or piece roofing.
A developer who plans to install flexible tiles should know that they are completely unsuitable for installing roofing systems with a low slope angle, since a large number of joints and seams will have to be made.
Conditions for installing UP air ducts on a rolled roof:
- Before starting work on arranging the UE, the side of its inclination is determined.
- Unlike a rigid roof before work begins, on a rolled roof the penetration is installed only after the base area of the roofing sheet has been rolled out.
- The part of the penetration facing the ridge of the roof is inserted under the material so that flows of atmospheric moisture do not fall into the technological cracks and damage the insulation of the roofing pie.
- Install the elements of the arrival unit in accordance with the manufacturer’s instructions and the selected form of the unitary enterprise: to install a round penetration, you will need to place only two elements, for a rectangular or square configuration - four.
- The elements are covered with thermal insulation materials.
- Instead of iron aprons, for rigid roofing material, pieces of soft fused roofing sheet are used here.
- It is fixed on the roofing platform and on the UP.
- The technological process of strengthening is carried out from the bottom, then from the center to the edges, and only after that the top of the lining is strengthened.
- In order for the connection to be strong and durable, the roofing lining is heated well and evenly and only then pressed tightly.
- Pressing is carried out in two ways - slamming with a mitten, in which a leather tab has previously been placed, or with a special roller used for rolling shingles. The latter option is more suitable for working with thin rolls.
- In multi-layer roll roofing, the installation area of large CPs is protected with two-layer overlays, and for the installation of small rectangular UPs, it is allowed to use single layer overlays.
- A passage with a circular cross-section of small diameter is closed with 2 large plates, in which a special side, the “skirt,” is bent in the horizontal direction. First of all, it is important to mount the lower element, and only then the upper one. During installation, the plate of heated roofing material must be slightly tightened in order to ensure reliable coverage of the duct walls and ensure overlap.
Elements to improve ventilation
Natural draft, based on the difference in height and pressure of the air column, is often not enough to ensure normal air circulation in the under-roof space or in the house.
Insufficient circulation leads to consequences such as:
- accumulation of condensation and the appearance of mold;
- rusting of metal parts and roof structures;
- crumbling of concrete structural elements
- rotting and drying of wood;
- getting wet thermal insulation, its damage and ineffectiveness.
All this will soon lead to a violation of the integrity of the waterproofing and the appearance of leaks in the roof. This means that the roof will have to be repaired or replaced, so it is much more effective to immediately install a good ventilation system.
To enhance traction, special elements are used:
- Aerators look like flat plates - pads. This device constantly maintains low pressure, the air in the aerator is rarefied. Thanks to this, a pressure difference is easily created - exhaust air is removed from the under-roof space quickly and easily. Elements may vary in size, and different types of roofs will require different quantities. The rule for installing aerators on the roof is that the distance between devices should not exceed 12 meters. Installation is carried out at the highest points of the roof; for this it is better to choose the joints of the insulation.
- Ridge aerators are necessary for pitched roofs. These elements are mounted along the ridge line, providing increased natural ventilation of the under-roof space. Ridge aerators can be combined with any roofing materials; they are especially important for roofs covered with flexible tiles. But the slope of the slopes must be certain - from 15 to 45 degrees. On such roofs, it is initially assumed that ridge vents will be installed, and aerators are inserted into these grooves. At the stage of roof repair, you can cut out an area for the aerator with a jigsaw or other element. It is imperative to monitor the tightness of the ridge aerator, because it is installed in the center of the roof - improper installation will lead to leaks.
- Deflectors operate on the principle of convection - moist air and steam are removed from the roofing pie with the help of these devices, ensuring its drying and ventilation. According to building codes, at least one deflector must be installed for every 100 square meters of roofing.
To bring ventilation ducts to the roof, it is necessary to make a preliminary calculation.
Attention! Often all ventilation ducts leading from different parts of the house are combined into one shaft. As practice shows, this method will be effective only with very competent calculation and installation of all elements of the system. When doing everything yourself, it is better to install three separate ventilation ducts on the roof.
An error in calculations or installation will lead to kitchen odors and sewer “aromas” spreading throughout the house, disrupting the microclimate and the circulation of flows in the under-roof space.
Roof Fan Installation
Roof or roof fans come in several types: with a noise suppressor, with a device for dampening vibration and removing excess moist air from the under-roof space, etc. In order to find out how many of these units you need, you need to know that for every 100 square meters of roof, you need at least 0.2 square meters of ventilation opening area.
If you have chosen to install a roof fan to equip the attic ventilation system, then first you need to find out the structure of the roof, its angle of inclination and the roofing material. If the roofing material is soft, then installing it yourself will be extremely difficult, and companies that specialize in this do such installation only on individual projects. In short - expensive and time-consuming. If the roofing material is hard, then the basis for its installation is a glass. It can be made with a round or square cross-section, made of galvanized steel, stainless steel or reinforced concrete structure. The ventilation outlet to the roof, made of brick or concrete, can serve as a rigid base for the glass.
- Initially, the pallet is fixed to a rigid base. It plays the role of a collector for the accumulation and removal of moisture.
- Using a truck crane or winch, the fan is delivered to the installation site and secured, having previously installed a rubber gasket on the surface of the glass.
- The last step is to connect it to the electrical network.
SNiP requirements for ventilation systems
The requirements of SNiP can be considered redundant, but they still need to be fulfilled. They clearly prescribe not only the minimum required air exchange for each room, but also regulate the characteristics of each of the system elements - air ducts, connecting elements, valves.
The required air exchange is:
- for the basement - 5 cubic meters per hour;
- for living rooms - 40 cubic meters per hour;
- for the bathroom - 60 cubic meters per hour (plus a separate air duct);
- for a kitchen with an electric stove - 60 cubic meters per hour (plus a separate air duct);
- for a kitchen with a gas stove - 80 cubic meters per hour with one working burner (plus a separate air duct).
It is logical to equip the bathroom and kitchen with a forced ventilation system, even if natural ventilation is sufficient for the rest of the house. Exhausting air from the basement to avoid the concentration of carbon dioxide, which is heavier than air, is also often provided by a separate air duct.
The air circulation diagram in the house, made in the style of infographics, gives an idea of the flow of air flows. It is very important to check the functionality of the system after installing the duct system
Homeowners who are not ready to turn the roof of their house into a palisade of air ducts often think about how best to arrange ventilation communications within the attic. After all, I would like the design not to be too bulky.
But is it possible to remove exhaust air through the roof structure and its supporting frame - the rafter system? And if this solution is acceptable, what is the best way to implement it? What equipment will be required for installation?
Selection and calculation of air ducts
The calculation of the cross-section and pressure in the air duct is carried out by technical specialists; it is difficult to do this on your own. The main line is selected taking into account the required air exchange rate per hour. The project takes into account the harmfulness of production and the number of people in the house or office. There are rooms from which air is removed separately and does not mix with flows from other rooms. These are chemical laboratories, hospitals, hazardous production workshops.
For private buildings, small-sized pipelines are used, attention is paid to high-quality cleaning of flows and humidification. The method of air movement is chosen - natural or forced. The material of the boxes and the shape are determined by the technical characteristics, customer preferences and the interior of the room.
When is roof ventilation needed?
It’s hard to argue with the fact that any residential building needs ventilation - it is always done in the form of dormer windows, vents, channels in the walls or using special electrical devices that enhance draft.
But not all owners take ventilation of the under-roof space with the required seriousness. However, there are types of roofs that must be equipped with a separate ventilation system:
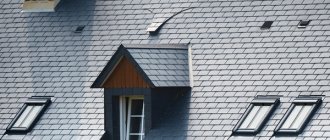
- Roofs covered with flexible tiles require good ventilation due to their design features. The fact is that bitumen shingles are mounted using glue; for normal roof strength, the sheathing pitch should be minimal. The most effective solution is a continuous sheathing made of moisture-resistant plywood, knocked down boards or OSB boards. This design does not have natural gaps, and the tile material itself does not allow air to pass through - this will lead to stagnation of air masses, disrupting the microclimate under the roof and even in the house. To avoid this, gaps are made on the gables, along the eaves line and at the roof ridge. Ventilation is supplemented with special elements (aerators, deflectors).
- Attic-type roofs also need enhanced ventilation, because people who need a sufficient amount of oxygen and fresh air are expected to live here. But the main function of the system in such structures is to save heat during cold periods and maintain cool temperatures in winter. Natural air circulation is used here - the warm flow is displaced by the cold flow, which comes from below. This method makes it possible to enhance thermal insulation, which on attic roofs runs directly under the ceiling. A vapor barrier membrane is definitely needed, which will remove wet steam from the residential attic to the street, while at the same time protecting the inner surface of the roof and insulation from condensation accumulation.
- roofs treated with metal profiles must have a number of air ducts equal to 1% of the total area of the slope. In this case, the number and size of vents for supply air must correspond to the dormer windows for outflow. The distance from the insulation to the roofing sheets should not be less than 5 cm, so timber of the appropriate thickness is chosen for the sheathing.
Features of UP for chimney
For houses that have stove heating or fireplaces, the construction of a control unit for the design of pipes and chimney will be required. Such designs have their own characteristics: when installing a chimney pipe, it will be necessary to create auxiliary rafters in the attic so that snow masses do not accumulate on the chimney duct.
Auxiliary fastening of rafters and corrugated sheeting will be required if the roof penetration is placed through the ridge. This arrangement complicates the installation of a mansard roof in the attic.
Features of UP for chimneys:
Organization of UE for chimneys will require compliance with fire safety
Particular attention should be paid to wooden structures. Non-flammable products must be used for work. This will prevent the roof from heating up and catching fire.
It is also necessary to comply with the requirements of SNiP, which indicate the size of the gaps between pipes and wooden parts in the CP. The popular UP design, which protects the chimney pipe from heat, looks like a box around the pipe. The box must be filled with non-flammable materials. You need to install a special umbrella over the chimney, which will prevent water from getting inside and minimize the blowing of winds into the attic roof. Since the tightness indicators in joints on a seam roof may be compromised, installing a UP in the valley is not recommended.
How to install roof ventilation
The ventilation duct is usually laid in the walls, so the ventilation pipes are mounted on that part of the roof that rests on the load-bearing walls of the house. You need to understand that high pipes and ducts installed in the highest part of the roof are, in fact, a sail. Strong wind puts a lot of pressure on these systems and can lead to destruction of ventilation. Installation of pipes above load-bearing walls strengthens the entire structure.
Having decided on the installation location, you can begin installing the ventilation system:
- Purchase the necessary ventilation elements that match the roofing material, the size of the slopes, and the shade.
- A hole is made in the roofing material. A template is applied to the roof, which usually comes with ventilation elements, outlined with a marker and cut out.
- The same cutout must be transferred to all layers of the roofing pie.
- In accordance with the same template, holes are made for self-tapping screws.
- The roof surface is cleaned and degreased.
- The gasket included in the kit is treated with sealant on the inside. Connect the contours of the seal to the cutout in the roof and press the gasket.
- Place the ventilation element on the seal and secure it with self-tapping screws.
- A pipe is inserted into the passage element and its verticality is checked.
Important! The reliability of installation of the ventilation element should be indicated by excess sealant squeezed out from under the gasket.
To get a consultation:
For high-quality air exchange, as well as the safety of the house, it is necessary to correctly install ventilation outlets, in particular, passage units.
The passage unit consists of the following elements:
- holes in the roof of the required size;
- an air duct that is inserted into the hole;
- elastic penetration, made of flexible materials and repeating the pattern of the roofing.
Many manufacturers produce units that are a ready-made solution for installation. They consist of two layers. The inner one is a galvanized steel pipe, and the outer one is a polypropylene layer. Ready-made solutions also include insulation, a valve and a cap with a deflector.
Stages of installation work
The ventilation pipe is brought to the roof and securely fixed after the internal system is equipped with wiring. A set of tools is selected depending on the type of roof. The standard kit for installing a ventilation pipe includes the following materials and tools:
- insulation;
- electric drill, chisel, electric jigsaw and screwdriver set;
- fixing hardware;
- sealant;
- Bulgarian;
- passage unit;
- rags and protective equipment.
To facilitate installation work, use a passage unit that is pre-assembled. Installation process:
- Markings are made in the roof area where the ventilation shaft will exit. A marker is used for this. Marks are placed according to a standard template depending on the size of the outlet pipe and its cross-section.
- Using a grinder, cut a hole in the roof for the pipe. In this case, the top layer of the roof is removed.
- To secure the outlet section of the ventilation shaft, holes are drilled.
- In the place where the passage unit will be installed, markings are made.
- Grooves are cut according to the finished markings. They are designed for self-tapping screws.
- Then the passage unit is installed and secured with self-tapping screws.
- The pipe is mounted on top and securely secured with hardware.
At the end of the work, insulation is carried out. If there are cracks and holes, they are insulated.
Installation Features
It is better to entrust all calculations for the design and installation of a ventilation system to specialists, since the diagram must comply with the technical regulations. Installation Features:
- The efficiency of ventilation increases in winter, and decreases in summer. This occurs due to the temperature difference that occurs at the inlet and outlet of the ventilation duct. Different temperatures inside and outside the structure increase the draft inside the channel.
- To prevent air draft from becoming smaller in the future, the channels located under the roof elements must be thermally insulated. This point is taken into account during design. Thermal insulation will protect the channels from moisture accumulation.
- The pipe also needs to be heated if its installation location is located next to the chimney. The draft in this design works differently, so if the calculation is incorrect, the performance of the ventilation is disrupted.
Ventilation of the room will occur effectively if the ventilation duct is properly arranged. If you study the installation features, you can do all the work yourself. For tile roofs, it is recommended to install the ventilation outlet closer to the ridge.
Consequences of installation errors
In order for the entire system to work efficiently and without disturbances, the ventilation pipe must be installed correctly. If you do not follow all installation rules, the following problems may occur:
- all the unpleasant odors will begin to accumulate inside the room;
- fresh air will no longer flow into the room;
- condensation will accumulate inside the ventilation system;
- cravings will decrease;
- If installed incorrectly, mold and mildew may occur;
- kitchen cabinets become covered with soot and grease;
- family members begin to get sick more often;
- some structural elements located on the structure begin to freeze.
A comfortable state in the house is created thanks to high-quality air exchange. Therefore, it is important to install the ventilation system correctly.
How to secure a tall pipe?
If for some reason it is not possible to bring the ventilation outlet closer to the ridge, and meeting the requirement for wind support forces you to make a very high pipe above the roof surface (more than 1.5-2 m), then the ventilation pipe must be additionally secured.
This must be done because the higher the pipe, the greater the wind loads it is exposed to due to the larger blowing area. In case of strong gusts, the pipe can simply break in a place close to the passage through the roof.
There are several ways to securely secure a ventilation pipe to the roof:
- Stretch marks;
- Mowing;
- Metal stands.
Depending on the design and height of the ventilation duct and roof, these methods of reinforcement can be used together, for example, strengthening the ventilation outlet with a metal stand and then securing it with guy wires.
Providing stability with guy wires
Guys are most often made of galvanized cables, less often of thin chains.
If you plan to attach the pipe to guy wires, then take care in advance to purchase a suitable clamp for attaching them.
To securely secure the ventilation outlet, the installation of at least three guy wires is required. The angles between the braces should be made as equal as possible, that is, 120°, and it is better to install the braces to the axis of the pipe at an angle of 45°.
To fasten the guy wires, a clamp with three eyes is installed on the pipe, and three anchors with rings are installed in the roof or other places. Threaded tensioners are used to tighten the cables, and screw clamps are used to make loops.
Tensioners come in different sizes and can withstand different loads. The higher your pipe, the stronger the device you need to choose
Cable braces are very easy to manufacture and install, and all the necessary materials are sold at any hardware store and are not expensive. Strengthening the ventilation pipe with guy wires with your own hands is not difficult.
Fixing the pipe position with bevels
The braces (rigid braces) are similar in appearance to cable braces, but differ from them in the principle of operation. Unlike cable braces, which work exclusively in tension and must be attached in at least three places, braces can also work in compression, so to strengthen the pipe with them, only two points of attachment to the roof are enough.
Depending on the direction of the wind, the slopes will equally well withstand the wind load, either compressing them or stretching them. Thanks to this advantage, slopes can be used in conditions of limited space, for example, if the ventilation duct exits close to the roof eaves and the installation of three braces is not possible.
The higher your pipe, the larger the cross-section the bevels should have so as not to break or bend when compressed
The slopes are usually made from light metal profiles, painted to protect against corrosion. For fastening to the pipe, just like with guy wires, a clamp is used, and the braces are attached to the base with anchors or other fasteners.
Unlike stretch marks, braces do not require tension. They are immediately made to the required length and are rigidly fixed to the pipe and roof to eliminate any vibrations. When choosing angles between the slopes, as well as between the slopes and the pipe, it is better to adhere to the same rules as with stretch marks.
Construction of metal structures
Metal racks are used in cases where it is not possible to secure guy lines with slopes on the roof or the pipe is so high that it needs to be not only secured, but also strengthened.
The most widespread are welded volumetric racks. Externally, they look like mobile phone towers and are a welded structure that acts as a load-bearing frame for the pipe.
The use of such racks strengthens the pipe and allows it to be securely held under wind loads in all directions. Making racks yourself is problematic, since this will require metal, tools and experience in working with welded geometric structures. It is better to order their manufacture in a locksmith workshop.
The protective metal structure will ensure the stability of the tall ventilation pipe. at the same time it will serve as the basis for laying insulation and finishing with facing bricks, tiles, corrugated or regular or sheet metal
If you still need or want to make your own, you will need:
- A flat surface for welding so that the stand is straight;
- Tools: welding machine, mask, electrodes, angle grinder with cutting and cleaning discs;
- Materials. For small structures, a 40 angle and a 40×4 strip are suitable. You can also use profile pipes of various sections: 40×40, 40×20, 20×20;
- High-quality primer-paint for corrosion protection.
Structurally, the rack is made of two, three or four vertical 40 angles or 40x40 profiles, which are connected to each other by short sections of a strip or profile of a smaller cross-section at a right angle or diagonally.
The greatest strength is provided by the diagonal installation of the crossbars. However, for domestic use, the strength of the crossbars installed perpendicular to the racks is quite sufficient. At the point where the vertical element is attached to the base, platforms with holes for fastening elements are welded to it.
A well-made rack can reliably hold a high ventilation pipe, increasing the structure’s resistance to even strong gusty winds
Depending on the design of the rack, it is securely attached to the roof or wall, and a ventilation pipe is attached to it with clamps. The design is quite durable and can withstand strong gusts of wind.
However, it should be remembered that the stability of a metal stand primarily depends on the reliability of its attachment to the base: the smaller the supporting platform and the number of attachment points, the less wind the stand can withstand.
Consequences of incorrect ventilation outlet
If the project did not provide for the organization of a heated insulated attic, then, as a rule, in private houses the attic is an unheated room. The temperature in the attic is lower than in the house. When warm air from the duct, saturated with moisture from breathing, electrical appliances, and heating systems, enters a colder room, the moisture condenses.
In summer, this can lead to the formation of fungus and even rotting of the ceilings. In winter, moisture freezes and turns into frost and ice. There is nothing good about these snow and ice build-ups either. In winter, they contribute to the formation of microcracks. In the summer they can melt and flood the attic.
The air within the attic should be completely changed at least twice a day. This frequency of air exchange will eliminate the formation of fungus, which irreversibly destroys the wooden components of the roofing system
There is a solution: to install ventilation in the attic in a private house, a number of important conditions must be met, these are:
- the presence of a ventilation outlet from the attic to the street;
- installation in the attic space of the attic with its own ventilation system;
- installation of a mechanical ventilation system in the house - supply and exhaust with a recuperator installed in the attic.
Depending on whether the ventilation system is forced, natural or combined, its methods of venting to the attic also differ.
Specifications
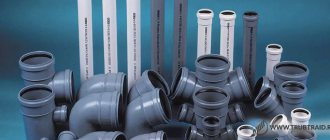
PVC pipes are resistant to ultraviolet radiation and are quickly installed.
Ventilation pipes presented on the domestic market have technical characteristics depending on their type. Asbestos and conventional sewer products are described by the following parameters:
- Main standard size (working diameter).
- The degree of resistance to mechanical loads and chemically active environments.
- The temperature range in which they remain functional.
- UV resistance.
Plastic pipes are characterized by approximately the same indicators, tied to the characteristics of a particular material. For example, polyvinyl chloride (or PVC) is resistant to UV rays, is not very expensive, and the operating temperature range of pipes based on it is from -10 to + 70 degrees. It is most suitable for installing ventilation systems in bathrooms and kitchens.
Polypropylene is slightly superior to PVC in terms of its technical characteristics, since it can withstand temperatures up to + 85 degrees. In addition, it is resistant to chemically aggressive environments and is available in a fireproof design. Fluoroplastic has an increased heat resistance (up to + 200 degrees), is also UV resistant and easily tolerates contact with active chemicals (alkalies and acids).
Polyethylene is characterized by a wide range of operating temperatures - from -50 to +80 degrees. It is UV resistant.
Natural ventilation with access to the attic
Gravitational ventilation, also known as natural ventilation, ensures air circulation according to the principle familiar from school: warm air is lighter than cold air. Warm air rises through exhaust ducts located as high as possible. Cooler air from the supply ducts enters the house.
Ventilation ducts in a one- and two-story private house can be combined into one system only if there is a good ventilation system in the attic itself. This reduces the number of air ducts on the roof
If effective under-roof ventilation is properly arranged in the attic and in the roof pie, then the exhaust air exhaust systems can be fully or partially combined.
The circulation and removal of contaminated air mass within the attic will be ensured by:
- fan risers;
- aerators (an air duct with access to the street, which forcibly ensures constant air circulation in the attic);
- proper installation of a roofing pie (the simplest is ventilation using two gaps under the roof and above the rafters);
- roof vents that cut directly into the roof system.
If a natural ventilation system is organized within an unheated attic, a rational solution is to combine all the ventilation pipes in the attic to be discharged through a common ventilation shaft.
A single riser vent can solve condensation problems in your attic. The natural ventilation system closes on it
If the attic is sufficiently ventilated, condensation will not accumulate in it. Unfortunately, roof vents or attic gaps do not always provide it fully.
Ventilation of the cold triangle of an unheated gable roof (called a gable or gable) is carried out by installing ventilation windows or openings with access to the street. This ensures there is sufficient air circulation in the attic
Dormers and attic vents that can be closed and opened should provide more air circulation than other methods of natural attic ventilation. For example, supply and exhaust openings drilled in the gables.
Is it necessary to insulate the ventilation outlet?
The question of the need to insulate ventilation and, in particular, its exit to the roof is often asked by independent developers. The answer to this is clear: insulation must be mandatory!
If you do not pay due attention to insulation, you may be left without ventilation in cold weather.
The ventilation outlet is located outside and is exposed to sub-zero temperatures, and the wind only accelerates the cooling process. Having frozen, the walls of the ventilation duct begin to cool the warm air passing through it from the room. As a result, the traction force is significantly reduced.
This creates two negative phenomena:
- If warm air from the room goes up, trying to go outside, then, having cooled from the walls, it begins to fall down again, creating counterdraft and turbulence, preventing the normal operation of ventilation;
- The warm air removed from the premises contains fumes from human activity. In contact with the cold walls of the ventilation duct, this moisture turns into dew and begins to flow back down the ventilation duct in drops, creating excellent conditions for the development of mold fungi.
In extreme cold, the condensed moisture does not have time to drain inside and freezes at the very exit. The ventilation outlet hole becomes smaller and may freeze completely.
To eliminate these problems, the ventilation outlet must be sufficiently insulated. The easiest way is to use factory-made ventilation outlets. The manufacturer makes the structure double-walled and puts insulation into it.
If the exit is made with ordinary ventilation plastic or metal pipes, then you can insulate them yourself. Tubular insulation made of foamed polyethylene (used for insulating sewer, water and heating pipes), rolled insulation or similar material is best suited for these purposes.
It is conveniently applied by simply wrapping it in several layers and secured with reinforced tape. Polyethylene and isolon are not afraid of water and sunlight, and birds and insects do not show interest in them.
It is not necessary to use foil insulation: it costs much more, and the effect of the metal layer is unlikely to be noticeable. The main thing is to ensure a sufficient thickness of insulation, which is recommended to be at least 30 mm.
When attaching roll insulation to the pipe, carefully seal all joints with tape. Thermal insulation, made in the form of a shell for pipes, holds well without additional tricks
Mineral wool is also suitable for insulating the ventilation outlet. However, you will have to make a protective cover on top of it from a durable material (fiberglass, galvanized or plastic sheet, etc.) to protect it from wind, precipitation and birds. Mineral wool in rolls is most convenient for such purposes: it is simply wrapped around the pipe.
In addition, if you are thinking about how best to fix the ventilation pipe on the roof and at the same time immediately insulate it, sandwich chimney elements are perfect. They are easy to install and are equipped with insulation installed at the factory.
Using such a pipe, you will save yourself from the problems of applying thermal insulation and protecting it from external influences
In addition, the chimneys have standard passage units that provide a tight connection, as well as standard deflectors and umbrellas for protection from precipitation and wind.
Another advantage of using chimneys for the manufacture of ventilation outlets is the possibility of connecting them with clamps for guy wires for subsequent reliable fastening. And the service life of stainless steel chimney pipes as a ventilation duct is practically unlimited.
Combined ventilation outlet to the attic
A good solution for a simple ventilation system is:
- separate outlet to the attic for kitchen and bathroom exhaust pipes with forced exhaust;
- a separate outlet to the attic with further connection to the vent riser (or without connection) of exhaust pipes from the remaining residential premises.
This is the simplest and most effective way to provide ventilation at home without a supply and exhaust ventilation system with a recuperator.
In combined ventilation schemes, a device for forcing air movement is installed either in the exhaust or in the supply openings
Fans of combined ventilation system options operate either for exhaust or for supply. In the first case, fresh air enters on its own, trying to fill the vacated space. In the second case, the portion pumped from the street removes the waste air mass from the room.
REQUIREMENTS FOR AIR DUCTS
When choosing equipment for arranging a ventilation system, it is important to take into account that a number of requirements are imposed on air ducts to ensure that the direct functions of the devices are performed.
Among the general mandatory conditions imposed on air ducts are:
· tightness of connections;
· compact dimensions in relation to the room;
· high resistance to external and internal physical stress;
· strength;
· installation in unused parts of the room volume.
Requirements for air ducts for residential, public premises and industries, as well as safety rules for their installation are set out in SP 60.13330 regarding heating, ventilation and air conditioning of premises, as well as in SP 73.13330.2012.
Including the attic in the ventilation system
An attic built instead of an attic is essentially another room. Which is good from the point of view of optimizing the living space, but somewhat complicates the installation of the ventilation system in the traditional way.
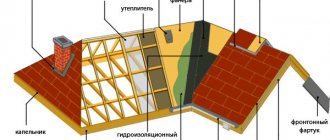
There should be a ventilated attic space between the attic and the roof. Fresh air must be allowed to circulate freely in the roofing pie and within the attic or furnished attic.
Natural ventilation occurs due to the gravitational movement of the air mass. Cold air comes from the holes under the roof ridge, warm air leaves from the ridge hole, aerator
In the process of installing a roofing pie, it is necessary to construct vents - longitudinal ventilation holes. They start from the eaves line and end at the ridge line. Provided by installation of battens and counter-battens on rafter legs.
In the eaves area, street air enters these ventilation ducts. In the ridge area, the air flow exits, taking with it condensation and household fumes that have penetrated from the living quarters into the attic space.
The ventilation system for the rest of the house is also ducted into the attic. Exhaust ducts and risers from the house and from the attic can be combined and connected to an aerator. However, you need to be sure that there is sufficient air circulation.
SAFETY INSTRUCTIONS WHEN INSTALLING AIR DUCT
Installation of ventilation air ducts is characterized by an increased danger for the ventilation system as a whole and for human life. Therefore, for safety reasons, we recommend adhering to the following rules for working with the material:
· for internal installation, be sure to use durable scaffolding and scaffolding;
· when installing air ducts on a stepladder or other elevation, insurance and personal protective equipment are required;
· work on cutting sections is carried out only with gloves and glasses;
· specialized equipment is used to cut the material;
· processing of all materials is carried out exclusively on the ground;
· assembly and lifting of sectional parts is carried out using the pull-down method to prevent excessive swinging.
In order for the installation of the air duct to be carried out efficiently and in accordance with all safety rules, it is recommended to entrust this task to the appropriate workers who are knowledgeable about the standards and technologies of installation work.
Supply and exhaust ventilation with recuperator
This is the simplest, most expensive way to vent ventilation into the attic. It is necessary to purchase a recuperator - a device that ensures the movement of air flow while simultaneously mixing in a fresh portion of air and heating it to a comfortable temperature.
The entire circulation system is connected to the recuperator; the principle of its operation is quite simple. Heat from heating devices and boiler rooms is often wasted. So why not use it to partially heat cold air?
The cool air drawn in by the recuperator from the street is not only prepared by mixing with the already heated air mass, but is also cleaned of harmful and unpleasant impurities suspended in the air. In addition, the recovery equipment is equipped with heaters that heat the air flows.
A schematic representation of a ventilation system with a recuperator in the attic looks quite simple. You just need to purchase a recuperator, install and connect air ducts to it
A prerequisite for the functioning of a system with an integrated recuperator is its compulsory nature. Air enters and is removed from the room by two constantly running fans. Otherwise, the recuperator simply will not work; the device provides too much aerodynamic resistance.
Valves and dampers are installed along the entire length of the air ducts to ensure proper flow distribution. Additional meshes must be installed at the inlet and outlet of the recuperator to prevent dust and grease from entering the device. The exit to the street is closed with additional bars against birds and insects.
The recuperator cannot operate without fans. Thus, having a constant source of energy in the house becomes of utmost importance. If electricity in a private home disappears regularly and for a long time, it is better not to use this system
Modern recuperators can be programmed using buttons on the control panel. Such devices are even more expensive, but their ease of use makes them attractive.
What about condensation, a major problem in the attic? Condensation does not accumulate in the recuperator, does not settle on the walls and beams of the attic, but quietly and peacefully flows into a pan located under the device.
In winter, in an unheated attic, this can become a problem, since in severe frosts the recuperator’s power may not be enough. In this case, you can install another heating device next to the recuperator box.
Installation of a passage unit for smoke
Most often, a ventilation channel intended for smoke must be laid, in the case of a roof with one or two slopes, at the minimum possible distance from the ridge. Also, the air duct, which is the main one, must be made in the attic area. This will make it possible to minimize the appearance of moisture on its inside. And some builders recommend installing ventilation shafts through the roof ridge; such ventilation installation will be optimal.
If the chimney is exhausted through a pitched roof, then there is a chance of snow accumulating on it, which in turn will lead to leaks. If ventilation is done through the roof ridge, then part of the rafter rows will have to be dismantled. It is for this reason that the system is changed in most cases, but it should be noted that in this case it will not be possible to create an attic under the roof.
Output via skate
Such a chimney outlet does not pass through the roof if the owner wants to create a cozy space under it without building a second floor. But such a channel arrangement also has unique advantages, among which are conveniently mounted elements and a complete solution to the inconveniences associated with accumulating snow. Thus, we will get ventilation outlets that will not lead to pressure from snow and ice on the roof, and as a result, will not cause damage to it.
Care must be taken to create a system that eliminates the possibility of fire during the installation of a ventilation duct through a surface made of wood and through a roof made of corrugated sheets. When using such a system, it is necessary to ensure overlap and the maximum possible protection in case of fire that may occur due to overheating of the pipe.
The installed chimney will need to have protective elements built into it, in most cases this is an umbrella, which helps eliminate the risk of cold air and water entering the chimney. Also, ventilation should not be done in the valley, because this can lead to uncorking of the seams of the roof and pipe covering. Snow deposits may also accumulate there and even ice may form.
If you plan to install the ventilation duct not on the roof, but under it, then you will need to create rafters made of wood, which have a tendency to ignite quickly. That is why it will be necessary to leave technical openings between the rafters and the air exchange system, the size of which is regulated by SNiPs. When conducting ventilation through a thermally insulated metal tile roof, you need to use the type of structure that will make the constantly heated passage of the chimney safe and protect against an increased risk of ignition. To do this, you will need to create a rectangular box-shaped unit, which is filled with non-flammable material such as glass wool.
Common mistakes
Before installing ventilation on the roof, you should study the common mistakes that beginners often make.
List of common mistakes when arranging roof ventilation:
- neglect of SNiP rules;
- selection of unsuitable ventilation systems;
- asymmetrical arrangement of ventilation ducts;
- incorrect calculation of ventilation capacity;
- neglect of heat balance calculations;
- errors in installation.
Mistakes in using material for hydro- and vapor barrier are also common. Errors when applying waterproofing or vapor barrier are due to the fact that users confuse the purpose of the materials.
If you confuse the purpose of the products, you may encounter some problems:
Using vapor barrier film instead of waterproofing. A vapor barrier can completely eliminate the penetration of moisture. If it is installed on top of the insulation material, the moisture that enters will remain in the insulation. After some time, the insulating material will no longer fulfill its intended purpose, and home owners will face large heat losses.
Some users make mistakes in the number of ventilation layers required for a particular roofing material. For example, the back side of metal tiles does not tolerate contact with condensate. For this reason, there must be a ventilation gap between the roofing material and the waterproofing layer.
To create a ventilation gap, it is necessary to create a sheathing of not a solid type, but a timber one. There should be gaps in it for air circulation. If liquid penetrates under the roof from the outside, due to such a layer it will be eliminated through the ridge.
The grille together with the counter-lattice will form an air gap, which is sufficient for condensation accumulations to escape out. Special anti-condensation films are used as waterproofing, which do not allow vapors to escape from the insulating layer under the roof.
To ensure that moisture leaves the thermal insulation, it will be necessary to create a second ventilation layer to provide an air cushion, which will be located between the insulation layer and the anti-condensation film. Laying diffuse and super-diffuse membranes is not allowed, as they are designed to allow vapor to pass under the roof. For metal tiles, such actions are fraught with corrosion.
Design of a pipe passage for removing contaminated air
Its structure is related to the type of structural building material from which it is made: metal, plastic and combined metal-plastic. They are available with a valve and can be valveless, the latter not adjustable in terms of the volume of ventilation air flow.
The valve-type ventilation passage through the roof can have mechanical or automatic regulation, the latter has a built-in controller and air sensors that control the ventilation modes in the household. For different climatic conditions, UP can be produced with insulation for the central and northern regions of the country and without insulation for the southern regions.
Important! When the air duct is located at a significant distance from the ridge run in any climatic regions, an insulated UP is installed to reduce the process of condensation in the exhaust pipe.
Standard UP equipment:
- Ventilation outlet hole on the roof of the calculated diameter.
- The outlet pipe is installed on a special concrete glass, mounted on the ceiling and secured with anchors. In some designs the mill is made of metal.
- Penetration - provides a tight connection between air ducts and roofing material, consists of a support ring and flanges. They can be elastic, highly resistant to weathering and corrugated, which allows installation of UP on roofs with a variety of slopes.
- A support ring that ensures reliable connection of the ventilation pipe to the roof area.
- Connecting flanges to strengthen the fixation of the unitary unit. The lower one is installed on the outgoing air duct, and the upper one under the support of the protective umbrella from atmospheric moisture.
- Condensate drain ring located in the middle of the duct.
- Fan pipes connected to the sewer and having independent penetrations.
Conclusions and useful video on the topic
The video clearly demonstrates the installation of a pipe air duct passing through the roof, allowing you to get the most complete picture of such work:
We suggest you visually familiarize yourself with the installation of ventilation by watching this video:
Video instruction on the construction of a box for a group of ventilation pipes:
Familiarity with the technology, options and details for arranging ventilation passages through the roof is necessary for both independent craftsmen and customers of guest worker services, whose qualifications and experience should not be relied upon unconditionally.
Tools and accessories for installing a ventilation pipe on the roof
Before performing installation work on the roof, you must prepare all the necessary tools and equipment.
As a rule, for work you need:
- roof passage unit;
- insulation;
- sealant;
- sealing elements;
- self-tapping screws;
- mounting belt for compliance with safety regulations when working on the roof;
- gloves to protect hands;
- perforator;
- metal scissors or jigsaw with blades for wood and metal;
- level;
- screwdrivers or screwdriver.