It is impossible to install ventilation for an independent or centralized wastewater disposal system without installing a special drainage outlet. The element blocks the return flow of gases into the bathrooms, acting as a connecting component between the septic tank and the atmosphere.
The technology for installing the riser is quite simple. But before you start work, you need to understand the principle of operation of the ventilation duct and understand how to properly install the vent pipe in the house. The answers to these questions are described in detail in the article.
What are fan pipes?
Many people have heard from friends and acquaintances that it is necessary to create a scheme for installing a vent pipe in a private house. This is due to high-quality ventilation of the toilet, bathroom, kitchen, and entire house, which can be built using a vent pipe.
What is a fan pipe, what can it be, how to install it?
The drain pipe is connected to the sewer system and is designed to perform a ventilation and water seal function with subsequent outlet to the roof. During operation of the sewer pipeline, gases accumulate in it. If you do not install a waterproof barrier, they will penetrate into the living space, which is dangerous for the lives of the inhabitants of the apartment. In addition, an unpleasant odor will spread throughout the house.
It can be of any length, shape, depending on the installation location and the size of the sewer line. This part of the exhaust system can be straight, angular, placed in horizontal, vertical directions.
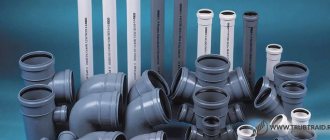
To prevent unpleasant odors from entering your home, it is necessary to ensure high-quality ventilation of sewer risers. In such cases, a fan pipe, for the manufacture of which plastic is most often used, helps. However, plastic products have not completely replaced elements of metal origin. Today, many people use cast iron, less often copper, structures in their homes. Metal does not want to give up its positions.
Read with this article: How to bend and connect a brass pipe with your own hands.
Review from “A” to “Z” of this product.
How to properly install a sewer riser
In this article I will talk in detail about choosing a location and installing a sewer riser in a country house. Please note: if a number is indicated in brackets at the end of a sentence, this is the number of the corresponding clause of SP 30.1330.2012 “Internal water supply and sewerage”. This document is an updated version of the relevant SNiP. If some standard is established by SP 31-106-2002 “Design and construction of engineering systems of single-family residential buildings,” this will be stated explicitly.
The riser is the main element of the internal sewer network. The main task of the riser is to collect wastewater from floor drains and divert it to a horizontal collector.
Possible schemes
Laying and replacing sewer risers does not allow mistakes in the process of planning and installing the system, otherwise the living space will be filled with an unpleasant odor. To prevent this from happening, in a private house you need to choose the right drain pipe design.
There are 2 installation schemes for exhaust systems:
- Horizontal. According to this scheme, the outlet of the vent pipe must be carried out through a hole in the wall, and not through the roof. This scheme can be used in private construction if it is impossible to make an exit through the roof. The final outlet is covered by a grille rather than a deflector.
- Vertical. With this design of the fan pipe in a private house, the riser goes out through the roof.
There are three types of vertical outlet of the riser to the atmosphere:
- output at an angle of 90⁰. It is necessary to make two branches from the riser, one after the other, at angles of 90⁰, after which it will come out vertically upward through the roof;
- output at a slope of 45⁰. To directly exit the riser through the roof, it is necessary to alternately make a branch from the main riser, first at 45 degrees, and then at 135 degrees;
- the usual vertical type outlet, which will immediately continue to the roof and exit through it to the outside.
Important! The ventilation installation scheme in a private house must be correct, that is, in accordance with the appropriate diameter and in the right place, provide for the presence of a check valve that blocks the overflow of feces.
Choosing a pipe for the riser
You can find information on different types of pipes in the corresponding section. Polypropylene pipes are most often used.
It is also important to correctly determine the diameter of the riser. The throughput capacity must be sufficient to simultaneously drain wastewater from all connected floor drains. To calculate the risers of multi-story buildings with a large number of connected devices, a complex formula is used. For a private home, you can use a simplified calculation algorithm that takes into account only the total flow of wastewater from different appliances. Read more about calculating the diameter of the sewer riser.
Use of cast iron elements
For several decades, the installation of exhaust ducts took place using cast iron risers. Today, cast iron fan pipes are becoming increasingly rare. But in vain, because using risers made of this material you can be sure of the quality of the exhaust and ventilation ducts. Cast iron parts have a number of advantages.
They differ:
- strength. The rigidity and density of the alloy contribute to the safe operation of cast iron products, which can be purchased at a hardware store. They are used in the construction of private, multi-storey buildings;
- long service life. This is due to high wear resistance, which helps metal products maintain excellent technical characteristics for many years;
- resistance to mechanical impacts. They are not afraid of accidental impacts, damage, or heavy loads.
Minuses:
- tendency to corrosion processes;
- difficulty of transportation;
- heavy weight;
- high price.
When repairing or replacing old cast iron risers, it is necessary to dismantle the existing system. It is not easy to do this if the sewer or exhaust line is located in a hard-to-reach place. How to disassemble a cast iron pipe behind a toilet? It is difficult to carry out this procedure if tow with cement, aluminum or sulfur were used to connect the risers.
First you need to dismantle the parts that are located further from the riser. To do this, you should stock up on a chisel or a hammer with a plastic or rubber head. When you hit the chisel with an iron hammer, pieces of metal sharply bounce off the pipe and can fall into the riser, since cast iron is a very brittle alloy.
Having completed all the preparatory work, proceed to removing the cast iron drain or sewer riser:
- After destroying this element of the system, gradually approach the crosspiece, leaving 30-35 cm of an almost broken part.
- Using the remaining piece, gently loosen it. If this does not help, then use a chisel to start removing the packing, loosen it again, and then remove the remaining fragment.
- If the system is sealed with sulfur, then you need to take a blowtorch or gas torch and start heating the packing. Before doing this, you need to cover the furniture and walls with a screen so as not to damage them. It is advisable to carry out this work together, since one person must remove the heated, viscous sulfur.
- After removing a certain amount of the heated mass, remove the remainder of the unnecessary part of the part.
An option is possible when you can use a grinder to cut off the rest of the line right up to the socket. This procedure will ensure not only a neat cut, but also a quick, convenient joining of the new plastic sewer part with the old cast iron riser.
Important! The cast iron fan pipe can be used in any extreme situations. This means that such a system will function normally under conditions of a wide temperature range at elevated pressure.
Work with cast iron sewer or sewer pipes, including drilling them, must be carried out with the utmost care. This is due to the increased fragility of the metal.
Over a long period of operation, as a result of corrosion processes, cast iron sewer risers become unattractive. Therefore, they need to be refreshed. How to paint a cast iron pipe in a toilet?
For painting use acrylic, water-dispersion paint. The shade can be very diverse.
Some owners refresh cast iron risers with oil paints. Before painting, you need to get rid of rust, old peeling paint, unnecessary debris, and dirt. Only after such preparation can you begin painting. A painted, restored sewer line will last for many more years.
Requirements for a ventilated valve (aerator)
The installation of ventilated valves to allow air into the system (Figure 5), which guarantees normal operation of the sewer system, is carried out on the basis of appropriate calculations. The throughput of the aerator must correspond to the specified design parameters for the throughput of the riser. In turn, the fluid flow through the riser depends on its diameter, type (ventilated/non-ventilated) and height. The calculations also take into account the diameter of the dictating floor drain (with the highest waste flow), the angle of liquid entry through it, the height of the water seals and other initial data.
Figure 5. Operating principle of an aerator - air valve for sewerage: 1. In the operating position, the valve is closed - air from the sewerage does not enter the room. 2. When a vacuum occurs in the sewer riser, the aerator valve opens, the missing amount of air comes from the room, preventing the water seal from breaking.
In a simplified form, you can coordinate the flow parameters of the aerator and ventilated riser using tabular selections. Initially, you should refer to Appendix “B” of SP 40-107-2003 for the installation of internal sewerage from polypropylene pipes. It is to this that SP 30.13330.2012 refers to determine the characteristics of the aerator.
The largest valve with a live air flow cross-sectional area of 3170 mm2 ( Important! Look in the store not at the outer diameter, but at the size of its opening, roughly), if the design conditions are met, it is capable of compensating for decompression in risers ∅110 mm, the maximum throughput of which is indicated in table 1.
Table 1. Capacity of a riser made of polypropylene pipes ∅110 mm, equipped with a ventilation valve with a clear cross-sectional area of the air flow of 3170 mm2 and 1650 mm2.
| Diameter of floor outlet, mm | Angle of liquid entry into the riser, ° | Riser capacity, l/s | |
| 1650 mm2 | 3170 mm2 | ||
| 50 | 45.0 60.0 87.5 | 5.85 5.10 3.75 | 7.7 6.8 4.54 |
| 110 | 45.0 60.0 87.5 | 4.14 3.64 2.53 | 5.44 4.8 3.2 |
Next, you should find out the flow parameters of the sewerage system with similar initial data. For ventilated risers, they can be gleaned from tables 6-9 (SP 30.13330.2012).
Table 2. Capacity of ventilated risers made of polyvinyl chloride (PVC) pipes (SP 30.13330.2012 (Table 7)).
| Outer diameter of floor bends, mm | Angle of connection of floor branches to the riser, ° | Throughput, l/s, risers with pipe diameter, mm | |
| 50 | 110 | ||
| 50 | 45 60 87.5 | 1,10 1.03 0.69 | 8.22 7.24 4.83 |
| 110 | 45 60 87.5 | 1,10 1.03 0.69 | 5,85 5.37 3.58 |
This also takes into account the diameter of the floor outlet and the angle of its connection. From the tables it becomes clear that, for example, for some of the most popular PVC pipes today, Ø 110 mm with an outlet Ø 110mm/450 (outlet for connecting a toilet), the second throughput of the riser will be 5.85 l/s. This figure turns out to be slightly higher than with similar geometric parameters of a sewer system with an air valve (5.44 l/s (Table 1)).
Consequently , by removing the decompression pipe and installing a similar aerator, during a salvo discharge it is possible that a vacuum may occur with dehydration of the siphons.
Application of plastic structures
In private homes, when installing systems for removing air and various types of odors, they mainly use plastic vent pipes. They can be round or rectangular.
Risers used as fan risers are produced in different sizes. When installing an exhaust or supply ventilation system, plastic fan pipes with a diameter of 50 to 110 mm and a length of 3-4 meters are in demand.
If the plastic fan pipe in the ceiling is cracked, it needs to be replaced. Repairing this part of the exhaust or ventilation line will not bring the desired result.
When carrying out this procedure, you should adhere to the sequence of work:
- using a hammer drill around the riser, expand the diameter of the hole (at least 2 times);
- use a grinder to cut the cracked element of the system approximately in the middle of the height so that it is convenient to remove both pieces;
- remove the cracked parts and put a new riser in their place;
- seal the hole around the installed exhaust ventilation element both from below in the ceiling and in the upper plane of the ceiling.
It must be said about the presence of flexible plastic fan pipes. To connect them to a solid part of the system, it is recommended to use rubber rings for sealing. For better fit into the socket and complete tightness, they must be coated with silicone before installation. When attaching such a section to the wall, metal clamps are used, which are characterized by increased reliability.
Important! Although silicone is an ideal substance for high-quality sealing, it should be remembered that the next time you dismantle it, you will have to put in a lot of effort to remove it.
Today, plastic risers can be purchased at any hardware store or store.
Video description
This video demonstrates the consequences of the absence of a drain pipe and explains how this happens:
Acceptable reasons for non-use
The most obvious reason for refusing to install a drainage channel is a small one-story house with a minimum number of sources of waste water. With a greater height, the building should be provided with a riser with a diameter of 110 mm. This is enough to use the bathtub and toilet at the same time. In the case of an autonomous septic tank located nearby, the pipe can be replaced with a vent valve.
Example of a vent valve Source rus-line.com
Dimensions
There is no separate part called a fan pipe, regardless of size.
This design includes:
- regular tee;
- lid or grill;
- one or more pipes;
- safety valve.
The dimensions of drainage pipes for sewerage, as well as for toilets, depend on the specific conditions of their operation.
The following rules must be followed:
- You can use parts from any materials;
- The size of the pipes for the exhaust riser, including the length, may vary.
Today, the most popular are plastic fan pipes with diameters from 110 to 50 mm, regardless of other linear dimensions (length).
Using a 110x45 ani plast w4220 drain pipe, which can be of different sizes, it is convenient to connect the sewerage system to the toilet outlet. Such a detail will seem to glue the toilet bowl to the sewer riser, which will ensure that there are no leaks in the bathroom. The size of the toilet drain pipe depends on the diameters of the drain, sewer riser, and the distance of these elements to the wall or ceiling.
The diameter of the part must be such that the maximum possible sewer flows do not interfere with its normal functioning. Sometimes ventilation and sewage systems are constructed from risers of different diameters. Then you need to use a special adapter.
There is a catalog where you can select the necessary parameters of parts for arranging an exhaust system.
Important! The ideal location for the exhaust riser is the place where the internal and external sewers are connected.
Typical installation errors
Most often, the situation with the formation of a vacuum in the system occurs when pipes of different diameters are used in its arrangement. For example: the toilet is connected to a pipe D 110 mm, the bathtub is connected to a pipe D 50 mm, and the opening of the cistern is D 70 mm.
Unpleasant stench in bathrooms often appears when plumbing fixtures are equipped with siphons that have insufficient volume. This occurs due to the fact that when the devices are not used regularly, the remaining water in the siphons dries out, removing the hydraulic valve and opening up free access to the spread of “aromas”.
When choosing a place to place a ventilation fan pipe, many people make the mistake of placing it under the roof overhang. This leads to the fact that in winter, snow sliding and falling from the roof damages the drainage structure.
To prevent the condensate formed inside the ventilation duct from freezing at sub-zero temperatures, the structure must be insulated.
Fan pipe ventilation
Current building regulations state that it is not necessary to install ventilation in one-story houses, since in such dwellings the one-time drains are small. Buildings with two or more floors must be equipped with such systems. This is due to the fact that with the help of such risers there is a connection with the environment, which means ventilation processes occur.
Many people ask: “Can the waste pipe be vented? And if so, how to connect the vent pipe to the ventilation?” We will give detailed answers to these and other questions.
When installing a vent pipe, it can and simply must be vented, which is most often done. To carry out this procedure, you must first build a ventilation duct.
It is necessary to anticipate the installation of a check valve.
Its purpose:
- prevents the return of drain flows;
- prevents rodents from entering the sewer and into the premises;
- corrects a sewer pipeline with an incorrectly installed slope;
- limits the entry of mechanical impurities into the toilet.
The principle of operation of the device is simple: after water comes out of the drain tank, it is triggered and the liquid enters the sewer system. When the valve is closed, unpleasant odors from the toilet and sewerage do not spread throughout the rooms, since the device is completely sealed.
Important! Install a check valve immediately after the toilet.
Although everyone is trying to install the exhaust system correctly, you can still smell an unpleasant odor from the sewer system in our houses and apartments.
Sometimes odors from the exhaust pipe are blown into the ventilation, since these two channels are located next to each other. To get rid of unpleasant odors, you need to install an aerator at the upper end of the riser. Thanks to this vacuum valve, the system will function perfectly.
Elements of the ventilation device
Since the drain pipe is a natural continuation of the sewer riser, it is allowed to be made from the same material as the main pipeline in the apartment or house. Installation involves the additional placement of an umbrella or decorative grilles on top of the device, which prevents fallen leaves, large debris and dust from entering the channel.
Fan pipe location
Thus, the ventilation device consists of two main elements:
- Pipe base;
- Umbrella for protection from precipitation, wind and debris.
Output to the roof
Not everyone knows how to ventilate the roof. This must be done, since the ventilation system in the attic cannot end. The drainage pipe must have access to the roof so that there is a connection with the street and the atmosphere. If the sewer is led to the attic, then all the unpleasant odors will be concentrated there. When the hood does not reach the roof, mold will begin to appear in the attic as a result of increased humidity, which will cause a lot of harm to the entire home. The fan pipe is installed both on the roof of a multi-story building and a single-story building.
What to do when the drain pipe on the roof freezes? To prevent it from freezing on the roof, it is necessary to provide insulation around it. The cause of freezing is the formation of condensation, since warm air tends to rise. The result is freezing of the walls with ice, which can lead to the blocking of the exhaust lumen and the cessation of the functioning of the entire system.
The risers are insulated with rolled heat insulators or “shells”, which should be securely fastened.
In some cases, it is impossible to carry out the drainage pipe to the roof. This is not a problem, since you can use a horizontal mounting scheme for the exhaust system. The end of the ventilation system will not be located on the roof, but will be vented through the wall into the air.
You can buy a roof vent pipe at a construction supermarket.
Important! Regardless of how the drain pipe is routed - onto the roof or through the wall, the system requires a check valve.
In order for ventilation systems to function for a long time and efficiently, when laying pipelines, you must adhere to the above-mentioned norms and rules. Only then will your home not be filled with unpleasant odors, but will constantly feel the flow of fresh air.
Recommended diameters according to SNiP
According to SNiP, the diameter of the drain pipe must be no less than the diameter of the drain riser. In the case of combining the ventilation of several risers into one drain pipe, the size of the latter is selected according to the number of water consumers in a residential building. If it does not exceed:
- 120 - 100 mm;
- 300 - 125 mm;
- 1200 - 150 mm;
- 1200 - 200 mm.
A 50 mm drain pipe will not be enough to ensure normal ventilation of waste gases.
About ventilation of concrete septic tanks
For sewerage on their territory, each owner tries to make a two-chamber concrete septic tank. These containers must be ventilated not only to eliminate unpleasant odors. If you correctly design and build a ventilation system in a septic tank, then you will make the living of your family and residents of neighboring houses safe, comfortable, and enjoyable. You need to take care not only of yourself, but also respect your neighbors.
Such a structure is a habitat for bacteria that can quickly process organic waste coming from the sewer system. As a result, dirty wastewater turns into clean water and sludge. This biological-chemical process is accompanied by the release of a large amount of gas, which not only smells unpleasant, but can cause an explosion if a spark hits it. Conclusion: high-quality ventilation of a two-chamber concrete septic tank without a drain pipe is impossible. For the full functioning of a conventional septic tank, it is also necessary to provide ventilation.
How to properly install a riser in a private house:
About riser clamps and sound insulation
A significant part of the noise from a working sewer riser is associated with the transmission of vibration to the walls through the clamps holding the pipe. This problem can be solved by using a damping clamp with a rubber insert.
Passing the sewer riser through the ceiling
As noted above, there should be no joints where the riser passes through the ceilings. For the obvious reason - a leak in the riser most often occurs through a joint, and if it ends up inside the ceiling, this is a problem.
After installing the riser, the passage through the ceiling is sealed with cement to the entire thickness of the ceiling (8.2.8). In addition, it is necessary to protect the lower part of the riser with concrete to a height of 8...10 cm. The thickness of the concrete layer is 2...3 cm.
Before sealing the riser with concrete, it is necessary to wrap the pipe with rolled waterproofing material. There should be no gaps in the waterproofing protection.
Sound insulation of sewer riser
If you are bothered by riser noise, you can use polyurethane foam or foam shell. Polyurethane foam is more expensive, but its flexibility allows you to effectively insulate curved sections of pipes. Foam shells are only suitable for straight sections, but they are noticeably cheaper. In addition, working with foam soundproofing for pipes is very simple - apply it, snap it on, and secure it with tape.
I do not recommend using foamed polyethylene as a material for sound insulation - it is cheap, but very short-lived. Polyurethane foam is completely useless - it practically does not absorb sound.
Passage of a sewer riser through the roof
The ventilation part of the riser must be brought to the roof. Standard roof penetrations can be used to penetrate the roof. The choice of passages for pipes with a diameter of 100, 110 and 150 mm is large - there will be no problems with the purchase.
In addition to the penetration, I recommend buying an insulated sewer outlet - especially if you are building a house in Moscow, the Moscow region or even further north.
The work itself is carried out in the following sequence:
- remove the thermal insulation at the site of the intended passage through the roof;
- we look for the area between the sheathing elements and mark the middle of this area;
- drill a through hole of small diameter at the location of the expected center of the output;
- we move to the roof and cut out a hole of the desired shape in the roof (use a stencil);
- We apply the sealing element of the penetration to the roof and adapt it to the topography. The element bends easily, so it can be pressed tightly even to a roof with complex terrain;
- We fix the seal using non-acetic sealant and self-tapping screws. The distance between the screws is 3.4 cm;
- if the axes of the sewer outlet and the main element of the ventilation pipe do not coincide slightly, we attach a special corrugated pipe to the sewer outlet. If the discrepancy is significant, you will have to install an inclined element;
- We attach the roof penetration to the sealing element. The method of fastening depends on the design of the penetration.
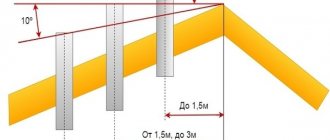
Please note: the remote elements of the ventilation pipe must be inclined. The minimum slope is 2 cm per 2 m length. This is necessary so that the condensate can freely roll down and fall into the drain.
- We insert the sewer outlet into the penetration and fix it. The output must be positioned strictly vertically;
- we return to the attic and attach the water seal seal to the waterproofing (supplied with the roof penetration);
- We connect the corrugated pipe or the outlet of the sewer riser to the waste pipe using a clamp.
Features of repair of fan systems
Installation of the internal sewerage system is carried out “in the socket”. This greatly simplifies the process of installing and dismantling all pipeline elements.
Repair work is necessary when there is physical damage to a drain or sewer pipe. Due to the excellent rigidity (pipe bending resistance is 80 MPa) and the long service life of the plastic (up to 60 years), there is a low probability of physical damage to the pipes.
When repairing sewer pipes, the technician must take into account the following rules:
- the end of the drain pipe is positioned in such a way as to ensure effective dispersion of unpleasant odors;
- the diameter of the pipe must be the same or larger than the riser on which the installation is being carried out;
- lay the pipe in warm rooms, and complete the installation in a cold zone, since the temperature difference provokes a pressure difference in different sections of the pipe.
Repair work involves connecting a waste pipe to a sewer riser. At the same time, vacuum valves are installed on other risers - rubber seals equipped with springs.
Replacement and repair of drain pipes must be carried out according to design documentation, taking into account the rules for installing risers in the sewer system
During operation, the sewer system creates a vacuum in the valve, as a result of which it opens and sucks air from the room. After stabilizing the pressure in the riser, a special spring automatically closes the check valve, preventing the unpleasant odor from escaping into the atmosphere.
Comments
April 21, 2017
Alexander
Good evening! After renovation, a smell appeared in the bathroom when draining the water. No one can explain the reason. Maybe you can explain?
0 1 Reply
April 21, 2017
Mikhail (o-trubah.ru) ➜Alexander
Possible reasons: 1. low water level in one of the siphons, there is a passage for air; 2. leaky sewer connections with siphons and drains; 3. The outlet of the sewer riser to the roof is frozen, and when water is drained in the riser, a permit is created that breaks one of the water seals.
0 0 Reply
April 21, 2017
Yuri
There is a private house. There are two toilets on the first floor and on the second, the problem is that on the first floor when using the shower, the smell of sewage appears in the bathroom, but not always. The drainage takes place into an ordinary cesspool, the first two rings of 1.5 m each, the overflow three rings of 1.5 m each, the smell comes from under the toilet, there is Geberit in the wall, I think maybe the ventilation vent has come off, but it needs tiles take pictures to understand or something else? I’m waiting for an answer and is it possible to get rid of this without disassembling anything, by installing some kind of valve on the drain pipe?
0 0 Reply
April 21, 2017
Mikhail (o-trubah.ru) ➜Yuri
I had the same picture after installing the septic tank and before installing the ventilation outlet from the second floor sewer. The presence or absence of odor depended on the direction of the wind. I installed a vent pipe, brought it above the roof level - it was fine, now in any wind and when there is no wind there are no smells at all.
0 0 Reply