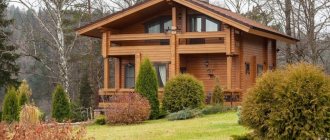
Land plots are not always perfectly level. Usually they have elevation changes and unevenness. If small holes and mounds can be filled up and leveled, then it is almost impossible to get rid of a slope, especially a significant one. There is no need to do this, because the irregular terrain makes it possible to erect an original building with many interesting architectural and design solutions. You just need to choose the right type of foundation on a slope. Let's figure out how to do this.
Plot with a slope: origin and features
The main task of designing on a slope is to competently use the existing unevenness of the terrain. The first step to creating a project is to study the characteristics of the territory, which is important for assessing the risks of ground movement. Slope can be classified into one of three types:
- Slope as part (edge) of a ravine . Such a depression in the terrain is formed under the influence of rain and melt water, and often occurs in places composed of loose rocks. In such places, grasses and shrubs grow poorly, and gullies, screes and landslides are common.
- Slope as part of a general decline in terrain (for example, towards a river). This is the most stable relief option.
- Slope as a result of human economic activity . Perhaps the difficult terrain is the result of the accumulation of a mine dump, the removal of soil and construction waste. Such “terrain folds” are unpredictable, since they have variable density.
There are no hopeless slopes Source hypebeast.com
Materials and preparation for garage construction
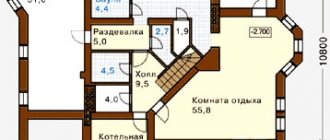
The preparation of each project must begin with a plan. It will perform two functions: a) a working drawing for implementation; b) a plan for calculating consumables. The plan is drawn up simultaneously with the selection of a site for construction, because they depend on each other. Here's what you need to consider when choosing a site for your future garage:
Dimensions of the machine and/or number of machines. Of course, the width, length and height of the room for the car must be made with a margin. The ceiling height is in any case not less than 2 meters. If you doubt the measurements, or the garage is not being built for one specific car, then focus on the universal garage size of 4 * 6 meters (width * length).
Connecting the garage to communications. It is imperative to install electricity and it is highly advisable to install plumbing. Both will be easier and cheaper if you locate the garage as close as possible to the communications of the residential building.
Access to the garage. The car must freely cover the distance from the site gate to the garage door. It is advisable to lay a driveway along this section. When the site has been found, cleared and prepared for work, it’s time to buy building materials and prepare tools. To build a frame garage you will need:
- for the frame - a wooden beam 100*100 mm (or more) or a metal profile;
- steel angles, bolts and plates for fastening frame beams;
- boards for rafters, sheathing, flooring and interior decoration;
- materials for heat and moisture insulation of floors, walls and roofs;
- sandwich panels for external wall cladding;
- concrete mixture for pouring the foundation.
To work with these materials you will need a shovel, an angle grinder, a welding machine, a drill, a supply of fasteners and screws, as well as a level, a triangle and a marker for marking.
Pros and cons of sloped areas
On almost every site with difficult terrain, it is possible to build high-quality and comfortable housing. Moreover, the house will have advantages that are not available on level land, which include the following features:
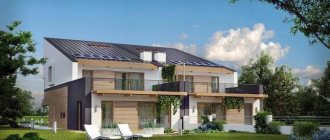
- Architectural diversity . A house on a slope always looks unconventional and attracts the attention of others. The slope is an ideal place for expressive buildings with an unusual layout and original landscape solutions. The appearance of the building will be determined not only by the taste of the owners, but also by the characteristics of the site. For example, the method of access to the house (from the top or from the bottom) will affect the location of residential and utility rooms, the main facade, stairs and terraces.
- Saving on sewerage . There is no need for pumps to pump out wastewater. It is enough to lay the pipes, the laws of physics will do the rest - the waste will be removed by gravity.
- Saving on foundation drainage . Rain and melt water will flow down, and the house will remain dry. There is no need to completely abandon drainage; its design is simplified and thereby reduces cost.
A rocky slope in a coniferous forest is an ideal place to build a house Source houzz.jp
- New opportunities for amateur gardeners . The slope can be divided into terraces and plants can be planted taking into account their light and moisture-loving properties. Crops that need sunlight are planted at the top, those that need moisture are planted at the bottom. You can also decorate the house itself with plants, adding greenery to your flat roof.
Building a house on a slope is always a unique project; there are no ready-made solutions. Construction companies offer projects for complex sites, but they usually require adaptation to a specific area. Refinement of a standard project or development of an original project will require additional funds. When designing a house on a slope, not only the height difference and soil characteristics are taken into account, but also the permissible loads on the soil are determined. The disadvantages of a difficult site (easily overcome thanks to modern technologies and materials) include the following features:
- The need to strengthen the soil . An important event that helps protect the area from landslides. The soil is strengthened in two ways: installing retaining walls in the lower part or terracing along the slope (also with the installation of retaining walls).
Gabions (grids with stones) strengthen the slope and help avoid landslides Source satu.kz
- Zero cycle costs . The more complex the terrain of the site, the more finances will be required to dig a pit, organize retaining walls and drainage. Sometimes the zero cycle is more expensive than all subsequent construction work.
- Restrictions on the location of housing . At night, cold air falls down along the slope. A house located on a slope will serve as a barrier to air movement and a so-called “cold pocket” (stagnation of cold air) will form around it. To avoid the cooling effect, the house is built as high as possible.
- The need for careful waterproofing of the foundation . Since the house is always laid horizontally, part of the foundation will inevitably be buried in the ground. This promises savings in heat consumption, but also requires proper drainage of groundwater and additional insulation.
- Restrictions on use . The rooms in the house will be illuminated unevenly. Another limitation concerns older family members who find it difficult to move from one level to another on a daily basis.
The highest location of a house project on a slope improves the performance characteristics of the building Source pinterest.com
See also: Catalog of house projects presented at the “Low-Rise Country” exhibition.
Step-by-step guide to building a garage
Let's start building our own cinder block garage.
The first stage is the foundation
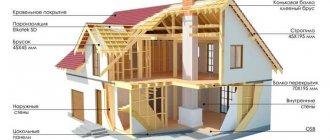
Schematic diagram of a shallow foundation
We start with arranging the foundation. A cinder block structure will have a relatively light weight. A shallow strip base is quite enough.
We dig a trench in accordance with the markings. Ideally, the depth of the structure should exceed the freezing level of the soil. Most often they are buried by 60-80, and sometimes by 100 cm. At the same stage, we prepare recesses for the cellar and inspection hole, if their presence is provided for by the project.
Soil freezing level
We attach plastic film or roofing felt to the walls of the pit for waterproofing.
We fill the bottom of the trench with a 20-30 cm layer of a mixture of crushed stone and gravel, followed by careful compaction.
We install the formwork so that the height of the finished concrete structure is approximately 100 mm higher than the ground level.
Let the concrete mixture harden. According to the regulations, concrete gains strength within 28 days. We lay roofing material on top of the frozen tape in two layers for waterproofing.
Trench for a foundation for a garageFormwork with reinforcementFillingStrip foundation for a garage
Stage two - walls
Scheme for laying cinder blocks
Determine the height and length of the walls individually. Laying blocks is done like bricks. The most popular methods are the following:
- half a stone;
- into stone;
- one and a half stones;
- two stones.
The thickness of the masonry directly affects the resistance of the finished walls to wind loads, temperature changes, etc.
Sequence of laying cinder blocks
Most often, as noted, builders use the “brick” masonry method, in which the next laid row overlaps the seams of the underlying one. First we lay out the corners, then we stretch ropes between them to make the masonry even and continue working.
In the process of arranging walls, we adhere to the following important rules:
we lay the blocks with bandaging of the seams; if walls are built without further insulation or other cladding, we carefully control the quality of the seams at each stage. It is recommended to do jointing; We measure each block with a building level
We pay special attention to the starting row; Before laying out the blocks on the side of the gate, we install at least their frame for better orientation. We do this by checking the level and temporarily fixing the structure with spacers; maintain a slope to the front of at least 0.3 m.
In the upper part of the walls we leave nests for installing floor beams. Recommended dimensions – 200x200x150 mm. You can then fill in or blow out the gaps. The optimal step for placing nests is 100 cm.
The beams are located at the same distance and filling elements are laid on them, which perform the enclosing function. Ceilings. Ceilings and sheathing. Garage ventilation scheme. Installation of ventilation.
Third stage - roof
We make the base of the roof from I-beams - this is the best option. We select the length of the elements so that it exceeds the width of the building by 250 mm.
Garage roof diagramGarage roof
We lay the beams across in increments of about 1 m. We fasten the beams in a suitable way, for example, using anchors.
After this, we sew up the base with beams 4 cm thick. We lay the beam as tightly as possible. We put roofing felt on top of the beams, insulation on it (mineral wool, slag or expanded clay), fill in 2 cm of screed and finish the “pie” with aquazol, rubemast or other suitable material. If you wish, you can choose a different finishing coating at your discretion.
Laying roofing felt on the sheathing Laying insulation Laying reinforcement Concreting the floor Concreting the floor Bicrost flooring is done using a torch Waterproofing a flat roof
Stage four - floor
We make the floor level with the plinth. As a standard, a screed with a thickness of at least 100 mm is poured. We first clean the surface of debris, level it and, if necessary, fill the bottom with sand or fine gravel.
Diagram of a floor in a garagePouring floors in a garageHow to make a concrete floor in a garageHow to make a concrete floor in a garageHow to pour a floor in a garage with your own handsConcrete floor in a garage
We make the screed from concrete grade M200. We pour the material continuously, slowly, in several layers. Let the concrete set and rub the surface.
To make it convenient to enter the garage, we are installing a ramp in the front part of the building. Be sure to make a 50-70 cm blind area around the entire perimeter of the building. It will ensure timely drainage of water from the base.
An option for making a floor in a garage from concrete and blocks. We lay out concrete slabs, and fill the space between them with concrete and rubble stone. We lay out concrete slabs, and fill the space between them with concrete and rubble stone.
Site with a slope: what to pay attention to
Before building a house on a slope, a thorough study of the territory is carried out.
Important characteristics that directly influence the choice of house design are the following features of the slope of the site:
- Slope steepness . If you walk 100 m along a section and rise 10 m (in height), this means that the slope is 10%. Based on the slope, it is customary to divide areas into flat (from 0 to 3%), as well as with a small, medium and steep slope (up to 8%, up to 20% and over 20%, respectively).
- Orientation . When designing a country house, pay attention to the location of the slope in the cardinal directions. The southern and southeastern directions are considered favorable for construction in most of Russia, as they receive the optimal amount of sunlight. In areas with a hot climate, the northern direction becomes preferable.
Facade orientation affects living comfort Source homesfeed.com
- Choosing a location for a home . When choosing a place for future housing, they evaluate not only the panorama of the opening views, but also other, often more important parameters. These include the entrance to the house. A convenient road is important not only during construction (for the operation of equipment and the supply of materials), but also during operation. Often the entrance is the only possible one, and this has to be taken into account when designing.
- Placement of buildings and communications . Due to the difference in altitude, additional difficulties may arise with the organization of the water supply system. The features of the relief will have to be taken into account when choosing a location for outbuildings, a bathhouse, a playground, a well and a septic tank.
See also: Catalog of companies that specialize in the design and construction of turnkey country houses.
Types of roof of attic superstructures
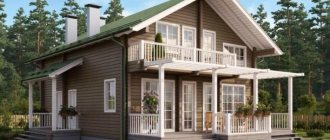
Before we talk about how to build a two-story garage, let's consider what type of attic is built as a superstructure on the garage. The most popular options are structures with single-pitched and gable roofs.
Superstructures with a sloping roof type and multi-level slopes will be more expensive, while the useful area of such a room does not increase due to changes in the roof structure.
Let's take a closer look at the characteristics of various types of roofing devices:
- Single pitch roof. The most cost-effective and easy-to-use roofing option. The main thing is to make the angle of the structure convenient for the removal of snow and other precipitation. Otherwise, it may not withstand the load and break.
- Gable roof with symmetrical pitches. One of the inexpensive types of roofs that can be used to equip attic extensions. As a result, this project will look like a house from a child’s drawing.
- Gable roofs with rafters at different levels are also called asymmetrical in construction. From a design point of view, such projects look very interesting, unbroken. At the same time, during the construction of this roof, calculations are required, since this is not a completely typical type of development. Therefore, before using this idea, be sure to consult with qualified developers.
- Broken type, half-hip. It is also one of the popular types of roofing, due to which you can slightly increase the volume of the room. The implementation of such an idea is a rather labor-intensive process, since it requires installation of the rafter system at angles and their correct fixation.
- Roofs with external dormer windows. They differ from the classic gable type only in the installation of vertical dormer windows on the surface of the roof itself.
The main material in the construction of attic superstructures is timber. Due to this, the second floor, erected above the garage, will be both strong and light, without putting a large load on the foundation and walls of the garage itself.
Features of choosing a project depending on the steepness of the slope
House designs and construction principles are selected based on the characteristics of the landscape; in doing so, they are guided by the following principles:
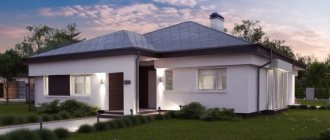
- If the slope of the construction site does not exceed 3% , then it is considered flat and standard designs are used without restrictions. It is considered advisable to create a small backfill of soil to expand the terrace and simplify water drainage.
Typical project on a site with a slight slope Source bankfs.ru
- Areas with a low slope (up to 7%) also allow the use of standard designs. The only restriction is that the house must have no basement, and it may also need to be filled with soil.
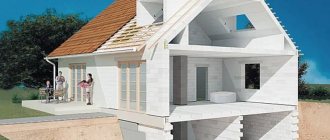
- Slope 8-20% . In such a site, the site is no longer leveled; The best solution would be to construct a basement floor (removing part of the soil from the slope). Projects of houses on a slope with a basement require careful waterproofing. Ideally, it is possible to organize an entrance to the lower floor. In this case, the basement becomes an ideal place to place a garage. In addition, it is often used to create a pantry, workshop or sauna.
Preparatory activities
Self-construction of a cinder block garage begins with a number of important preparatory activities. Follow the given sequence.
Selecting a location
First of all, we choose a suitable place to build our motorhome. It’s convenient when the garage is located next to the house - in bad weather you won’t have to get wet in the rain and wade through snowdrifts.
Selecting and preparing a garage location
It is better that the garage is located at a minimum distance from the exit from the site. The number of turns should be minimal. It is not recommended to build a cinder block garage in a low-lying area, because... this threatens flooding with atmospheric and groundwater.
Be sure to make sure that there are no communication lines at the planned construction site, such as:
- water pipes;
- power lines;
- sewerage and heating pipes.
If the listed communications break down in the future, the presence of a garage will significantly complicate their repair.
Layout of a garage made of foam blocks Layout of a garage made of foam blocks
Make sure that when constructing a garage in the chosen location there will be enough space for opening the gate. It would be useful to have a free space to park your car during washing and other work.
Construction site marking
Marking the area for the foundation
Having chosen a suitable place to build a garage from cinder blocks, we proceed to marking the site. At this stage you will need a small set of auxiliary tools, namely:
- reinforcing bars or other similar devices;
- hammer for driving rods;
- dense thread for pulling between pegs;
- tape measure for measurements.
Before starting marking work, you need to accurately determine the dimensions of the future structure. At this point, focus on the following factors:
- available free space on the site;
- financial opportunities;
- individual preferences and needs.
If a cinder block garage will be used as a place to store a standard-sized car, a structure measuring 6x4 m and a height of 2.5-3 m will be enough for you.
The six-meter length is due to the dimensions of the car (on average 4-5 m) with a half-meter margin for unhindered passage. The width of the car is on average 200-250 cm. Approximately 70 cm should be left for passage, installation of shelving and storage of various types of materials used in the garage.
Approximate garage dimensions
If you wish, you can adjust the dimensions of the building at your discretion. There are no strict restrictions or standard dimensions for cinder block garages.
Marking the site for the foundation
Calculation of cinder block
Having chosen a place for construction and determined the optimal dimensions of the garage, we begin to calculate the materials. Treat this stage of work with maximum responsibility. Due to errors at the calculation stage, you may simply not have enough materials, or you may waste money on unnecessary blocks.
cinder block
The calculation will be considered using the example of a garage with dimensions of 6x4 m and a height of 250 cm. The masonry is carried out according to the most common method - half a block. Gate dimensions – 300x230 cm.
The dimensions of one block are standardized - 39x19x18.8 cm. Based on this, 13.6 blocks will be needed to lay 1 m2. You will build the entire building from 586 elements. Typically about 5-10% of the material is added “for reserve”. If the design provides for additional doors and window openings, take this into account when performing the calculation.
You will also need to buy rubble stone for arranging the base, several beams made of metal or wood (in the case of a garage of the specified dimensions, five 430-centimeter beams will be enough).
Rubble stone
Don’t forget to buy concrete for pouring the foundation or components (cement, sand and crushed stone) to prepare it yourself.
Concrete
You will also need material for the finishing coating of the roof. When choosing it, be guided by your preferences.
Metal tilesOndulinTechnical characteristics of ondulinRoof sheetingRoof sheeting
Buy concrete or prepare it yourself. Standard proportions:
- part of the cement;
- three parts sand;
- 4-5 parts of crushed stone.
Foundation structure
The foundation is an invisible part of the structure, the quality of which determines the reliability of the building. The foundation on a slope has its own characteristics: it is more complex to implement and often has an asymmetrical shape. To select the optimal foundation, a soil analysis is carried out and the permissible load on the soil is calculated. For houses on difficult terrain there are three types of foundations:
- Horizontal . A standard base, strip or pile in design, is suitable for an area with homogeneous soil. Organizing a construction site and access to it will require large expenses. You will need to call special equipment that will remove excess soil and level the required area.
- Stepped . A type of strip foundation in which the thickness of the concrete base will change due to the slope of the surface. Such a foundation looks like a regular horizontal foundation, but in the lower part the concrete layer will be maximum, and at the top - minimal. No excavation is carried out when organizing a stepped foundation.
What kind of garage can you build with your own hands?
Garages differ from each other primarily in materials.
The next gradation is the insulation of the garage or its absence, then the installation of communications. Let's start with the first criterion of what a garage is built from: A brick garage is a solid, warm and dry room. This is the most complex and expensive construction of the possible garage options, but just like a house, it will serve not only you, but also your children for many years.
The main disadvantage of this option, after the cost of materials, is the inability to build a brick garage yourself unless you have professional construction skills.
A garage made of blocks (slag concrete, foam concrete or gas silicate) is also quite warm. The materials for its construction are cheaper than bricks. At the same time, the blocks themselves have less weight, and therefore create less load on the foundation. Accordingly, it is possible to build a simpler foundation, which also reduces both work time and costs.
A metal garage is a very popular design in the past. usually stands on a concrete foundation, but is not firmly anchored to it. This is not an insulated garage, and this is its main drawback. The second disadvantage is the inability to weld a garage without professional welding. Although a specialist with a welding machine will assemble it from parts in just a day.
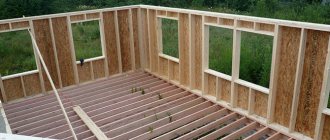
A frame garage combines the relative ease of construction, the availability of materials and the ability to make the building warm and comfortable. You can install the frame yourself, unless you invite a neighbor or friend to help you for faster work.
Of all the possible options, frame garages best satisfy the requirement to combine quality with a low price.
Pay attention to the process of building a frame garage
Video description
About the modern Norwegian project on the slope in the following video:
Additional work when building housing on a slope
A house on a slope with a basement and a terrace is a popular housing option. The foundation and terraces serve as the fundamental part of the building; they distribute pressure on the ground and prevent soil movement. To protect them from the negative effects of natural forces, additional measures are taken to make the slope strong and safe. Such work includes:
- Organization of the drainage system . Effective drainage of rain and melt water has the most positive effect on the condition of the walls and foundation. To ensure that water flows in an orderly manner, grooves are laid along the terraced retaining walls and covered with crushed stone.
Scheme of a stepped house on stilts Source stroy-dom-pravilno.ru
- Soil compaction . It is recommended to build a concrete blind area around the building and additionally replace part of the soil with sand. In other areas, geotextiles and reinforced gratings can be used.
Step-by-step instructions for building a two-story garage
Now it’s worth considering how to build a two-story garage from scratch. All stages will be considered - from the foundation to ventilation with wiring.
Foundation structure
For a garage with room for 2 cars, a strip foundation is required. For 1 it is better to choose a monolithic one. The construction itself takes place in several steps:
- First, mark the soil. Just place pegs in the intended corners and connect them with fishing line.
- Now you need to dig a pit. In general, it should be slightly below the freezing depth. It is individual for each region. Here on this map you can see the freezing point for Russia. If you do not reach this point, the foundation will shift during the thaw.
- Sand and crushed stone are poured onto the bottom. This is a drainage pillow, 20 centimeters high.
- If you plan to build a two-story frame garage, then in principle you can do without reinforcement of the foundation. But it’s better to spend money and install lathing with composite or steel reinforcement.
- Formwork made of boards, plywood, polystyrene foam or polystyrene foam is placed along the walls of the pit.
- It's time to fill. Concrete can be prepared according to standard instructions: part cement, 3 sand and 4 crushed stone. Fill the base in 1 go. By doing it partially, you risk reducing the strength of concrete.
- When the foundation is dry, cover it with a couple of layers of roofing felt.
Construction of garage walls
It is safer and easier to make a two-story garage from aerated concrete with your own hands. It is light, durable and very warm. You don't even need to do additional insulation.
And so, the building from blocks looks like this:
The first row must be leveled, otherwise the rest of the masonry will float. The easiest way is to use a spoon dressing.
Every 4th row must be reinforced with steel ribbed reinforcement.
- Window and door openings are also reinforced.
- Gates are installed when the height of the walls reaches half a meter.
- The upper levels are also reinforced with thick reinforcement.
Construction of the second floor
Rafters are installed on the upper reinforced rows. Ordinary low-class reinforced concrete is suitable as a ceiling. There will be no special load on them.
Next, the rafters for the roof are laid out. The design of a garage with an attic must immediately take into account the angle of the slope. SNiP specifies 2 types: steep (60 degrees) and flat (30). They rest against the walls, and are laid on top with any roofing material with a layer of vapor and wind insulation.
Stairs for a two-story garage
There are 2 types of stairs to choose from: external and internal:
- An external one is suitable if the area is too small and does not allow it to be installed inside. But this is a garage with a second residential floor, it is unlikely to suit her. For this case, a regular stainless steel metal stepladder is suitable.
- Internal. With such a staircase, the second floor above the garage will become full-fledged housing. It is best to make it from natural wood, as it is lighter. The load on the foundation and walls will be lower. A detailed video on how to make a staircase can be watched below.
Ventilation and electrical wiring in the superstructure
Without ventilation, the project cannot be registered as a residential premises. This may result in an administrative fine. Therefore, in each room it is necessary to make regular supply ventilation
It is better to take VVG-Png 3x2 as a conductive cable. This is the optimal wire for connecting a TV, refrigerator, or electric hob. It is not worth cutting aerated concrete, as this will reduce the strength of the house.
In a garage with a residential second floor, it is better to make external wiring in self-extinguishing corrugation. It does not support combustion, and is easy to install without calling an electrician. If you do not want to lay the cable in a corrugated cable, you can use plastic pipes for electrical installations. If necessary, you can always add a new line, without dismantling the walls or chipping. Sockets and switches must also be external, without cutting into the material.
Country house project on a slope: design nuances
Projects developed taking into account differences (sometimes significant) in height always look unusual. Such buildings can be divided into two types:
- Houses with stepped storeys . The design can be cascade-sectional, when the elements of the building are shifted relative to each other vertically. For steep slopes, a terrace design is suitable, when the roof of one building serves as a terrace for another. In both cases, the structure resembles steps.
- Houses of variable number of storeys . Here, the roofs of all components of the building are on the same level, and the number of floors of each part can be different (which depends on the topography). Such housing is allowed to be built on any slopes.
Country house with stepped floors in a modern style Source pinterest.at
When designing a house on a slope, techniques are used that increase the reliability and comfort of living:
- Multi-tiered houses located on several levels have separate entrances on each tier , which is very practical and convenient (especially for guests).
- Flat exploitable roof . An ideal option, especially if the area is small. Multi-tiered houses with a flat roof are a godsend for organizing recreation areas: all kinds of patios, gazebos, terraces with barbecues and children's playgrounds.
- Roof garden . Modern technologies (the use of membrane materials) make it possible to green even the roof, creating an environmentally friendly and popular recreation area. Greening the roof should be included in the project, since only specialists can correctly distribute the load (a place for trees, for example, is chosen above load-bearing walls).
Using panoramic glazing Source architizer.com
- Facade elements . A project in any style will benefit from the use of panoramic windows. Modern large-area windows have improved thermal insulation qualities and are suitable for use in regions with long and frosty winters.
How to waterproof and lay walls
After laying the base, the floor is waterproofed from two or one layer of roofing felt, roofing felt or cement mortar two centimeters thick.
The foundation is being leveled. To do this, using a spirit level, slats are attached strictly horizontally on both sides of the base. The solution is poured between them and its surface is carefully leveled.
After drying, the walls are laid. In this case, the level should be ensured that the masonry is strictly horizontal.
The order of work is as follows:
- In the corners, orders are installed, which are wooden slats with divisions, the distance between which is 7.7 centimeters. As shown in the photo.
Installing orders in the corners of the garage
- The height of the brick laid flat is equal to one division of the order.
- Thin cords are stretched between these elements from one corner to another, and the horizontalness of the masonry is checked using them.
- Without mortar, bricks are laid along the border of the garage being built with a gap equal to the thickness of the seam, approximately 12 millimeters.
- The cord is pulled at a distance of about two millimeters from the edge of the wall, which allows the cord not to move during masonry and the masonry to be maintained horizontally.
- A portion of mortar is placed with a trowel and a brick is laid, which was previously laid without mortar.
- Tapping the brick with the handle of a trowel, it is necessary to press it in such a way that the seam is of a certain thickness, and the top of the brick is placed on the line of the cord.
- All bricks are laid out in the same way. In this case, all the spaces between them are filled with the solution.
- Excess mortar is removed so that the seam with the front surface of the masonry is at the same level.
Further, the construction of the roof and finishing work are carried out in the same way as for a regular garage, which is clearly shown in the video.