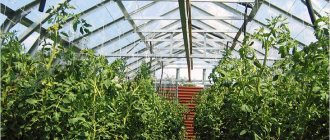
In central Russia, a small unheated greenhouse with a film covering can be found in almost every household.
But winter greenhouses made of polycarbonate with heating are a rarer phenomenon. The construction of such a structure is more expensive, but fresh vegetables will be on the table all year round.
Choosing a site for a greenhouse and hotbed
It is best to build it on the south side.
The ideal option would be a greenhouse that is attached to the southern wall of a residential building. In this case, the entrance to it is made from the house. However, a free-standing greenhouse also “copes” perfectly with the task of growing a variety of crops, including heat-loving ones. In order for a building to last for many years, its structure must be strong enough. This will allow you to avoid spending money on constant repairs of the greenhouse in the future.
On a note!
To reduce heat transfer, the greenhouse can be repeated in a pre-dug rectangular pit. This helps to improve the thermal regime in winter, and in summer - to equalize the air temperature inside the room. Even lower depth is undesirable, since low-growing crops may end up in the shade.
Good waterproofing of walls is no less important. For this purpose, a roofing felt gasket is placed between the foundation and the walls. If the greenhouse is built using bricks, the permissible width of the masonry is 1 brick. On the outside there is a canopy for water drainage.
For this purpose, roofing iron or roofing felt is used. The inside of the walls are covered with resin, after which oil paint is applied to them. It is advisable to provide additional electric lighting in the greenhouse. In addition, the room can be divided into two sectors by a thin partition. This is necessary in order to create conditions with different temperature conditions.
Since almost none of us can afford the use of energy-intensive production technologies to heat a greenhouse, the main thing we need to focus on when choosing a location for its construction is the maximum use of solar heat, as well as light. It is necessary to use the area of the site as efficiently as possible and choose the most convenient location for the cultivation room.
The structure must be well lit. It is also necessary that it be protected from sharp, especially cold northern winds. You can set up a greenhouse near a utility block or a building for storing sand, etc.
It is better to orient the building from west to east so that the sun illuminates its entire area for as long as possible. But often the choice of location for a greenhouse is limited by the capabilities of the site.
If there is not enough space and you have to save it, you can build greenhouses not free-standing, but attached, for example, to a house, etc.
It is not advisable to install the greenhouse in an open place, since the sealed covering material will become very cold under the pressure of the wind and due to drafts. This means that the temperature inside the room will decrease. That is why it is advisable to protect a greenhouse located in an open area from the wind by creating artificial obstacles - protective plantings, fences, awnings, etc. d.
A structure oriented east to west will be best illuminated at midday, when the sun is at its zenith, and will therefore receive maximum heat.
If there is no such place on the site, preference should be given to a place that is illuminated by the sun in the morning. At this time, the air is cool, and under the influence of the morning sunlight, the crops in the greenhouse will warm up faster.
The sooner heating of the greenhouse begins, the faster it will warm up in the evening. From the point of view of solar energy consumption, such a placement of the structure is much more efficient than installing it in a shady area, where the sun appears only in the afternoon. In the latter case, the structure will warm up much longer.
Basic costs
Assembling a greenhouse: how to assemble a Kinovsky greenhouse, instructions and videos, do-it-yourself photos, summer resident and hero A
winter greenhouse as a business requires significant initial investments. These include:
- Purchase or lease of land. The price depends on the distance. It is worth considering that a farm located far away increases transportation costs.
- Construction and equipment of a greenhouse. The most expensive option is a fully automated structure with a climate control system, drip irrigation, self-ventilation, fogging and shading.
- Purchase of planting material. The cheapest option is to buy seeds. Grown seedlings and cuttings for flower rootstocks are more expensive. In the future, you can allocate an area in the greenhouse for the constant cultivation of seedlings for yourself and for sale.
- Registration of a farm or individual entrepreneur. Necessary for entrepreneurs planning active work with retail and attracting employees. A small greenhouse on its own plot does not require registration, but it limits the farmer’s ability to find buyers for his products.
In addition to one-time expenses, the farmer also faces monthly expenses. These include:
- expenses for heating, lighting and plumbing;
- purchase of fertilizers;
- fare;
- employee salaries.
Materials for constructing a greenhouse
When constructing both greenhouses and greenhouses, gardeners use the most accessible building materials.
The latter include logs, boards, slabs, sand, clay, slag and rubble stone, peat blocks, as well as cuttings of boards, slabs, sawdust and shavings.
In the construction of greenhouses and greenhouses, already used building materials remaining after the demolition or major renovation of housing (glass, window and door frames, etc.) can be used.
Ordinary polyethylene film serves as a covering material for spring greenhouses.
It has many advantages over glass: easy to use, lightweight and flexible.
Expert advice
When constructing greenhouses, you can use slate and sheets of translucent plastic. In addition, there are currently many types of films and other materials on the market for the construction of greenhouses and greenhouses.
What wood is best to use
Coniferous wood can be used to build greenhouse complexes and greenhouses; it is inexpensive and easy to process. Species such as larch and oak may be better suited for constructing a frame, but the cost of wood is so high that it is cheaper to assemble a structure from an aluminum profile.
Often, to build a greenhouse or greenhouse complex, they use wood available on a summer cottage, for example, old fruit trees, walnuts, acacia, and anything that can be used for hemming the lower tier and tying are planted onto timber and slats.
Building materials for frame
When choosing materials for making a frame, you must remember that they must withstand serious loads. This is the impact not only of external factors (wind, rain and snow), but also of a significant difference between internal and external temperatures. For this reason, building materials for the greenhouse frame must meet the highest requirements. At the same time, it is better that it is light and lets enough light into the interior space of the room.
The frame is made of wood, plastic or metal.
By shape
Manufacturers offer greenhouses of various shapes, so summer residents have a legitimate question - what to choose. To make an effective decision, you should carefully study the features of the various options.
Arched or gable
The arched greenhouse reaches a height of no more than 2 meters, its length has no restrictions. The summer resident decides which sizes are suitable for his needs.
Arched greenhouse
Pros of the arch:
- ease of assembly, ability to carry out work independently;
- no need for a foundation;
- affordable cost of the finished structure;
- easy to disassemble, change the covering or move to another place;
- you can change the length of the structure without major alterations;
- high resistance to snow load.
Among the disadvantages are instability to gusts of wind and limited height.
Choosing a “house”, i.e. gable greenhouse, the summer resident receives:
- high variability of sizes (it is easy to create a structure of any height, width);
- wind resistance;
- the ability to do without a foundation;
- possibility of making vents on the roof.
Gable greenhouse
The high reliability of such greenhouses is guaranteed only if there is a foundation, which means that moving it will not be easy. It will require more material, thicker polycarbonate is needed for the coating.
Drop or arched
A cap of snow does not form on the droplet, but it has more modest dimensions, which are problematic to increase. Such a greenhouse is suitable only for the personal use of a small family. Compared to the arch, it has higher wind resistance.
Greenhouse droplet
Wooden greenhouse frame
Wood is considered the simplest and most accessible material.
This material is easy to process, so it is often used in the construction of greenhouses. However, wood is subject to rotting - it is short-lived.
When constructing a greenhouse, this factor is especially important.
If wood is used as a building material for the frame, it is necessary to take into account some design features. It is necessary to ensure that water can flow down and does not accumulate between the wooden posts. Therefore, you will have to periodically remove excess moisture by wiping the wooden supports.
You can protect the wooden parts of the upper and lower trim with sheet steel, using it as a cladding. In a word, the wooden frame will require careful maintenance throughout the entire operation of the greenhouse.
Size calculation
The wooden structure of the greenhouse allows it to be made in any size that is suitable specifically for your site. There are several calculation rules that should be followed when constructing a structure to increase its strength and reliability:
- Tall crops require a wall height of at least 2 m.
- Load-bearing beams require fixing in the ground by digging them to a depth of 50 cm; they should be placed along the perimeter of the future greenhouse at least every 1.5 meters.
- If you are planning to build a gable greenhouse, then it will need to be strengthened with the help of additional beams that are dug into the center of the greenhouse from the inside. Their height is approximately 3.3 meters, and the spacing is 2.5 meters.
- If you plan to use film as a covering material, then you need to make additional wooden fastenings along the end parts of the greenhouse.
- On top, along the entire perimeter of the frame, bars are attached, which will serve as a supporting structure for the future roof.
- Rafter pairs must be attached strictly to the supporting structures of wooden walls.
- If your greenhouse is small, then it is enough to make one door opening and a window, but in a large-scale building, for better ventilation you need to provide two entrances.
Greenhouse steel frame
The steel frame is even more durable. This is a very durable material that is relatively easy to work with (welding is used during assembly). Its price is quite affordable.
The disadvantage of steel is its high thermal conductivity (which is bad for crops) and susceptibility to corrosion. However, this drawback can be overcome by painting the frame white.
A steel frame coated with powder paint is short-lived, but galvanized or painted can last for several decades. True, the galvanized profile is not so durable, since easily deformable thin sheets of steel are used for the frames.
In addition, there is a square steel profile made of galvanized steel. This is probably the most acceptable option for building a greenhouse with your own hands and at a reasonable price. It is very durable and, thanks to its zinc coating, does not corrode.
Heating
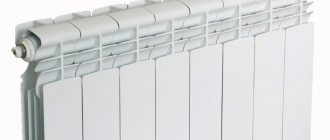
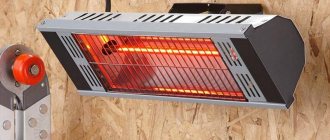
The most convenient heating is electric.
Convectors or infrared heaters are installed, but this solution has disadvantages:
- high price;
- risk of plants freezing during a power outage;
- limited power: the power grid allocates no more than 7 kW to each household.
Gas heating is cheaper. In non-gasified areas, solid fuel heat generators are used. To minimize heat loss, a vestibule is installed at the entrance to the greenhouse.
It is most correct to install the stove in a greenhouse, but place the firebox in the vestibule so that combustion does not consume air from the room with the plants. A brick screen with holes at the bottom is installed around the metal stove a few cm from it, turning the heat generator into a convector. The screen serves to protect plants from hard IR radiation generated by hot walls.
Glass
Glass belongs to the category of traditional materials for the construction of greenhouses. This material is durable and has excellent light transmission.
However, despite all its obvious advantages, glass has its drawbacks. It is heavy and fragile, breaks if handled incorrectly, and is also quite difficult to handle.
In addition, glass is an expensive material, but its service life is long; it can retain 1.5 times more heat than conventional polyethylene film.
In terms of its ability to transmit light and heat, glass still remains in first place, but it still retains this heat much worse than new polymer materials.
On a note!
During the construction of greenhouses, single, double and triple glazing is used. Many farmers even build greenhouses from glass bottles, but this looks more exotic.
Single glazing is the cheapest option, but it allows too much sunlight to pass through in the summer and does not provide the necessary thermal insulation in winter. That is why it is better to give preference to double or triple glazing, which filters more “harmful radiation”.
In winter, the greenhouse must create a comfortable microclimate necessary for the crops. The microclimate in the greenhouse is a very important factor because if the growing room is too hot or cold, the process of photosynthesis in the plants stops.
In addition, diffused sunlight resulting from the use of opaque, or “smoky” glass, has a beneficial effect on crops. The latter provides uniform lighting and also activates the process of photosynthesis in plants. This property is characteristic of the so-called milk glass.
With transparent glazing, crops located closer to the outer skin are better illuminated. They, in turn, shade the plants in the depths of the greenhouse. Therefore, the glazing must be of high quality, and when choosing between transparent and milky glass, preference should be given to the latter.
If funds allow, it is best to use safety or even vandal-proof glass. In this case, the structure will last for decades.
When glazing a greenhouse, some installation features of this material should be taken into account: for example, so that the glass roof does not experience overload from heavy rainfall in winter, the roof should be tilted at least 15°. Then the snow will flow freely from the roof without forming large snowdrifts, which are undesirable for a heavy structure.
The correct position of the glass greenhouse in relation to the movement of the sun will protect crops from overheating and burns.
Lighting
To illuminate plants, a wide range of lamps are used:
- phyto-LED;
- sodium;
- daylight.
LED greenhouse lighting
It is useful to equip the lighting system with a timer or a “smart” socket with a light sensor connected to it. Then the lamps will turn on without user intervention.
Film
This material is easy to use, quite durable, has a low cost, but, unfortunately, is short-lived. There are several types of film that is used to cover greenhouses and greenhouses.
Polyethylene film
This film is often used to cover cultivation areas due to its low cost, ease of handling and high light transmission. However, ultraviolet radiation and solar heat, as well as exposure to wind, rain or hail, significantly reduce its service life. Such a coating can last no more than 4 months. Recently, higher quality analogues of conventional film have appeared - with polymer additives.
Expert advice
When choosing a suitable polyethylene film, in most cases preference should be given to reinforced film - light, durable, easy to use and not requiring large material costs.
Hydrophilic film
The surface of such a film is much less contaminated than the surface of a regular polyethylene film. However, the main difference between this material and a simple film is that all the water that evaporates eventually accumulates on its surface and flows down again, creating a humid microclimate in the greenhouse. Such conditions are beneficial for some plant species. The service life of the hydrophilic film is 2-3 years.
Light stabilized film
This is a polyethylene film with the addition of a light stabilizer concentrate. It is much more resistant to ultraviolet rays and converts them into infrared. Thanks to this, its energy efficiency increases. The service life of such film is significantly longer and ranges from 2 to 5 years. Light-stabilized film can be painted in any color and even left for the winter.
Heat retention film
Such a film, unlike conventional polyethylene film, allows you to increase the temperature inside the cultivation room by 1-2 °C. Heat-retaining films include multi-layer air bubble and foam films, which are able to regulate the air temperature in an enclosed space, increasing it at night and decreasing it during the day.
PVC film
This material is smooth, transparent and thermoplastic. It is very strong, micro-permeable, heat-resistant and durable. The service life of PVC film is usually 4-5 years.
Seed preparation
Let's start by preparing our seeds for sowing. Tomato seeds are usually small. They remain similar for up to 10 years. First of all, you need to start disinfecting the seeds. Prepare the following solution: 0.3-0.5% solution of potassium permanganate (3-5 g per liter of water). And put the seeds in a gauze cloth, wrap the gauze, and put it in the solution for 0.5 hours. This is how the seeds are disinfected and all surface infection is killed.
After this, we wash the seeds in running water, and then we can do as we please. You can germinate seeds in any growth stimulants; for this we use either aloe juice or wood ash. After that washing under running water, we can keep the seeds in wood ash for half a day. Leave until the seeds germinate, and then proceed to sowing.
We plant in containers with a depth of at least 4-5 cm, we can sow tomatoes directly in the pot. We prepare the soil for preparing and growing seedlings very carefully. It is better to put 100-120 grams per bucket of soil. dolomite flour, 50 grams of any complex fertilizer or 1 tbsp. superphosphate and 1 tbsp. potassium nitrate or potassium sulfate. Mix everything thoroughly, pour water on it so that the soil is always moist. And after that we start sowing.
How to make frames, doors, transoms
Transoms, frames and doors that are used for service and ventilation can be glazed or covered with film. They may consist of one or more cross bars, crossed slats or cells.
The design and size of doors and frames depend on the type of greenhouse and its size. It is important that frames with a large number of cells are quite difficult to manufacture, and they do not have high strength. The optimal frame size is 130-150 x 70-80 cm with cells measuring 60-80 x 30-50 cm. The size is selected in accordance with the overall size of the greenhouse frame. An example of making a transom for a greenhouse is shown in Figure 8.
Frames, doors and transoms are made from square-section wooden slats, which are additionally processed with a planer. The corners are tied or connected with nails, screws or glue. Metal corners provide additional strength to the structure.
Figure 8. Drawing and example of manufacturing a transom for a greenhouse
Frame bonding with glue will be very strong if you use synthetic resin glue. They are not susceptible to fungus and moisture. However, it is important to consider that when gluing the parts, they must be dry.
When making frames, you need to determine in advance what type of coating you will use. For glazed greenhouses, grooves need to be made in the frames, but if the structure is covered with film, they will not be needed. In order not to make grooves, you can simply attach slats of a smaller cross-section to the finished frame.
It is also necessary to mark places for attaching the hinges. Try to drill the holes for the hinges to the same depth so that the greenhouse can be tightly closed.
No. 9. Attention to the package
If you, like many summer residents, have opted for a ready-made greenhouse , then when purchasing, pay attention to what is included in the kit. In addition to the frame and covering material, there must also be seals, as well as doors and vents. The location of the latter is of great importance: in the summer heat, without normal ventilation, the plants in the greenhouse will burn, so ideally the doors should be on both sides, and the presence of windows is also necessary. The prefix “economy” in the name of the greenhouse model means that the greenhouse can only be used in warm weather or its design can be significantly modified, since often the step between the arcs is too large. A responsible manufacturer will always provide the design with assembly instructions.