The standard material for making bathtubs is steel, cast iron or acrylic. Despite all the variety of shapes, sizes and styles, factory products do not pretend to be original, as they are manufactured on an assembly line. The only way out if you want to get an exclusive and one-of-a-kind plunge pool is a homemade bathtub. Technologies and materials for making a bathtub with your own hands are discussed in this material.
Concrete font - how to make it last forever
At the moment, stores with a variety of plumbing equipment are ready to offer their potential customers all kinds of hot tubs made from classic and modern materials. But not all people are satisfied with the range of such products that are available.
They want to install durable and truly non-standard bathing structures in their homes. In this case, they will definitely like a brick or even concrete bath.
These types of bathtubs can highlight the unusual design of a sanitary facility. But the most important thing is that you don’t have to spend a lot of money on some exquisite (and at the same time expensive) bathtub. Homemade concrete fonts are finished using simple or plastic mosaics.
It is permissible to use simple slabs for these purposes, but only when you are creating a simple bathtub - in a classic configuration or with right angles. Concrete structures are very durable. They can be used for decades, and the manufacturing process does not take much time and is quite simple.
The bath manufacturing operation consists of the following steps:
- Development of a plan and drawing of the font, as well as the acquisition of the required materials.
- Preparatory stage of the foundation and installation of the formwork structure.
- Creating the walls and bottom of the bathtub.
- Giving the shower structure the desired shape and plastering the structure.
- Bathtub finishing.
Please note that you need to immediately decide what specific material (paint and varnish composition, liquid acrylic, mosaic and tile) you will use when facing the finished structure. The method of plastering the font will depend on this.
If you plan to use mosaic elements, then the plumbing structure can be made in a round shape. And in the case of structural finishing with ceramic tiles, it is best to avoid smooth lines, because it is almost impossible to attach a fairly large tile to such fonts. Also pay attention to the fact that plastering the walls and bottom of a concrete bathtub that you plan to treat with paint or liquid acrylic must be done using a special mesh for reinforcement. Moreover, we strongly recommend adding special additives to plaster products for such purposes. They will provide the mixture with excellent strength and at the same time the necessary plasticity.
Is wood afraid of water?
We know that the presence of water is the most important condition for the existence of life on earth. A tree, during its growth and development, also needs regular watering and absorbs liquid in significant volumes.
According to scientists, approximately 200 million trees grow even at the bottom of artificial reservoirs. And this is about one percent of the world's wood resource.
Environmentalists believe that transporting wood by water is harmful to nature, but it is still used
But even after the tree is cut down, its contact with water can continue. Whips and logs are floated down rivers, transported to the place of further use. They are even processed using the flooding method.
For example, oak, after several years spent in a flooded state, acquires special strength. Even before the processing stage, the cost of such material is very high.
It turns out that wood is quite compatible with water. But what she doesn’t like is frequent changes in temperature and humidity. We all know that an oak barrel filled with water swells. If you leave it for a long time without liquid, it can dry out and become unusable.
Instructions
Start of the manufacturing process
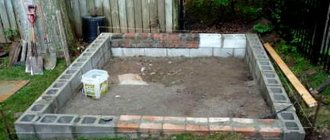
Clean the area where you plan to install the bathtub. At this stage, the structure should be stripped down to bare concrete - the bathtub being built will become the most important part of your sanitary unit. After such extremely thorough preparation, it is worth applying a couple of primer layers to the site to ensure reliable and high-quality adhesion of the walls of the room and the floor covering to the font being built. The next step will be to create a frame for the future concrete bath. For this, metal rods with a cross-section of 0.7 cm are used. They should be used to make a single structure for the floor and the outer wall. Moreover, the frame should be attached to a load-bearing wall.
Pro tip! In sanitary facilities with a small area, it is advisable to place a concrete bath between opposing wall surfaces so that the existing load-bearing walls become a single part of the bathing structure. Then you will only need to build one (external) wall. This means you can significantly save on building materials and carry out all construction activities as quickly as possible.
How to make a bath at home? You also have the opportunity to build a corner bathtub, as in the photo, taking into account the specified principle. In this case, the corner of the sanitary unit will play the role of the internal walls of the structure. And the last wall is made in the form of a semicircle or even at an oblique angle from formwork (wood). Everything is reasonable and quite simple. Then we will begin the construction of the plank formwork. You will need OSB sheets or flat bars (using them you can form the walls of a concrete font), wood panels, the previously mentioned reinforcing metal rods and special mounting wire to create a solid frame. This should be done using all materials and you will get a structural skeleton. It will come out extremely durable and without cracks. This is extremely important. The concrete mixture will escape from the formwork through the cracks, which reduces the quality of the work performed. Additionally, you can lay the formwork (bottom, walls) with thick construction film. This increases the level of tightness of the structure frame.
Preparation and pouring of concrete mixture
The solution for production will be made from cement and sand in a ratio of 1 to 3, and the cement should be at least M400. Add a little water to this cement-sand mixture and gradually stir the composition. As a result, you should get a solution that will have the consistency of homemade and good sour cream. Before pouring concrete, it is worth deciding on the points where the technological holes for the future font will be placed. You should also consider the fact that there is quite a lot of space left for washing/repairing the siphon during the operational process of the font. Use plastic pipes to supply and drain water, and they must be installed before you start pouring the concrete mixture. It is permissible to immediately install a siphon, connect it to the sewer network, and then firmly concrete it.
Afterwards you can begin the filling process. First, concrete is supplied to the bottom of the structure, and the mixture must cover the weight of the font skeleton. After this, form the wall of the bathtub from the concrete solution (the composition for such purposes can be made a little thicker). Complete the pouring by tapping in different places on the formwork. Perform the procedure with a small hammer. Tapping will generate vibration, which promotes uniform distribution of the mixture throughout the formwork structure. Leave the font for 3 days, and there is simply no point in keeping the concrete longer. In 72 hours it will become quite strong and quite ideal for further processing - plastering.
Existing types and forms
In order for a wooden bathtub made by yourself to please the eye and bring pleasure during the procedures, you should familiarize yourself in great detail with the existing forms of products and their features.
It is the option you like that will have to be brought to life - some of them can only be reproduced in a carpentry workshop using wood processing machines. The shapes of sanitary containers for ablutions are very different.
Image gallery
Photo from
Ideal geometry of a round wooden bathtub
Oval shape wooden bathtub
Irregular bathtub shape
Rectangular wooden bathtub
One of the variations of the oval theme can be considered the shape of the product, repeating the outline of a boat - here the flexible lines and grace of the floating device are combined with the natural structure of the material, which gives an indescribable feeling of lightness and naturalness.
A boat rushing across the sea waves can easily moor in a cozy bathroom. True, such a product costs more than one thousand euros
In addition to unusual shapes, manufacturers offer a combination of various materials with wood - polymers, glass, metal.
Due to their light weight and unstable position, acrylic bowls and steel bathtubs are placed on a frame made of a durable metal alloy. It is necessary to increase the user's confidence during procedures and to minimize the risk of injury.
Sometimes, instead of the usual metal structure, a frame is built, for which lumber or an aluminum profile is used. The frame is complemented with a decorative ladder, making it easier to get inside the bowl.
Image gallery
Photo from
Wood with polymer coating inside
Symbiosis of an oval with a barrel
Combination of glass and wood
Wood and nothing else
In addition to the shape, the products differ in the type of material - a solid piece of wood is not always taken to make an original container.
Based on the appearance of wood, bathtubs can be made from the following elements:
- whole tree trunk;
- large fragments of material;
- blocks;
- planks or they are also called rivets;
- from veneer.
The last option applies to cheaper products. There are natural and artificial veneers. In the first case, the product is related to natural material. Moreover, when finishing luxury yachts, valuable wood veneers are also used.
But the second is modern technologies that make it possible to create the structure of wood. Such a bathtub has its advantages, but it is in no way connected with wood, with the exception of the pattern on the polymer coating that imitates the structure of wood.
To recognize the latter option, you should study the company’s offers - if the same model is offered in different colors - ash, oak, cherry, walnut and other variations, and the price is almost the same, then the future product has nothing to do with wood.
Cherries are not used to make baths. And the surface of a product made from natural wood will never be uniform - the fibers create their own unique pattern
How to make a quality concrete bath
After 3 days, you need to dismantle the formwork (the procedure should be done as carefully as possible, but remember that the concrete has not yet become fully monolithic) and plaster the font. At this working stage you will be able to level all the surfaces of the bathroom and give it the desired configuration. The event is carried out using the rule of small geometric dimensions and a construction trowel. Upon completion of plastering, creating straight or rounded corners and leveling the structure, it should be treated with a primer. Then wait about 10 days, and they are also required for the final drying and hardening of the solution.
There are a couple of little things left. You need to finish the bath well, but before that, apply a primer to all its parts, ideally in 2 layers. The mosaic used for bathtubs with rounded corners will help give the bath a beautiful appearance. First, the mosaic is mounted on a reinforcing fiberglass mesh, and then the adhesive is applied to the concrete bath with a notched trowel and part of the mosaic is installed. It should be pressed a little into the surface. Then place a little more mosaic cladding, and the whole procedure turns out to be painstaking and lengthy. But you will get a bath with a perfect appearance. After laying all the mosaic elements, grout the tiles (the seams between the finishing elements) with special means. Congratulations, now you know how to make a bath yourself!
Additional points
Is it possible to install a shower in the bathroom? Of course, it’s enough to install a special common mixer and hang a curtain. The latter will come in handy if the bathroom is shared. In addition, the curtain protects the floor from liquids.
I would like to create a large, beautiful plunge pool, where you can then spend hours relaxing in the hot foamy water. The task is quite doable even in a city apartment. The main thing is to imagine in advance what the room will look like and measure the location of the future bathtub. And select materials.
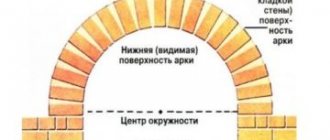
Brick font - is there any point in such a product?
Brick baths are made extremely rarely, and as a rule, they are built in this case:
- If you plan to convert a regular bathroom into a combined sanitary unit.
- If the bathroom in your apartment or house is quite spacious, then you can make not just a bathroom, but a personal brick pool).
- If you want to create an original and sophisticated sanitary unit according to a unique design project.
Before you start building a brick bathtub, you should think carefully - do you need it? This type of font has several noticeable disadvantages. For example, for construction you need to know about all the rules for laying bricks, and the operation itself takes quite a long time (especially when a structure with a complex shape is built). And caring for a brick structure is much more difficult than caring for a cast iron, concrete or acrylic product. But a brick bath also has many advantages. It is extremely durable and also easy to use (most often the depth of the bathtubs is greater than that of cast iron or acrylic bathtubs). And the price of the construction with the right approach to the work will be quite affordable.
Screen options
The screen is a protective wall that helps cover the legs and bottom of the bathtub. Sewer pipes, supports and other communication systems are “hidden” behind it. You can also make the screen yourself. Before choosing a material, you need to measure the space and estimate the shape of the screen.
It is better to determine in advance whether the screen will be monolithic (stationary) or sliding. The second option is more convenient if you plan to create a place to store various things under the bathroom.
You can choose any material, the main thing is that the finished screen fits harmoniously into the overall design of the room and is:
- moisture resistant;
- resistant to possible temperature changes;
- washable;
- easily replaced.
We recommend reading: Installing a cast iron bathtub
Most often, sliding plastic screens are installed, designed to match the color of the walls or floor.
A wooden screen looks gorgeous, but the wood will need to be protected by treating it with a special moisture-resistant compound. It looks beautiful if there are other wooden parts in the room. For example, cabinets, shelves or racks.
Drywall also looks beautiful, but here you need to install profile bases, then cladding the finished structure. The advantages of the material are the ability to create any shaped element.
The most convenient screen option is a removable sliding screen made of lightweight, washable material. This one is easy to clean and replace if it breaks or loses color.
Step-by-step guide to making a brick bathtub
For home craftsmen with an average level of skill, performing such an operation will not cause any particular problems. The layout of the font is as follows:
- Before starting the work process, it is worthwhile to arrange all the necessary plumbing communications.
- Measure the dimensions of the room, prepare a plan for a brick bathtub, order the required materials.
- Make structural masonry - it is worth doing it in ½ brick, connecting the products using a classic masonry mixture (4 measures of sand and 1 measure of cement grade M400, M500). Some thrifty craftsmen recommend building a font with a thickness of ¼ brick, but it is better not to do this. In this case, thin walls may not withstand the pressure of the collected water.
Next, you need to perform high-quality font waterproofing. Ideally, such procedures should be carried out using bitumen coating compounds, as well as floating-type moisture-protective solutions. The use of roofing felt is not permitted under any circumstances. This popular waterproofing agent is not suitable for protecting brick bathtubs from moisture. Materials for waterproofing should ideally be applied in 2 layers, and before starting finishing activities, it is imperative to apply a primer to the protective equipment. In this case, the adhesive composition for impregnation will perfectly hold the finish for a long time. At the end, all that remains is to glue the tiles/mosaics and the bath is ready!
Finishing
The final step, at which all that remains is to choose the cladding material. The main criteria should be strength, durability and moisture resistance, which is very important for a bathroom. The mosaic, liquid acrylic and tiles listed above fit this description. All materials are equally good, but each is intended for cladding only a certain type of purchased. If it is difficult for you to decide on just one thing, then you can try a combined technique, in which the outer walls of the bathtub are decorated with tiles or mosaics, and the inner walls with acrylic.
To make it easier for you to decide on the type of bathtub, here is a brief description of each of them:
- Polyethylene: cheap, practical, but disposable;
- Concrete: durable, can be given any shape, resistant to high temperatures, but difficult to create;
- Brick: durable, does not allow heat to pass through, unusual, can be very large in size; with the right approach, such a bathtub will cost quite inexpensively, but requires more careful care than others, and is difficult to build.
Space layout
The dimensions of the bathroom are the main factor that determines the layout. The cubicle will fit perfectly into a narrow bathroom, but it will also look great in a large bathroom. The design with or without a low tray looks airy, and the glass doors seem to dissolve the shower room in space.
The photo shows a bathroom in gray tones, equipped with a cubicle with a glass hinged door.
The layout of a small room allows you to place the cubicle in the corner to save as much space as possible: this frees up space for the washing machine, sink and laundry basket.
Down with partitions
The optimal solution for a small bathroom is to combine it with a toilet. Sometimes, it turns out to further expand the area due to the corridor and kitchen - such an option is only welcome.
The absence of an internal partition allows you to easily install a washing machine, an additional piece of furniture or a plumbing fixture.
Considering that now instead of two doors to the bathroom you will need one, it can easily be replaced with a sliding structure - it saves space and looks aesthetically pleasing.
Global restructuring will require a lot of work and financial investment, but the result is worth it. The possibilities for arranging the interior of a small bathroom will expand significantly.
Bathroom design on an area of 4 m²
Such a space makes it possible to organize a combined bathroom, albeit a very compact one. The main task in this case will be to visually enlarge the room and organize spacious storage spaces.
Some tricks for a small bathroom of 4 m².
- It is advisable to install several light sources - general and local to create a spatial play in the room. The same task will be performed by mirrors located opposite each other, for example, on the door and above the washbasin.
- It is better to choose furniture in light colors with glossy facades; the room will seem more spacious.
- The area allows the use of two types of finishes in the design of a small bathroom. Ceramic tiles are required in the bathing area; the rest of the room can be decorated with waterproof paint or wallpaper. You should pay attention to “tricks” that create additional perspective. A great idea for a small bathroom would be photo wallpapers with natural or city landscapes. Black and white images in small spaces will look more stylish and impressive than color ones.
- Hanging furniture, a washbasin and even a toilet will create a feeling of lightness and allow housewives to spend less time on cleaning.
Hello from the past: a bathroom in a Khrushchev building
Owners of bathrooms in houses of the so-called “Khrushchev” buildings are faced with several problems at once:
- record small area;
- inconvenient location of communications;
- poor-quality building structures - uneven walls, distorted coatings, and the like.
There is only one way out - to combine a separate bathroom, move communications and carefully align the walls, while hiding at least part of the water pipes in them.
The design of a small bathroom in a Khrushchev building is built on the nuances of colors, shapes and textures. There is no place for contrasts that will visually fragment an already intimate room.
It is better to use ceramic tiles to decorate the walls and floors, and make the ceiling suspended to hide all its unevenness.
A corner shower cabin will save as much space as possible - it is the most compact of all models. There is also a way out for adherents of traditional bathing methods. A corner bath designed for one person in a small bathroom will not take up much space and will allow adults to bask in the fragrant foam or children to happily splash around.
The amount of furniture should be minimal; it is better to organize additional storage spaces outside the bathroom. Doors should be either sliding or opening outwards. In the second case, you can place an organizer for small hygiene items and towels on the door leaf.
More solutions for “Khrushchev” buildings can be found
We act according to plan
Before you start renovating your bathroom, let’s answer a few basic questions:
- Is it important to maintain a separate bathroom or can both rooms be combined? In the second case, the area of the room will increase significantly due to the demolished partition.
- What plumbing fixtures can a family not live without? It is clear that the set will be minimal to free up useful space. It is more correct to limit yourself to a standard bathroom, or even better, a shower stall (we will talk about this below), a toilet and a washbasin.
- Will redevelopment require relocation of utility lines?
- Is it possible to install the washing machine outdoors, for example in the kitchen or hallway. The design of a small bathroom will only benefit from this.
- Is a full-fledged bath necessary in this case or can it be replaced with a compact hydrobox, which can give no less pleasure from water procedures.
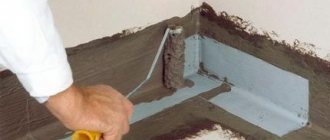
Waterproofing
Waterproofing a bathtub can be done using roofing felt
To protect yourself from bathtub leakage, you must seal it. To do this, you can use either special waterproofing materials for swimming pools or regular roofing felt. As practice shows, it copes with protection against leaks no worse than expensive materials. The use of roofing felt is possible only in one case - you need to remove powder from its surface. To do this, you can use a metal brush.
Then the sheets cut to size are glued to the bottom and walls of the bath using bitumen mastic. At the same time, do not forget to lay the material overlapping with a wide overlap on the walls. The edges and joints of the strips are additionally treated with a layer of bitumen. Finally, the internal and external surfaces of the bath are plastered with the same solution that was used for the brickwork, and for better adhesion of the plaster to the waterproofing layer, the surface is treated with a primer.
If you decide to use a dry mix, be aware that only cement-based compounds can be used. Considering the need for facing work, grouting of the plastered surface is not carried out. They proceed to the final stage only after the plaster has completely dried.