A safety group in a heating system is a control and measuring unit designed to remove air masses and automatically prevent emergency situations associated with an increase in pressure in the heating system to critical values. The safety group is used exclusively in closed heating systems. In an open type CO with natural coolant circulation, it is simply not needed: the air is discharged through an expansion tank located at the top of the system, and the pressure, even under the most extreme conditions, cannot approach at least 1 bar.
The average cost of a ready-to-install unit is 1,100-3,000 rubles; if desired, you can assemble it yourself by purchasing all the components separately.
What is included in the heating system safety group
Composition of a classic security group.
The safety group consists of three elements connected by a collector (a technical element that divides the flow into several parallel branches).
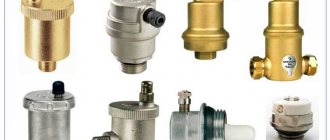
Automatic air vent
The automatic air valve is designed to relieve air masses from the heating system. An earlier alternative is Mayevsky’s manual taps on radiators. The air in the pipes and radiators of the heating system slows down the heating and circulation rate of the coolant, reduces efficiency, and when heated above 90°C, it seriously increases the pressure, which can lead to damage and depressurization of the heating system.
Air may appear even with competent and careful operation of the CO. The most common reasons:
- initial filling of the heating system with coolant allowing air;
- release of air bubbles when heating water used as a coolant above 90°C;
- improper use of the make-up tap;
- wear of the elements and components of the heating system, which violates its tightness.
The automatic air vent does not require adjustment or human intervention. As soon as air forms in the system, it enters the air vent channel. The float located in this cylindrical channel lowers, lowering the locking rod: the valve opens and bleeds all the air from the channel.
Pressure gauge
The purpose of the pressure gauge is to display the exact pressure inside the heating system to monitor performance. Typically, bars are used as units of measurement. Having adjusted a certain level of pressure, looking at the pressure gauge, you can make sure that the system is working properly, all components are completely sealed, and other elements of the safety group are performing their functions.
Safety relief valve
The operating principle of a spring safety valve designed for an individual heating system.
The safety valve ensures automatic release of air, steam or coolant when a critical point is reached, thereby freeing up space in the system for further expansion of the coolant. An increase in pressure in the heating system can be caused not only by the formation of air (which is handled by the air vent), but also by the expansion of the coolant itself during strong heating, which can lead to damage and leakage.
If radiators and pipes can usually withstand a pressure of 7-9 bar without problems, then the most vulnerable element of the heating system is the boiler heat exchanger, often designed for 3 or even 2 bar.
It is based on the maximum permissible operating pressure that the safety valve is selected: there are models designed for a specific pressure and models with an adjustable value, which is set during installation and configuration. The most common and best in terms of price-quality ratio is the spring mechanism, which is what is used in almost all versions of security groups.
The principle of operation of a spring safety valve is the balance of pressure inside the system and the clamping force of the valve spring:
- from the inside, the coolant exerts pressure on the valve shutter;
- on the other hand, the spool is pressed by a rod, on which a spring presses, thereby holding the valve in the closed position;
- as soon as the pressure in the system exceeds a critical value, it outweighs the clamping force of the spring and the valve opens slightly, releasing excess air, steam or coolant;
- as soon as the pressure drops below a critical point, the spring force is sufficient to move the valve to its original closed position.
Filling coolant and starting the system
Before starting work, fully open the automatic air vent. There is a drain valve in the boiler return line through which the system can be filled. Sometimes a special unit with a check valve is provided nearby. Connect the water supply and open the valve. If a permanent pipe is not available, use a flexible hose. A good head is required so that it exceeds the operating pressure of the system.
Injection is completed when liquid flows through the air valve. They close it and begin to remove any traffic jams that may have formed. One by one, the Mayevsky taps are opened on the batteries. Resume injection and stop when the air is gone and the pressure gauge needle shows 1.5 atmospheres or more, which depends on the characteristics of the boiler. The dual-circuit unit has a tap to which a water supply hose is connected.
A simple device for filling or draining liquid
A closed system can be filled with antifreeze. It will not evaporate, and in the absence of leaks it can last for a long time. It is impossible to pump it like water; other available methods are used: using a pressure test or electric pump. The second option is through a flexible hose. One end is connected to the check valve, and the other is raised above the highest point of the system.
Antifreeze liquid is used in houses with non-permanent residence. The price is quite high, so you need to know exactly the capacity of the system. How to calculate was described above. They determine the extreme sub-zero temperature and use the graph to find how much antifreeze to add to the water. An important caution: if the pipes are galvanized, such anti-freeze protection is not used.
Graph for determining the percentage of antifreeze-water mixture
An automatic gas boiler with a built-in water circuit module is started according to a special scheme. Remove the cover from the unit to gain access to the pump. Set the switch to operating mode, use a screwdriver to unscrew the screw in the housing to allow air to escape. When the water drips in, wrap it up. After a few minutes, the procedure is repeated until the device stops gurgling and operates more quietly. The burner will turn on. Check the pressure gauge readings, open the tap briefly so that the pressure readings reach a state corresponding to the working one.
Trigger algorithm
Let us briefly summarize the principle of operation of the entire group. From the very beginning of commissioning, an automatic air vent operates, removing all air from the system. However, if it overheats and reaches critical pressure levels, it is powerless. To avoid an emergency, the safety valve is activated, releasing excess coolant, thereby reducing the pressure in the system.
To monitor the operation of the system, the safety group includes a pressure gauge that shows the pressure at the moment: low pressure indicates depressurization, a malfunction of the expansion tank or make-up valve; increased - about expansion of the coolant or excessive release of steam due to overheating.
Operating principle of the safety unit
The security group works according to an extremely simple scheme, where each of the modules is responsible for maintaining the standards of certain indicators in a private boiler room:
- Thanks to a convenient pressure gauge, the user can monitor the pressure readings at the moment the line is filled with coolant, as well as during the operation of the boiler.
- The safety valve protects the heat generator from critical pressure drops.
- The main functionality of the air vent is based on the automatic release of air entering the pipeline during its initial filling or during operation.
All safety modules are represented by a single unit and are equipped with a special housing - a manifold.
Provided that the boiler room circuit uses an open type expansion tank, installing a safety group does not make sense - the pressure in the pipeline is equal to atmospheric pressure, and excess air leaves the system through the tank capacity.
Regardless of the type of boiler used (solid fuel, gas, diesel), the protective unit is considered the main emergency element of a closed heating system, which tends to work with excess pressure
How to choose a security group for the heating system of a private home
Choosing the right model is not difficult, you need to look at:
- The maximum permissible system power (kW) for which the unit is designed. Typically this is 44, 50 or 55 kW. If the system has less power, great, but if it has more power, you need to look for a more durable option.
- Safety valve response pressure . As a rule, valves with a fixed value are installed in finished units - 1.5 bar, 3 bar, 4 or 6 bar. The response pressure must correspond to the maximum permissible operating pressure of the most vulnerable element of the heating systems - usually a steel boiler heat exchanger designed for 2 or 3 bar. Safety valves for 2 bar, despite sufficient demand, are difficult to find on sale; the way out of the situation is to assemble the unit yourself by purchasing the safety valve and other elements separately (see below for more on this).
- The operating temperature is the permissible temperature of the coolant; for almost all modern models it is within the range of -10°C – 110°C, which is more than enough.
- Compatibility with coolant - if antifreeze is used as a coolant instead of water.
- Threaded connection diameter – it can be 1″, 1/2″ or 1.4″ in diameter. You can also select a unit that does not match the thread diameter, but then you will have to take care of selecting an adapter, which is not always easy.
It is important to pay attention to the material of manufacture; galvanized steel or stainless steel is a good, but not the best option. More expensive, but more durable, wear-resistant and even more resistant to corrosion are brass products. The material of manufacture is not always indicated in the characteristics; in addition, the collector can be made of steel, and the remaining elements - of brass. You can distinguish brass by its characteristic monochromatic, matte color (bronze-golden or silver, depending on the alloy).
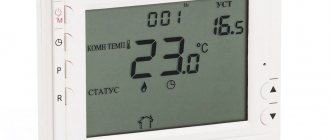
How to choose a room thermostat and save up to 30% per month on heating
Collectors
The collector groups separate the main heating circuits, as well as individual circuits of the underfloor heating system.
This is what a heated floor manifold assembly with a three-way mixing valve looks like.
In addition to the above cases, collector units are used in radiant heating systems.
A lot of controversy arises about where to install circulation pumps in collector systems, as well as in simple heating systems - on the supply or return? Here's what experts say about this.
Evgeniy Kruchinin
By and large, it makes no difference where the circulation pump is installed - in the supply or in the return. It is important that the pump is easy to maintain - this is perhaps the main criterion for choosing an installation location. An exception is the case when the temperature of the coolant in the heating system may exceed the maximum temperature for which the circulation pump is designed. In this case, it is recommended to install the pump on the return line, where the coolant temperature is lower.
Multi-circuit heating is a cumbersome engineering communication with many elements that must be correctly calculated, installed and combined into a single system.
In order to make the piping scheme simpler, more reliable and aesthetically pleasing, experts recommend using pump groups (quick installation groups), which are completely ready for installation and are sold already assembled. They include circulation pumps and piping elements that may be needed in one case or another.
Pump groups can be used as part of simple and complex heating systems.
Evgeniy Kruchinin
Pumping groups are easy to install and operate. All strapping elements included in the quick installation group have already been selected according to their characteristics and assembled into a single structure. Moreover, each pump group produced is necessarily tested by pressure testing at the factory, which makes it a much more reliable solution than pump piping assembled “from scratch” from the market. This greatly simplifies life for both installers and residents. In addition, compact pumping groups, having an aesthetic appearance, fit perfectly into the interior of a modern boiler room.
The best known manufacturers and models: characteristics and prices
TIM JH-1024-1.5
One of the most inexpensive but proven models. Despite the low cost, it has a brass manifold. The maximum power of CO is 50 kW, the response threshold of the safety valve is 1.5 bar, the connection diameter is 1″ BP. Country of origin: China.
VALTEC VT.460.0
One of the best ready-made safety groups for the boiler and heating system of the famous Italian manufacturer VALTEC. The unit is entirely made of nickel-plated brass and has an additional threaded outlet for connecting an expansion tank. It is distinguished by high reliability and quality of all connections and technical elements. The permissible power of the CO is up to 44 kW, the response threshold is 3 bar, the diameter of the connection to the network is 1 V.
Watts KSG 30
Security group of another well-known German company with production in Italy. There is a whole range of models on the market, where there are models designed for power up to 100 and even up to 200 kW. The collector body is made of galvanized steel, which, given the cost, is a disadvantage. However, the technical elements are made of brass, and there is a thermal insulation casing. Maximum CO power – 50 kW, response pressure – 3 bar, connection diameter – 1″ (internal thread).
Caleffi 302631
Another reliable and high-quality (in terms of materials and assembly) Italian-made model, entirely made of brass, with a heat-insulating polystyrene casing included. The maximum power of the CO is 50 kW, the response pressure is 3 bar, the diameter of the threaded connection is 1″ female.
Cost: 4,500-4,750 rubles.
Balancing
Most often, balancing heating systems is carried out in three ways:
- 1. Calculated – takes into account the design coolant flow in each section of the system.
- 2. Balancing based on the actual temperature of heating devices (radiators, underfloor heating circuits, etc.).
- 3. Electronic balancing is the most accurate method, allowing you to set up the system correctly the first time. This is done using a special mobile application, shut-off valves and adjustment functions built into the circulation pump.
Balancing according to design calculations
The easiest way is to balance the system using the data specified in the heating project. The essence of balancing, regardless of the chosen method, comes down to setting the required coolant flow in various parts of the system. The flow is regulated using balancing valves or thermostatic valves with presetting.
Temperature balancing
To balance the system by temperature, you will need balancing valves (or thermal heads with presetting) and an electronic thermometer for non-contact measurement of surface temperature. The main goal of balancing in this case is to achieve approximately the same temperature difference at the inlet and outlet of each radiator.
Electronic balancing of the system
Temperature balancing is a long and painstaking process. It is very difficult to accurately regulate complex heating systems in this way. It is much easier to use a circulation pump with a balancing function. It automates and thereby significantly simplifies the process of setting up the system. This method makes it possible to calibrate the heating system in a house with an area of up to 200 m² in about one hour.
Devices needed to electronically calibrate the system:
- - a circulation pump with a corresponding function (in some cases, a removable pump head is installed on the existing pump, designed to balance the system);
- — smartphone and special software;
- — wireless communication module installed on the pump head.
Correct balancing allows you to accurately adjust the operating parameters of the heating. This significantly reduces the cost of operating the system and ensures the most comfortable temperature in all rooms.
Prices: summary table
| Manufacturer and model | Maximum CO power, kW | Response pressure, bar | Thread diameter, inch | price, rub. |
| TIM JH-1024-1.5 | 50 | 1,5 | 1″ BP | 990-1 200 |
| VALTEC VT.460.0 | 44 | 3 | 1″ BP | 1 650-1 800 |
| Watts KSG 30 | 50 | 3 | 1″ BP | 2 600-3 400 |
| Caleffi 302631 | 50 | 3 | 1″ BP | 4 500-4 750 |
Features of choice
For any model of protective group, the instructions indicate acceptable parameters. The main criteria that influence the choice of device:
- maximum coolant temperature;
- thermal performance indicators of boiler equipment;
- thread diameter for connection (if necessary, you can buy an additional adapter);
- compatibility with thermal fluid;
- nominal pressure.
A competent choice of unit power can provide reliable protection of boiler equipment from various disturbances during operation of the heating circuit.
Where is the security group placed?
The safety group is placed on the supply line of the heating boiler, as close as possible to the boiler unit, but above its level. It is prohibited to install any shut-off valves, filters or other elements that narrow the pipeline between the boiler and the safety group. The safety group must be installed strictly in a vertical plane so that the air vent and safety valve are in a vertical position; in the horizontal plane the unit can be rotated as desired.
Please note that if there is an appropriate outlet pipe, it is recommended to connect the expansion tank through it. If this is not done, the outlet pipe for the expansion tank must be plugged.
Heating boiler piping
The piping of a heating boiler is usually called all the elements of the system that are installed between the boiler and the heating circuits (meaning radiator and underfloor heating circuits, as well as hot water supply circuits). If the heating system is balanced correctly, it will ensure uniform heating along the entire heating perimeter. If the system is not balanced, the rooms will be either too hot or too cold, and the pipes will make noise due to suboptimal flow rates.
Connection to the heating system
The entire process of connecting the safety group to the heating system consists of a threaded connection to the vertical pipe previously allocated for it (the diameter of the pipe thread = the diameter of the thread of the safety group) and checking the functionality of its modules. An example of installing a security group is shown in the diagram below.
An example of installing a security group in a closed heating system.
After a tight connection, you need to check the operation of the air vent by forcibly opening it: turning the valve handle (top cap) until it clicks. Leave the air vent open. It is better to close the automatic air vent while the system is filling with coolant. A drain tube must be placed on the relief valve, leading either to the floor (into a prepared container) or to the sewer. In the first case, the consequences of the accident will be visible; when draining into the sewer, you may not even know what happened.
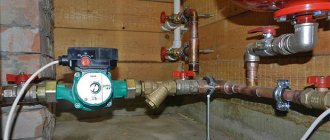
Circulation pump in a closed system
Circulation pump in a closed system
Due to these structural elements, the functioning of the entire system occurs. There are models on the market of different capacities, which are determined by a combination of several factors. The size of the pipes and the material of their manufacture, the number and presence of radiators, if there are thermostatic fittings, the length of the pipes, as well as how the equipment works are taken into account.
There are standardized tables from which you can select a pump. They need to focus on the area of the room that needs heating or the power of the system as a whole - you can build on this data when searching for a suitable option.
Harness
Earlier in the article it was mentioned that pumps in a closed system are mounted on the return pipeline. A few years ago this was a mandatory requirement for installing the system, but now the owner can do it as he sees fit.
The pump is manufactured using durable materials that can withstand temperatures up to 90 degrees.
If the design operates with natural circulation, then during installation it is better to make sure that the pump in case of wear or breakdown can be replaced without removing the coolant. Ideally, the station should operate even without a pump. To implement this idea, it will be enough to install a bypass - this part allows the coolant to flow without the participation of other elements.
If you are dealing with a closed system that uses forced circulation, then a bypass will not help here. This design option cannot function without a pump. However, here you already need a filter and two taps, which are located at the inlet. With the help of ball valves, you can disassemble the structure at any time if it needs repairs or replacement of worn parts. The filter performs a standard function - it prevents the system from clogging. To further secure the system, a check valve is installed between these two parts, which closes the path for the coolant in the opposite direction.
How to properly assemble a knot with your own hands
A correctly configured safety group should be in the shape of a trident, so that the air vent is located in the middle, directly above the pipe under the safety group. This way air will be guaranteed to flow into it, without any obstacles.
A homemade security group includes the following elements:
- pressure gauge, automatic air vent and safety valve;
- 2 steel or brass squares at 90° with external and internal threads (the diameter is selected to match the diameter of the threads of the modules and the crosspiece);
- 1 steel or brass cross;
- 1 coupling/nipple for connecting the finished unit with the heating system tee;
- tow or silicone for sealing joints (FUM tape is not recommended because it deforms at temperatures above 70-80°C).
We connect the elements in accordance with the photo below, connect them to the heating system and check their functionality.
An example of a knot assembled by yourself.
Video description
This video will show you how to make a collector for a heated floor with your own hands:
A collector heating system, also known as a radiant heating system, consists of the following elements:
- collector;
- pump;
- heating devices;
- safety devices;
- expansion tank;
- pipeline;
In turn, the collector assembly is mounted in two parts:
- Input - it is connected to the heating unit, receiving the coolant at the required temperature, and distributes it along the circuits of the system.
- Output - return circuits are connected to it, which release the cooled coolant, which is redirected to the boiler for the next heating.
The main difference and advantage of this installation method is the ability to independently connect heating devices to the system. This allows you to simplify repair work and more accurately regulate the temperature in the room. The disadvantage is the high costs of communication and installation.
Leningradka system
Another interesting solution is the Leningrad heating system. The Leningradka heating system in a private house allows you to level out heat loss by the coolant when moving away from the boiler.
This is the main problem of classical type heating systems - achieving the same temperature along the entire length of the line. To solve this problem, it is necessary to increase the number of heating devices as they move away from the heat source.
Radiator installed according to the “Leningradka” scheme Source plusteplo.ru
Maintenance
- It is advisable to check the status of all modules of the security group every 2-3 months.
- The safety valve must be cleaned every 6 months to prevent leaks and contamination. To do this, it must be opened by turning the valve cap in the direction of the arrow.
- After 5-7 operations, it is recommended to replace the safety valve due to wear on the spring, which can lead to leakage and operation at lower pressures in the system.
Instructions Boilers Boiler room equipment Safety valves
Self-installation steps
You can assemble a safety group for the heating system yourself. This will require a large investment of time and money. If everything is done correctly, the unit will work perfectly and protect the equipment from breakdowns, as well as emergency situations.
Connection rules
Before you begin installing the security unit yourself, you need to study in detail the advice of professionals. They will help beginners avoid a large number of mistakes and make a truly reliable design.
Do not forget to strictly follow the instructions when connecting a security group
General connection tips:
- It is best to install the protective block on the supply pipeline located at the outlet of the device.
- The unit can be placed at a distance of at least 50 centimeters from the heat source.
- There should be no foreign parts (tees with branches, taps) on the section of the pipeline where the protective device is installed.
- Professionals do not recommend installing a safety group on metal-plastic or polypropylene pipes, as they can be deformed when exposed to heated air. The best option would be to use a metal piece.
- The automatic air vent is fixed only in a vertical position.
- A flexible hose can be connected to the safety valve, through which excess liquid can flow into the bottle or onto the floor.
Selection and purchase of components
Ready-made security units are quite expensive, so it is best to purchase individual components. This little trick will help cut your costs in half.
When choosing parts, you should adhere to the following tips:
- You should not buy the cheapest safety valves that were made in China. Such products will quickly fail and will not relieve pressure.
- All pressure gauges of Asian origin give incorrect readings. This is due to low quality materials and incorrect graduation.
- It is better not to use a corner-type air vent, as it creates additional resistance to escaping steam.
- The safety valve should be selected based on the operating pressure of the installed boiler. Such information can be found in the technical data sheet that comes with the device.
- It is better to choose a crosspiece from high-quality brass.
During the work you will need some materials and tools. You can buy them at any hardware store or rent them from friends.
Items must include:
- adjustable wrench;
- gas keys;
- union;
- crosspiece;
- adapters;
- angles with external and internal threads;
- any material for sealing connections (plumbing linen, special tapes and others);
- sealant.
Operating procedure
Once all the preparatory steps have been completed, you can begin assembling the security unit. This work is done in a few simple steps:
- Plumbing flax is carefully wound onto the threads of the angles. It is important to lay the material evenly, without gaps.
- For better fixation of the connection, a thin layer of sealant is applied.
- The squares are attached to the crosspiece using a wrench.
- Then a pressure gauge, a Mayevsky valve and a safety valve are installed. If they have different diameters, then use suitable adapters.
- All joints are carefully treated with sealant.
- The protective unit is tested for functionality. During the inspection, detected leaks and other defects are eliminated.
The use of antifreeze in a heating system
To reduce the negative impact of low temperatures on radiators and pipelines, antifreeze is used for the home heating system. Antifreeze usually contains ethylene glycol. It is poisonous and you need to be careful not to get this substance on exposed skin and, especially, in your eyes. Antifreeze vapors, which are formed under the influence of high temperatures and can be released outside if there is a small leak, are also harmful.
Of course, the price of antifreeze for a heating system may vary depending on the composition of the product and the manufacturer. But still, using antifreeze in heating devices will cost more than using ordinary distilled water. True, in some cases, the use of non-freezing liquid is simply necessary to ensure the safe and proper operation of the entire heating system.
Many people have a question: is it possible to pour antifreeze into the heating system of a house? You can use such a non-freezing liquid, but you should know a number of rules and follow safety requirements. Sometimes automotive antifreeze is used for the heating system.
In this case, it is important to take into account some features of the operation of the heating system:
- Antifreeze is more viscous than distilled water. Therefore, if a circulation pump is used, it will have to be replaced with a more powerful unit;
- the degree of fluidity is quite high. A small microcrack or loose connection is enough for antifreeze for heating the house to begin to penetrate into the room. Therefore, you need to ensure the tightness of the structure, and instead of rubber gaskets it is better to use paronite gaskets;
- The heating rate of water with antifreeze is slightly lower. This feature should be taken into account when choosing the temperature mode for the heating system;
- Antifreeze cannot be used in a home heating system in concentrated form. The product must be diluted with water.
Thus, many modern models of heating systems are equipped with a safety unit. But if this module is missing, you should install it additionally. This protective mechanism reduces the likelihood of air locks and regulates the pressure in the system. To avoid the negative impact of low temperatures on pipes, use antifreeze. All this allows you to extend the service life of heating devices and make their work better and more efficient.
How and where to install the expansion tank
So, we are going to design and assemble a heating system with our own hands. If it also starts working, our joy will know no bounds. Are there instructions for installing the expansion tank?
Open system
In this case, the answer will be prompted by simple common sense.
An open heating system is, in essence, one large vessel of complex shape with specific convection currents in it.
The installation of a boiler and heating devices in it, as well as the installation of pipelines, must ensure two things:
- Rapid rise of water heated by the boiler to the top point of the heating system and its drainage through the heating devices by gravity;
- Unhindered movement of air bubbles to where they will rush in any vessel with any liquid. Up.
The conclusions are obvious:
- The installation of a heating expansion tank in an open system is always carried out at its highest point. Most often - at the top of the accelerating manifold of a single-pipe system. In the case of top-fill houses (although you hardly have to design them) - at the top filling point in the attic.
- The tank itself for an open system does not need shut-off valves, a rubber membrane, or even a lid (except to protect it from debris). This is a simple water tank open at the top, into which you can always add a bucket of water to replace the evaporated water. The price of such a product is equal to the cost of several welding electrodes and a square meter of steel sheet 3-4 millimeters thick.
This is what an expansion tank for an open heating system looks like. If desired, a water tap from the water supply can be brought into the hatch in it. But much more often, as the water evaporates, it is topped up with an ordinary bucket.
Closed system
Here both the choice of tank and its installation will have to be taken quite seriously.
Let's collect and systematize the basic information available on thematic resources.
Installation of the expansion tank of the heating system is optimal in the place where the water flow is closest to laminar, where there is a minimum of turbulence in the heating system. The most obvious solution is to place it in the direct filling area in front of the circulation pump. In this case, the height relative to the floor or boiler does not matter: the purpose of the tank is to compensate for thermal expansion and dampen water hammer, and we can bleed the air through the air valves.
Typical tank installation diagram. Its location in a single-pipe system will be the same - in front of the pump along the flow of water.
- Factory equipped tanks are sometimes equipped with a safety valve that relieves excess pressure. However, it is better to play it safe and make sure that your product has it. If not, buy one and install it next to the tank.
- Electric and gas boilers with electronic thermostats are often supplied with a built-in circulation pump and heating expansion tank. Before you go shopping, make sure you need them.
- The fundamental difference between membrane expansion tanks and those used in open systems is their orientation in space. Ideally, the coolant should enter the tank from above. This subtlety of installation is designed to completely remove air from the compartment of the tank that is intended for liquid.
- The minimum volume of the expansion tank for a water heating system is taken approximately equal to 1/10 of the volume of coolant in the system. More is acceptable. Less is dangerous. The volume of water in the heating system can be roughly calculated based on the thermal power of the boiler: as a rule, 15 liters of coolant per kilowatt is taken.
- A pressure gauge mounted next to the expansion tank and the feed valve (connecting the heating to the water supply) can provide you with an invaluable service. The situation with a stuck safety valve spool, alas, is not so rare.
- If the valve releases pressure too often, this is a clear sign that you have miscalculated the volume of the expansion tank. There is no need to change it at all. It is enough to purchase another one and connect it in parallel.
- Water has a relatively low coefficient of thermal expansion. If you switch from it to a non-freezing coolant (for example, ethylene glycol), you will again need to increase the volume of the expansion tank or install an additional one.
The expansion tank in the photo is installed according to all the rules: the coolant is supplied from above, the tank is equipped with a pressure gauge and a safety valve.
Where is the expansion tank installed for heating?
So, the installation of the tank depends on the type of heating system and the purpose of the tank itself. The question is not why an expansion tank is needed, but where it should compensate for the expansion of water. That is, in the heating network of a private house there may be not one such vessel, but several. Here is a list of functions assigned to various expansion tanks:
- compensation of thermal expansion of water in closed heating systems;
- in open networks, the reservoir performs 2 functions - it absorbs excess coolant volume and removes air from the system into the atmosphere;
- under certain conditions, the membrane tank serves as an addition to the standard expansion tank of the gas boiler;
- absorb excess heated water in the hot water supply network.
Being at the highest point of an open type system, the tank acts as an air vent
In open heating networks, the water in the reservoir comes into contact with atmospheric air. Therefore, the installation of the expansion tank is provided at the highest point - on the riser coming from the boiler. Often these systems are made gravity, with increased diameters of pipelines and a large amount of coolant. The capacity of the tank should be appropriate and be about 10% of the total volume of water. Where else if not in the attic to put such a large tank?
Alternative homemade open tanks made from a plastic canister (photo on the left) and an air receiver
Closed-type heating systems are distinguished by the fact that the membrane expansion tank for water is completely sealed. The optimal installation option is in the boiler room, next to other equipment. Another place where it is sometimes necessary to install a closed expansion tank for heating is the kitchen in a small house, since the boiler is located there.
In closed systems operating on non-freezing coolant, the volume of the tank should be increased to 15% of the total amount of liquid. The reason is the increased coefficient of thermal expansion of glycol antifreeze.
How to tie solid fuel boilers
The connection diagram for a wood-burning heat generator is designed to solve 3 problems (in addition to supplying the batteries with coolant):
- Preventing overheating and boiling of the TT boiler.
- Protection against cold “return” and excessive release of condensate inside the firebox.
- Work with maximum efficiency, that is, in full combustion mode and high heat transfer.
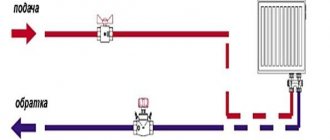
The presented wiring diagram for a solid fuel boiler with a three-way mixing valve allows you to protect yourself from condensation in the firebox and bring the heat generator to maximum efficiency mode. How it works:
- While the system and heater are not warmed up, the pump drives water through the small boiler circuit, since the three-way valve is closed on the radiator side.
- When the coolant heats up to 55-60 degrees, the valve set to the specified temperature begins to mix in water from the cold “return”. The heating system of a country house is gradually warming up.
- When the maximum temperature is reached, the valve completely closes the bypass, all water from the TT boiler goes into the system.
- A pump installed on the return line pumps water through the jacket of the unit, preventing the latter from overheating and boiling. If you put the pump on supply, the chamber with the impeller can fill with steam, pumping will stop and the boiler is guaranteed to boil.
The principle of heating using a three-way valve is used for piping any solid fuel heat generators - pyrolysis, pellet, direct and long-term combustion. The exception is gravity distribution, where the water moves too slowly and does not provoke condensation. The valve will create high hydraulic resistance, preventing gravity flow.
If the manufacturer has equipped the solid fuel unit with a water circuit, the coil can be used for emergency cooling in case of overheating. Please note: the fuse on the safety group is triggered by pressure, not temperature, and therefore is not always able to protect the boiler.
A proven solution is to connect the DHW coil to the water supply through a special thermal relief valve, as shown in the diagram. The element will be triggered by a temperature sensor and at the right moment will pass a large volume of cold water through the heat exchanger.
Using the Buffer Capacity
The best way to increase the efficiency of a TT boiler is to connect it to heating through a buffer tank. At the inlet of the heat accumulator we assemble a proven circuit with a three-way mixer, at the outlet we install a second valve that maintains the required temperature in the batteries. Circulation in the heating network is ensured by a second pump.
A balancing valve on the return line is needed to adjust the performance of the pumps
What we gain thanks to the thermal accumulator:
- the boiler burns at maximum and reaches the declared efficiency, fuel is used efficiently;
- the likelihood of overheating is sharply reduced since the unit dumps excess heat into a buffer tank;
- the heat accumulator plays the role of a hydraulic arrow; several heating branches can be connected to the tank, for example, radiators of the 1st and 2nd floors, floor heating circuits;
- a fully heated tank maintains the operation of the system for a long time when the wood in the boiler firebox has burned out.
TT boiler and storage water heater
In order to load an “indirect” boiler using a wood heat generator, you need to embed the latter into the boiler circuit, as shown in the picture. Let us explain the functions of individual elements of the circuit:
- check valves prevent the coolant from flowing in the other direction along the circuits;
- the second pump (it is enough to take a low-power model 25/40) provides circulation through the spiral heat exchanger of the water heater;
- the thermostat turns off this pump when the boiler reaches the set temperature;
- An additional air vent prevents the supply line from becoming aired, which will be above the standard safety group.
In a similar way, you can connect the boiler to any boiler that is not equipped with an electronic control unit.
Date: September 25, 2021
Boiler - which one to choose
Since the closed heating system of a private house can operate autonomously, it makes sense to install a heating boiler with automation. In this case, you do not need to return to it after configuring the settings. All modes are supported without human intervention.
Gas boilers are the most convenient in this regard. They have the ability to connect a room thermostat. The temperature set on it is maintained to the nearest degree. It dropped by a degree, the boiler turned on, heating the house. As soon as the thermostat is activated (temperature reached), operation stops. Comfortable, convenient, economical.
Some models have the ability to connect weather-dependent automation - these are external sensors. According to their readings, the boiler regulates the power of the burners. Gas boilers in closed heating systems are good equipment that can provide comfort. The only pity is that gas is not available everywhere.
Two-pipe closed heating system in a house on two floors (diagram)
Electric boilers can provide a no less degree of automation. In addition to traditional units, induction and electrode units have recently appeared on heating elements. They are distinguished by their compact size and low inertia. Many believe that they are more economical than boilers using heating elements. But even this type of heating unit cannot be used everywhere, since power outages in winter are a common occurrence in many regions of our country. And provide the boiler with electricity. 8-12 kW from the generator is a very difficult matter.
Solid or liquid fuel boilers are more versatile and independent in this regard. An important point: to install a liquid fuel boiler, a separate room is required - this is a requirement of the fire service. Solid fuel boilers can be installed in the house, but this is inconvenient, since a lot of debris falls from the fuel during combustion.
Modern solid fuel boilers, although they remain periodic equipment (they warm up during combustion and cool down when the fuel burns out), but they also have automation that allows you to maintain a given temperature in the system, regulating the intensity of combustion. Although the degree of automation is not as high as that of gas or electric boilers, it is there.
Example of a closed heating system with an induction boiler
Pellet boilers are not very common in our country. In fact, this is also solid fuel, but this type of boiler operates continuously. Pellets are automatically fed into the stove (until the stock in the hopper runs out). If the fuel quality is good, ash removal is required every few weeks, and all operating parameters are controlled automatically. The only thing that prevents the spread of this equipment is its high price: manufacturers are mainly European, and their prices are appropriate.
A little about calculating boiler power for closed-type heating systems. It is determined according to the general principle: per 10 sq. square meters with normal insulation will require 1 kW of boiler power. It’s just not recommended to take it end-to-end. First, there are unusually cold periods when you may not have enough rated power. Secondly, working at the power limit leads to rapid wear of the equipment. Therefore, it is advisable to take the boiler power for the system with a margin of 30-50%.