The first stage of renovation work is finishing the room. First you need to completely prepare the ceiling and walls. Then an equally important point is attaching the door frame to the opening.
This process is of great importance, since the quality of installation will determine the appearance and performance characteristics of the doors. It is critical that clearances be strictly observed.
Measurements
The quality of further work depends on the thoroughness of the measurements. The door opening, even after finishing, may have deviations from the vertical and horizontal, and the frame will have to be adjusted in height and width. To save yourself from unnecessary work, measurements should be made as follows:
- Using a tape measure, measure the width of the opening at a height of 10-15 cm from the floor and repeat the measurements at a height of about 20 cm from the top of the opening. If a difference is found in two measurements, then the smaller value should be taken as the width.
- In the same way, measure the height of the door: at a distance of 10-20 cm from the side walls of the opening. Take the smaller value as the height.
When purchasing ready-made doors, it may turn out that there is no model that exactly matches the size of the opening or that the door you like is not large enough. In this case, additional elements will be required that will help narrow the opening a little.
Marking
Marking of anchors for metal doors is carried out using alphanumeric designations. As an example, consider one of the most popular sizes: M8 10/40x100.
- M8 - indicates the diameter of the thread of the screwed-in element.
- 10 – diameter of the drill used to drill a hole for installing the anchor. In this case - 10 mm.
- 40 – maximum thickness of attached elements. Here the value is 40 mm.
- 100 – minimum depth of the hole for the anchor. In our case it is 100 mm.
How anchors are marked Source sdelai-lestnicu.ru
Important! The selection of the appropriate anchor for the installation of metal doors is carried out based on the above markings.
Strength marking
On large anchors and bolts, strength markings may be indicated on the head. But in most cases, these indicators are printed on the packaging or in the documents for the product.
This marking is found on bolts and large anchors Source sdelai-lestnicu.ru
Important! Every seller must have a quality certificate, and he is obliged to present it upon the first request of the buyer. That is, if you are interested in the strength class of a particular hardware, you need to ask the corresponding question directly in the store.
Tools and materials
In addition to purchasing an interior door with frame and trim, you will need the following:
- a hand saw with a miter box for cutting at a precise angle;
- screwdriver or drill with attachments;
- for concrete walls you need a hammer drill;
- chisel;
- construction level;
- square, protractor, ruler;
- fasteners: screws and dowels;
- small nails;
- hammer;
- polyurethane foam;
- door fittings (handles, latches, hinges).
What is an anchor
The term anchor means a metal device designed for strong and reliable fixation of a separate element (in this case, a metal door) with brick, stone, aerated concrete, concrete or hollow walls.
Strong fixation of the door frame can withstand significant loads during its operation. This is achieved due to the following factors:
- The friction force, due to which the metal collet rod of the anchor is securely fixed in the hole.
- The force and interaction produced by special spacer mechanisms, which received the appropriate tension as a result of twisting the pressing part.
- The gluing characteristics of the components are adhesive in nature, acting as the main stopper.
Anchor design Source tehno-gid.net
Interesting! In German, the word "anker" means "anchor". This is explained by the principles of functioning of the devices. After the hardware is placed in the hole, the locking element wedges the holding part and becomes like an anchor.
Device and comparison with other hardware
The classic design of anchors is presented as a metal device consisting of a non-expandable and a spacer (working) element. Expansion can be carried out using different devices (depending on the design features of the anchor). In most cases, bolts, studs, nails, and specialized screws are used for this.
The expansion occurs due to a sleeve, cone, sleeve or other device, which is subject to pressure from the above-mentioned spacer element. When the non-spacer part moves inward, the spacer element expands. The resulting friction and resistance causes the anchor to remain in the wall structure.
The key difference between an anchor and its closest analogue, a dowel-nail, is the material from which they are made and the method of fixation in the hole. The plug of the latter is made of plastic, in which the fastening part (nail or self-tapping screw) is attached. Fixation is carried out due to the frictional force that arises between the plug and the “pin”. In addition, the core of the dowel-nail is made of a soft alloy that bends under load.
Important! The manufacturer of dowel nails does not provide for their use for fixing heavy objects. The main purpose is the installation and assembly of sheathing in walls made of dense rocky material.
Due to the fact that the material for the manufacture of a classic anchor is alloy steel or other metal, fixation is also carried out due to the resistance of the materials. Anchors are able to withstand high dynamic loads and pressure.
What is better: an anchor or a dowel-nail Source mkt-profi.ru
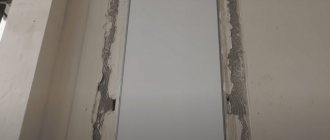
Preparing the opening for installing a door frame
Before installing the door frame, be sure to check the verticality of the wall at the opening and inside it. This is done so that the platband is installed in the same plane with the wall and does not move away from it, and the frame fits into the opening without distortion, otherwise the fastening of the door frame will be defective. For measurements, use a building level with a plumb line.
If deviations of the concrete wall from the vertical are detected, the defect will need to be eliminated using finishing putty. Once the wall near the opening is completely vertical, dry it for 24 hours. Detected deviations of slopes from the vertical inside the opening are corrected in the same way.
Bottom line
High-quality materials and tools allow you to ensure the reliability of the door frame for many years. Do-it-yourself installation is a completely feasible undertaking if you strictly follow the rules.
Did you manage to solve your problem using the recommendations from the article?
Yes!
46.57%
No. More answers required. I'll ask in the comments now.
37.79%
Partially. There are still questions. I'll write in the comments now.
15.64%
Voted: 569
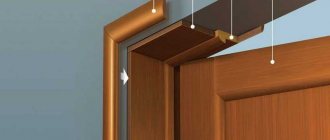
Box assembly
Most often, the timber for the box is supplied in the form of separate parts that you will need to connect yourself. The door frame is assembled on the floor. To properly assemble the frame, you need to prepare the parts.
Measure the width and length of the canvas. For the door to move freely, you need to make allowances of 5-6 mm when marking the frame parts. This will make it possible to leave gaps between the box and the canvas.
To install the top strip of the box, the ends of the vertical elements need to be processed:
- measure the thickness of the top crossbar at the protrusion location;
- set aside this value from the end cut of the side;
- make a cross cut of the part of the sidewall protruding into the vestibule along this line;
- Using a chisel, cut off part of the material from the end to the cut, leveling the surface of the profile.
After such preparation, you need to try on the cross member to the cut of the vertical sidewall. If the thickness measurement was not made accurately, a gap will form between the edges of the parts. It needs to be eliminated.
Determine the hinge side of the box and mark the hinge locations at a distance of 20 cm from the top and bottom edges. If flat hinges are chosen for hanging the door, make a recess in the narthex. The dimensions and depth of the notch depend on the dimensions of the loop card. When marking the recess on the box, you need to make sure that the hinge pins are directed upward. The hinges can be fastened immediately or you can leave this part of the work for later. Place the door leaf in the frame and mark on it the locations of the hinge parts.
Connect the parts of the box into a U-shaped structure. Use self-tapping screws for connection. They must be screwed through the plane of the vertical parts into the end of the top bar. In order to avoid cracking of the box profile, first make holes at the screw installation sites with a 3-4 mm drill.
The uprights of the interior door frame have a length reserve (about 5 cm). After connecting the parts, you need to measure the opening again and cut off the excess length of the bars. If a wooden box is assembled with a threshold, then it is necessary to prepare the lower ends for installing the crossbar at the bottom, as indicated for the upper strip.
Why jambs bend: all the reasons
You know that door frames are made of wood. And, as you know, wood perfectly absorbs moisture. Of course, the outside of the jambs is varnished. And this, in theory, should protect the material from water. But the fact is that the varnish perfectly allows moisture to pass through.
The result is the following diagram. By absorbing moisture, the tree increases in size. And when it gives it away, its size decreases. The process is natural - but unpleasant.
Installation of jambs
Since wood has a non-uniform structure, it both increases and decreases non-uniformly. As a result, the jambs bend.
This is the main, only and main cause of the problem. How to solve it? Yes Easy! The jambs should be properly secured. Then they will remain in their place in any case, even when exposed to external factors.
Installation
If the work is done without an assistant, it is more convenient to mount the frame without the door leaf and hang the door later. With this method, the frame needs 1-2 spacers, which can be cut from a block or other available material. To prevent the ends of the spacer from damaging the box lamination, wrap them in fabric.
Step-by-step installation of the box is performed as follows:
- Raise the frame and install it in the opening. If the door does not have a threshold, then you need to leave a technological gap between the end and the floor. Its size is 1.5-2 mm. You need to place wood chips of this thickness under the edges of the box.
- To fix the box, drive small wedges between it and the wall in the upper corners (side and top). Check the structure for verticality and horizontality, and for compliance of the edges with the plane of the wall.
- Install a spacer across the opening. Secure the box with wedges next to it.
- Drill holes at two points on the sides to secure the door to the wall. Use a hammer drill to make holes in the concrete and drive capsules of dowels or anchors into them. Screw in the fastening screws.
- Fill the gaps between the frame and the wall with polyurethane foam. Before this process, it is necessary to cover the frame with wide construction tape, since foam can get on its surface. Fill gaps to ½ of their depth: foam expands greatly. It will take 24 hours to cure. The spacer wedges must be cut or removed.
If the width of the box is 3 cm or more less than the opening, then additional installation will be required before installing it. These are bars of the required thickness, which are secured with dowels to the wall inside the opening. After this, install the frame of interior doors with your own hands according to the above instructions.
How to securely fasten a jamb? Tips for everyone
Experts offer a number of tips:
- first step: insert the frame into the opening. It must be made of metal. And then foam it;
- Mechanical fastening of the jamb must be done at five points. If you neglect at least one of them, then the door will subsequently become difficult to close. Or other, not the best consequences will arise;
- if the door is double-leaf, then it should be secured at six points;
- if flexible plates are inserted into the opening, they should grip the wall.
Hanging an interior door
Installing the canvas and carrying out finishing work is much easier than fixing the box in the opening. The home master needs to do the following:
- attach hinges to the frame and canvas;
- hang the door and check its progress;
- install handles and latches;
- perform finishing work.
Installing hinges
To install mortise hinges, recesses on the box must be made before assembly. You can attach the halves of the mechanism after installing the box in the opening. The hinge parts with the pin are attached to the door jamb in the prepared recess so that the pin points upward.
A notch is made on the canvas according to the markings and another part of the loop with a capsule for the pin is attached there. Its hole is directed downwards. Both parts are fastened with self-tapping screws.
If permanent loops are used, they must first be secured to the canvas. Fastening to the frame is done at the moment of hanging the door. A recess is not made for such hinges, since the parts of the cards fit into each other and the gap between the canvas and the box is enough for their installation.
When hanging an interior door, you can also use screw-in hinges. They are fastened using pins, for which holes are drilled with a diameter less than the thickness of the threaded pin. The hinge parts are screwed into the canvas and the box.
After hanging, you need to check the movement of the door: it should remain motionless and fully open, and half-closed or closed. If the canvas moves spontaneously, you need to adjust the hinges by tightening or loosening the fasteners.
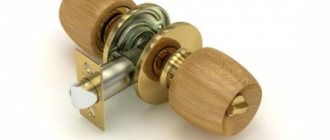
Handle attachment
For this part of the door trim, you may need a drill with a cutter attachment with a diameter of 5 cm. If the handle does not have a locking mechanism, and the fastening is a threaded pin, you need a drill of the appropriate diameter. The overhead handles are attached to self-tapping screws.
Under the handle with a latch, you need to make a through hole in the canvas and a recess in the edge part for the tongue. Insert the mechanism, install decorative trims. Place a mark on the door frame where the tongue should fit into the lock groove. Use a chisel to make a notch and attach the cover to the screws.
For the handle, a through hole is drilled on the pin in a convenient place in the door leaf. Remove 1 part of the double structure and pass the pin through the canvas. Decorative overlays are put on the reverse side and the handle is screwed on.
The overhead fittings have standard holes for fasteners. You need to screw the screws into them and tighten them.
Installation of platbands
Before starting work, you need to cut off the foam protruding from the gap between the wall and the frame. Make 45° cuts at the top ends as follows:
- Carefully measure the length of the vertical strip of the box from its bottom end to the inner corner of the opening.
- To this value add the width of the casing and another 2-3 cm in case the cut needs to be adjusted.
- Measure a 45° angle using a protractor or use a miter box and saw off part of the upper end of the sidewall. On the other side of the door, the side panel needs to be sawn off in the opposite direction.
- At the top casing, you need to make an oblique cut at both ends. Its length must be accurately measured as the sum of the width inside the opening and 2 measurements of the width of the platband. The cuts are made from the upper corners of the ends at 45° into the opening.
- If everything is carefully measured and neatly cut, then the trim strips will meet in the corners without a gap. If available, you can adjust the cutting line. Cut off the excess length on the sides from the bottom at a right angle.
Attach the prepared platbands to the box, covering its cut and part of the wall. Fastening is done using small nails. Their caps can be removed with wire cutters, and the fastening will be invisible.
Errors that prevent you from performing high-quality fastening
There are errors that lead to poor fastening. Take them into account and try not to do:
- You cannot attach the block only to polyurethane foam because it is unreliable. Foam is an elastic substance and cannot prevent bending;
- foam itself can be a problem. This may cause bending. Everything is very simple - if it lies unevenly somewhere, this provides a bend.
Even professional installers often attach blocks to three points, and not to five, as we advise. This is bad because then the entire lower part of the jamb will be loose, which is why the fasteners bend. So listen to us and don't make mistakes.
Double doors often lack fastenings between the hinges. This is a mistake that should not be made. Be sure to add another fastener between the loops.
The flexible plate must be fixed to two walls. If it is attached only on one side, nothing good will come of it. There is no reliability with such a door. Not only will the jamb bend, it can also turn like a screw.
Strength class
When purchasing anchors for installing a metal door, few people think about the quality of their manufacture. However, the composition of steel plays one of the main roles in the reliability of the entire structure.
The exact designation of the strength of bolts and anchors is regulated by state standards. The properties listed in it depend on many factors, for example, the grade of steel and the heat treatment of the workpieces. Let's look at the most popular strength classes and their key characteristics:
Connecting planks at an angle of 45 degrees
As in the previous case, before installing the door frame intended for an interior door, the structure is assembled on a flat floor base. The elements of the box frame are laid out on a plane, preliminary measurements are taken, and calculations are made. The structure is assembled from two vertical profiles, a lintel, a rebate and a hinge post.
The height of the vertical slats of the frame is equal to the height of the door leaf + the thickness of the lintel + 2 gaps between the slats and the wall (3 mm each) + the thickness of the threshold (if any).
The length of the threshold with a jumper is calculated in the same way. It is equal to the width of the door leaf + the thickness of the vertical frame slats + 2 gaps between the frame and the entrance wall (3 mm each).
Peculiarities
The door block serves as a remarkable interior detail. Additional accessories are added to it.
Pen
The handle is part of the necessary functionality. It emphasizes the finished look of the entrance block. It is selected in accordance with the appearance and material of the canvas.
Door handles are classified by type:
- Push - control the lock latch. They consist of two parts, fixed on both sides of the canvas. Push-type ones also include rotary rounded ones.
- Stationary (staples) - not functionally connected to the lock.
- On the bar - the most universal and common in modern door blocks.
The handles are secured to the door leaf with screws and self-tapping screws. To ensure secure fastening, screw the self-tapping screw into ⅔ of the door material.
How to correctly position a horseshoe over the canvas?
Decorative plastic and other horseshoes are fiction because they are not charged with energy. Inside the home, amulets are placed with their horns facing up, which symbolizes a full cup accumulating good luck. On the outside, the horseshoe is secured with its horns facing down, as a talisman against evil spirits.
In modern homes, such talismans are attached to decorative strips above a metal door or at the top of the door leaf.
The accessory is secured using self-tapping screws into pre-drilled holes or with special glue.
Mirror
A mirror is an important element of the hallway interior. At first, the idea of placing life-size mirrors on the front door was due to the lack of free space in the corridor. Now it has turned into an original design solution.
Advantages of a mirror panel on a door:
- Visually lightens the massive structure.
- Visually increases the space of a corridor or hallway.
- Reflects light, increasing the level of illumination.
- Brings an element of originality into the interior.
Disadvantages of mirrors on entrance doors:
- Weighting of the door panel, not designed for the strength limits of the awnings.
- The fragility of a large-area mirror plate.
- The quality of conventional mirror coating on glass is not designed for vibration loads.
- Increased level of contamination of the mirror surface.
When attaching mirrors to the front door, the following factors are taken into account:
- When hanging a life-size mirror of large thickness, it is necessary to replace the canopies with reinforced ones due to the significant weighting of the door leaf.
- Vibration loads on the mirror when opening and closing the door.
- Reserving space for fittings, etc. - 20 cm from the end of the door.
Special requirements for mirror fabric:
- the mirror is made of impact-resistant tempered glass;
- the thickness of the mirror is selected optimally to prevent an increase in the weight of the sash;
- a thin mirror sheet should not distort the reflection.
Methods for attaching a mirror plate to a door:
- Mechanical . Fastening is performed:
- brackets;
- staples;
- profiles;
- self-tapping screws with silicone inserts.
- Glue. Used when the mirror surface area is no more than ¼ sq. m. with help:
- double-sided tape;
- construction adhesive “Liquid nails”;
- glue for mirrors "Soudal";
- using a combined method (glue and double-sided tape).
When attaching a mirror to a metal door, use a gasket that compensates for vibration loads:
Mechanical fastening is carried out using self-tapping screws into pre-drilled holes.
Additions to the iron base
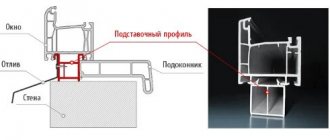
Additions are designed to bring the doorway to the required size when the thickness of the door block does not match the doorway.
Additional panels are produced by:
- Plain , finished with edge tape. Selected strictly according to size.
- Telescopic , having tongue-and-groove connections. The width is adjustable.
What to attach the extensions to depends on the size of the mismatch of the door block. Additional strips are fixed:
- On foam - the simplest method with fastening with polyurethane foam after installation and wedging.
- For nails - with preliminary drilling of holes, securing the finishing nails in them with the points outward. Extras are driven into them.
- Self-tapping screws are the best way to attach to a metal door.
- With expansion - if there is a large expansion of the doorway. It involves installing an additional block before installing the door block itself.
When installing the entrance block, serious installation measures are carried out. Anchor connections eliminate the need for welding. They make it easier to dismantle the door frame without disturbing the integrity of the structure to replace or correct the geometry of the door section. Fastening the fittings is facilitated by the presence of modern hardware.
The most important step in installing a door is attaching the door frame to the wall - the video below will confirm this. Weak fasteners, non-compliance with the level and other installation errors can lead to the fact that the leaf will not fit into the frame or the door will open randomly. In the worst case, the entire structure will simply fall.
We invite you to explore several installation methods and choose the one that seems most optimal to you in your situation.
Seal the seams
Hidden installation is called so because the structure does not have platbands. The installation seams are sealed with plaster and wall finishing in such a way as to hide the foam, plates, and all gaps after installation.
There are a number of important features that we strongly advise against skipping or ignoring.
- We process the aluminum box. For reliable adhesion (adhesion is the adhesion of dissimilar surfaces at the molecular level), we apply “concrete contact” to the surface of the box that will come into contact with the finish.
Concrete contact is a liquid mixture, sold in a hardware store, that acts as a connecting element between a smooth surface and finishing materials. It is easily impregnated into concrete, brick... what is important for us is metal. As a result of this finishing, the surface of the box becomes rough, which reliably fixes the plaster, tiles or wallpaper.
At the time of processing the box with concrete contact, it is important to stop dusty construction work so that construction dust does not settle on the surface.
- We cover the perimeter of the box, with an overlap on the wall, with reinforcing tape. Plaster fiberglass mesh - serpyanka.
Preparing a hidden door for plastering work, laying out the reinforcing tape
- Apply polymer cement starting putty.
This type of putty contains reinforcing microfibers, which improves the elasticity of the solution and forms a strong base and bond throughout the entire volume and perimeter. The starting putty will provide strength and prevent the possibility of shrinkage and cracks.
What is the fixation used for?
The reliability of the entire structure depends on fixation to the load-bearing wall , which is why it is important to know how to secure a metal entrance door. Types of fastenings:
- One-piece:
- “grip” fastening;
- reinforcing rod.
Anchors are used:
- Mechanical:
- wedge;
- mortgages;
- driving;
- spacer;
- frame;
- façade;
- hairpins;
- springs;
- ceiling;
- bolts with hook or ring.
- Chemical:
- For interior and exterior use;
- vibration-resistant;
- monolithic fastener;
- for thin-walled and loose bases;
- for long-term use.
- For foundation construction.
- Plastic.
- Height adjustable.
- Ground.