Brick has been and remains one of the main building materials. Master masons acquire the skill of high-quality masonry over the years. But this does not mean that it is impossible to lay out a smooth and beautiful wall without appropriate training.
Special devices for bricklaying greatly facilitate the work of non-professionals (and professionals, in general, too). Such frames are available for sale in various versions. But you can make them yourself, using a minimum amount of materials, tools and time.
The mason's toolkit is quite diverse, but consists of fairly simple devices. All of them are divided into several groups:
- Hand (trowels, hammers, etc.).
- Control and measuring (plumb, level, mooring).
- Mechanized (various types of solution dispensers).
Some of them are easy to make yourself, others will have to be purchased. It all depends on your needs and capabilities.
In private construction, there is not always a need to purchase professional tools. In most cases, you can get by with well-thought-out homemade products that will better meet the requirements of a particular type of work.
Making a template
The template can become a very useful and effective device for quickly laying bricks.
You can do it yourself. Of course, you can purchase ready-made models at a hardware store. As a rule, such products have the ability to adjust all dimensional parameters. If you want to save money, then it is better to start making your own template. First, you should focus on the basic geometric parameters of the masonry joint (meaning height and width). In this case, much depends on the material used in construction. Based on the laying technology and the blocks used, the dimensions of the template niche are determined.
To build the template you will need:
- a plastic box of appropriate size (or a sheet of plywood);
- pencil;
- level;
- ruler;
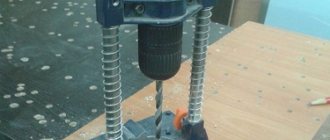
- drill (it is better to use an electric tool - working with it is more convenient and faster);
- fasteners;
- special steel corners;
- screwdriver;
- screwdriver;
- hammer.
If you were able to find a suitable plastic box, then making the template will be much easier
In addition, plastic itself is a more durable and strong material, but at the same time quite light, which is very important when carrying out masonry work. If you don’t have such a tank, then you can make a model of the required dimensions yourself from laminated chipboard sheets, plywood or slats
The design must consist of several main components.
- Frame with longitudinally arranged wooden walls. The space between the wooden planks should correspond to the thickness of the wall. Since these planks will have lower parts protruding forward, they will be convenient for aligning the bricks during laying.
- Handles for carrying. Thanks to these details, using the device will be much easier and more convenient.
- Cross parts. They are mainly made from special strip steel. This element makes it possible to control the linearity of the masonry.
Basic tools for quality wall construction
It is impossible to build a structure with just one template. This will require water, sand, cement. With their help, a mortar is made for laying the wall being built.
Naturally, a brick is also needed as the main element with which it is created. At the same time, builders must be provided with the following tools:
- A template is a universal tool that allows even a less experienced builder to lay bricks efficiently. A single template or a set of several standard sizes can be used.
- Construction corner, level, measuring tools to help maintain the verticality and linearity of the masonry.
- A construction bucket is used to supply a mixture of cement, sand, and water to the work area.
- A pick hammer is used to level or separate individual stone blocks.
- The trowel is used to distribute the solution over the surface of the layer being laid.
The use of all of the above tools together with a template will allow even not very experienced builders to build a brick structure with sufficient quality, subject to all building codes and regulations.
This device is used as follows.
//www.youtube.com/watch?v=VANRmDmWptM
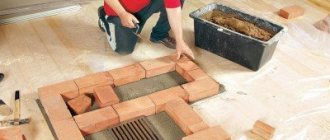
First of all, the device is placed on the ground. Then bricks are placed into its cells formed by metal strips. Using a winch or any other lifting device, the filled structure is raised to the desired height. After this, it is installed so that the protruding parts of the planks capture the bottom row of masonry. Then the mortar is applied and the bottom brick from the template is laid on it. The device is moved the length of the brick block (approximately) by the handles, and then the entire procedure is repeated until the template runs out of bricks. After this, the whole process is repeated.
The use of templates allows you to slightly speed up the pace of construction work. When making such a device yourself, you can usually place 5-6 bricks in it. This is done in such a way that no more than 2 people can be used to use the device.
The template refers to devices that facilitate the construction process. Therefore, its use is recommended for both novice builders and skilled craftsmen.
//www.youtube.com/watch?v=OxgNPQPxZC4
It is not difficult to learn how to operate this device. This will take 2-3 hours. You just need to take into account safety precautions during construction work and comply with all provisions of SNiP.
DIY making
Many hardware stores offer various kits. However, sometimes it is difficult to find something that would fully satisfy the needs of the master. Therefore, many take on the task of making the necessary tools themselves.
To make a level, just find a good metal cylinder, preferably with a sharp conical nose, and tie it to a thin, strong cord. A long, straight strip or board is ideal for checking the evenness of the wall. For convenience, a handle is placed on it in the middle part.
The more difficult situation is how to apply an even layer of mortar to the next row. To do this, make a template for brickwork.
Here is a step-by-step diagram of its manufacture:
- Prepare materials for work and tools.
- A frame is made from slats. Its width should be such that it fits tightly onto the brickwork of the wall being built. To do this, the longitudinal strips should protrude 5-10 cm compared to the transverse ones.
- The cross-bars are made equal in height to the height of the applied layer of solution. For a brick wall of one and a half bricks, this is 10 cm.
- For convenience, handles are nailed to the sides.
- To protect against corrosion, the product is coated with parquet varnish and cleaned regularly after use.
This is interesting: how to use a water level correctly.
The use of simple devices greatly facilitates the work of a mason and helps to make the result of his work better and more reliable. Having spent a little time and effort purchasing such equipment, a novice master will be able to master the basics of the art of bricklaying much faster.
Adviсe
- When making a template, it is advisable to immediately lay down a seam thickness of 10 mm. One is ideal for laying walls of one or one and a half bricks.
- To ensure that a wooden or plastic template lasts as long as possible, its most worn surfaces can be protected with wear-resistant parquet varnish. The composition is applied in several layers on the surface of the dispenser.
- After completing the work, all tools must be regularly cleaned of the construction mixture, otherwise they will very quickly become unusable.
Important: the time or money you spend on making auxiliary tools is more than compensated by the quality and speed of masonry work.
How to work with a template? Price of sets.
The set is easy to use. The main template is installed on the already finished row of bricks. Thanks to the presence of stops in its design that prevent movement across the wall, as well as the fixed thickness of the seam, the device ensures horizontality and stable layer thickness. Naturally, this is only true if the supporting (previous) row of bricks is made carefully and accurately. The frame cavity is filled, as a rule, with a trowel, although any suitable tool can be used - a spatula or scoop. The end dispenser is most often filled with a trowel, since the volume of solution that is enough to fill its cavity is small.
https://youtube.com/watch?v=oZruyWJrQL8%3F
Using the kit is intuitive, and anyone will quickly get used to working with it. It must be remembered that the use of the kit does not exclude masonry quality control using levels, plumb lines and mooring cords. The template only helps to obtain a high-quality seam and you should not rely only on it when controlling the geometric parameters of the masonry.
There are several advantages of such sets:
- it becomes possible to quite accurately calculate the required amount of solution;
- materials are used to greater advantage;
- the quality of the seam is good even for an inexperienced person;
- simplicity and ease of use;
- the speed of work increases noticeably.
The price of a set of masonry templates is low - the set is available to everyone. The original “Brick” set costs about 1.5–1.6 thousand rubles; there are also cheaper analogues that sell for 500–650 rubles.
Cost of factory products
If we are talking about large volumes of work, it is better to buy devices manufactured at the factory. Most often they are sold as a set, for example, the “Brick” or “Bricklayer” set includes the following elements:
- Templates for laying out the mixture on the bed;
- Trowel;
- The shape of the wall is one and a half bricks – 88 mm;
- The shape of the wall is one brick – 65 mm;
- Angle – allows you to check the angular parameters of the wall; the mooring is attached to it;
- Operating instructions, most often in video version.
The “Brick” set is used for laying the mixture on a horizontal row
On average, such a complex will cost about 1500-1900 rubles per set. The main advantage of such kits is high-strength plastic, which is designed for long-term use.
The finances spent on the purchase of factory devices or your own time and costs for materials, inevitable in the manual production of additional devices, are always justified by speeding up work, increasing quality and saving on binding materials.
Properties, sizes and types of bricks used for cladding
Material used for cladding
To decorate the interior or facade, you need to pay great attention to how to lay facing bricks. If we compare, for example, with a working solid brick, then it should have a high-quality front side of various shades and colors
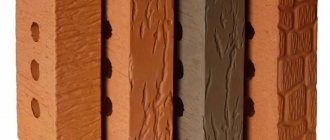
In addition to the commonly found standard colors (yellow and red), you can choose bricks in other colors. The front part can be smooth or decorative.
But the main difference between the cladding material and the simple one is the ideal dimensions, ends and right angles. The front side should not have various chips or deformations.
Main assumptions in dimensional deviation, in mm:
- length – 4.4;
- thickness – 2.3;
- width – 3.3.
There are simple and clinker bricks for cladding; they are also distinguished by durability and quality. Simple water absorption is much higher, which is due to the large number of pores. Double sand-lime brick M 150 is often used.
Main dimensions of facing (decorative) bricks, mm:
- ordinary – 250 X 120 X 65;
- narrow – 250 X 60 X 65;
- thickened – 250 X 120 X 88; 250 X 107 X 65; 230 X 107 X 65.
Cotton mason's cord. twist 3.0mm, 20m
We deliver goods directly from partners from all over Russia. These products are not presented in stores and are only available for ordering on the website.
Art. 11259376 In the shopping list In the shopping list In comparison In comparison
Characteristics
Prices and availability may vary. Please check the exact cost and availability of goods in stores.
Reviews
Cotton mason's cord. twist 3.0mm, 20m in Moscow
Cotton mason's cord. twist 3.0mm, 20m and other products in this category are available in the catalog of the Leroy Merlin online store in Moscow at low prices. Read the detailed characteristics and description, as well as reviews of this product, to make the right choice and order the product online.
Buy products such as Mason Cotton Cord. twist 3.0mm, 20m, in the Leroy Merlin online store, after checking their availability. You can receive the goods in Moscow in a way convenient for you; to do this, read the information about delivery and pickup.
You can always place an order and pay for it online on the official website of Leroy Merlin in Russia. For residents of the Moscow region, we not only have low prices for products such as “Cotton mason’s cord. twist 3.0mm, 20m", but also fast delivery to cities such as Moscow, Balashikha, Podolsk, Khimki, Korolev, Mytishchi, Lyubertsy, Krasnogorsk, Elektrostal, Kolomna, Odintsovo, Domodedovo, Serpukhov, Shchelkovo, Orekhovo-Zuevo, Ramenskoye , Dolgoprudny, Pushkino, Reutov, Sergiev Posad, Voskresensk, Lobnya, Ivanteevka, Dubna, Yegoryevsk, Chekhov, Dmitrov, Vidnoye, Stupino, Pavlovsky Posad, Naro-Fominsk, Fryazino, Lytkarino, Dzerzhinsky, Solnechnogorsk, Istra and Zhukovsky.
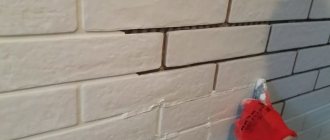
How to grout masonry joints
Brick jointing is required when restoring old walls. The technology may be associated with the execution of jointing in one color. Very often the mixture differs in color in different areas.
First, the surface of the dry mortar is cut to a depth of 1-1.5 cm using a hammer and chisel. After this, all its remains are removed. Cleaning should be done not only at the seams, but throughout the entire masonry. In order for the treated surface to look beautiful, the wall should be cleaned of dirt before grouting.
You can simplify the task if you blow out the cracks using a compressor unit. This will remove even the smallest crumbs and particles so that the fresh joint has the best adhesion. To prepare for the procedure, you will need a sharp, reliable instrument. This is the only way to remove excess mortar from the surface so as not to destroy the brickwork.
Next, all seams should be moistened with water and the jointing procedure should begin. There is no need to moisten the entire surface at once, since you can limit yourself to a small area that will need to be addressed in the next 1.5-2 hours.
In the store you can purchase ready-made grout or dry grout, to which pigments or plasticizing additives have been added.
When choosing a solution for jointing, you need to pay attention to its base. The seam can be processed using the following types of materials:
- cement;
- epoxy resin.
If you prepare the mixture yourself, then such a composition will be inexpensive. The simplest material used for grouting joints is a solution prepared from 2 parts of lime and cement, taken equally. You will also need fine sand in the amount of 10 parts. You should not mix too much of the composition, since its pot life is about 90-120 minutes.
For another recipe, recommended by experts, you will need to prepare ground volcanic traces and 5 parts of sand, which will serve as a filler. This composition is suitable for treating walls that have efflorescence and whitish stains from the seams. The prepared solution must be stirred until it has the consistency of liquid sour cream
It is important that it does not spread, but stays in a lump on an inverted trowel
What composition can be used for masonry
Before laying brick, prepare a high-quality mortar. It must firmly hold together individual fragments and rows of masonry. The following compositions can be used in it:
- lime; cement; simple; complex.
Lime compounds are used infrequently.
Many individuals are confident that they are the most reliable, but this opinion is erroneous. Lime mortar often requires a frame for installing fences and partitions. This composition can be prepared using quicklime and sand. These components must be mixed until smooth, then add water. Mix the resulting mixture thoroughly. Make sure that there are no lumps or foreign impurities in the lime mass. Cement mortar is the most popular. It is prepared from a mixture of construction cement and sand of medium or small fraction.
The proportion of the solution will vary depending on the brand of cement. The preparation of this solution will begin by mixing the dry mixture. Then gradually add water in small portions. Then mix thoroughly until smooth.
However, this type of mixture is not always suitable, since it may turn out to be too hard or too strong. It is best to use a cement-lime mortar. It consists of lime and cement respectively. The process of preparing cement-lime mortar is as follows: first you need to dilute the slaked lime to the state of “thick milk”; then pass the resulting slurry through a sieve; then prepare a dry mixture of sand and cement, which must be filled with lime “milk”. Masonry with cement -lime mixture can be used everywhere. Tip: adding lime significantly increases plasticity. The next type of mortar for masonry is simple.
It is prepared from a binder component and sand. Cement or ordinary lime is used as a binder component. Sometimes it is advisable to use clay as a binding component. However, a mixture with clay is not suitable for all masonry. A simple solution must be prepared in certain proportions. As a rule, this is one third of cement to one part of sand.
The resulting solution must be mixed and then added a little distilled water. It is better to stir with water until the mixture becomes sufficiently dense. Another installation solution is called complex. Such a mixture is a combination of a binder material and several components that have a certain physical effect on building materials.
Complex mortars include cement-clay-lime and cement-lime mixtures. Clay is added to the composition of such mixtures so that the mortar is plastic and does not fall apart during the laying process. Sometimes it is advisable to add plasticizers. Most often they are used when laying facade walls.
Recommendations for laying facades
How to lay brick under jointing
Let's figure out how to lay facing bricks correctly?
- For proper facade cladding, make vertical shrinkage and expansion joints on the wall every 4-5 meters along the entire height of the building.
- It needs to be dried for as long as possible.
- The rows are first laid dry to identify non-standard products.
- In the first row, the bricks are laid vertically. Such a row is made from whole products from below and above the wall, also on protruding parts, at the level of cut pillars and walls, under the supports of load-bearing structures (load-bearing slabs, beams, etc.).
We also recommend laying a row of vertically laid bricks every 4 horizontal ones.
After 3-4 rows, be sure to connect the load-bearing and facing walls with reinforcing mesh with a diameter of 2-3 mm, and the corner elements with anchors with a diameter of 6 mm.
- Seams - no more than 1.5 cm thick.
- Do not allow moisture to get on the material during work or on the finished wall. The top of the wall is covered with moisture-resistant material.
- To prevent the building material from getting wet, the laying is done using a hard mixture.
Brickwork under the template
Place a brick under the template
A layer of mixture having a thickness of 0.8-1.0 cm is laid so that about 1 cm remains to the front edge of the brick - it is placed under a template (a wooden strip 600 mm wide and 0.8-1.0 cm thick, which has there is a longitudinal protrusion at the bottom. This protrusion rests on the façade side, and the mixture is laid on it.
Today, a template for laying facing bricks is most often a calibrated metal rod (laying on a rod) with a square cross-section. The solution is made thick so that it does not spread under the weight of the building material.
The mortar is also fixed on the narrow edge of the brick: it is placed vertically on a horizontal surface and a cement-sand mixture is applied to it under the template, after which it is divided with a trowel between adjacent bricks and laid in a row of masonry.
Automatic mason's hammer
High-quality work on the construction of brickwork requires a high level of skill of the mason. In order to simplify installation work on bricks and make such work accessible to inexperienced builders, automatic hammer models have been developed for laying regular or facing bricks.
The product is equipped with two laser levels that evaluate the correctness of the laying, and an electric hammer itself, which receives signals from the levels and knocks the bricks to the required position. To do this, the mason sequentially places the product on each of the corners of the brick, horizontally and vertically. The automatic hammer system evaluates the current position of the building block and strikes the surface until the ideal position is achieved.
The battery charge of such a product allows you to install up to 300 bricks, ensuring an increase in worker productivity up to 5 times.
Sequence of the jointing procedure
Before preparing the grout, you must read the product instructions on its packaging. After this, you can begin making vertical seams. The composition must have the following properties:
- softness;
- plastic;
- density.
If the grouting solution is made liquid, it may flow through the masonry. Having made all the preparations, you can begin to carry out the work. To do this, you need to perform a series of basic steps:
- Use a trowel to apply a layer of grout so that it is larger than required to fill the joint. To prevent the bottom row of bricks from getting dirty, you can use a plasterer and place it in the right place.
- Remove excess mixture with a rib, smoothing the surface with the most suitable hand tool.
- Press down each seam firmly so that the space between the grout and the old mortar does not have any voids.
- Process horizontal rows using a strip, under which you will need to draw a straight line, like under a ruler.
- After completing the jointing of the brickwork, its front side will need to be cleaned of traces of mortar using a stiff brush.
- While the mixture is gaining strength, care must be taken to ensure that it does not dry out or get wet in the rain.
The special jointing used after the solution has set can be replaced with a piece of hose. Each seam should be smoothed and compacted slightly, pressing the compound 2 cm deep if necessary.
After summing up all the results, it is necessary to take into account some additional points, without which the jointing will not be of high quality:
- carry out the procedure in cloudy weather when there is no precipitation;
- start jointing with vertical rows.
The main advantage of jointing is considered to be an increase in the heat and sound insulation parameters of the wall. The jointing procedure allows for a high level of protection of the masonry joint from the influence of moisture on the wall surface. Brick laying under jointing is not only easy to use, but also durable when compared with a plastered surface.
The main purpose
Bricklaying is a very responsible job. Not only the beauty of the future structure, but also its strength and durability depends on it. Therefore, when building walls, you cannot do without precision instruments. Many people decide to lay bricks with their own hands. The devices that help them with this must be available and in good condition. The necessary tools are divided into 3 groups:
- Basic, or main.
- Control and measuring.
- Mechanical.
These include:
- Trowels or trowel. These are special blades of various shapes for applying and leveling the solution.
- Joining is a device for checking and aligning masonry seams.
- Hammer-pick. Fitting and splitting bricks into halves cannot be done efficiently without this tool.
In this video we will look at a device for laying bricks:
The second group is no less important. Without it, it is unlikely that you will get a high-quality wall. Only very experienced masons can afford to work without measuring instruments, and even then only on frivolous objects. This group includes:
- Plumb. This is a very simple device, but without it it is unthinkable to build a perfectly vertical wall.
- The level is one of the most complex construction devices. Used to check horizontal planes and lines.
- A pier is usually a simple cord that is pulled to align the next row of bricks.
- Ordering is a template for laying bricks of different designs. It is used to control the quality of masonry. This tool can be used by different rulers, squares and their modifications.
The third group includes more complex devices for laying bricks.
Here are some of these tools:
- Cuvette. This device helps to evenly distribute the mortar onto the next row of bricks.
- Dispenser order. A tool for laying a certain number of bricks. Typically has vertical and horizontal scales and clamps for secure attachment.
- Complex dispenser. This is a modified complex device that combines most of the necessary tools for work.
Without good tools, the final result of the work will be poor or completely unusable. If we allow irresponsibility in this matter, a situation may arise that is dangerous to the health and life of those who will use the building.
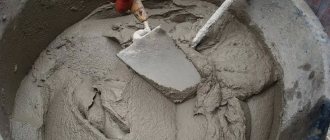
Cement mortar as the basis of brickwork
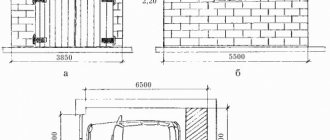
Brickwork diagram: a - leveling the mortar, b - spreading the mortar.
Separately, it is necessary to say about the cement mortar; it should be a little hard, that is, not contain too much water in its base. A standard solution involves using one part cement, three parts sand and two parts water. In our case, a little less liquid is needed, otherwise the ready-made solution poured into the template for laying bricks will not be able to take shape, but will simply flow out of it. In addition, the best option is to use a concrete mixer, which will perfectly mix all the components of the solution and create a product with an ideal consistency, which is unlikely to be achieved with manual mixing.
Using a template and guide elements, we lay the rows of bricks on top of each other. However, it should be remembered that different types of bricks have their own laying characteristics. Clinker bricks require laying only a few rows per day, since the degree of water absorption of this material is very low, which requires a much longer period of time to impregnate the product. Clay brick has a porous structure and, accordingly, a high proportion of water absorption, which makes it possible to lay this product in a much larger volume.
The main sheet is formed in this way to the highest point, each row being checked against the others and guided using a masonry template. After completing all stages of construction, the finished surface must be allowed to dry for 1-2 days. This time will allow the final shrinkage and adhesion of all components to occur. After this, the wall is completely ready and can be used to perform the tasks assigned to it.
Using order for masonry
Brick is an excellent material that has been used in construction since ancient times.
But its successful use largely depends on the quality of the masonry. To ensure that the brickwork is level, a special device is used - ordering. The order is a strip with divisions that serves as a template for even, high-quality masonry.
The order can be manufactured at the factory, but you can assemble it yourself, observing the basic design principles. It helps control the vertical and horizon level when laying bricks, and speeds up the work, since it takes less time to check.
As a rule, the arrangement is made from a metal corner or wood. The corner is taken with a size of 60x60 millimeters, and wooden slats with a cross-section of 5x5 centimeters. Divisions are applied to the vertical posts of the order according to the thickness of the brick, taking into account the width of the seams, this is approximately 77 millimeters for regular brick (65 millimeters is the thickness of the brick, plus 12 millimeters for the seams) and 100 millimeters for thickened brick (88+12). If a brick of a different size is used, then the distance between the divisions will be different.
The divisions can be marked with serif marks or slits, which are also used to tighten the mooring cord. It will indicate the horizon of the masonry and the cord for vertical correction. The mooring cord is located at the level of the top of the brick in the row; each row of masonry is aligned with it. The order can be from 1 to 5 meters long. It is used in the construction of various objects: walls, fences, stoves, etc.
For ease of work, the order is established from the outside, with divisions inward, so that the mason can navigate along them during the laying process.
The order of the metal profile is placed on the corners of the building or structure and attached to clamps. The end of the clamp is driven into the seam and the screw is tightened. The second clamp is installed in the same way, several rows higher. After laying the tier, the order is rearranged into the upper clamp, and the lower one moves to the height of the next tier. It is better to clean the order from the solution before each move.
Intermediate orders are mounted on straight walls with a difference of 10-12 meters. They are attached to U-shaped metal brackets equipped with a transverse bar. The part is placed in the seam horizontally after 5-7 rows of masonry. The staples are placed one above the other, recessed with the ends and the transverse bar into the seam. When installing, it is important to check the verticality of the order using a plumb line. The location of marks (notches or holes) is checked with a level. When all the parameters have been verified, you can finally secure the order and tighten the mooring cord. To prevent the cord from sagging on the longest sections of the wall, an intermediate beacon is placed under it, on which the cord rests.
As you move up, the mooring cord moves to the upper level of each new row with a distance from the plane of the wall of approximately 3 millimeters. A beacon is laid out at the borders and at the corners of the walls - a refuge fine. It will not only simplify further work, but also allow you to take a break.
Refuge fines are made 6 rows high and are used to attach the mooring cord. Ubezhnaya fine is a laying method in which bricks are laid in a “ladder” with a difference of half a brick. It helps make the dressing more secure. It is used to secure the mooring cord and connect sections of masonry. This kind of fine is especially useful when you need to build an even partition between walls. The mooring at the lighthouses is secured with staples every 5 meters or secured to a nail inserted into the seam.
When all the orders are installed and the cords are tensioned, you need to check them again with a level and plumb line. Further adjustments can be made using brackets and beacons. When working indoors, mooring brackets are usually used instead of ordering. The lower end of the bracket is inserted into the masonry seam, and the other should rest on the lighthouse brick. It is to this part that the mooring cord is attached. The second end is attached to the lighthouse brick on the other side of the masonry. The mooring cord should pass from the bracket to the top plane of the lighthouse brick.
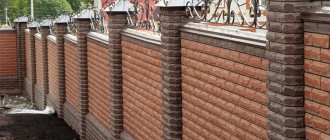
How to properly lay facing material
One of the options for how to correctly lay facing bricks together with insulation
If you want to do the masonry yourself, we would like to emphasize that such masonry is considered very labor-intensive and difficult, requiring special attention and precision. If there is a large amount of work, you will need a partner. And in this case, the price of masonry will increase.
Typically, facade material is laid simultaneously with the construction of the house, and the wall and facing masonry are connected with a special masonry mesh, and insulated inside as desired.
We will consider the option of masonry for cladding after the construction of a building for which building bricks were used. We especially note that the base is made to protrude beyond the wall by no less than 12.0 cm. This distance will make it possible to make a good stop for the wall under construction. In this case, you will have to strengthen and expand the base.
You need to decide on the tools you will need:
- concrete mixer;
- trowels;
- buckets;
- forests;
- threads;
- hammer;
- plumb line;
- a twig 80 cm long with a square section of 10X10 mm;
- round rod for sewing seams with a diameter of 10 cm.
Step-by-step instructions for laying:
- leveling the base;
- layout;
- cladding;
- washing (cleaning).
Joining seams
First, we level the base horizontally with a mortar using a level or building code. Then we lay out the brick dry. This is done to correctly determine where to cut it, and where it is better to place the seams for a better connection in the corners.
In places where there are openings for windows and doors, the rows should not be interrupted, otherwise in the future a similar layout will appear above the door or window. Here the brick is cut.
Next we lay the facing material. The corners are started first. Laying begins from the corners of the building at a height of 4-6 rows. Then the thread is pulled and the lining is done under the cord or thread.
For such work, it is better to use a solution in a ratio of 1:4. If possible, take fine sand from a quarry containing some clay. If you have an assistant, mix the mixture in a concrete mixer; you can also mix it in small portions using a mixer
It is very important to maintain proportions at all times.
The twig must be placed on the edge of the brick, then the mortar is placed just above the twig, which is used as a template for laying facing bricks, and we install it by hitting it with a hammer or the handle of a trowel so that it touches the twig.
When the brick is large and touches the cord, then the twig is removed and placed to the level of the thread. This is the method used to achieve identical seams. If the front side is dirty, clean it with a dry cloth before the solution dries.
It is very important to make the correct connection to the wall. If the wall does not have twigs and mesh for plaster protruding from the wall
Therefore, we attach it to the wall using dowels and a well-bending knitting wire.
How to do it:
- a 6-piece dowel is driven into the wall;
- a wire is screwed to the cap, the length of which should be equal to the width of the brick;
- the ends of the wire should be inside the masonry and not stick out;
- The height is knitted in 4 rows, and the width is 60-70 cm.
Linking can be done in various ways. The main thing is a good connection between the wall and the cladding.
The space between the wall and the cladding cannot be filled with mortar. Be sure to make a gap that contributes to good thermal insulation of the building.
Required clearance for thermal insulation of a building
Openings for doors and windows are made with a column, laying brick on the narrow side. For slopes, if desired, you can use a material of a different color. The seams are unstitched when doing the masonry so that the scaffolding does not move again.
Then the seams are filled with mortar and rubbed using a round rod. At the end of the jointing, wipe the finished surface with a dry cloth. That's it, the masonry is finished.
Application in practice
Even the most experienced masons use many quality control tools in their work. Despite the fact that over many years they have acquired enormous experience, they do not trust their eyes, but regularly check the masonry using precision instruments. It is especially important to use such devices for laying facing bricks, because this type of work requires special care and precision.
Cladding is done to give the building a beautiful appearance. Using special bricks or tiles, not only the outer part of the house is decorated, but in many buildings its internal elements are also decorated. This is a very difficult process. Here are just some of the difficulties that arise during such work:
- The cladding material comes in an unusual configuration. Because of this, difficulties arise with its installation.
- Often the customer requires an original type of cladding, which forces the mason to be very careful and careful. Laying out unusual shapes requires very precise tools.
- The use of solutions with additional components. For example, very often in such cases the connecting mixture is tinted, and this, in turn, requires the master to pay additional attention to the quality of the masonry.
Naturally, when performing such precise work, measuring instruments must be flawless. The more often and more responsibly they are used during construction, the greater the guarantee that the work will be performed with high final quality.
Brick laying for jointing: nuances of the process
Before moving on to directly solving the question of how to lay a brick under the jointing, we will first deal with the question of what it even is. According to many people, a stitcher is a special tool that forms a beautiful facial seam. But many people forget that jointing is a kind of template that allows you to maintain equal distances between individual bricks. In most cases, this tool is the length of half or most of the brick, which makes it quite easy to use for leveling masonry.
The joint is either a thick plate with a curved handle, or a tube cut halfway along the length. The latter option was actively used by masons in the past, and today flat jointing has become widespread, which makes the seam more neat.
Brick laying for jointing photo
So, we’ve sorted out the jointing, now it’s time to clarify the situation with the question of how the masonry for the jointing is done? In principle, there is nothing complicated here, especially if you clearly lay out the first, fundamental row in the level. Let's start with it.
There are several ways to lay out the first row while respecting the horizon, but in most cases experts use only one. Beacon bricks are installed at the corners or edges of the wall - their uniform level can be checked using hydraulics or a laser. A thread is stretched between these bricks, relative to which the first row is laid out.
Now the second row and all subsequent ones. This is where the fun begins - you will have to learn how to apply the solution in a certain amount. This is where you will need the jointing, which can be used as some kind of template. The solution is applied to the previous row in a slide, the height of which is twice as large as the width of the jointing. Then the brick is seated with a hammer, and the seam gap between it and the previous row is controlled by jointing. It is simply inserted into the seam, and the brick is lowered all the way. It should be understood that such control will have to be carried out on all sides of each brick.
How to lay brick under jointing photo
Each brick of the facing masonry is laid in this way. This, of course, may seem difficult, but believe me, after a maximum of several unsuccessful attempts everything will work out in the best possible way. As the mortar dries, it is additionally necessary to cultivate the seams - the jointing is again driven into the seam, and with its help, the mortar in it is smoothed out with a longitudinal movement. Here it works as a spatula. Do not forget that this tool needs to be wetted with water more often, then the solution will not stick to the metal, and the seam itself will remain smooth. And yet, in this way the seams can be given any color. This process is rather similar to grouting tile joints, only it is done much more carefully. After drying, excess mortar or grout is removed with a special brush with wire bristles.
Brickwork for jointing photo
Types of masonry devices
The types of fixtures are selected depending on the size and type of brick. After all, all dimensions must be proportional to the size of the wall or brick. Based on this, we can conclude that the devices can be adjusted to fit one, one and a half or two bricks.
Their selection will also be based on the availability of their sizes. Thanks to this tool, you can even make your own adjustments and nuances to the work process. For example, it will not be difficult to adjust the thickness of the seam, as well as the width of the opening, with the help of which further mortar tape will be formed.
Also, it won’t be difficult to make your own masonry tool. To do this, you just need to select the necessary material that will have durable characteristics, as well as light weight, which will allow you to freely hold it in your hands and manipulate it during work.
With such devices, work will move much faster, and as a result you will get high-quality and practical work that will delight you for many years to come.
Basic tools:
Trowel (trowel)
It is considered the most common tool that is widely used in the field of construction work. It really performs the main function, and is a smooth steel spatula, which is indispensable for a professional. Designed for particularly important functions, it is responsible for leveling the concrete mortar, grouting joints, and also for removing excess mortar from the resulting structure.
Plumb
This is a measuring tool with which the master can measure the angle that is formed during laying. This is a very important point, since all angles must correspond as closely as possible to all calculations included in the drawings.
Cord
This is also an important device, without which it will be impossible to check the height and distance that must be observed during preparation for the main work. Responsible for the correct execution of the work, he checks the height and width of the bricks being laid
Shovel bucket
This is a device of different sizes, without which not a single construction process can be completed. It is used during brick laying. It plays a special role when working with large amounts of cement mortar, which is why it comes in different sizes.
Level
This is a measuring instrument that consists of a durable body. Inside there is a container filled with non-freezing liquid. In addition, inside you can also mark balls of air, with the help of which you can determine as accurately as possible how accurately and correctly the masonry is being carried out, and whether there are any shifts in the horizontal or vertical position.
Joining
This is a tool widely used in bricklaying, especially during those works that require the formation of decor. The joints can be of different sizes, and accordingly, the designs turn out completely different.
Rule
This is an even, smooth strip, thanks to which you can check the surface and measure it, determining how evenly the installation is taking place. This tool is very widely used when checking external masonry.
This is a tool that is used in critical situations when something goes wrong at work.
Order
This is a device with which you can measure the location of the bricks, as well as maximum compliance with each other.
In order for all the work to proceed correctly and the structures to be durable, you should definitely learn how to work with devices for laying bricks and use them only for their intended purpose.
The article above already provided a list of available devices and what they are needed for. For example, to smooth out uneven seams on the resulting structure, you need to use only a trowel or mallet, because these are the tools that are suitable for this work.
To create the correct level and avoid unevenness on the surface, a tool called “Level” is used, because it contains all those edges that will indicate evenness or bends on the surface.
Template for laying facing bricks
Equipment for laying a brick pillar:. Brick pillar laying diagram:.
Half-brick masonry scheme: That’s why I wrote about it, so that knowledgeable people could share their experience! As long as I live, I learn as long as I can: Thanks again for your valuable advice!
Design and principle of operation of bricklaying kits
This template is no better:? The example in this case is not about the seams, but about the brick itself that I want to use for finishing. I agree with you that seams of one thickness are more beautiful.
For professionals, probably no devices are needed at all; for amateurs it will be useful. About wire and square. All the devices are often invented by professionals: And whoever does masonry without them is scary to look at.
Specifics of working with facing bricks
The main function of facing bricks is decorative; it shapes the appearance of surfaces, gives them stylistic completeness, a more harmonious and aesthetic appearance.
due to the specific shape and texture
- the unsuitability of rough hand tools for working with some decorative surfaces;
- special requirements for the quality of control, measurement and adjustment work;
- often - changing the composition of the solution, using tinting and binding agents;
- specific technologies for working with narrow and thick types of facing bricks;
- difficulty of figured masonry.
Here the use of mechanized devices will be more relevant than ever.
However, the general design described in the previous section should be modified to take into account the thickness and shape of the cladding blocks.
For figured masonry, a special, highly specialized class of devices is distinguished, the design of which is developed separately for each specific case and often includes hinged joints, stepper mechanisms and other complex components.
Common Helper Tools
Since the construction of brick houses has been practiced since ancient times, during this time people have come up with many devices to make the work of the person laying bricks easier.
Since the construction of brick houses has been practiced since ancient times, during this time people have come up with many devices to make the work of the person laying bricks easier. This not only makes the craftsman’s work easier, but also improves the quality of the masonry, and also shortens the time needed to construct the walls.
The most commonly used tools for laying bricks with your own hands are:
- The most common and also necessary tool is a trowel. This product is in the form of a smooth steel spatula. Using a trowel, the master levels the concrete mortar, rubs the seams, and removes excess construction mixture from the surface of the walls.
- A plumb line belongs to the category of measuring devices when making brickwork. Using this device, the verticality of the walls is checked, as well as the correctness of the corners. Depending on the length of the plumb line, control over the verticality of the walls can be exercised to a height of several floors.
- The cord is needed to mark the height of the masonry at the stage of preparation for masonry work. You can also use the cord to check whether the work is being done correctly. Typically, such a device is called a mooring, since the masonry being performed must be moored to a tensioned cord. In other words, the mooring cord is used to control the horizontalness and straightness of the masonry being performed.
- A shovel bucket is usually used for mixing mortar, but it is also needed during the masonry process. Using this device, cement mortar is applied to the stone being laid. This product is simply necessary when working with a significant amount of solution.
- Level . This device can also be classified as a measuring instrument. Using a level, you can control the evenness of the completed wall in the horizontal plane. This device consists of an elongated, durable body, inside of which there are containers with non-freezing liquid and an air bubble. Based on the location of the bubble in the container, conclusions are drawn about the horizontality of the masonry. That is, if the level is laid with the longitudinal side on the masonry, then the air bubble should be strictly in the middle of the container. This indicates that the masonry work was carried out correctly.
- A special device designed for decorative seams is called jointing. This product is used for laying facing bricks. Joining not only aligns the seams, but also gives them the desired shape. Depending on the masonry technology, jointing of different shapes and sizes can be used.
- The rule is a lath for laying bricks, which allows you to control the evenness of the facing masonry. Externally, it is an ordinary even and smooth plank, with the help of which the evenness of laying the outer side of the rows is controlled.
- A pick hammer is used to give the stone the required size and in case of errors during masonry. Using this product you can chop off unnecessary parts of bricks or give the stone the desired shape.
- The order is a device that is attached to the first masonry row. With this product you can accurately measure the location of stones and entire rows relative to each other. Quite often, ordering is used when laying facing bricks with your own hands, since with its help you can create various designs and patterns on the outside of the masonry. Also, using ordering, you can mark the locations of window and door openings, as well as other structural elements of the building. Sometimes ordering is used to fix the cord and level the masonry.
Joining and ordering
The skill of rubble masonry is very ordinary; often quite serious demands are placed on the mason in terms of his artistic skill. But don’t think that without many years of practice you won’t be able to achieve perfectly smooth and clean seams. We have already seen that maintaining their constant thickness is very easy with special devices (templates), and the situation is exactly the same with leveling the masonry.
To tension the mooring, it is very convenient to use a tie rod. It is advisable that this device be manufactured at a factory. In this case, the notches will be made strictly with the same pitch, plus the kit will contain everything necessary to securely fasten the rail. For laying walls over 10 meters in length, it is recommended to use additional intermediate row posts to compensate for the sag of the cord.
Working with the improvement of seams is the second component of aesthetic brickwork. A lot of hand tools have also been invented to perform jointing. First of all, these are the jointing knives themselves, of which it is advisable to have two at your disposal: with a convex and concave working surface. It is desirable that the tip tapers towards the end, so you can work with any thickness of the seam. If the jointing is not recessed, it is advisable to have a light, thin strip on hand along which the tool will be guided. Otherwise, a jointing ladle will be sufficient, which is difficult to do without if the seams are filled with a tinted compound. Roller scrapers are also very suitable for simple jointing profiles.
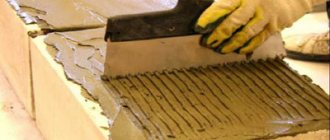
Homemade device for obtaining even masonry
To improve the quality of masonry work and speed it up, you can make a special template for masonry
To improve the quality of masonry work and speed it up, you can make a special template for masonry. Externally, this product resembles a wide container without a bottom. Using this device, you can easily apply a perfectly even layer of solution. As a result, the masonry process itself will be much easier.
The following characteristics of the masonry depend on the evenness of the mortar application:
- If you lay the stone on a very thin layer of mortar, the adhesion of the bricks will not be strong enough.
- A layer of masonry mortar that is too thick will lead to overuse and unsightly, uneven masonry.
- If the solution is applied in an uneven layer, the outer side of the masonry will look sloppy due to crooked rows.
You can avoid all these disadvantages of incorrectly applying the solution using a template. Externally, this is not just a container without a bottom, but a product with restrictions on the sides that allow it to be firmly held on the wall. The dimensions of the template can be very different and depend on the masonry being performed and the stones used.
You can pour the solution into the elongated hole in the central part of the device.
The template is laid on top of a row of bricks. The solution can be placed into the elongated hole in the central part of the device. As a result, thanks to the restrictive parts of the template, the layer of solution comes out perfectly even in width and height. Moreover, the height of the seam will be strictly as specified by the dimensions of the template. After filling the niche with the solution, the template can be moved to a new location.
The template allows you to replace two tools used when making masonry mortar at once - a building level and a cord. In this case, during the construction of one building, several types of templates can be used:
- When making the main walls of a building, templates with specified basic wall parameters are used.
- To make the facing brick layer, a different template with the parameters of the facing stone is used.
Additional accessories
Scaffolding can be built either along the entire perimeter of the building or only along one wall.
Usually, already during the masonry process, some difficult issues are identified that require additional devices and devices. Let's look at these points using a couple of situations as examples. One of them involves attaching a mooring cord to corner bricks. When the fence picket is nailed onto the veining, pickets are placed on one and the other side of the span to the selected height and nails are driven into them from above in order to wind a mooring cord around them and nail the remaining pickets along the cord. The difficulty with brickwork is that it is almost impossible to drive a nail into a brick that has just been laid on fresh mortar without dislodging it from its position.
To secure the cord, you can quickly make a simple device from a thin metal plate with your own hands. To do this, use metal scissors to cut out a T-shaped plate. Then we bend all the ends of the letter “T”. The result should be a metal crab that fits tightly onto the brickwork from above. The size of the crab depends on the thickness of the masonry. We put the resulting devices on adjacent corners, tie a mooring cord to them, so as to provide a slight stretch. We draw a straight wall along a straight line secured by a stretched cord.
There are already several rows in your wall. At this moment, you will begin to understand that it is already difficult for you to reach the top of the masonry, it is simply inconvenient to work. Scaffolding needs to be erected. The construction of this device will take you quite a lot of time, but with the help of scaffolding you will win it many times more. Scaffolding can be built along the entire perimeter of the building; it can be done only along one wall. In the latter case, you will have to constantly move the scaffolding one by one to each wall. In this case, it would be better to make two wooden goats. By placing two wide and thick boards on them, you will get easily movable scaffolding.
Remember the main thing: when working at height, follow all necessary safety measures. Make the forests reliable. It’s better to spend more time making them than to spend it constantly trying to find your balance on a structure swaying beneath you. Having learned how to lay bricks in the walls of your garage with your own hands, you can safely begin to make your dream come true.
- Mortar shovel
- Trowel
- Pick hammer
- Joining
- Mopping
- Plumb
- Building level
- Rule
- Wooden square
- Cord mooring
- Wooden arrangement
Mortar shovel
Designed for feeding and spreading mortar on the wall. Using a shovel, they also mix the solution in the box and level it between miles under the backfill.
Trowel
It is a steel blade polished on both sides with a wooden handle. Designed for leveling mortar over masonry, filling vertical joints with mortar and trimming excess mortar in the seams.
Joining
They are used for processing seams - with their help, the seams are given a certain shape. The cross-sectional profile and dimensions of the joints must correspond to the specified shape and thickness of the seams.
Mopping
Designed for cleaning ventilation ducts from mortar protruding from the seams, as well as for more completely filling the seams with mortar and smoothing them. On the steel handle of the mop at the bottom, a rubber plate measuring 140 x 140 x 10 mm is fixed between the flanges, with the help of which the process of stripping and smoothing is carried out.
The following instruments are used to check the quality of masonry and are called control and measuring instruments.
Mechanized devices
There are a number of devices that significantly speed up the laying process. They are conventionally called mechanized, but are not equipped with drives and complex systems of moving parts. Most often they are used to quickly and evenly apply a mortar bed under the next row of blocks.
Order-dispenser
Such a tool is a frame made of plastic, metal or wood. It allows you to quickly apply a layer of solution of the required thickness and width. Thanks to special stops, it quickly moves along the row; excess solution can be placed on special shelves for later use.
Some models are equipped with mechanisms for adjusting the parameters of the resulting mortar layer, others are equipped with clamping devices for reliable fixation on the row.
As a rule, dispenser sets sold include end versions. They are much smaller and are used to dose the solution applied to the end of the block being laid. Depending on your preferences, you can apply the mortar to the end of the previously laid brick or to the next one to be laid before placing it on the “bed”.
Cuvette
This is the name of a rectangular vessel with inclined or straight walls. The cuvette has no bottom, and its volume is designed for one portion of the solution. After filling, the device simply moves along the plane, leaving behind a layer of laid mortar.
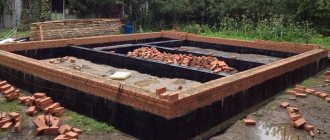
Waterproofing
Waterproofing the top of the foundation can be done with double roofing material. Be sure to overlap the seams by at least 10 cm. The process can be carried out using different methods:
- Simply spread the roofing material over the surface of the foundation and press it with bricks to protect it from being blown away by the wind.
- Glue with bitumen mastic or hot bitumen.
- Heat the surface of the roofing material with a burner and press it, thereby gluing it.
The need for waterproofing is explained simply: it protects the brickwork from moisture. Because moisture gets onto the walls not only with precipitation, but also through the capillaries of the foundation from the ground. A house with a brick basement needs double waterproofing: under the basement and under the wall.
Mooring lines in Moscow
- Fishing line and cords
- Manual levels and plumbs
- Other tools for measuring distances, lengths and angles
- Packaging materials
- Ropes and cords for mountaineering
- Accessories for drying clothes
Cord (rope) PP “ShnurOK” d=3mm, 20m, reinforced, without core, colored, art. 60390 MasterHouse (art. 686376)
Polypropylene braided cord d 6 mm, L 30 m
MasterHouse “Durable” PP cord, 3mm, 20m, reinforced, with core, 60321
coreless cord 4mm 50m pp black
Standard braided cord, 1.8 mm/70 kg, reel - 200 m, Black
Twisted cord 2mm 100m PP white
vorel marking cord 75 m
PP spiral braided cord 10.0mm (1500kg/s) 24 strands /white with green/ (reel -110p.m.)
Handrail cord (Diameter, mm: 12 | Length, m: 10 | Euro package | black |)
Cord 7mm without core - black / 10 meters
Masonry cord STABILA 40465
Cord (rope) PP “ShnurOK” d=4mm, 20m, reinforced, without core, colored, art. 60391 MasterHouse (art. 686377)
High-load polyamide braided cord BISON with core, black, d 5, 20m
Cord 4mm without core - white / 10 meters
DanLine twisted cord 4.0 mm.
Standard braided cord, 1.8 mm/70 kg, reel - 200 m, Black
High-load polyamide braided cord BISON with core, black, d 5, 20m
Cord 2V 520 with 2 mm core, 20 m
Cord Kona 8773-1
Cord with core 10 mm, polypropylene, 24 strands
Guard cord, 10 mm, 10 m
S1075 Cord dep. wicker 2mm*30m (black/gold)
cord with core 3mm 50m pp black
Heavy duty cord 10 mm, polypropylene, white with red
Mooring cord for mason “Vorel”, 1.7 mm, 50 m
Standard braided cord, 4 mm/200 kg, reel - 500 m, Black
Polyamide twisted cord, diameter 2 mm, length 100 m 21443
Standard braided cord, 10 mm/1100 kg, euro coil - 10 m, Black
Knitted PP rope, d=4 mm, 10 m, mix color
Polypropylene textile cord in colored balls (BPRC 2), 2 mm, 110 m
Twisted nylon cord, 2 mm, L 50 m, reel, 70 kgf SIBRTECH 93964
Braided fishing line Power Pro PP-0.22 mm
Cord twisted 1mm
Masonry cord red-white Stabila 40465 Ø1.7 mm x 50 m
Braided cord “Long”, with core, diameter 4 mm, length 300 m, assorted colors
Standard braided cord, 1.8 mm/70 kg, reel - 200 m, White
Preparatory work
Cement mortar has a short shelf life; it should be used as quickly as possible, but not more than three hours. By this time it will begin to set. It is better to complete all preparatory activities in advance:
- Bring the brick to the foundation and stack it in piles from which it is convenient to take it. The most important thing is that it does not interfere with the masonry process.
- Bring and check all instruments.
It is recommended to moisten red solid brick with water in advance. To do this, it is immersed in water for a few seconds. The length of time a brick remains in water causes controversy even among masons with extensive experience. The wetted brick will not set longer and will make the seam stronger.
STABILA mason's cord white 2.0 mm x 100 m 40467
For this product, up to 246 bonuses can be written off against the purchase when paying on the website with a Sberbank card with a sufficient number of bonuses, but the total payment amount must be at least 2,000 rubles.
All conditions for participation in the “Thank you from Sberbank” program
STABILA mason's cord white 2.0 mm x 100 m 40467 is used for marking during construction, leveling and marking. Made of polypropylene, which has high strength and resistance to solutions of acids, alkalis and solvents. Length - 100 m.
Technical characteristics of the cord STABILA 40467
- Type thread (cord)
- Length, m 100
- Diameter, mm 2
- Housing material: plastic
- Quick rewind no
- Cord material polypropylene
- No grip
This product is from selections
Parameters of packaged goods
Peculiarities
| Reliability In the manufacture of the cord for the mason STABILA white 2.0 mm x 100 m 40467, polypropylene is used - a high-strength material that is resistant to acids, alkalis and solvents. |