Grouting refers to both the final part of the facing work and the material used for this. Another term is fugue and, accordingly, jointing. The essence of the process is to fill the space between the tiles with an adhesive composition that hardens when dry. The goal is to seal the masonry, giving additional strength and aesthetic completeness. Fulfillment of all three points is possible only with the correct choice of fugue.
Which solutions to choose?
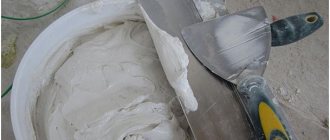
Grout is an important element when laying tiles. Previously, only mortars prepared by the tiler were used to grout tiles. To prepare such grout, knowledge of the appropriate recipes and careful measuring of the ingredients were required. Currently, one-component solutions are used - from ready-made bulk mixtures, the preparation of which is limited only to mixing with water, and two-component ones - from loose cement mortar, which is mixed with an emulsion containing elastic substances.
The process of removing grout from tile joints
If you want to update the fugue between the tile seams, sometimes you resort to radical measures. When the grout on the joints is in poor condition, it must be completely removed to refill the joints. While it is easy to remove just used grout during the grouting process, it is difficult to do so when it hardens. The following methods are used to remove grout from joints:
- chemical reagents - made on the basis of acids, applied to the seams carefully so as not to touch the tiles;
- mechanical method - tilers can use a construction knife, screwdrivers, or a small chisel.
A sharp knife perfectly removes frozen mixture Source acost.ru
If the grout has been in the joints for a long time, then tilers use an electric drill with a thin drill, a jigsaw or a screwdriver.
Tile grout: ordinary cement mortars
They are most often used for grouting small ceramic and stone (but not marble) tiles laid on non-deformable substrates indoors - mainly on walls. The application areas of such solutions should not be exposed too frequently to cleaning agents or strong jets of water, as although they are water-resistant, they may wash out the joints. Cement mortars are available in various colors. These are ready-made dry mixtures of cement, modifying additives and properly selected mineral fillers, on which the texture and permissible joint width depend.
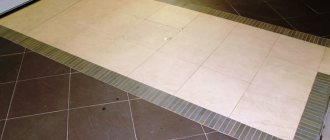
Types of grout for arranging seams in pool ceramics
Grout is a material without which, given the specifics of the operation of the structure, it is impossible to perform ceramic cladding that meets technical, sanitary, hygienic and aesthetic requirements. Therefore, the sealing of joints must be impeccable - to the full depth, and the material must be appropriate for the operating features. Not all grout mixtures are suitable for making ceramic joints in swimming pools. Even expensive compounds that are not designed for the operating conditions of the pool may prove unsuitable and lead to the need for costly repairs to the arrangement of the seams. Therefore, we will consider grouts intended specifically for use in swimming pools.
Cement-based grout mixtures
To create lining joints for small private swimming pools, cement-based grouts are most often used, which meet the necessary requirements and have a wide range of prices. Cement-sand mixtures are unsuitable for finishing bowls, since they do not allow achieving a smooth joint surface and are used when the joint width is more than 3 mm, which is unacceptable for a pool.
The disadvantage of cement compositions is their poor resistance to chemicals, so dry mixtures to enhance the water resistance of joints and the tightness of the bowl are sealed only with an aqueous solution of latex or special ready-made latex additives, for example, Litokol Idrostuk.
To facilitate monitoring of the sanitary condition of joints for the appearance of fungus, white or close-to-white mixtures are used. When using glass or smalt mosaic, the grout must definitely be white, otherwise the translucent chips may change their color unpredictably.
Latex additive for grout Litokol Idrostuk
Examples of the correct choice of grouting material include moisture-resistant cement mixtures Ceresit CE 40 Aquastatic, Ceresit CE-33 SUPER, Litokol Litochrom 3-15.
Cement compositions, despite their strength, still allow, if necessary, spot repairs of the finish to be carried out without much difficulty, removing glue from the joints. Installation of new ceramics instead of removed defective tiles is also simple, since to use a cement mixture there is no need to dry the base, which has been in water for months.
To enhance the waterproofing characteristics of the bowl located above the living space, cement-based grout mixtures can be periodically impregnated with special compounds, after first cleaning the joints from salt deposits.
Joint filling compounds based on reactive resins
Despite the high quality of cement mixtures, adhesives based on epoxy resins are superior to them in all characteristics except flammability (not relevant in a swimming pool). Therefore, the feasibility of using epoxy grout for arranging tile joints in swimming pools is indisputable, but you should be prepared for the fact that the price of such mixtures is several times higher than cement-based grouting material. In addition, working with any epoxy adhesives requires the performer to have certain skills and dexterity.
Among many other mixtures based on epoxy resins, pool grouts Litokol Litochrom Starlike C.290 Travertine, Litokol Epoxystuk X90, Index Fugopox AB have proven themselves well.
Litokol Epoxystuk X90
Recommendations for the color of the grout mixture used coincide with the rules for cement compositions.
And yet, the use of epoxy grout when finishing bowls has its disadvantages:
- short period of mobility of the mixed mixture;
- the difficulty of removing excess glue from tiles and, especially, mosaics;
- difficulty in drying the base for spot repairs.
In addition, there are disadvantages arising from the advantages:
- high quality leads to high cost;
- high adhesion and strength makes it difficult to dismantle defective tiles when making spot repairs to the finish.
Tile grouting: cement-epoxy mortars
Among elastic cement mortars there are also two-component epoxy-cement mortars. They are waterproof, frost-resistant and chemical resistant. They are used for grouting non-porous ceramic tiles (glazed or unglazed) that are subject to particularly harsh conditions such as constant humidity - they can be used for grouting tiles near a shower or in a swimming pool, heavy loads and the effects of chemicals. They can be used to grout wall and floor tiles inside and outside buildings. After hardening, such joints are very resistant to abrasion; they can be successfully used, for example, for grouting tiles laid in vestibules, hallways or garages.
Types of grout for arranging seams in pool ceramics
Grout is a material without which, given the specifics of the operation of the structure, it is impossible to perform ceramic cladding that meets technical, sanitary, hygienic and aesthetic requirements. Therefore, the sealing of joints must be impeccable - to the full depth, and the material must be appropriate for the operating features. Not all grout mixtures are suitable for making ceramic joints in swimming pools. Even expensive compounds that are not designed for the operating conditions of the pool may prove unsuitable and lead to the need for costly repairs to the arrangement of the seams. Therefore, we will consider grouts intended specifically for use in swimming pools.
Cement-based grout mixtures
To create lining joints for small private swimming pools, cement-based grouts are most often used, which meet the necessary requirements and have a wide range of prices. Cement-sand mixtures are unsuitable for finishing bowls, since they do not allow achieving a smooth joint surface and are used when the joint width is more than 3 mm, which is unacceptable for a pool.
Tile grout: flexible grout compounds
Flexible joints are mainly intended for filling expansion gaps, for example between tiles at the corners of walls where the walls meet the floor, and between tiles separating the surfaces of terraces or balconies. Some of the compounds on the market are easily color coordinated with other jointing compounds, so they can be used next to them on the same wall or floor. These are ready-made cement mortars enriched with polymer modifiers (increasing the flexibility of the joint). They contain mineral or synthetic fillers that reduce the porosity of the joints (low porosity of the joints makes them easier to clean). They quickly connect. Pre-made silicone, silicone rubber, polyurethane or acrylic compounds are waterproof, resistant to mildew, mildew, temperature changes and chemicals (including most common cleaning products).
Start of wet cleaning
All you need is a bucket of clean water and a sponge (it is better to use a sponge with rounded edges, this will prevent grooves from forming in the grout joints).
First, use a sponge to quickly remove most of the excess grout. Begin cleaning the grout from the surface of the tiles using a gentle, circular wiping motion to remove sand and cement particles.
Be careful not to create grooves in the grout joints. Rinse the sponge as soon as the pores of the sponge are filled with particles of cement and sand, and then wring it out well. If not too much time has passed before you start cleaning, you can remove excess grout from the surface of the tiles in two or three passes.
Clean only a small area at a time (1-2 square meters in size), wetting the sponge frequently to wash away any grout particles that have penetrated the pores of the tiles. When you rinse the sponge, always try to rinse as well as possible and squeeze as hard as possible to ensure that any grout particles that were in the pores of the tile are washed away. Be sure to shake off excess water from your hands.
If the cladding is no larger than 9 square meters. meters, there is no need to change the rinsing water in the bucket. You can judge by the purity of the water how well the tiles have been washed (of course, some commercial projects require constant water changes).
At the second stage, you need to inspect the grout joints to see if they are all neat. Level and smooth the seams using a jointer, a wooden stick with a sharpened end, or the end of a toothbrush. Then smooth the edges of the seams with a sponge. Move the sponge parallel to the seam, carefully removing any ridges and filling any gaps with a small amount of grout using your fingertip (wear tight rubber gloves to do this).
The actual joint size depends on the type of tile used and the industrial or artisanal finish of the top edge of the tile. If the edges of the tile are sharp and straight, the grout in the joints should be flat, flush with the top edge of the tile. If the top edge of the tile is rounded, the tiler must decide how high the joint should be.
Whatever height is chosen, ideally the seam should be smooth on top, not convex, although most of the seams then become slightly concave, which is quite acceptable. It is very important to give all seams the same shape and depth.
At the end, a final thorough cleaning of the surface of the tiles from grout residues is done. As soon as the seams in the cladding are leveled, the surface of the tiles should be thoroughly cleaned again. First, rinse and wring out the sponge well. Then make a straight, vertical pass about a meter long with one side of the sponge, moving it slowly towards you - slower than seems necessary - and without stopping (if you move the sponge quickly or intermittently, you will leave grout streaks on the surface of the tiles).
After the first pass, turn the sponge over to the clean side and make a similar pass parallel to the first, then stop and rinse the sponge. For one pass, use the freshly washed side of the sponge. Continue this process until the entire area of the cladding is completely cleaned, trying to act carefully so that again the sponge does not pull the grout out of the joints.
If this happens, it may mean that there is too much grout in the seams and the seams need to be trimmed, or there is too much water in the sponge. After such cleaning, all grout residues must be removed from the surface of the tiles, and the joints must be allowed to dry for 15 minutes.
During this pause, the moisture remaining on the tiles after cleaning evaporates and the cement particles that were in the water are deposited on the surface of the tiles. If the tiles are covered with a shiny glaze, and the corners are smooth and straight, then grout deposits can be easily removed by immediately wiping the surface with gauze or a soft, clean cloth. If the tiles have a matte surface or rounded corners, you may need another, additional pass with fresh water and a sponge.
If the grout residue is still difficult to clean, you may not have cleaned the surface well enough the first time. If there is glue left on the surface of the tile, the latex or acrylic additives contained in it may be the reason why the grout has set more than usual.
However, whatever the reason, the longer the plaque remains on the tiles, the more difficult it is to remove. If you were unable to remove the residue using a damp abrasive float, you can try using a special solution to remove plaque, or, as a last resort, resort to acid cleaners.
If you decide to use special cleaners or acids, keep in mind that the grout needs to fully set before you use them. However, don't wait for the grout to fully set until the final cleaning step is completed - removing any traces of grout from the expansion joints.
Tile grout: epoxy grout
Epoxy mortars are particularly suitable for grouting wall and floor tiles exposed to constant moisture and chemical attack, such as in swimming pools. Because they are sealed and low in porosity, as well as acid-resistant, epoxy grouts do not absorb water vapor or other stain-causing substances such as grease, and are therefore easy to clean with regular detergents. Therefore, they can be used, for example, to fill gaps between tiles laid on the kitchen floor or on the countertop. These are solutions with plastic properties and special mechanical strength, wear resistance and very good adhesion to the base. They are produced in the form of two-component chemically resistant preparations containing epoxy resin with mineral fillers and modifying additives.
Types of grout mixtures
There are several types of grout for joints:
- Cement . This composition is based on cement; additives and color pigments are also used. To use this composition, it is mixed with water to the consistency of thick sour cream. Dry grouting is much more economical, since tilers use the required amount of cement at a time. Sand is added to the composition for wide joints, which, due to its dispersion, fills the joints. The material is easy to use, low cost, durable, but not resistant to mold.
- Epoxy . Such mixtures consist of two components - a hardener and an epoxy resin. The finished mixture looks like a dense elastic mass. This grout is not very popular, but it is resistant to moisture, hardens quickly, is durable and can remain attractive for ten years.
- Polymer . This includes silicone and silicate compounds. Special polymer additives are added to such grouts; the putty is easily washed off and creates a dirt-repellent surface.
Examples of epoxy grout mixture Source ohiogas.info
Cement grout is considered the most popular; epoxy mixtures are less commonly used. Tilers often choose dry compounds, as they have lower consumption and are economical.
Tile grout: elastic cement mortars
Due to their properties, they have more universal applications. Therefore, they can be used to fill both thin and thick gaps, for laying ceramic and stone tiles (mainly except marble) inside and outside the house. They are particularly suitable for areas where tiles are laid on deformable substrates such as chipboard, plasterboard, underfloor heating or plinths, terraces or balconies. These joints are also suitable for laying tiles on heated floors. Flexible mortars are available in a variety of colors.
Using a grout bag
If you are working on a surface that is particularly difficult to clean after grouting, such as antique brick veneer, use a grout bag to fill the grout. This bag looks and acts just like a piping bag for decorating cakes. A metal tip approximately the same width as the grout joint is attached to the end of the bag. The bag is filled with grout, and then it is squeezed out with force through the tip into the seam.
When working with a grout bag, place the tip of the bag at the top of the joint and slide it forward along the edge of the joint as you fill it. For best results, grout the entire length of the grout rather than around individual tiles. Usually, all horizontal seams (along the x-axis) are filled first, and then the vertical ones (along the y-axis).
You should squeeze out a little more grout than seems necessary. After it has set slightly, tamp the grout into the joint using a jointer or a piece of smooth metal tube, the diameter of which is larger than the width of the joints being filled. Then let the grout pressed into the joint set for half an hour, after which remove the excess with a stiff brush.
Cleaning Grout: 4 Home Remedies for Clean Grout
Cleaning grout is often problematic, but only because we don't know how to do it correctly.
Learn about four home remedies for grout cleaning, such as baking soda, toothpaste, or vinegar.
Freshly laid or painted tiles are striking in their cleanliness, mainly due to their flawless seams. However, white joints turn yellow over time, which does not look aesthetically pleasing. We also often have difficulty cleaning joints after repairs. Luckily, there are four proven home remedies that will clear out your joints and restore them to their former glory.
Before using any grout cleaning methods, be sure to clean your tiles regularly. By sweeping and rinsing the surface, we get rid of dirt that settles in nooks and crannies, such as joints, and becomes difficult to remove over time. Regular cleaning and washing of your tiles will make cleaning your grout much easier.
Vinegar and ammonia solution
You can prepare a cleaner to clean the joints. Ideal for cleaning with vinegar. In a bucket or large bowl, combine 2 quarts of warm water, 1/2 cup baking soda, 1/3 cup ammonia and 1/4 cup vinegar. Pay attention to whether the baking soda has dissolved well. Pour the solution into a glass cleaning bottle. A container ending in spray will make it easier to access the joints and tiny nooks and crannies between the tiles.
Next time you wash your grout, you can use the same mixture, just remember to shake the bottle before use. Spray a small amount of the solution and wait 2-3 minutes until the substances begin to act on the surface of the grout. Then scrub the joints with a stiff-bristled brush. Wipe up puddles of dirty water with a damp cloth and wring it out into a separate container. After cleaning the joints, wipe the entire floor surface with a dry mop.
Hydrogen peroxide and baking soda
Before you start cleaning the joints, wash the tiles in the bathroom with water and detergent. In a small bowl, mix hydrogen peroxide and baking soda to form a thick paste. Decide which consistency suits you best. Using a brush, spread the mixture over the entire surface of the grout and leave for 5-10 minutes. After this time, begin scrubbing the joints with a small brush or brush. Use fairly strong pressure to remove dirt from the joints. If the solution is still not clear, apply the paste again and leave for a few minutes. Use a damp cloth or mop to wipe away any remaining paste.
Active oxygen for cleaning
Get rid of all surface debris and dirt that can make cleaning the grout tedious. Active cleaning oxygen is a bleaching agent that dissolves bacteria and dirt. Mix it with warm water and let it dissolve. Pour the mixture into a glass cleaning bottle to make it easier to apply the grout cleaner. After spraying, leave for 15-20 minutes. Using a toothbrush, scrub the seams. Wipe the joints with a dry towel. If you still see stains on the grout, you can apply the liquid again and let it sit for an hour or more.
Video description
The process is described in more detail in the video:
Tilers make sure that the grout mixture does not protrude beyond the plane of the tile, otherwise it will be difficult to wipe it off later. Ideally, the grout should be slightly pressed into the space between the tiles. Then the master runs a spatula along the seam, removing excess. The tiles embroidered with grout should stand for 24 hours, then you can begin cleaning work.
Finish stage
Some tilers immediately wipe the tiles, others wait until the grout is completely dry. To do this, take a damp cloth and carefully wipe each tile, without touching the space with seams. A white coating may form on the surface of the tile after applying the grout mixture - this must be removed. To do this, use a damp sponge or cloth. Difficulties arise when the tile has a porous surface and the grout mixture eats into the tile relief itself - then it becomes difficult to wipe off the grout.