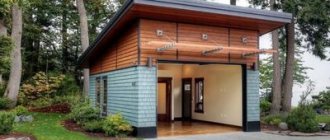
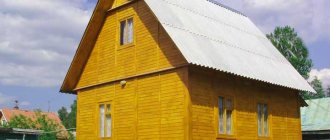
How to make a roof for an extension to a house
A lightweight roofing structure, which consists of only one inclined slope, is usually called a shed roof. Let's look at how to make a roof on an extension to a house, what are the nuances and features of construction. This design includes a rafter system, gables, sheathing and finishing roofing material. A special feature of attaching a pitched roof to a house is the need to secure it to one of the load-bearing walls of the main building.
The structural elements of a pitched roof of this type are as follows:
- Mauerlat . This is the main support beam, which bears the main weight of all rafter structures and roofing material. It also redistributes the load on the load-bearing walls and foundation of the building. To lay this element, hard wood treated with antiseptics is used. When deciding to build a pitched roof for an extension to a house with your own hands, one beam of the Mauerlat is fixed on the load-bearing wall of the building, and the second is fixed on vertical supports.
- Rafters . These elements support the roofing material and transfer its mass further to the mauerlat beam. To create rafter legs, use a board with a section of 50×150 or 100×150 mm. To fasten them to the support beam, cuts are made at both ends of the rafters.
- Struts . These are additional supporting elements of the frame that support the rafter legs if the length of the slope exceeds 4 m. One end of them rests on the rafters, and the other on the mauerlat.
- Lathing . For its arrangement, boards measuring 40×150 mm are used. They are piled on top of the rafters at a certain pitch to create support for laying the finishing coating. A continuous sheathing of plywood or particle boards is used for soft roofing.
It is worth noting that the drawing of a shed with a pitched roof attached to a house can be done independently, since this design is the simplest of all possible. This does not require complex mathematical calculations. True, special attention should be paid to the method of joining the roof of the extension to the main building. It is important to ensure reliable waterproofing of the seam to avoid leaks.
Design features
A pitched roof is a lightweight structure with one slope. The main elements of a house with such a roof are a frame made of wooden blocks, sheathing made of boards, as well as the selected roofing covering. An extension to a house with an attached roof differs from a free-standing structure in that one of the sides of such a structure is securely fixed to the load-bearing wall of the building .
The structure of a frame of this design includes:
1. Mauerlat or wooden beam, which serves as a support for the rafters. This product is made from hard wood and treated with antiseptics to prevent rotting and mold. The Mauerlat supports the weight of the entire roof; this element serves to evenly distribute the loads on the walls of the building. In this place, the connection between the roof of the house and the extension takes place, with one Mauerlat securely fixed on the wall of a private house, and the second bar laid on the support pillars.
2. Another equally important element of the described structure is the rafter legs. Such parts are made from wooden beams with a cross-section of 5*15 or 10*15 centimeters. A notch is made at the edges of the rafters for attaching to the Mauerlat. The rafters support the entire roof covering.
3. To strengthen the rafter legs, a brace is used, especially if the length of the slope exceeds 4 meters (in this case there may be several such parts). One of the sides of the strut is fixed to the mauerlat, the second rests on the rafter leg.
4. Many people do not know how to connect the rafters; lathing serves this purpose. Such structural elements are made in the form of boards 3-4 centimeters thick, the width of which corresponds to 15 centimeters. When constructing a deck, the boards are distributed at a certain pitch. If rolled materials are used for the roof, the sheathing is made continuous. For this purpose, moisture-resistant plywood is used.
You should pay attention to the following fact: the gable roof of an extension to a house is quite difficult to implement, so many choose the single-pitch option and make such a roof with their own hands without the help of qualified specialists. The design and installation of such a structure is quite simple without complex calculations. The only nuance that needs to be paid attention to is the joining of the main residential building with the extension. Poorly installed waterproofing will cause leakage.
Design calculations and drawing of a pitched roof
Of course, in order for the finished structure to be durable and not cause problems during rainfall or the cold season, before starting construction you need to draw up a design for a shed with a pitched roof that will be adjacent to the house. In this case, it will be necessary to calculate the surface area of the slope, its slope, the length of the rafter legs and the difference in the height of the supports. All this should be included in the house roof project. Correct calculations will ensure the durability of the roof and its efficiency. You can determine the necessary parameters using ready-made calculator programs or using formulas.
Manually, the required quantities are calculated as follows:
- The angle of inclination of the roof is determined by dividing the difference in the height of the support pillars by the width of the structure. As a rule, it is within 15-40º and is determined based on the weather conditions of the area and the requirements of roofing material manufacturers.
- For a given slope slope, the difference in the heights of the support pillars can be calculated by multiplying the angle by the width of the extension. These parameters are calculated so that when constructing a pitched roof for an extension to a house, the required slope can be maintained.
- To determine the length of the rafters, it is necessary to divide the difference in the height of the supports by the sine of the slope of the slope. The resulting value will allow you to calculate the amount of material required to create a rafter system for an extension to a house.
- You can calculate the surface area by multiplying the length and width of the slope - the parameter is used to determine the amount of roofing and waterproofing materials for the roof. Please note that you need to purchase them with a 15-20% margin for trimming and overlaps.
The weather conditions of the area significantly affect the durability of the roof. So, if significant snow loads are expected, it is better to make the slopes steeper, and if windy weather prevails, flatter, with a slope of less than 15º.
Design and calculations
Any roofing structure, even the simplest one, requires preliminary calculations and a design, at least a schematic one.
Calculations can be performed using special computer programs or calculated using formulas.
- The slope is calculated as the quotient of the difference between the height of the support posts and the width of the extension. The slope of the slope can be 15-40 degrees.
- The difference between the height of the support posts is calculated by multiplying the width of the extension by the slope of the slope.
- To calculate the length of the rafter leg, it is necessary to divide the difference in the heights of the support posts by the sine of the angle between the slope and the base of the roof.
- Area is calculated by multiplying the length by the width.
What materials are needed for a barn roof?
Let's think about how to cheaply cover the roof of a barn to reduce costs. The most reasonable thing from the point of view of safety from wind and heavy rainfall would be to build a shed with a pitched roof, since fairly inexpensive materials will be needed. In addition, you will not have any problems purchasing them - everything is freely available in stores. And the number of consumables will be much less than for roofs of a more complex design.
During the construction of the roof of an extension to the house you will need:
- Wood . You will need pine beams with a cross-section of 100×100 or 150×150 mm, edged boards 50×150 mm, unedged boards 40×150 mm and a lath with a cross-section of 25×50 mm for the construction of the rafter system. The moisture content of the material should not exceed 15-16%, and its surface should be free of chips, cracks and stains. Using deep penetration antiseptics, you can avoid rotting and mold formation due to penetrating moisture.
- Roofing covering . You can select a suitable material in terms of quality and cost from a wide range of varieties on the market. A budget option would be slate, corrugated sheeting or roofing felt. A higher quality and visually presentable material – soft roofing, ondulin, metal tiles – will cost twice as much. If we are talking about covering a winter garden, greenhouse or veranda, you can use polycarbonate - a transparent material that perfectly transmits sunlight, a thermal insulating material.
- Waterproofing . This layer is designed to protect the wooden truss system of the roof of the extension from moisture penetration and, as a result, damage to the structure. For this, roofing material, film or diffuse membrane can be used. However, in practice, roofing material has shown itself to be the best, since it is the most durable of the above.
- Fastenings . There are many options for fastening consumables when installing a roof - self-tapping screws with rubber washers, nails, anchors, metal corners. In the case of self-tapping screws, their consumption per 1 m 2 of area is about 10 pieces. So, to calculate the quantity, the consumption rate must be multiplied by the area.
Please note that choosing a roof covering similar to the main building will make the extension a harmonious continuation of the house. However, if this is not possible due to financial capabilities, it is worth choosing a material that is as close as possible in color. The choice of lightweight materials (ondulin, roofing felt or corrugated sheets) will make it possible to create a lightweight, simple frame.
Roofs from Ondulin
The sloping roof made of green Ondulin harmoniously complements the architecture of wooden frame houses built in a rustic style. Natural tones of light or dark wood combine pleasantly with all shades of green and blend seamlessly into the surrounding landscape. White frames of window openings refresh the dark color scheme of the facades in the photo and add accent touches to the design of the house.
The combination of lining on the facades and roofing from Ondulin is one of the most cost-effective options for finishing a private house. The corrugated surface of the walls to some extent echoes the wavy profile of Ondulin - and this gives integrity to the exterior of the building, despite the pronounced color contrast between the terracotta-red roofing and the white wall cladding. Such a solid sloping roof, the color of which is much darker than the façade finish, adds solidity to the surroundings of the house.
The ease of installation of sloping roofs from Ondulin allows you to implement quite complex structures, one of which you see in the photo. Here the roof not only has two slopes with a slight bend, it is also equipped with additional, flatter slopes that help drain heavy rainfall without an avalanche. In addition to structural practicality, the roof made of brown Ondulin in the photo effectively sets off the sandy-yellow facades of the house.
See also: Ondulin: Beautiful photos of house roofs, types of roofs
Methods for constructing a roof structure with your own hands
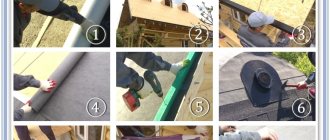
So, if you decide to build the roof of the house extension with your own hands, after designing and purchasing materials, you can begin construction. To work, you will need a hacksaw or grinder, a screwdriver, a plane, a drill, a stapler, a ruler, a marker and some string.
Construction is carried out in several stages:
- Using anchor bolts or metal studs, the first Mauerlat beam is installed on the load-bearing wall of the house. The rafter legs will be laid on it, so the fixation must be reliable.
- The second beam of the Mauerlat is mounted either on the load-bearing wall of the future extension or on support posts. Their height must be lower than the main load-bearing wall of the house to ensure the required roof slope. The beam is fastened on the posts with studs, and on the load-bearing wall with anchor bolts.
- Next, the calculated number of rafter legs of the same length is made and cuts are made in each of them for laying on the mauerlat. The outer rafters are attached first, then a cord is pulled between them, and all the remaining legs are attached to this level.
- Waterproofing is laid over the rafters. The roofing material at the junction of the extension with the main house is brought 15-20 cm onto the wall and melted to it using a gas burner.
- The waterproofing layer is fastened with a counter batten nailed to the rafters. The main sheathing under the roofing material is mounted perpendicular to the counter-lattice in increments of 10-15 cm.
- The last step will be laying the roofing covering on the sheathing. You need to start the flooring from right to left and from bottom to top, laying sheets with an overlap of 10-15 cm. On flat roofs, the overlap of the material is increased, and the joints are additionally coated with a sealing compound.
It is worth noting that the movement of water along a pitched roof will only occur in one direction, therefore it is necessary to install high-quality gutters. Lastly, you can begin insulation work and the final filing of the gables.
Instructions for performing work
Before making a pitched roof, you need to choose the right lumber for the rafter system and sheathing. In this regard, we will give the following recommendations:
- for a span of up to 4.5 m wide, rafters made of 15 x 5 cm timber are suitable, up to 6 m - from 200 x 50 mm boards, spliced in pairs or lengthwise;
- timber 150 x 50 mm will be used for the wall frame (mauerlat) and the beds;
- cross-section of racks, struts and purlins – 10 x 5 cm;
- the sheathing is made of boards 20-25 mm thick and 10-15 cm wide.
For waterproofing, you will need roofing felt and a superdiffusion membrane, and for laying the finishing coating, metal tiles, corrugated sheets or other roofing material. If we are talking about a residential building, do not forget about insulation: prepare mineral wool of the required thickness (or other insulation) and a vapor barrier film.
Laying the Mauerlat
The strapping beam should be placed on 2 opposite walls, where the rafter legs rest. If it is planned to support the layered system on internal partitions, then a board called a bench is also laid on them. The exception is log and frame houses, whose walls are ready for the installation of rafters.
The technology for laying Mauerlat on walls made of different materials looks like this:
- Studs are pre-embedded into the brickwork, onto which the strapping beam is attached. Before installation, the stone wall is covered with 2 layers of roofing felt. If the studs were not installed, then the Mauerlat is secured with anchor bolts or pulled together with steel strips.
- Before installing the Mauerlat, porous walls built from aerated concrete should be tied with a reinforced concrete belt, as done in the diagram. The studs for fastening are placed into the monolith during pouring.
- In wooden extensions (verandas, terraces) built with your own hands, to support the rafters you need to attach a second board of the same width to the top trim beam of the wall. To install the upper end of the rafter leg, you need to screw a horizontal beam 15 x 5 cm to the wall of the existing building. This operation is demonstrated in more detail in the video below.
Installation of rafters step by step
Before building the frame, you need to determine the actual length of the rafters, taking into account the extensions beyond the walls that form the eaves overhangs. However, the canopies can be extended after installation by nailing boards cut to size to the rafter legs - the so-called fillies. The minimum length of the roof overhang is 300 mm.
Then proceed in this order:
- To increase the internal partition to the height of the inclined plane of the roof, assemble a frame from vertical supports connected at the bottom by a plank and at the top by a purlin. The location of each rack must coincide with the pitch of the rafters that will rest on them. For stability, secure the frame with struts.
- Try the rafter in place and cut it from below at three support points in order to increase the area of contact with the Mauerlat and the beds, as shown in the photo.
- Install the rafter leg and attach it with self-tapping screws to the steel corners. Repeat the operation at 3 points, then move on to the next beam.
- Trim the legs of the eaves overhangs, and then sew them up from the bottom and sides with clapboard. It is more convenient to do this before the roof covering is laid.
If the side gables are not laid under the slope of the future roof, then they should be covered immediately after assembling the rafter system. Otherwise, you will then have to do this work from ladders or build scaffolding. For installation of a truss system for a pitched roof of a large building, see the next video:
Lathing and finishing coating
Before laying the boards on the roof slope, the rafter system is covered with sheets of super-diffusion membrane, which provides protection from wind and moisture entering the attic space. The canvases must be laid horizontally, starting from the bottom, and secured to the upper plane of the rafters with counter-lattice bars with a cross-section of 5 x 5 cm. The membrane should sag slightly between the rafters to drain water, and adjacent canvases should be glued together (the overlap is 15 cm).
The sheathing boards are nailed to the rafters in increments depending on the type of roofing:
- under metal tiles – 35 cm;
- for corrugated board and slate – 50-60 cm;
- Under shingles, bitumen and ceramic tiles, the sheathing is continuous.
The last step is the installation of coating and insulation (if necessary). Thermal insulation of a pitched roof is best done along the ceiling, leaving the unused attic cold. How to properly insulate ceilings is described in our guide.
Shed with pitched roof 3x6
The first building that appears on a new summer cottage is, of course, a barn, large and roomy. At first, until the bare territory of the dacha is “overgrown” with full-fledged outbuildings, a house, a summer kitchen and a garage, a simple shed with a pitched roof will long remain the only shelter for equipment, building materials and dacha property.
Related article: How to make a roof over a porch
Foundation
Screw piles were chosen for the foundation; I am aware that it is bad to use different foundations for one structure. But natural conditions, such as the landscape of the site, turned out to be stronger than the standards. There is a slope from the house to the river, so the height difference at a distance of three meters from the house where the edge of the extension will be is more than a meter.
Which type of shed to choose for your summer cottage?
Depending on the plans for the future development of the suburban area, the availability of free time and money, the problem of utility room on a suburban area can be solved in several ways:
- Hire a team and build a permanent shed from brick or foam block, with a pitched roof and a basement;
- Pour a concrete foundation for the future building with your own hands, buy a five-ton railway container and install it on your summer cottage instead of a barn;
- Build an ordinary barn with a pitched roof, 3x6 in size, from timber and boards, as in the photo.
Of course, experienced summer residents with experience will without hesitation cast their votes in favor of the last option; this is the most balanced and thoughtful decision.
In addition, the construction of stone, prefabricated, panel sheds, as well as the purchase of a container, will require an order of magnitude greater investment and time than is necessary for a wooden building with a pitched roof and a simple foundation. The main thing is that, at considerable expense, there are no tangible advantages over a lean-to wooden shed measuring 3x6.
Optimal design of a 3x6 wooden shed
The most difficult element of a homemade shed is its roof. Choose a pitched roof for your shed, you can’t go wrong. Even experienced craftsmen prefer to install pitched roofs on barns; they are not as beautiful, but easier to build and more reliable in operation. Moreover, you can make a shed roof with your own hands step by step even with minimal construction experience.
The only mandatory condition is the correct orientation of the pitched roof and the entire shed building relative to the wind rose in order to reduce the risk of rainwater flowing under the upper overhang and gables of the roof:
- The design of the barn, dimensions 3x6 m, with a pitched roof is shown in the drawing;
- The construction is carried out on a simple columnar foundation of 12 supports. A standard cinder block is used as the material for the pillars, but it is better to cast the supports from concrete in the formwork;
- The basis of a lean-to barn is a frame made of boards and timber, the dimensions of the structure are 3x6 meters, with a ceiling height of 2 m and the highest point of the rafters of 2.7 m;
- The shed roof is made according to the classical scheme, on hanging rafters with stuffed sheathing boards and a flat roof. As a roofing covering, you can use corrugated sheeting, ondulin, or make a two-layer version from rolled material, for example, roofing felt.
The construction will be very simple and easy; if you assemble the foundation correctly, the wooden frame box with a pitched roof can easily withstand winds of 18-25 m/s. If there are no strong winds in the area in which the shed is planned to be installed, then when building walls you can limit yourself to vertical drains from boards and timber, as in the drawing. For open areas, it is recommended to strengthen the vertical load-bearing supports with side struts, as in the photo.
The same applies to the design of a pitched roof. For a quiet area, you can build a pitched roof without using ceiling beams, but in this case, the upper frame of the walls and the mauerlat will need to be supported with additional vertical supports made of timber. For windy areas, a pitched roof must be reinforced with floor beams and supports in the middle of the rafters.
Massive option
It is logical to use a powerful seamless reinforced concrete slab as the basis for the roof being used. Such a slab can be poured over a metal profile sheet. You should immediately add special modifiers to the concrete (sold in hardware stores), which make it waterproof.
Next, the roof over the heated residential space must be insulated. To do this, first a layer of vapor barrier is laid on the concrete slab. This could be, for example, a roll of material impregnated with bitumen, glued with mastic.
As insulation, you can take two layers of rigid extruded foam, which is glued to the vapor barrier with construction adhesive. By varying the thickness of the insulation layers, we form a slight slope to drain water.
The formation of the slope ends with a reinforced concrete screed. You can make grooves in it to give the rainwater the desired direction. We add a modifier to the concrete and cover it with water-repellent paint (this can be found, for example, in the arsenal of pool builders).
On top of this inclined surface you can assemble a horizontal flooring from antiseptic boards coated with a good varnish. Rainwater should flow between the boards through grooves in the concrete screed into the drainpipe. In winter, snow can be removed from the decking without fear of damaging the waterproofing.
We build a barn with a pitched roof with our own hands
You can calculate the amount of material needed for the frame and pitched roof. To build a 3x6 shed, six-meter boards are used:
- For the frame, material with a cross section of 50x150mm - 14 pcs., 25x100 - 23 pcs., 50x100 - 19 pcs.;
- For the floor, boards measuring 25x100 mm - 27 pcs.;
- For the sheathing and roof supports, 43 boards with a section of 25x100 mm are required.
All joints and connections are made with black carpentry screws 50 mm, 70 mm and 110 mm. To reduce the cost of construction, you can use ordinary nails and construction angles, but such savings are not always justified.
Making a foundation for a 3x6 shed
After choosing a site for building a shed, you will need to plan and remove soil on an area of at least 3x6 m in size. It makes no sense to make a larger building area. To prevent vegetation from pestering you, the cleared space can be covered with salt and sand.
After marking the location of the supports, at the installation points of the pillars we dig 12 holes, 15 cm deep and the size of a standard cinder block. At the bottom of the mini-pits we pour a 5 cm layer of a mixture of crushed stone and sand, after which we lay out columnar supports from cinder blocks using masonry mortar with the addition of PVA.
Before laying out, you will need to pull horizontal cords, along which you can control the height of each support, so that the entire supporting surface of the pillars is in the same horizontal plane.
After a day, you can install the strapping beam. All corner joints and T-shaped mortises are made with the ends “half-timbered”, each connection is reinforced with self-tapping screws screwed into the beam at different angles.
Assembling the frame and pitched roof
At the next stage, you will need to install load-bearing vertical posts; they are highlighted in orange in the drawing. Next, we sew up the floor and lay the rafters of the pitched roof.
We make the central load-bearing racks from 50x100 boards, for the rear wall you will need to cut three 220 mm racks, for the front wall - four 250 mm racks. We first fix each support on the lower frame with one self-tapping screw, then set the exact horizontal position according to the building level and additionally fasten it with small half-meter struts, as in the photo.
After all the racks are installed, we strengthen them with additional temporary struts and tie the upper tier of the frame under the future pitched roof. To give the entire structure of the barn additional rigidity, before assembling the elements of the pitched roof, it is necessary to cover the floor with a tongue-and-groove board.
Related article: Hip roof rafter system diagram
Next, all installed elements, floor boards, rafters, sheathing material, side posts, lower and upper trim must be treated with an antiseptic and preservative. During the time it takes to assemble the rafters and roof of the pitched roof, the procedure must be repeated twice.
For the upper overhang of a pitched roof, installation of rafters and sheathing, you will need to secure an additional horizontal beam of the mauerlat, as in the diagram.
The cutting of the seat on the rafter beam is carried out according to the markings or according to a prepared template. After installing and leveling the position of each beam, it is recommended to fill the space between the beams with short boards; they will fix the rafter from horizontal displacement and at the same time strengthen the base of the pitched roof.
Roofing and finishing works
At the final stage, we sew up the rafters of the pitched roof with a sheathing board. If bituminous materials - flexible tiles and roofing felt - are used for the roof of the barn, additional OSB sheets will need to be laid on the boards or the sheathing will need to be completely hammered in with wooden clapboard.
The easiest way to cover a pitched roof is with corrugated sheeting. The metal surface will withstand any disasters that may occur in a summer cottage, and laying and fastening roofing material is much easier and faster than euro-slate or roofing felt. A polyethylene film is laid as waterproofing, the edges of which will be released from under the awnings and nailed to the top edge of the wooden walls of the barn.
Laying the roof on a pitched roof begins with the bottom left sheet, as in the diagram. Each element is joined to the previous one in a row in an overlap of two waves, an overlap of 15-20 cm is made on the bottom sheet. The overlap areas, the lower and upper edges must be pierced with roofing nails with a silicone washer.
Wind strips are nailed to the sides of the roofing pie, protecting the pitched roof from water flow and gusts of wind. We nail a similar strip for installing a drainage gutter under the lower overhang. We protect the upper overhang of a pitched roof with a screen made of two wooden planks.
The assembled frame of a shed, as a rule, is not insulated for the winter, so lining, ordinary edged boards or OSB sheet panels can be used as a material for lining the walls. To install the cladding, you will need to install additional vertical slats and struts on the walls. The joints and cracks between the OSB boards and the edged boards must be blown out with polyurethane foam, excess polyurethane foam must be cut off and painted over with weather-resistant paint.
Flat roof pie: what's inside?
A flat roof pie on a wooden frame can have a different structure. There are many design options, many of them are posted on the Internet. And they will all work!
Option 1. Roof with insulation over beams
Flat roof insulation layers can be laid on top of the beams. For example, a proven working option (classic roofing with insulation):
- floor beams;
- lathing (if necessary);
- continuous cladding made of plywood, CBPB, OSB;
- vapor barrier;
- insulation – EPPS, mineral wool;
- waterproofing material – polymer membrane.
When using EPPS insulation and PVC membranes simultaneously in the structure, a separating layer (geotextile, fiberglass) must be laid between them. The fact is that these two materials are incompatible and when they come into direct contact, the PVC is destroyed.
The polymer membrane is fixed to the insulation mechanically or loaded with ballast. Crushed stone or gravel (for all types of roofs), paving stones (for maintained roofs), and soil (for green maintained roofs) are used as ballast. However, when choosing ballast, you should soberly assess the reliability of the wooden frame and its maximum load.
If the final coating is to use a weld-on waterproofing or an EPDM membrane with adhesive fixation, a change is made to the scheme discussed above. It consists in laying sheets of plywood, OSB or DSP between the insulation and waterproofing.
This results in the following diagram:
- floor beams;
- lathing (if necessary);
- continuous cladding made of plywood, CBPB, OSB;
- vapor barrier;
- insulation – EPPS, mineral wool;
- plywood sheets, OSB, DSP;
- waterproofing material.
Installation of a built-up roof traditionally requires the use of a gas burner, therefore, according to existing fire standards, it is not allowed on wooden structures. Therefore, they act as follows. The first layer of waterproofing is nailed or glued to a wooden base, and the second layer is fused, as it should be. It is also convenient to use euroroofing felt with a special adhesive base, for which cold installation without heating with a torch is recommended.
The installation of a membrane roof on a wooden base is shown in the video:
Option #2. Roof with interbeam insulation
Another principle of assembling a flat roof pie is associated with laying insulation in the space between the beams. This option is more convenient than the first if EPDM membranes with adhesive fixation or fused roofing are used as waterproofing.
The following roofing pie scheme is often used:
- floor beams;
- vapor barrier (between beams);
- insulation (between beams);
- lathing (if necessary);
- continuous cladding made of plywood, CBPB, OSB;
- waterproofing.
In principle, a similar system is used in the formation of classic pitched roofs.
Option #3. Roof with internal insulation
In this case, sheets of plywood, OSB or DSP are sewn onto the supporting structure (beams), and waterproofing is laid over them. The remaining insulating layers of the roofing pie are sewn on the side of the room.
A rough ceiling (made of boards or sheet materials) is fixed to the beams; planks are screwed to it, perpendicular to the load-bearing beams, in increments of 40 cm. Polystyrene foam boards are placed between the planks, gluing them to mastic or glue. A vapor barrier film is sewn to the insulating layer. Cover the insulation cake with a finished ceiling.
Design diagram (top to bottom):
- waterproofing;
- continuous sheathing made of sheet materials;
- beams;
- rough ceiling;
- insulation;
- vapor barrier film;
- finished ceiling.
An example diagram would look like this:
Option #4. Inversion roofing on beams
Or you can go against all “traditional” solutions and build an inversion roof on beams. Due to the fact that the waterproofing will be covered with insulation, that is, protected from loads, exposure to oxygen, UV rays and precipitation, its service life is significantly increased.
When constructing an inversion roof, you can use the following diagram (from bottom to top):
- beams;
- continuous sheathing;
- waterproofing;
- separating layer (when using PVC membrane as waterproofing);
- EPPS insulation;
- separating layer – geotextile;
- ballast, paving slabs, decking, etc.
The principle of inversion roofing is often used to install green roofs. For example, you can do this:
Shed with pitched roof 3x6
It is difficult to imagine a country house or dacha without outbuildings. Gardening tools, summer swings, hammocks and folding furniture are stored in the sheds; farm animals and poultry can also be housed here, hay and feed can be stored. As a rule, outbuildings are constructed from materials that remain after the construction of the house. The owner can only choose a drawing of the barn, decide on its size and roof structure.
Pediment and cornice
The pediment is sewn up after the construction of the rafter structure is completed. Modern materials are increasingly replacing traditional wood when sheathing gables, and now they use lining, siding, corrugated board, and other durable decorative finishing materials. Any cladding material is attached to a frame, which is mounted in advance. Regardless of whether or not there is a room or attic in the attic, it is necessary to leave a window opening in the gable - for ventilation and minimal natural lighting of the space.
Arrangement of the pediment
The cornice must be installed around the entire perimeter of the house - it is necessary for moisture and wind protection of the truss structure, the walls of the house and the foundation. Since every self-respecting owner must install drainage systems around the perimeter of the house, they are also attached to the eaves, and drain pipes to the walls. The plastic drainage system is mounted on plastic clamps. The bottom of the cornice boards or cornice frame is painted, sheathed with siding, clapboard or corrugated sheeting - in unison with the finishing of the pediment.
Gable roof cornice
The roof is mounted on the sheathing, and, based on the type of roofing materials, the sheathing is first done with vapor barrier, hydro- and heat-insulating materials. For roofing, you can use ondulin, metal tiles, ceramic materials, soft tiles, etc.
Barn construction
The most optimal size for an outbuilding is 3x6 meters. This area is even enough to build a summer shower and toilet inside the building, and you can also arrange a summer kitchen here.
You can make a drawing of a shed using photos found on the Internet, or come up with your own original shed, and then transfer the idea to paper. It is not recommended to build even the simplest buildings without a drawing. After all, all the dimensions and inconsistencies will become visible on paper.
The roofs of barns are most often made pitched. A flat roof retains too much precipitation and snow masses and requires careful waterproofing. Roofs of complex shapes are also inappropriate for sheds, because this building is not intended to decorate the site, but to serve household needs.
The optimal solution for a shed would be a pitched roof. Unlike a gable roof, there is no need to install a ridge; you will need half as many rafters. It is easier to assemble a pitched roof, and precipitation and snow disappear from it very quickly, without threatening the waterproofing.
The optimal value of the pitched roof angle is 18-25 degrees.
The walls of an outbuilding can be erected from absolutely any materials, it can be:
- brick;
- foam concrete or aerated concrete;
- boards;
- plywood or MDF mounted on a wooden frame (frame type building).
Varieties
All mansard roofs can be classified into 4 categories, each with different designs. Moreover, such attics can be single-level or two-level. It is easier to build a one-level attic. As a rule, this design involves the construction of a conventional gable or sloping roof.
Two-level attics are more difficult to construct. This design involves the construction of 2 rooms at different levels. In this case, the method of combining supports is used.
In the photo of the attic roof you can clearly see the design options for such structures. Additionally, a balcony can be provided. It is constructed by analogy with a window opening.
But this possibility depends on the load-bearing capacity of the walls. If it is not enough, a balcony can be built using additional supports.
Shed made of foam blocks
If you need to buy materials for building a shed, it is better to opt for foam concrete. Porous blocks have many advantages over other building materials:
- do not burn;
- do not absorb moisture;
- are light in weight;
- There are several standard sizes, from which it is easy to choose the best option for a small building;
- have higher strength and heat capacity than bricks;
- can allow air to pass through no worse than wooden walls;
- absolutely safe and non-toxic.
Despite the lightness of foam blocks, it is imperative to build a foundation for the shed. Considering the size of the building (3x6) and the weight of the structures, it is better to choose a strip foundation. For stable, dry soils, a columnar base is also suitable.
A strip foundation for a small outbuilding is poured to a depth of about 40-60 cm, and it is necessary to take into account the depth of soil freezing on the site in winter.
The ground at the site chosen for construction is cleared of debris, roots and vegetation. They mark the perimeter of the barn and dig a trench for the strip foundation.
A “cushion” of sand, crushed stone and gravel is poured into the bottom of the trench and compacted thoroughly. Now you need to secure the formwork for the foundation from old boards, plywood or slate. Metal reinforcement is installed inside the boxes, which should strengthen the foundation.
Concrete is poured. The solution is pierced in several places with a metal pin, ridding the foundation of excess air. Now you need to leave the foundation for several weeks so that the concrete can gain the necessary strength.
Once the concrete has dried, you can begin building the walls. First lay out the bottom belt.
In accordance with the building drawing, the walls are laid out, making window and door openings. The outbuilding box made of foam blocks is ready.
Insulation from the cold
To insulate the extension, use polystyrene foam or mineral wool.
Moisture-resistant types of insulation are used, for example, penoizol, polystyrene foam, expanded polystyrene. If mineral wool is laid, the waterproofing membrane is placed so that there is no contact with the insulating layer. Vapor barrier is important, which does not allow household vapors to pass into the roofing deck.
The appearance of moisture in the layer increases heat conductivity, and the material ceases to perform protective functions. To prevent getting wet from condensation, install a counter-lattice - additional bars along the rafters.
Expanded polystyrene is thin and contains a reflective foil coating on one side, so it does not transmit infrared rays. Polystyrene foam is not saturated with moisture and retains its declared qualities. Cotton insulation is an environmentally friendly material, but requires a ventilated gap.
Wooden barn
Much more often it turns out that the owner has leftover wood, and he decides to build a wood shed. For such work, at least minimal carpentry skills are required, because you will have to work with both a saw and a plane.
A building made of wood weighs very little; a columnar foundation can serve as its base. To do this, markings are made on the site, transferring the perimeter of the future building to the ground.
Posts are installed at the corners of the barn. Several more supports should be located in the center of the rectangle. The distance between the supports is 80-120 cm (depending on the size of the shed and the type of soil on the site).
The depth of the supports depends on the level of soil freezing in the construction region; on average, it is 40-60 cm. After the trenches for the supports are dug or drilled, wooden formwork is installed in them, a sand and gravel “cushion” is filled in, and metal reinforcement is laid.
Related article: Modern one-story houses with a flat roof projects
Now you need to pour the concrete. After 5-6 days, when the foundation has hardened, you can dismantle the formwork and begin building walls.
First, you need to make the bottom frame of the building from timber. Before laying the wood, the foundation supports are covered with a double layer of roofing felt. At the corners, the timber is connected with metal brackets and checked for level.
Install vertical supports in the corners of the barn, always checking the level. They are fixed with temporary spacers. Taking into account the door and window openings, the entire frame of the barn is assembled from wooden beams.
After assembling the frame, they begin covering the walls. This can be done with boards, moisture-resistant plywood or other sheet material.
Selection of roofing material
Initially, building materials are selected taking into account the exterior of the attached premises, and the cost of the roofing is of no small importance. The load-bearing rafters are affected by wind, snow and the weight of the flooring itself
To correctly assume the magnitude of the loads, refer to reference books that indicate the strength of the seasonal wind, the calculated thickness of the snow flooring and its pressure on the roof.
The material is selected taking into account these parameters. If you take thin metal or a soft type of coating, arrange a solid base from sheets of chipboard or moisture-resistant plywood. Rigid flooring with a high wave can withstand heavy loads and is mounted on flat and low-slope roofs.
Installation of a barn roof
Assembling a shed roof with your own hands step by step consists of the following steps:
- Installation of the mauerlat - a load-bearing beam that serves as the top frame for the walls, as well as support for the roof rafters.
- Making patterns for rafter legs. All rafters for a pitched roof are the same, so first one piece is made, which serves as a template for cutting out the rest. For a 3x6 shed roof, eight rafter legs will be enough. They are cut from 50x150 mm timber. The length of the rafters should be equal to the width of the barn plus two eaves overhangs. To prevent the walls of the barn from getting wet, the overhangs should be 40-50 cm. In accordance with these data, the beams are cut to the required length. Where the rafter rests on the mauerlat, a recess must be cut in the beam.
- The rafters are secured to the mauerlat with nails or metal staples.
- Lay waterproofing material, starting from the lowest point of the roof. This way, draining moisture will not get into the joints. The overlaps between adjacent strips must be at least 15 cm.
- Depending on the chosen roofing material, sheathing is installed on the roof of the barn. The step directly depends on what the roof will be covered with later.
- Roofing material is mounted on the sheathing. Most often, slate, flat or shaped galvanized sheets, metal profiles are used for sheds - the cost of these materials is lower than others.
Photos of finished sheds will help you decide on the type of construction and size of the utility room. But most owners of suburban areas and summer cottages choose small outbuildings, with parameters of 3x6 meters. And the roofs are made pitched; this design is easier to implement, cheaper and performs well in operation.
Installation of the rafter system
The first step in building a roof is installing the rafter system. The rafter system can be triangular in shape or located at different levels of the building. The choice of rafter system does not affect the quality and stability of the structure; these parameters are equal in both cases.
The triangular rafter system is characterized by a large amount of lumber costs, because it includes beams, posts and rafters. Its advantages include ease of installation, which is due to the ability to mount the structure on the ground, and then, using winches, lift it to the required level and carry out installation work. Also, this type of rafter system does not require building up load-bearing walls. You can see an example of a roof with a triangular rafter system in the photo below.
A rafter system located at different levels of a building, on the contrary, requires an increase in load-bearing walls, because The rafters should rest against them to strengthen the entire structure as a whole. The advantage of this method of roof construction is the low consumption of lumber.
To attach the rafter legs, supports and slopes are used, the number of which is influenced by: the weight of the rafter leg, the slope of the slope, the total length of the leg, the distance between the roof and the wall, as well as the thermal insulation layer and roofing material.
Shed roof for a barn: a budget option
For a summer resident, a shed is almost indispensable in the garden - you can store equipment, tools and even bulky items in it. Installing a shed on a foundation prepared in advance is only a matter of a few hours if you have an assistant. Its roof can be pitched or gable. The choice is only a matter of personal preference and available materials. A shed roof for a barn requires significantly less material - almost half.
This roof is tilted to one side, so the height in the barn is not the same. This is necessary to ensure normal drainage of water from the roof, but due to this, the headroom in such a shed will be limited.
A shed roof for a barn usually has a slope directed backwards, that is, the height of the facade in it is greater than the height of the rear wall.
Windows are usually located on the side of the facade. In this case, you can use natural light in the shed, for example, place a workbench under the window or grow plants in pots.
Selecting an extension project
We quickly decided on the size: 6*3, this footage fully corresponded to our wishes.
We thought for a long time and chose the extension option. I didn’t want a single-slope one; in my opinion, it greatly simplified the design visually. If such an extension is on the side, it looks like a shed; if it is forward from the gable, it is better, but also not the same. For a long time, the main option was an extension with beveled corners, such as a bay window.
But then a picture of a house with a sloping roof and an extension with a gable roof caught my eye. After discussing with the household all the pros and cons of the two options, we chose the second option.
The disadvantages mainly consisted of the increased price of the “bay window” extension, a more complex roof to construct, the loss of several meters due to beveled corners, and an increase in the number of screw piles for the foundation.
How to properly build a pitched roof for a barn ↑
A simple drawing of a shed with a pitched roof, which you can build with your own hands (photo above ) consists of the following parts:
- pitched roof,
- doors,
- small window.
How to ensure tilt angle ↑
You can achieve the desired angle of inclination in various ways.
- Small posts are attached to the top beam of the frame with nails, and ceiling beams are also attached to them with nails.
- If the width of the barn is small, it is enough to simply nail another beam to the front one.
- During the construction process, you can initially build one of the walls higher than the other - the front wall is higher than the back wall. In this case, the ceiling beams are laid directly on the frame. These roofs are usually not hemmed underneath.
Installing a pitched roof for a small shed ↑
An ordinary trailer can serve as a small shed. You can also install a pitched roof on a trailer yourself . Typically, the support for such a structure is the front beam, which is mounted on top of the front panel, and cone-shaped strips nailed from the sides to the side walls. They are screwed to the panel using single-pitch fasteners.
The roof itself in this case is a large sheet of chipboard that hangs over the side walls, protecting them from rain. The roof is raised, placed on the beam and support strips, leveled so that it overhangs the walls equally on all sides, and then nailed down.
Choosing an Angle and Shape
The greater the roof extension, the less the risk of the walls getting wet.
The shape is chosen so that it matches the appearance of the house and is economically justified. The complexity of interfacing with the building frame and the difficulty of execution are taken into account. The enclosing surface of the coating is exposed to negative influences.
When choosing a slope angle, we are guided by the following factors:
- the amount of rain and snow load in the region;
- wind strength and direction;
- volume of solar radiation;
- indicators of summer and winter temperatures;
- indoor mode.
They ensure sufficient overhang of the cornices to prevent the walls from getting wet, and provide a system of organized drainage and fastening to it. In heated extensions, the outlet of the chimney and ventilation are marked and other structural elements are installed.
Construction of a pitched roof for a barn: basic principles ↑
On both sides of the racks, longitudinal slats (4 x 10 mm) made of wood are mounted lengthwise, which should extend at least 20 cm on both sides beyond the ends of the walls. Transverse ceiling beams will be located on them. Thick boards of about 7–8 cm may also be suitable for this. They are laid in increments of 60–80 cm and secured with nails or special corners.
Then, from the side of the facade of the barn, a beam of the same cross-section as for the strapping is nailed. Next, logs (sheathing) are installed in increments of 50 cm. These boards begin to be laid from the high side of the facade to the lowest. The structure is also nailed down and twisted with wire in several places. It is recommended to extend up to 20 cm from the sides.
The roof of a regular shed usually has a slight slope. Consequently, during snowy winters quite a lot of snow can accumulate on them, and during heavy rains - moisture. Therefore, it is advisable to strengthen the roof of the barn in advance so that the roofing material does not quickly sag. The rafters are strengthened by adding transverse beams to the frame, which will provide additional support. It is better to set the rafter spacing to no more than 0.5–0.75 m.
Roofing material is spread overlapping on top of the logs and secured with nails to thin strips. Roofing material – corrugated sheeting, slate, ondulin – is attached on top of the roofing material.
How and how to cover a pitched roof for a barn ↑
Often, roof panels are already covered with roofing felt, which protects it from rain, dampness and moisture. If there is no special coating on them, the roof must be sheathed with roofing felt. It is cut to the width of the roof. The first strip of roofing material is placed on the very bottom edge so that it hangs about 5 cm above the wall. Fold and nail at 10 cm intervals on the inside of the roof panel using 1.2 cm galvanized large-head nails. The second strip is laid above the first - it should overlap the upper edge of the previous strip by 10 cm, and is nailed in the same way using nails. If the dimensions of the barn roof are small, then a layer of roofing material can simply be laid on it and secured with boards treated with an antiseptic.
A thin border strip is nailed to the joints of the rolls. The only exception is the bottom of the rear wall, onto which the slats are not nailed, thereby ensuring unhindered water flow.
Design features of a pitched roof
There are ventilated and unventilated pitched roofs.
When choosing a specific option, focus primarily on the purpose of the building. Unventilated pitched roofs are usually placed above terraces. In such a situation, it will be enough to tilt the slope by 3-5 degrees. However, in winter, the owner of a terrace with such a roof will have to pay additional attention to cleaning the roof from snow mounds
Ventilated roofing systems are installed on houses, saunas and other buildings that require the creation of a favorable microclimate. To ensure ventilation, it is enough to create a gap between the layers of insulating materials and prepare technological holes at the side ends of the roof. Ventilated roofs last significantly longer than their non-ventilated counterparts.
Single-pitch roofing structures are built on simple rafter systems. The technology for constructing such a roof requires the presence of a mauerlat - this is a support beam fixed to the external walls. The racks of the rafter system will rest on this beam.
Rafters for a pitched roof
The slope of the structure is created due to the difference in height of the walls of the house. If the load-bearing walls of the building have the same height, a pediment is fixed to the corresponding wall (taking into account the required slope direction). Thanks to this simple design, the required height difference will be set.
When choosing the design of a rafter system, it is important to take into account such a parameter as the span length. If the walls on which the rafter legs rest are no more than 450 cm apart from each other, no additional reinforcement of the rafters is done
Otherwise, the rafters are supported with the help of a rafter leg - this is a block, the lower end of which rests on a bench. The latter is an additional supporting element fixed along a wall of greater height. This recommendation is relevant for cases where the span between adjacent walls is 4-6 m.
If the span has a length of 6-12 m, the middle of the rafters should rest securely on a special purlin fixed on the racks. Rafter legs are installed on the sides of such a rack. The previously mentioned bench is located parallel to the supporting walls. The distance between the stand and the wall in each direction can be a maximum of 600 cm.
If the span length is more than 12 m, 2 supports are mounted from the purlin using the support and reinforcing posts. The supports are located no further than 600 cm from the walls. The gap between individual racks should be no more than 30-35% of the total length of the entire span. Use a clamp to secure the posts together.
Rafter legs are fixed between the rafters and the support posts. Each rack is combined with one rafter leg. The racks are fixed in the direction of the load-bearing wall, located at a minimum distance.
Common mistakes
In addition to incorrectly calculating the amount of materials and the load on the building, there is another mistake that will have a bad effect on the reliability of the roof - the lack of ventilation or its improper arrangement. Violation of the ventilation regime will lead to the roofing cake collapsing over time.
To avoid such consequences, it is important:
- leave a sufficient gap between the roof and the insulation;
- make special passages for ventilation in the ridge and eaves of the roof;
- leave the required air gap - for flat roofing coverings the gap should be at least 50 mm, and for profiled roofings - at least 25 mm.
Required materials and tools
In order for the construction process to proceed quickly, without causing downtime, you need to immediately purchase the necessary materials and make sure that the tools are available. An outbuilding with a pitched roof is a fairly economical option; for its construction, they mainly use wood; it can even be built from cheaper second- and third-grade lumber. You will need:
- Beam 100x100 mm or 150x100 mm for constructing a frame;
- Edged boards 50x150 mm for the rafter system;
- Edged boards 40x150 mm for cladding;
- Unedged boards for sheathing;
- Roofing material;
- Waterproofing film;
- Ruberoid
- Mixture for making concrete, sand, fine gravel
- Fasteners: nails, screws.
Tools that will come in handy include a powerful screwdriver, drill, grinder, electric plane, and jigsaw. In general, all operations can be done manually, but the presence of electrical devices will speed up the construction process by half.
Important nuances
If you make calculations and calculate the costs, then you will be able to choose budget options.
It’s easy to build a structure with your own hands from corrugated sheets, wood, and foam blocks. The frame can be built in a few hours, and the shed can be erected in two days.
However, such speed of construction is only possible when using certain materials, for example, timber and boards. If you use other building materials, such as brick, or a shed made of foam blocks, it will take more time.
Skate attachment
A ridge is a rib located at the very top of the roof, formed as a result of the contact of the roof slopes. The components of this element also include various parts attached to the rib. It is at this point that the roof roof is ventilated.
Did you know? People first learned about corrugated sheets back in 1820, for which today we must thank Henry Palmer, a British engineer and architect who was the first to start corrugating.
The process of installing the ridge is also the process of arranging its run, connecting the slopes of the rafter systems.
The method of installing this element directly depends on the type of roof, which means it’s worth thinking about when choosing a specific covering material. For example, when purchasing asbestos-cement sheets. Shaped elements resembling a gutter are ideal for them.
They are fixed to boards or ridge beams using nails for fastening slate sheets, with a rubber gasket on them. It is also mandatory to waterproof all covering elements, and the ridge beams are covered with roofing felt tape.
To fix all the ridge elements, first install a special beam with a cross-section of at least 70 x 90 mm. Then two sheathing bars are attached to it on both sides, and to simplify the task of installing the parts, special brackets can be attached to the central wooden block to hang the walking bridges from them.
Important! When choosing a ridge board, keep in mind that it should be 10-15 cm thicker than the sheathing boards.
The ridge beam is attached to the central one, and for the convenience of performing this task, its upper edge should be rounded. This form guarantees a more durable attachment of all parts of the ridge, and to prevent rotting and the development of mold of the wooden parts, it is better to cover them with ordinary roofing felt along the entire length, applying enamel or paint on top.
The ridge ceiling is obtained by combining two ridges placed on adjacent slopes, after which the main ridge, extended by 10 mm, is fixed.
67edd9c3d932775c99921889e6f99a73.jpe
88eb853caecc7e3b5aaa7f5468223310.jpeConsider the option of installing a ridge on a metal flooring:
- It is necessary to make holes on two skates, exactly the same as on the flat block side.
- Then two holes are drilled and on the longitudinal axis of the line of the timber hump. Just make sure that on the lapels they intersect the crests of the waves of the coating.
- The ridge is installed on top of the end strips, and its edge should extend outward by at least 2-3 cm.
- When installing a flat element, you need to ensure that all parts are joined together with an overlap of about 10 cm or even more.
- In the process of joining the elements of a semicircular ridge, the connection is made along stamping lines.
- Be sure to consider the possibility of combining the ridge strip with the angle of inclination of the covering material. If necessary, you need to adjust the angle of the plank to the angle of the slope (if necessary, it can be easily bent and unbent).
- It is quite possible that additional installation of a ridge board will be required, which is placed slightly higher than the top sheathing board, but maintaining an 80-mm gap between the slopes themselves and their ridge boards for good ventilation of the free space under the roof.
Video: installation of corrugated sheets and installation of a ridge
The final installation of the ridge strip is carried out by tightening it with self-tapping screws to the highest parts of the metal tile sheets. The pitch of the screws is usually within 0.8 m.
At this point, the independent organization of the attic roof is considered completely completed, and the final result will depend on the accuracy of all the above actions.
Of course, doing the work yourself seems to be a more profitable option than paying workers, but in some cases the opinion of specialists is really important, which should never be forgotten
The advantage of single-pitch systems
A do-it-yourself shed roof on a barn is good not only because it can be done on your own, but also because it has other positive aspects:
- Minimum consumption of lumber and their availability are one of the main advantages of the design.
- Speed and ease of construction are especially important when building a shed with your own hands.
- The flat roof of the utility block perfectly resists wind loads. It is quite durable and reliable.
- The weight of the entire structure is light, so you can build a barn from blocks, bricks, wood and other suitable materials. Most often, a frame shed is made, since it is quickly assembled.
- To cover the flat roof of a barn, you can use any suitable roofing materials, including the most inexpensive ones (roofing felt, galvanized roofing steel, profiled sheet).