how to make a table from a profile pipe
In fact, making a table frame from a profile pipe is a great idea. It is clear that this is a matter of taste, but from a practical point of view, metal structures have a number of undeniable advantages. We won’t list them all, they are obvious. If you want to learn how to make a table from a profile pipe with your own hands, here are ten specific examples with step-by-step photos. If you don't have much experience working with metal, this is a good opportunity to practice because the projects presented here are quite simple. For example, making a coffee table from a profile pipe or a frame for a dining table is possible even for a novice craftsman.
How to make metal beds with your own hands
An iron bed is an item that can add special luxury and chic to the interior. Smooth metal curves will add aesthetics to the bedroom.
An iron bed is an object that can add special luxury and chic to the interior. A person spends a third of his life sleeping. A good night's rest is the key to daytime activity, the quality of which can only be ensured by a comfortable bed.
Smooth metal curves will add aesthetics to the bedroom. Furniture stores offer a wide range of choices for this essential piece of furniture. But it is not always possible to choose exactly what you need based on all parameters. In this case, the question arises of independent production of such an important piece of furniture.
A good night's rest is the key to daytime activity, the quality of which can only be ensured by a comfortable bed.
- Connect the opposite ends of the pipe to each other using a clamp or welding.
- Drill holes exactly in the middle of each of the long sides of the rectangle.
- Align the rectangles so that their holes match.
- From the outside, insert a pin or bolt into the hole so that it goes through both pipes.
Video description
An example of making a table of an unusual design is shown in the video:
When the frame is ready, it is processed with a grinding disc, smoothing out the welds and removing rust. Then it is primed, coated with paint and allowed to dry.
When making furniture from profile pipes and wood, parts from different materials are fastened with ordinary self-tapping screws. To attach the tabletop, it is laid on the floor or other flat surface, and an inverted frame is installed on it. Mark the mounting holes and drill them into the metal, selecting a drill to match the diameter of the screws. They are screwed in from the side of the frame so that the hardware goes through it and goes deeper into the boards of the table top, but does not go right through them. Why fasteners are selected in advance according to length.
The last stage is sanding and treating the table top made of planed boards with paints and varnishes.
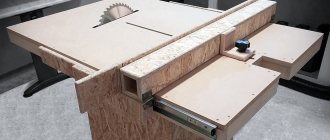
Table for welding work made of profile pipes
Greetings to all DIY enthusiasts, today we will look at a useful homemade product for a welder. Those who have welding know that without a table or at least some kind of metal plate, it is quite inconvenient to carry out welding work. You have to work forever on the ground, ruin the covering on the table, and so on. For welding work, you must have a welding table that will be convenient for you in height and near which you do not need to bend your back. Another advantage of the table is that you don’t have to constantly sculpt a mass onto the part, the wire of which usually gets in the way. To weld, you just need to place the product on a metal table and there will already be a mass on it. The author welded a table for himself from profile pipes. The table top is made in the form of a grate through which garbage spills onto a removable tray. The table also has shelves for a welding machine, electrodes and other tools. If you want such a table, I suggest you familiarize yourself with the project in more detail! Materials and tools used by the author: List of materials:
- rectangular profile pipes;
— OSB or similar durable sheet material; — sheet steel for the pallet; — wheels for trolleys; - steel plates; - paint for metal. List of tools:
- grinder;
- welding machine; - marker; - roulette; - vice; - clamps; - screwdriver. Table manufacturing process: Step one.
Tabletop First of all, we cut the required amount of materials to make the tabletop. It is made of two components, many pieces of pipe directly for the lattice table top, and also two more pieces of pipe as a base to which everything is welded. The author cuts the pipes with a grinder, this is long and inconvenient, since you have to cut from both sides. It would be nice to have a miter saw or similar machine for cutting pipes.
Step three. Painting
We paint the table together with the frame from a spray can, but it is important for us not to paint the top plane, since it must conduct electric current. The author sealed the top part with masking tape. Of course, steel will rust, so it would be nice to come up with a conductive coating. As an example, you can try using a thin layer of graphite lubricant; it conducts current and will prevent the steel from rusting.
Step four. Wheels
We attach the wheels from the carts to the frame of the table, choosing something more reliable, since the weight will be considerable. Thanks to these legs, the table can be easily moved along with all the equipment and parts. The author fastened the wheels with “self-drilling” screws.
Step six. Equipment installationWe install a welding machine in the compartment, attach the mass to the table, the author welded a piece of reinforcement for this. The author made a hook on the side under the “positive” wire; it’s convenient to hang the wire with the electrode holder here. In addition, there was a vice on the table, which is often needed for welding work. Well, in the remaining compartments you can put electrodes, a mask, as well as other equipment and even materials, there’s enough space. That’s all, now the table is completely ready, the homemade product turned out to be beautiful and useful. I hope you enjoyed the project and found some useful thoughts. Good luck and creative inspiration if you decide to do this again, don’t forget to share your ideas and DIYs with us!
Become the author of the site, publish your own articles, descriptions of homemade products and pay for the text. Read more here.Which pipes are suitable and how many are needed?
To make a table, a profile pipe with a thickness of 2 to 4 mm is suitable.
Furniture made from thinner-walled material will weigh slightly less and look more elegant. But a massive pipe can withstand high loads and last longer. In addition, it is easier to fix it at home using inverter welding.
More often they use a profile of 40×25 mm or 20×20 mm. The material is necessary for the manufacture of the frame frame and legs. Its quantity depends on the size of these parts of the product. To make a medium-sized table, you will need approximately 6.5-8 linear meters of profile.
General recommendations for production
To make a table or chair from a profile pipe, you start, as in any other business, with a project, selection of materials and tools.
Selection of construction and design
The design, shape, size and design of the product are determined by its purpose and the design of the surrounding space into which it should fit harmoniously. Any types of tables are excellent from profile pipes:
- large dining room;
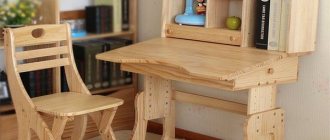
- desk with drawers and shelves;
- desk with an inclined tabletop;
- magazine;
- mobile serving table;
- table for a gazebo or recreation area;
Garden furniture set Source 9dach.ru
- folding transforming table with one or two benches;
- a convenient workbench in the workshop for metalwork.
Having decided on the functionality and location, they begin to create diagrams and drawings. Separately draw the frame for the tabletop and the supporting structure. The simplest one consists of four vertical legs connected by longitudinal, transverse or diagonal jumpers. But you can design more original products from professional pipes.
Table frame with X-shaped legs Source cs1.livemaster.ru
It is advisable to make several projections of the frame: the base and all the sidewalls, which have different numbers and locations of parts. This will allow you to accurately determine the required pipe footage, the number of nodes, decorative elements, etc. A detailed drawing will facilitate the practical stage of work.
Step-by-step instructions for assembling a table from a professional pipe with your own hands
The first step is to determine how the future piece of furniture will generally look: a coffee table or dining table in the garden, on the terrace; what will be the design of the legs - straight or crossed, etc. For a workbench, the diagram will be simpler, but its future location and the profile of the work that will be performed on it are important. The sizes of the components depend on this.
A drawing diagram is drawn indicating the dimensions of all segments.
Based on the drawing, materials and consumables are selected, and the necessary tools are selected.
Required tools and materials
To work with metal and wood at home you will need the following set of tools:
- Power saw.
- Plane.
- Grinder machine.
- Grinder with carved and cleaning discs.
- Welding equipment and electrodes.
- Drill-driver with drills for metal and wood, attachments for screwing nuts.
- Devices for bending pipes (if necessary).
Materials are selected according to the drawing:
- Profile pipes in the required quantity.
- Boards or any solid material for the countertop.
- Bolts and matching nuts.
- Appropriate paints and primers.
Design and construction
The appearance and overall design of the product must correspond to the purpose and style of the room, country house or garden plot. They must fit into the atmosphere, the colors of the surrounding reality.
Any metal structure is based on two segments: legs and a frame where the tabletop is attached.
A table made of profile pipes should be convenient to use. It can decorate a room or garden area, serve for plumbing work or preparing lunch, or be a place for friends and family to communicate over a cup of coffee. Based on the assigned tasks, the design and construction scheme are determined.
For a garden or summer cottage, a table option complete with a bench made from profile pipes is suitable. This material is an excellent solution for making a coffee table in the house or on the terrace.
There are many benches available on websites that are convenient for a garage or home workshop.
Drawings and diagrams
The drawing is of great importance for the master. It serves as a guide to the manufacture of the product, contains dimensions and other necessary design information. I have selected several drawings and diagrams that can serve as a sample for your furniture.
Work progress
To make the simplest version of a table from corrugated pipes, you will need 4 legs, 2 short cross members and 1 or 2 long spacers. The cut is made at a right angle in order to subsequently achieve a better connection. The cutting areas are cleaned from burrs with a disk or file.
First, the frame is welded, ensuring that the elements are connected in the same plane. Then the legs are welded at right angles. The welding areas must be cleaned with a grinding disc.
After assembling the frame, the structure is primed and painted with powder paint. This type of coating is more suitable for metal.
Attach the table top. It can be assembled from planed boards, use a sheet of chipboard, a tabletop from an old table, or finally purchase it ready-made. The easiest method of fastening is with self-tapping screws through drilled holes in the metal frame.
Self-tapping screws are screwed into the back of the tabletop; they must be less than the total thickness of the profile pipe and the table covering.
In the video below you can see how a folding table is made
Welding and threaded connection
If elements are welded, the contacting surfaces must first be cleaned with a file, removing scale, rust, and dirt. If an old water pipe is used, it is better to completely brush it with a wire brush before starting welding work, removing paint residues. When making a frame, the ends of the pipes can be cut at an angle of 45°, corner welded joints can be made, and then a closed structure will be obtained. The legs are usually welded to the frame with a T-joint. It is important to select electrodes of a suitable diameter for welding; it can be equal to the thickness of the pipe walls or slightly thinner (for steel pipes with a thickness of 2 mm, an electrode with a diameter of 1.5 mm is suitable). During the welding process, it is necessary to periodically remove slag, which reduces the strength of the weld. After finishing the work, the welding seam must be smoothed using a file or grinder.
For threaded connections of profile pipes, special clamps are best suited; they have holes for fasteners, and there is no need to drill the pipes. If metal corners are used for connections, holes are drilled in the pipes for bolts and screws. Hollow pipes are connected with bolts and nuts. If self-tapping screws are used, wooden bushings are hammered into the ends of the pipes and screws are screwed into them. Before attaching the tabletop, the frame must be cleaned of rust, polished and painted; it is advisable to additionally treat the welding seams with a composition to protect against corrosion.
It is very convenient to make frame blanks from an aluminum profile on a Monticelli multifunctional machine; it allows you to cut the pipe at the desired angle, drill holes for fasteners, and cut out shaped cutouts with a punch. Corner connectors of the same brand are used to assemble the frame.