Today, many are wondering how and what is the best way to heat their home if there is no gas. Firewood and coal are among the most affordable types of fuel. Therefore, the right solution here would be to build a heating stove, or even better, add a cooking stove function to it. There are a lot of design options both in form and in operating principles.
In this article I will introduce you to the features of the Kuznetsov furnace, its advantages and a step-by-step scheme for constructing such a unit yourself.
Order
The design of the stove is not the simplest, but you can make it yourself. There are several options for constructing a stove, but they are not very different. Here's how the order is done:
- Lay the base of the oven, which will be the first row. On the outside it is lined with facing material; for the inside, you can use halves of red brick.
- When laying the outer walls in the second row, mandatory dressing is used. They also make a special opening into which the blower door will be installed.
- In the process of laying the third and fourth rows, an ash pit is isolated - this is a channel fenced off with a wall one brick thick. The channel is closed from above with a jumper, and the corner inside it is rounded.
- From the fifth row they begin preparations for blocking the channel, which will be completed after the seventh row. At this stage, the side walls are cut together to form a heel.
- The vault is completed, the rise of which is brought to the eighth row. When they begin to form the vault, formwork is sometimes installed to make the process easier. If you fail to remove it, it will simply burn during the fire.
- The next stage is laying out the walls and installing the hot water box. The previously created channel is overlapped, above which three holes must be left. One is located near the water heating box, the other two are in the heating panel.
- The edges of the bricks above the ash pits are trimmed and a grate is laid. Then they install the doors, make a large firebox and walls of the cooking chamber.
In the photo below you can see an example of the construction of the structure.
If you follow the operating rules, the Podgorodnikov stove will last a long time. Before cooking, the structure must be allowed to warm up and the ash pan must be regularly cleaned and the condition of the masonry checked for cracks.
There is no need to use both fireboxes at the same time, and the door of the one that is not working should be closed. If these conditions are met, the stove will provide warmth and comfort for a long time. published by econet.ru If you have any questions on this topic, ask them to the specialists and readers of our project here.
Preparatory work
First of all, you need to choose a place to build a furnace. The easiest way to do this is before building a house - then both the stove and the building are designed together so that three or at least two rooms are heated. With a ready-made house, the situation is more complicated. In this case, they tend to build the stove into an interior partition, since installing it into a load-bearing wall requires complex calculations and dangerous, time-consuming work (part of the wall will have to be dismantled, keeping the load from being blocked by a system of lintels and columns).
You can, of course, limit yourself to a simple wall-mounted arrangement, but then only one room will be heated.
A reinforced concrete foundation must be built at the selected location. Its dimensions must exceed the dimensions of the oven by at least 100 mm on each side. It is not allowed to combine the foundation of the furnace with the foundation of the building - both structures give different settlements and one of the foundations will pull the other along with it, causing it to skew.
A reinforced concrete foundation must be installed under the furnace.
The depth of the foundation depends on the bearing capacity of the soil, the depth of its freezing, and the method of operation of the building (periodically/continuously). Typically, in buildings with year-round habitation of people located on stable ground, the foundation is deepened by 400–600 mm. Crushed stone should be poured onto the bottom of the excavation as a reinforcing layer, and a sand cushion should be placed on top of it.
Then everything is done using traditional technology - they install the formwork, fix the reinforcement frame and fill it with concrete. You should proceed to the construction of the furnace only after the concrete has fully matured and gained sufficient strength - this usually takes about a month.
Before laying the 1st row, waterproofing of two layers of roofing felt or roofing felt must be laid on top of the foundation. The contours of the future furnace are drawn on it with chalk - this will make it easier to navigate.
Construction
The Russian housekeeper stove is not the simplest device, but it is quite accessible for DIY construction. A high-quality order with a description of each step will allow even a novice master to complete all the work without any problems. The difficulty is to understand how the stove works, the features of the device, and the purpose of each component. The 4th generation Podgorodnikov furnace is complicated only by the fact that a chamber with bottom heating appears in the path of gases. In other respects, the circuit diagram corresponds to the classics. The key elements include a small firebox, a large firebox, an ash pan, grates, cleaning doors, a hob, a vault, and under.
The ordering scheme is not difficult to find in an accessible form. There are ready-made projects in which all the preparatory stages are described, calculations and financial costs are made. It should be noted that there are several options for constructing a heated house. They have minor differences, but the project cannot be disassembled, since the circuits are not interchangeable.
Ordinal laying of Podgorodnikov's stove
Row 1 is the base of the future oven. It is enough to cover only the outer perimeter with facing bricks. The inside can be filled with halves or smaller pieces of red brick. Row 2. The outer walls are performed with mandatory dressing. You can observe the appearance of the channels of the lower chamber. The resulting opening will be used to install the blower door. Row 3-4. Since the project was created on the basis of the author’s rich experience, all design features are determined by a certain theory. It is not always appropriate to provide this theory in a project. So, for certain reasons, some corners in the channel of the lower chamber are made rounded. A zone is separated that will act as an ash pit. Row 5-7. Preparations begin to block the canal. In row 7 it is already blocked. Row 8. The wall is tilted by cutting off the edges of the bricks located above the ash pit. The grate is installed
It is important to take into account the thermal expansion of the metal, so you should leave a small gap between the grating and the masonry. 9 row. In the back of the firebox, the bricks also have hewn edges
This procedure is performed so that the fuel, after loading, is distributed on the grate. Doors are being installed. Row 10-12. The water-heating box is closed, and the walls of the cooking chamber begin to form, creating a large firebox. Row 13-16. The cooking chamber has a characteristic arch. It is made of bricks laid on edge. The inward tilt is provided by small brick wedges. Row 17. The construction of the vault is being completed. For more convenient work, formwork can be installed before forming the arch. If it cannot be removed after completion of the work, it will burn safely during the first kindling.
The formation of the chimney does not require comments, so we will not describe these steps.
Safety
The main requirement for any type of oven is its safety. In addition to the fact that the use of a constant open fire in the house always sharply increases the risk of fire, the combustion of any type of fuel produces carbon dioxide, which is extremely dangerous for humans, which, if the design is defective or improperly used, leads to carbon dioxide poisoning.
Therefore, if the owner of the house does not have stove construction skills, the construction of the stove should be entrusted to a master, despite the high cost of this work. Only a specialist will be able to lay bricks in the stove correctly with minimal gaps and correctly install the chimney and pipe, taking into account all possible nuances of its operation, including the prevailing wind direction.
The design of Russian stoves and their evolution
In Fig. Figure 3 shows an ordinary Russian stove, which was installed everywhere, both in simple huts under plaster, and in manor houses under tile cladding. The masonry of the stove was usually made entirely of red stove bricks. The oven is quite simple in design, but very functional - it allows you to cook food for a long time, bake bread (about 20 kg of bread can be baked at a time per 1 sq.m. hearth), dry mushrooms and berries, dry and smoke food, steam wood etc. However, as a heating device it has a significant drawback - the oven only warms up above the hearth. The lower part of the oven is the so-called. the guard (for some stoves it is wooden) is used to store household equipment. As a result, the bottom of the room and the floor do not warm up well, and the walls below become damp. To avoid this, a metal stove - a potbelly stove - is often attached to Russian stoves, but this is quite inconvenient and a fire hazard.
Rice. 3. Scheme of the Russian stove.
The next stage in the development of Russian stoves was the addition of a separate firebox to the stove. The so-called Russian stove with heating. Usually this firebox is located under the hearth, and the hearth itself is covered with a hob. Hot gases from the furnace are directed into smoke circuits located along one or more walls of the furnace. In fact, such a furnace consists of two furnaces combined into one array. As a result, the heating situation has improved. But now, if it was necessary to cook food in a crucible, it was necessary to heat both the crucible and the flood. When only the furnace was fired, the furnace did not heat up, and in the same way, when the furnace was fired, the bottom of the furnace remained cold. This presented significant inconvenience.
A brief excursion into history
Our ancestors noticed the heating effect of open fire when they lit fires in caves. Bonfires were replaced by partially enclosed hearths, and then by the first inefficient fireplaces, most of the heat from which went up the chimney.
The Russian stove, laid using channel technology, in contrast to the famous “blacksmithing”, is only 30-40% efficient
Over time, they came up with a kind of cap that traps hot gases inside the structure, and learned to separate the hot air into several streams. A turning point in technology occurred when I. S. Podgorodnikov, a well-known heating engineer in our country, took up the issue. He invented a “two-story hood,” which organized the exit of flue gases in a slightly different way. However, practice was not enough, and the idea was finally brought to life thanks to I.V. Kuznetsov.
Option of a bell-type device for a wood-burning stove with an oven
Igor Viktorovich created a powerful theoretical basis for bell-type combustion, which he was able to successfully put into practice. Only thanks to his work did stove heating become truly effective. He has developed more than 150 different standards and collected dozens of standard solutions and schemes. The most advanced modifications became popular, hundreds of craftsmen adopted Kuznetsov’s bell-type furnaces. Let's try to figure out how “blacksmithing” works.
How to fold a stove, fireplace. Other documents
Selection of oven
Where and how to place the stove? Selection of oven sizes. Method No. 1 Selection of oven sizes. Method No. 2 Selection of oven sizes. Method No. 3
Furnace structure
About what is not visible, but what needs to be understood Features of solid fuel combustion The main elements of heating stoves Furnace fireboxes - a general idea Firebox for firewood, coal, anthracite Firebox for peat, mine firebox Smoke generators Chimney
Construction of a furnace - general idea
Foundations for stoves Preparation and laying of stoves - general overview Arches and vaults in stoves Kiln tools, devices and products How to plaster a stove Tips for laying stoves; how to whiten a stove
Necessary materials
Materials for laying stoves (1) Materials for laying stoves (2) Auxiliary materials for laying stoves Properties of materials for stoves Clay mortar Four ways to check the quality of clay Lime mortar Cement mortar, heat-resistant concrete mixtures
Furnace set
Stove fittings (1) Stove fittings (2) Chimney sweepers and equipment for maintaining the stove or fireplace
About chimneys
Chimneys and ducts Draft force in the chimney Chimney structure Condensation
After laying
Testing and operation of the furnace External finishing of the furnace Repair of furnaces
Heating stoves
General overview Heating furnace No. 1 Heating furnace No. 2 Heating furnace No. 3 Heating furnace No. 4 Heating furnace No. 5 Heating furnace No. 6 Heating furnace No. 7 T-shaped heating furnace Double-bell furnace (large) Double-bell furnace (small) Small-sized heating furnace
Frame stoves
General overview Thin-walled frame furnace No. 8 Thin-walled frame furnace No. 9 Thin-walled frame furnace No. 10 Thin-walled frame furnace No. 11 Thin-walled frame furnace No. 12 Thin-walled frame furnace No. 13 Small-sized furnace No. 14 Thin-walled brick furnaces
Heating and cooking stoves
Heating and cooking furnace No. 15 Heating and cooking furnace No. 15 (option 2) Heating and cooking furnace No. 16 Thick-walled heating and cooking furnace Ш-5 Heating and cooking furnace No. 16 with a heating cabinet Heating and cooking furnace No. 17 (improved L.S. Borozdenko) Heating and cooking furnace No. 18 (designs by L. A. Korobanov and N. I. Samarin) Heating and cooking furnace No. 19 or “Shvedka” (designs by K. Ya. Buslaev) Thick-walled mini-oven Heating and cooking furnace ( designs by I.F. Volkov) Double-bell stove IP-1 (without oven) Double-bell stove IP-2 (with oven) Heating stove “Economka”
Kitchen stoves
General idea Simple kitchen stove Kitchen stove with oven Kitchen stove with trenches Kitchen stove with oven and hot water box
Various ovens
About stoves made of titanium About stoves made using barrels and more Multifunctional outdoor stove; stove for heating a greenhouse Stove with an open firebox Hearth with a table and spit A little about air heaters Home smokehouse
Heating shields
General overview Light-weight heating panel Thick-walled heating panel
Sauna stoves
Heater stoves for Russian baths. General presentation of the design of heater stoves for Russian baths. Heater stove designed by A. Suzdaltsev. Heater stove designed by A.F. Filichko. Sauna stoves
About fireplaces
Choosing a Fireplace Size Fireplace Placement Fireplace Foundation About Brick and Mortar Fireplace Firebox Choosing a Fireplace Pipe How to Increase Fireplace Efficiency About the Fireplace Tooth What kind of wood should you burn in your fireplace?
Laying (arrangement) of fireplaces
Simple fireplace Stove Swedish with a fireplace Stove-fireplace with a steel cap Stove with an attached English fireplace Mini-fireplace English-type fireplace Fireplace for a summer house Fireplace lined with brick Corner fireplace project Fireplace project with an open firebox
Operating principle of the bell structure
Previously, before Kuznetsov’s discoveries, heating was ducted, that is, hot air from the firebox rose up inside the device, heating its walls. Giving heat to the bricks, the gases cooled and, under the influence of draft, went into the pipe. Over time, due to uneven heating, cracks appeared and the masonry required repairs. The disadvantages of duct heating are rapid cooling and a large amount of soot.
The movement of gases, according to Kuznetsov’s theory, occurs freely. Hot air inside the structure is retained by two hoods, located either one above the other or side by side. There are options with holes in the middle of the domes. Both elements are connected through a so-called “dry seam” - free space necessary for the circulation of gases.
Gas flow diagram in a bell-type furnace
When the fuel burns, hot gases enter the first hood, which is connected directly to the firebox. Expanding, they cannot move upward and stop in a limited space, where they cool over time, or flow downward, reducing draft and delaying the combustion process. Thus, the temperature and combustion power are adjusted independently.
The second hood creates additional draft, as a result of which complete combustion of solid fuel occurs first, and the resulting heat is retained thanks to the pyrolysis gases accumulated under the roof. Due to the fact that hot air does not evaporate instantly, but circulates inside the device, the efficiency of the heat source reaches 93%. In addition, there is a noticeable saving in fuel (briquettes, firewood or coal), and soot deposition is reduced to a minimum.
Photos
Fifth row. Heating chamber. Columns on which to rest under the stove. In the lower corner there is a transfer channel into the upper cap. The channel has two folds, 13 cm wide and 2 and 3 rows high. Right angles at gas turning points are rounded to reduce drag. A combustion door will be installed on this row. The grate is recessed by 2 rows relative to the combustion door in order to lower the heating zone as low as possible. Its front edge rests on a reinforcing rod 25 mm long, installed in the masonry with gaps. Three purges are visible located on the first row. The columns opposite the cleaning chambers are slightly chipped to make it easier to remove fly ash from the bottom of the heating chamber.
Tenth row. Preparing to lay the hearth. The under in Teplushki usually overlaps in three rows. First, the columns are connected (as in this row) and then two continuous rows of brick are laid. These three rows will also narrow the exit from the firebox (higho) into the furnace to a section of 25 by 38 cm. This is done to increase the area of the hearth, so that when firing in Russian style, firewood does not fall into the higho. There is a transfer channel in the lower right corner.
Eleventh row. The first continuous row of the hearth. The bricks in the front wall of the stove are shifted by 3 cm to form a decorative cornice. The combustion well is separated at its entire height from the outer red brick masonry by basalt cardboard.
Twelfth row. Under laid and sanded. In the front wall of the oven there is a decorative cornice with cut corners, protruding 6 cm. There are five holes around the perimeter of the hearth (one on the left, one on the back and three on the right) for the passage of gases from the furnace into the lower heating chamber.
Fifteenth row. Visible are the heels installed on the fourteenth row, holes for the passage of gases into the heating chamber. The mouth and hearth have been formed. The cheeks of the mouth are cut at an angle from the inside. This is done for the convenience of installing dishes in a small crucible. Fire-resistant bricks are placed behind and to the right of the heil (they do not support the heels), protecting the heels of the vault.
The same row, view from the other side.
The markings were circled for laying the ceiling arch of the pole window. The width of the opening to be covered is noted, the required rise of the arch (vault) is set, and the radius of the circle is selected using a rope. Then an inner circle is built and an outer one, 12 cm larger - the height of the brick. Next, the outer circle is divided into equal (preferably) shares, no more than 7 cm wide (brick thickness + seam). After this, radii are drawn to these points to control the laying of wedge bricks.
Laying the ceiling arch of the sixth window.
The arch is finished. The vault has been laid out. Above the ceiling of the hearth window, a smoke collector (overtube) of the furnace is formed. The overflow channel is visible at the top left; a small niche will be built on the right.
The vault is covered with a continuous row of bricks. This row is placed on the corners (shelf 40), and does not rest on the arch. There is a gap of 1.5-2 cm between the upper point of the arch and the corners. Traditionally, the ceiling of a Russian stove rests directly on the arch (and the filling of the side cavities), however, when heated, the arch expands and, accordingly, rises, which often (almost always) leads to cracking in the bed of a Russian stove. The expansion of the vault is noticeable to the eye if the stove is heated without the upper rows of the ceiling. Cracks (up to 1 mm) form in the longitudinal seams of the roof, closing when the furnace cools.
Six rows of top cap. The overpipe is gradually reduced to a section of 25 by 25 cm. A niche is built on its right. The furnace chimney pipe (13 by 25 cm) is separated in the hood; it has 2 covers, the same as in the lower chamber near the transfer channel. The stove chimney will initially be two-channel (the exhaust from the over-pipe and the pipe itself), on the second floor both channels will be combined into one, with a brick cross-section. This decision was caused by the need to move the pipe to the back of the stove to pass the rafters of the house.
The stove is ready, test firing “Russian style”.
The oven is in operating mode. The soot in the furnace burns out completely.
29.01.2011
Basics
Most of the advantages of Kuznetsov furnaces come from the principle of free passage of gases. Let us explain again with an example.
Let's imagine a stove with a complex system of smoke ducts: an ethermark, a four-five-turn Dutch oven. In this cramped labyrinth, strong turbulence will inevitably arise. Have you heard the furnace humming? This is only a minor manifestation of the vortex energy raging within her. And there’s nowhere to get it from except from the fuel stash. If the channels are long and narrow enough, then at first glance there is nothing terrible here: the vortices, by the time they reach the pipe, will dissipate, cooling, and will still give their energy to the body of the furnace, and it to the room. But in reality, nuances appear, which will be discussed later in the text. Because of them, the efficiency of a channel furnace over 60% is an exceptional rarity.
In a channel stove, while it is being heated, a huge flow of energy rushes about, and only a small part of it can be used for heating or heating water without disturbing its operation. Such a furnace is somewhat similar to a nuclear reactor. Don’t be alarmed, just because of the synergy, i.e. along the paths of energy circulation in it. A nuclear reactor has to be loaded with tens of times more fuel than is necessary to ensure the design energy output. Otherwise, the neutrons will simply fly out without having time to meet the uranium atoms ready to receive them. In a channel furnace, hot vortices, without having time to cool, will fly out into the chimney or, conversely, will cool down immediately, producing smoke and soot.
But the Kuznetsovkas (details below) are closer in synergy to the thermonuclear reactors of the future. “Thermonylus” sounds scary, but this is only due to its association with the hydrogen bomb. In fact, fusion reactors are quite safe.
Why? Because they generate exactly as much energy as the consumer needs, and the technological power reserve required for rarefied plasma is scanty. If suddenly the chamber of a tokamak or stellarator suddenly completely collapses, the plasma will be completely emitted (there are no heavy atoms in it) and will cool down before it reaches the walls of the room. The repairmen will curse - maybe the duty department is sharpening their laces - but after 5 minutes. will be able to blunt to elimination without protective equipment.
So what do Kuznetsov furnaces have in common with thermonuclear reactors? The fact that the energy of the flue gases, thanks to the principle of free passage, does not scroll many times in the flow until it is pushed into the body of the furnace, but saturates it immediately . And now she has nowhere to go from there except into the room and/or the water heating register.
Materials used
Simplifying the design of a Russian stove does not affect the requirements for materials that will be used in construction. The outer cladding and body of the body are made of refractory brick. Only the surface of contact with the open fire is covered with basalt cardboard. If it is possible to process bricks by making cuts in the longitudinal direction, then it is better to use fireclay bricks. The temperature in the lower chamber, although quite high, does not require the use of special heat-resistant materials.
Successful brick buildings
Stove masonry, regardless of the model of the device, is made using a solution consisting of clay and sand. The dosage depends on the fat content of the clay. To determine it without special instruments, you will need to use folk wisdom. We will not list them, since today there are many options for ready-made mixtures intended for furnace work on sale. All proportions have already been taken into account and composite materials have been added that improve the adhesion and strength of the resulting solution.
Don’t forget about metal products, which should be purchased in advance so as not to stop the construction process. These are doors for the firebox, grate bars, valves and views, and a hob. If you have a choice between steel and cast iron structures, then you should choose cast iron, as they will increase the efficiency of heat extraction and transfer to the furnace walls.
Recommendations for self-construction
If you decide to build a stove according to one of Kuznetsov’s plans with your own hands, get ready for careful and scrupulous work. On the diagrams you will find a graphic representation of each row, but before starting laying you need to become familiar with the features of the technique, in particular:
- selection and pre-processing of bricks;
- purchase of metal parts (plates, dampers, doors, valves);
- determining the most suitable location;
- preparation of the base and foundation;
- possibility of installing a chimney, etc.
Fireclay refractory brick (Sh-5, ShB-8) is recognized as the best material for the internal masonry of “smiths”, and ceramics (M-150) for external decoration. To strengthen brick walls, metal elements (rebar, wire) are used. In order for the stove to function with maximum heat output, experienced craftsmen hone not only their skills, but also every brick - literally. They polish every detail, which is why projects completed by professionals look flawless.
Fireclay brick masonry
Having the author's order in hand, we recommend not to experiment, but to follow the designated order. Deviations from the diagram do not guarantee complete heat transfer.
Ordinary masonry of the furnace.
Since in the video above I fully described the laying of each row of this furnace, here I will simply post 3D photographs of each row to make it more convenient to take the rows with you to the site.
www.osnovaremonta.ru
The thickness of the seam on refractory bricks should be 2-5 mm.
7-12 rows of the Porfiryev Russian stove
Ceramic bricks are laid on a clay-sand mortar of 3-8 mm, depending on the geometry of the brick.
13-18 rows of the Porfiryev Russian stove
For even laying, it is recommended to use vertical cords, plumb lines and a horizontal level.
19-24 row
It is advisable to make the furnace roof from selected wedge bricks.
24-24 oven rows
If this stove is not considered large enough for you or you want to heat a room much larger than 60 meters, I recommend you another Russian stove by Ya. G. Porfiryev 5.5x5.5 bricks with a power of 8.2 kW.
Basic installation rules
- The inner shell of the furnace must be surrounded on all sides by empty space, since the brick will become very hot during operation of the furnace.
- The location of the furnace heat source can vary depending on the type and shape, but it should always be located at the bottom of the hood.
- Every third row of brickwork must be tied with metal wire. This will strengthen the bond and prevent further deformation of the oven.
- The shape of the cap can be of any shape and size.
- When installing the stove, take into account the fact that when heated, all metal elements (grid, door) will expand. Therefore, all these parts of the furnace system must be installed with a reserve for expansion. A fireproof gasket must be installed between the brick and the metal.
- When lighting a finished stove for the first time, you do not need to immediately set the maximum temperature. The kiln must be fired gradually, starting at low temperatures.
- After installation, the stove should be treated with a refractory compound.
Today there are a huge number of varieties of bell-type furnaces, because progress does not stand still. Kuznetsov himself only laid the foundation for this new type of heating system, and his followers around the world are already making their own adjustments and working to improve the stove. Of course, it is much easier to build a stove at the stage of building a house. But often people think about the need to place such a heating device after the walls have been built. Here, when developing a scheme, you will have to take into account the height of the beams, the location of the partitions, the roof, etc.
If the stove is installed during the construction of the house, then it is better to position it in such a way that it heats 2-3 rooms at once.
It is simply physically impossible to describe the instructions for laying all types of bell-type stoves, so in this article we will present a classic version of installing a bell-type stove with your own hands. By following our instructions exactly, you will definitely be able to assemble a high-quality, beautiful and functional stove.
The dimensions of the furnace, of course, can be different - the volume of material will depend on this. But under no circumstances should the order be changed!
What materials will be needed to install the stove?
Before you begin construction work, stock up on all the necessary materials. In order for a bell-type stove to please you with its functionality and appearance for many years, the materials must be of good quality.
| Fireproof mastic (ready-mix) for laying fireclay | Fireproof mastic (ready-mix) for laying fireclay. |
| Fireclay brick | Refractory brick for firebox (fireclay) SHA-8. |
| Brick M150 | Ceramic brick (grade not lower than M150). |
| Cement | Clay, sand and cement for laying bricks and creating foundations. |
| Plywood sheets | Plywood for formwork construction. |
| Steel plates | Steel plate. |
| Armature | Metal wire or reinforcing rod. |
| Corner | Steel corner. |
| Wooden blocks | Wooden blocks (50x50 mm) – 4 pcs. |
| Oven doors | Doors and latch. |
| Foil | Foil for the first layer of brick (according to the size of the foundation). |
| Combustion stove | Furnace stove. |
| Grate | Grate. |
Tools for laying a bell furnace
- construction mixer or drill with an attachment;
- Circular Saw;
- pliers (for tightening the wire);
- Master OK;
- shovel;
- building level;
- Bulgarian;
- construction gloves.
Let's start installation: step-by-step instructions
Step 1. We think over the design of the bell furnace and draw a diagram on paper.
Before starting work, you must clearly know how wide your oven will be. It must be drawn on paper, calculating all the necessary parameters.
- Calculate the size of the hole for the foundation. Keep in mind that it should be 10 cm wider than the heating structure itself.
Furnace foundation
Step 2. Laying the foundation
Before installing the stove, you need to take care of the base. It must be solid and perfectly smooth to prevent cracking of the structure and deformation in the future. Laying the foundation is a very important step that needs to be taken seriously.
For a concrete floor, the foundation will act as a kind of platform, raising the stove itself 20-30 cm above the floor level. We make the formwork according to the dimensions of the foundation and fasten its corners with wooden blocks (50x50 mm). We pour sand 15-20 cm thick at the bottom of the foundation, compact it well, and only then slowly pour in the solution. The foundation of the main house should not be connected to the foundation of the furnace. They have different weights, which means the shrinkage will be different.
Scheme of laying the foundation of the furnace
If you are making a stove in a wooden floor:
- We draw the size of the future foundation with a marker on wooden boards and cut a hole around the perimeter with a circular saw.
If the stove is being built in a wooden house, then fire safety rules should be taken into account. It is necessary to lay a sheet of asbestos between the furnace structure and the ceilings.
Preparing the furnace foundation
- We dig a hole 80 cm deep and 1.5 m * 1 m wide. Make sure that all walls are smooth. For this it is better to use a bayonet shovel. Pour sand into the bottom of the hole 15 cm thick and tamp it down thoroughly. It is necessary to wait for the sand to shrink (within 2 days).
- Let's start creating the formwork. You can use any old wooden doors or unnecessary boards to install the formwork, but, ideally, it is better to take plywood. We measure the length and width of the boards according to the dimensions of the foundation, lower them into the hole and connect them with screws. If the formwork is not all immersed in the ground, then we additionally connect the corners with wooden blocks (50x50). If the formwork is immersed in the pit to its full height, then you don’t have to do this.
- We reinforce with a metal rod.
In some wooden houses, the floor is raised above the ground by 50-80 cm. In this case, you will need to dig a hole under the foundation by 20-30 cm. That is, you need to “go deeper” in any case, but take this difference into account.
- Prepare a cement mortar (sand+cement+water) and slowly pour it into the hole. Try to pour in layers, stirring lightly with a shovel each time. This will allow excess air to escape and create a stable base. Let the foundation dry. This will take at least a week, but sometimes you have to wait 20-25 days for the solution to completely set. There is no need to rush in this matter, since the operational properties of the furnace depend on the strength of the foundation.
- While the solution is still wet, it is necessary to clearly determine with a building level how level the site is. Adjust if necessary.
- To do this, take a building level and check the place where the stove will be installed.
- When the solution has completely hardened and the foundation is ready, you can begin laying the stove. Don't rush to build the stove. The foundation must be strong and solid; the further operation of the furnace depends on this.
- Lay a layer of reflective foil under the first layer of brickwork. This will prevent heat loss and redirect the direction of heat flow from bottom to top. Take material slightly larger than the perimeter of the foundation. After laying the brick, you will then need to cut off the edges evenly with a knife.
Order diagram of stove masonry
Bibliography
- Podgorodnikov I. S. Household stoves of the prof. system. V. E. Grum-Grzhimailo. M, 1929
- Teplushka-1. Russian oven system prof. V. E. Grum-Grzhimailo and engineer. Podgorodnikova M, 1936
- Podgorodnikov I.S. “Russian stove “Teplushka-2”, M., Ministry of Communal Economy of the RSFSR, 1946
- Podgorodnikov I.S. Russian stoves “Teplushka-2” and “Teplushka-4” 158 pp., M., Ministry of Communal Resources of the RSFSR, 1956
- Podgorodnikov I.S. Russian stoves “Teplushka-2” and “Teplushka-4” 2nd ed., 154 pp., M., Ministry of Communal Resources of the RSFSR, 1957
- Podgorodnikov I.S. Household stoves (Teplushka, "Dutch", "Swedish" type, kitchen hearth) 3rd ed., 223 pp., M., Ed. Ministry of Communal Resources of the RSFSR, 1960
- Podgorodnikov I.S. Household two-bell ovens 4th ed. reworked and additional 160 s.M., “Spike”, 1992
- Podgorodnikov I.S. How to fold a stove 5th ed. reworked and additional 190 pp. M., New Wave, 1998
- Podgorodnikov I.S. The oven is the head of everything, 6th ed. reworked and additional 190 pp. New Wave, 2001
- Podgorodnikova A. Kolpakovy hearth, “Rural Construction”, No. 9, p.50-52 1989
- Podgorodnikova A. Furnace “Two-tier hood”, “Rural Construction”, p.50-52 No. 10, 1989
- Podgorodnikova A. Improved Russian stove “Teplushka”, “Rural Construction”, No. 12, pp. 46-47, 1989
- Podgorodnikova A. Construction of the Teplushka 15 stove and its handling “Rural Construction”, No. 1, p. 50-52, 1990
- Podgorodnikova A. “Teplushka 15” size 154x141 cm, “Rural Construction”, No. 2, pp. 50-52, 1990
- Podgorodnikova A. Construction of the Teplushka 2 stove and its handling, Rural Construction, No. 4, pp. 50-53, 1990
- Podgorodnikova A. Construction of the Teplushka 4 stove and its handling, “Rural Construction”, No. 5, pp. 46-49 1990
- Podgorodnikova A. Construction of the Teplushka 4 furnace measuring 154x141 cm, engineering systems. Podgorodnikova, “Rural Construction”, No. 7, pp. 30-34, 1990
- Podgorodnikova A. Construction of the Teplushka 9 stove and its handling, Rural Construction, No. 8, pp. 33-35, 1990
- Podgorodnikov I. S. Long-burning furnaces, “Rural Construction”, No. 1, pp. 32-34, 1992
- Podgorodnikov I. S. Stove for a bath (development in 1932), “Rural Construction”, No. 1, p. 34, 1992
About followers
Drawing of a homemade Kuznetsov stove
However, “blacksmithing” is not some kind of unspeakable miracle. There have already been many amateurs and professional craftsmen who not only repeat Igor Viktorovich’s original designs, but also create their own. In Fig. on the right is a drawing, and in Fig. in the section - the order of one of them.
She has two features. The first is kindling moves on the 21st row. They are quite similar to Kuznetsov’s idle air passages, but they are included in the work during kindling, speeding up and facilitating it. On a flame or smoldering, their throughput does not allow for the escape of gases, and these channels are drowned out by gas plugs.
The second is sawn along, and even at an angle, bricks in the 17th, 28th and some other rows. In fact, both stove makers and just builders know that bricks are not sawed lengthwise. But this belief arose at a time when the concept of “angle drill”, aka grinder, did not exist. People only heard about diamond tools back then, saying that they were used somewhere in the secret workshops of military factories.
But it’s still impossible to saw a brick lengthwise with a grinder while it’s in weight; its strength will drop below the minimum limit due to the beating of the tool in your hands. There are two options, the first is to install the tool in a frame with a lever running in a vertical plane to create a cutting machine. You can make this yourself, there are ready-made ones for sale.
Ordering a homemade Kuznetsov stove
Another method is suitable if the farm has a circular machine with at least 1500 rpm, and better - 2500-3000. Then a diamond wheel for stone is tucked into it instead of a standard toothed saw. This option is preferable: a support board with an angle stop provides a much cleaner and more accurate cut. And if necessary, you can finish it on the other side without the risk of getting a high step on the cut.
Video: the process of laying a 3 x 3.5 brick oven
Improved Russian stove Peasant Teplushka
There were many attempts to improve the Russian stove. In 1927, the People's Commissariat of Agriculture of the USSR even announced a competition for an improved Russian stove. The first prizes were taken by the furnace developed at the All-Union Thermal Engineering Institute named after. Dzerzhinsky, as well as a stove designed by Grum-Grzhimailo and Podgorodnikov, which served as the prototype of the “Peasant Teplushka” stove. Its significant advantage is that simultaneously with the heating of the cooking chamber, the lower part of the oven also heats up.
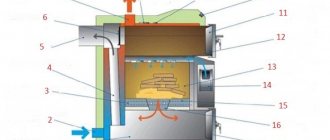
Rice. 4. Sections of the Teplushka stove.
The furnace is built using a ductless design. Outwardly, it is almost no different from an ordinary Russian one, with the exception that there is a firebox in one of the corners. Sections of the furnace are shown in Fig. 4. It is a chamber - a cap, limited at the top by the arch, and at the bottom by the bottom of the furnace. This hood is divided by the hearth into an upper cooking chamber (furnace) and a lower heating chamber. Under the stove it rests on free-standing brick pillars. A pipe begins from the bottom of the heating chamber, passes through the hearth and is equipped with a stove valve. Just like the Russian stove, Teplushka has a mouth, an over-pipe - a smoke collector above the mouth and a ventilation valve. Above the valves, two pipes are combined into one. In addition, there is a firebox located in one of the corners of the stove.
When the furnace is fired, the mouth of the furnace is closed with a damper. The ventilation valve is also closed. Firewood is burned in a firebox on a grate. Hot gases from the firebox are directed under the roof, wash it and, through holes located along the perimeter of the hearth, enter the lower heating chamber. When cooling, the gases sink to the bottom of the furnace, from where they are sucked out by the chimney. The stove can also be heated like an ordinary Russian one. It is advisable to do this in the warm season, when, for example, you plan to bake bread. In this case, you can admire the open fire through the mouth. When firing in Russian, the stove valve is closed and the ventilation valve is opened. Firewood is burned on a hearth.
Thus, while maintaining all the advantages of Russian stoves, Teplushka has a 2.5 times larger heating surface, heats up faster, since the firebox is equipped with a grate, and warms up the bottom of the room. In addition, the Teplushka cooking chamber cools down more slowly than that of a Russian stove, because the oven is also heated from below. With regular two-hour heating once a day, the temperature in the furnace does not fall below 90 degrees, which allows you to cook food for a long time after heating. Without exaggeration, we can say that today Teplushka is the best stove for rural life.
Design features
Currently, there are more than 100 different types of structures. However, despite the variety of shapes and design solutions, the structure of all stoves is the same. Kuznetsov, inventing his stove, set the following priorities for himself: efficiency and high productivity. In order to achieve these indicators, the creator paid a special role to the location of the internal channels of the bell-type furnace.
The cap is a separate chamber where heated gas is retained, due to this, high efficiency is achieved, and much less fuel is consumed.
The standard version of the “caps” has two caps. The lower one is in direct contact with the combustion chamber, and the other cap is located at the top of the stove. The main function of the first is to separate gases into hot and cold streams. This is the main difference between a “blacksmith’s oven” and a channel furnace, where warm air comes out under the influence of draft.
In a bell-type furnace, the flow of heated air that comes out of the firebox is directed up the structure, under the first bell it lingers and accumulates heat for a long time.
Stove for Kuznetsov’s bathhouse
The flow then moves through the passage into the second chamber, where it is also retained under the second hood, since the passage is at the base. As a result, before leaving through the chimney, hot air accumulates heat inside the stove for a long time. Thanks to this, the efficiency is very high - 90-95%, which is almost twice the productivity of a duct stove.
Another important component of the device invented by Kuznetsov is mechanical flow control. To do this, valves are installed in the unit, which, if necessary, can retain and change the direction of hot air.