I wish you good health to the readers of From-the-wood-with-your-own-hands!
Let's look at some options for treating wood with natural substances, which can be very useful in the absence of special tools.
Linseed oil
Linseed oil treatment is a classic method for treating wood types such as birch to achieve a durable, strong and moisture-resistant surface. Possible options:
1. Raw linseed oil, undiluted oily drying oil.
Application example: the handle of a knife (or other product) should be placed in linseed oil for several days.
To do this, the knife can be placed in a jar with a screw-on lid with a thin slot for the blade, which, after placing the knife in it, must be hermetically sealed.
When the wood is soaked through, it must be wiped with a smooth, dry rag. After this, let it dry completely for several weeks. When the oil evaporates, oxidation and polymerization of the surface occurs, which after some time becomes strong and elastic.
2. Flaxseed oil, diluted half with turpentine. A liquid prepared from linseed oil, real natural turpentine (do not use substitutes!) in a 1 to 1 ratio.
Turpentine has long been called
resinous discharge from wounds inflicted on trees. Now this substance is usually called oleoresin.
With the help of turpentine, the time for wood drying and oil oxidation is reduced. Application: (see 1). Drying time is 1-2 weeks.
3. Linseed oil with tar.
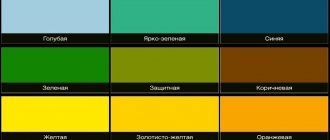
The addition of 50% tar gives the wood a red-brown tint. (for use, see 1) Use only natural tar; after use, thoroughly wipe off any remaining oil with a soft, smooth cloth.
WARNING: When using linseed oil, there is a risk of spontaneous combustion of rags soaked in linseed solution. Therefore, dispose with extreme caution to avoid causing a fire!
Wooden products can be waxed, here is one varnish recipe:
wax – 100 parts rosin – 25 parts turpentine 50 parts (parts are indicated by weight).
Grind rosin and wax and melt, mix, then remove from heat and pour in turpentine, mix thoroughly. Coating recipes are different and here you can and should try different compositions. Another method of such folk varnish is rosin dissolved in turpentine.
Ancient recipes for cheap and durable paints for wooden surfaces
Curd-lime
Equal quantities of fresh cottage cheese and slaked lime are thoroughly kneaded. A white, quickly drying liquid is formed. It must be used on the same day because it spoils quickly.
Ocher and some other paints can be mixed into this composition. In this case, it is necessary to consume as little water as possible, as it negatively affects strength.
The paint dries very quickly and does not leave the slightest odor. Therefore, you can cover the surface with two layers in one day.
To make the paint more durable, after applying two layers it is polished with pieces of coarse cloth.
Starch-painting
From 10 parts by weight of wheat starch, poured with cold water, a composition is obtained whose consistency resembles thick sour cream.
Stirring constantly, add boiling water until the composition reaches the desired thickness. For greater strength, you can add 1 part of alum or borax to the warm paste.
To prepare the paint, add zinc white and any colored paint, vegetable or mineral, to the still hot paste.
Then zinc chloride is dissolved in water and a small amount of tartaric acid is added to it.
Before use, mix the first mixture with this solution. The amount of material and proportions do not matter much. The paint is applied in the usual way. It is not flammable, is not afraid of dampness and cold water, but can be washed off with hot water and soap.
Potato paint
Take 1 kilogram of potatoes and boil it. Peel while it is still hot and add 4 large mugs of water. After this, you should mash everything into porridge and rub through a sieve so that there are no lumps left. Add 1.5 kilograms of powdered chalk, which is pre-diluted in 4 cups of water. The result will be about 8 mugs of grayish, durable, well-covering and very cheap paint.
All these paints have been tested and give excellent results.
Processing of wood and other products
1. To prevent the wooden product from cracking and crumbling into pieces, it was boiled for 1-2 hours in a solution of ash alkali. After this, it was dried, and, if necessary, the processing of thinner parts continued.
Ash lye is an ancient recipe of our ancestors, used both for washing woven products and for processing wooden products.
The lye is made simply - firewood (birch is best) is burned to the state of white ash (ash). Ashes (ash) are filled with water, into which, during soaking, all alkaline groups of substances pass. After this, the sediment can be used to fertilize the soil (it is not dangerous for plants, since it does not contain “soap”), and the water can be used for washing or for treating wood products.
2. In a strong decoction of crushed oak bark, our ancestors either boiled (for a couple of hours) or soaked (for a day) products not only made of wood, but also all kinds of wicker - from bast, flax, hemp, reed... Tannins strengthened the product so much that, for example, ropes and ropes increased their strength by an order of magnitude.
- Related Posts
- Finishing wood. How to make and apply shellac
- Waxing wood. Wood mastics and impregnations
- How to coat wood carvings. Tinting technology
« Previous entry
Transferring the image to wood with firing and brushing
Hi all!
Today I will show you how to decoupage a wooden board. Namely: transferring an image onto a wooden surface with preliminary brushing.
- Wooden board (preferably with a well-defined structure);
- Gas-burner;
- Metal brush (preferably a drill attachment);
- Acrylic paint;
- Acrylic lacquer;
- Printer, office paper.
Step 1.
We take a wooden board and burn it with a gas burner (just don’t get too carried away). At the same time, soft wood fibers burn faster, and hard ones burn slower.
Step 2.
Using a metal brush on a drill, we begin to remove soft fibers from the surface of the board, moving the brush along the fibers (this is very important). You will see how the structure of the tree appears, relief appears.
Step 3.
The structure can be emphasized by running coarse sandpaper along the grain. This should be done using the end of the sandpaper, folding the paper in half.
Step 4.
The surface needs to be sanded a little and cleaned of dust; you can do this with the hard side of a dishwashing sponge.
Step 5.
We print on a printer (preferably a laser, but in this case an inkjet was used) the desired drawing that fits the size of the board.
Step 6.
We cover the surface of the board on which we want to transfer the image with acrylic paint, and then, while the paint is not dry, we wipe off the excess with a damp cloth, thereby revealing the structure of the wood.
Step 7
We apply acrylic varnish to the board and to the front surface of the printed drawing, and then quickly apply the drawing (with the front part) to the board (this step must be done quickly so that the paint on the drawing does not float). We smooth the pattern well on the surface of the board, rubbing it into all the unevenness of the wood. Try not to move the drawing at this moment. Leave until completely dry.
Step 8
After the varnish and paint have dried, use your fingers to remove the paper from the board under running water, gradually rolling it off when the paper gets wet. Our printed image will remain.
Step 9
After removing the paper and drying the board, we coat the entire product with acrylic varnish. Let's dry it.
All is ready! We made a beautiful decoupage board with a brushed surface.
If you liked it, share the idea on social networks!
Source: mastersergeich.ru
Drying time
The drying period for any paint is indicated by the manufacturer on the product packaging, but this is only an approximate time.
The period is determined by various influencing factors:
- type of base. It has been noticed that paint dries faster on a porous wooden surface than on a smooth one;
- temperature indicators in the room. The higher the temperature, the faster the polymerization of the composition will occur;
- air humidity. As this indicator decreases, the drying period of the paint accelerates;
- circulation of air masses in the room. Hardening of the paint occurs better with active ventilation of the living room.
Nitro enamels and wax-based protective coatings dry the fastest. Paint and varnish materials, which are supplied to hardware stores in spray cans, dry well.
Aerosols harden within 20 minutes after application to the surface. After just half an hour, the material can be coated with a second layer of dye. Thus, the wooden product will be ready for use within an hour after painting.
Liquid nitro paints dry much slower. This coating is suitable for use after 5-10 hours.
An oil paint solution, which is applied to a porous base, dries in 3-4 hours, but certain conditions must facilitate this (room temperature and air humidity no more than 60%). The second layer of coating will harden only after 10 hours.
Water-based dyes take the longest to dry, this is due to the complex evaporation of water. The speed of the process depends on the temperature and humidity conditions indoors.
How to age wood
Vintage style, which has become quite popular recently, involves the use of certain materials, for example, aged wood is often used. Interior elements and products made from aged wood can retain their performance characteristics for a long time if properly processed and, moreover, look very noble.
If you want to add a touch of antiquity to the interior of your house or apartment, then this article on how to age wood will certainly come in handy.
There are 3 main methods of wood processing, the purpose of which is to obtain an aged surface:
- Mechanical method;
- Thermal method;
- Chemical method;
Each method uses its own technology for performing the work, but as a result, if all the rules are followed, you will get an artificially aged tree, which in appearance will be difficult to distinguish from an antique one, but at the same time very durable and strong.
Finishing wood decor: coat one element at a time
Apply the composition to the wood in a loose layer using a natural bristle brush. Remove excess stain using a clean cotton cloth in the same order in which you applied it. Thanks to this technique, the stain will not flow into all the cracks at the same time. Rub the wood with light, even pressure. Lay out and fold the fabric over and over again so that you always work on the dry side. Once the cloth is completely damp, take a new, dry one. Apply the compound to one element at a time so that the stain does not have time to dry by the time you wipe it off.
How to age wood mechanically
Otherwise, this method is also called “brushing” and is the most effective method of aging wood. The method got its name from the English word “brush”, which translates as brush, which fully reflects the essence of the method.
How to age wood
With this method, the surface of the wood is treated with a wire brush (a wire brush is also sometimes used, which is inserted into a drill). Under the influence of a brush, soft fibers are removed from the surface of the wood, as a result of which the wood becomes more prominent (as if eaten away by time).
By brushing you can age wood species such as pine, larch, oak, ash or walnut. However, it is worth remembering that this method cannot be used to age teak, pear, beech, cherry and maple. After the surface has been brushed, it must be cleaned of fibers and varnished. To give the wood an additional effect, before applying varnish, you can cover it with stain or patina (paint the surface of the wood with a contrasting color).
You can patina wood with your own hands in the following way: you need to apply dark paint to its surface, and then quickly wipe it with a rag until the paint dries. If everything is done correctly, the pores of the wood will become dark, and the rest of the surface will be lighter. After the remaining paint has dried, the wood is varnished.
Go over the cracks with a dry brush
The stain may seep into the cracks. Use a dry paint brush to remove any excess after the application process is complete. Wipe the brush with a clean rag or wipe it on newsprint to remove any stain.
To avoid stains and inclusions when staining wood, you should do this...
Thermal aging of wood
This method involves burning the wood with a soldering iron or blowtorch until the pattern of knots and wood texture appears. After this, carbon deposits are removed from the surface of the wood with a wire or metal brush, at the same time giving it a rougher texture. Then you can varnish the wood.
To get a more visible wood structure before varnishing, you can use stain. When using this method, special care and precision must be taken during the work process, otherwise there is a risk of burning or damaging the wooden element.
Chemical method of aging wood
Do-it-yourself wood brushing
If you really want, you can make artificially aged wood yourself:
- The selected workpiece needs to be slightly moistened, this will eliminate the release of wood dust during work. First, the workpiece is processed with a hard metal brush. Its rigidity is selected experimentally. It is necessary that the brush removes soft surface fibers well, but does not disturb the structure of hard fibers. The movement of the brush attached to the grinding machine or grinder is carried out in the direction of the fibers. The rotation speed is also pre-selected on the sample; for each wood the speed can vary significantly. When working manually, there are no problems with selecting the rotation speed of the brush, but the process of preparing wood becomes significantly more complicated and lengthened.
- After using a wire brush, use abrasive bristles. Using this attachment or brush, all fiber fragments and roughness are removed. At this stage, using a chisel, you can further add various indentations and grooves. They can be given the appearance of natural cracks in wood.
- In the future, final polishing is necessary, this is usually done using a brush with sisal bristles. You can use sandpaper by hand. At this stage it is necessary to achieve perfect polishing of the entire surface.
- The part acquires a special decorative appearance if it is tinted, painted, or gilded at the final stages. Stain is often used. Impregnation with stain and its quick removal allows you to paint areas with the softest fibers, while the hard ones are practically not stained.
- Painting with gold or silver paint gives the wood an original look. When applying the dye, particles of coloring pigment get clogged into microcracks, which ensures the appearance of glare in sunny weather. You can use different dyes for painting, but they must be designed for working with wood. After painting, it is recommended to polish the surface again, this will remove roughness from the product.
- At the last stage, you need to apply several layers of varnish. Before applying a layer of varnish, the previous one must dry well and it must also be polished.
With sufficient experience, the process of brushing wood and using special devices is not particularly difficult. At the same time, it is possible to produce the most exclusive products, ranging from wall shelves to cabinets and kitchen units.
This video will tell you how to age wood yourself:
Chemical method of aging wood
This method is only suitable for aging hardwood, since only they contain tannins. The essence of this method is that the surface of the wood is treated with ammonia. Under the influence of alcohol, the wood darkens with the appearance of a characteristic gray tint.
Before alcohol treatment, it will not be superfluous to sand the wood. The result of such processing will be a particularly clear manifestation of the structure of the wood, and the antique appearance of the product will provide a noble darkening.
If you need to age coniferous wood, you will have to use only thermal or mechanical methods.
Test the stain first
Test the stain on a small piece of the same wood as the decor you want to treat. You can create your own color by mixing two or three stains (of the same type) together. If you decide to go this route, you must immediately prepare a large enough batch of the composition to cover the entire tree. It is almost impossible to get exactly the same composition as in the first batch a second time. Provide a small margin in case any modifications are required.
How to paint a wooden surface while maintaining texture
Buildings and structures made of wood need additional protection. They can be negatively affected by the environment and harmful organisms. The clear finish highlights the natural grain of the wood, which was not as prominent. Painting wood while maintaining the texture creates a layer that acts as a protective barrier against bugs, mold and mildew.
In addition, certain types of paints and the presence of ordinary tools can create a unique texture for every taste. This process does not require large expenses and will help give a second life to an old item without the services of professionals.
What you need to know about wood species when choosing impregnation
Depending on the type, trees have different degrees of resistance to biodestruction:
- The weakest. This includes linden, alder, and aspen.
- Weak resistance. Solid elm, maple, birch and beech sapwood.
- Medium resistant. These include fir, larch, and spruce.
- Sustainable. Ash, pine, solid oak.
Based on absorbency, rocks are divided into 3 categories:
- Difficult to impregnate. Ash, solid oak and beech, spruce.
- Average. Linden, alder, aspen, solid pine.
- Lungs. Beech, birch, pine sapwood.
It is important to note that when choosing raw materials for construction outside, the key factor remains the resistance of the rock to destruction, so you need to choose the most resistant ones.
Two in one: beautiful appearance and protective barrier
To give wooden surfaces a brighter appearance and increase their service life, the following types of treatments are used:
- Glazing is the application of a colorless coating.
- Varnishing.
- Waxing.
- Polishing.
- Stain treatment.
Transparent paints are usually used to preserve texture on wooden surfaces. Their composition includes various oils, synthetics, natural ingredients and wax. Insects and pests can damage wood. To protect it, preparations are added to the composition of the treated product, which perform both a preventive role and rid the wood of existing pests.
With the development of the painting industry, new types of multifunctional paints have appeared, which include:
- antiseptics;
- light stabilizers that save the tree from direct sunlight;
- oils and other trace elements.
All additives are created for biological protection, water resistance and preservation of natural shade. Thixotropy is one of the properties of modern paints, which allows you to carry out work without smudges and with the necessary accuracy.
Antiquity effect: what is it?
Paradoxically, the more technologically advanced a society is, the more it values antique products. It would seem that with the appearance on the market of a huge range of innovative building materials with which you can build and decorate your home in an ultra-modern style, many people prefer old things.
By the appearance of the front door you can determine the status, level of well-being and personal preferences of the home owners
The Wright (Prairie) style is easily distinguished by its clearly defined lines, flat or hipped roofs with widely projecting eaves, and maximum integration of houses into the surrounding landscape
What styles does the antique effect suit?
- French, Swedish or German;
- Victorian, medieval and Gothic;
- country, baroque, rococo, classicism;
- modern or alpine;
- Russian estate style.
Thanks to the wooden design elements, the super-fashionable industrial loft style does not seem lifeless and gray, but, on the contrary, cozy and stylish
If initially loft-style rooms were rough and sometimes brutal, recently such living rooms have become more and more sophisticated and fashionable.
Although this super fashionable trend is considered bohemian and the most expensive, you can still bring the characteristic elements of this attic style into any room without special expenses. This may be due to the existence of techniques for aging materials.
afc5bf42701d7a257de741e117f01aca.jpe
6e008fbcc71232a540b736d10a22bdf5.jpeHow to choose the right paint?
Before buying paint, you need to know that you need antiseptic impregnation of wood into the soil. This is done to ensure even application of the coating and many years of service without peeling.
The required amount of material must be calculated based on the area of the treated area. The instructions indicate paint consumption per square meter. We multiply the resulting area by the consumption - the required amount of material. At the end, you need to take into account the number of layers and multiply the previously obtained value by it.
Recommendation: it is better to purchase paint in excess. This will be useful for future repairs (full or partial). Every year new types of products are released, the shades of which often do not match. After some time, the paint used may go out of production altogether.
Paints are generally classified into three types:
- Oily. At the moment, only domestic companies produce it. The fundamental components are toxic drying oils that have a pungent odor and form smudges. The cost is much higher than modern competitors due to the raw materials used. Drying time is one day. It is recommended to work in a cool, dry climate. A significant disadvantage is that during future repairs, you will have to use only oil paint or remove it to the base. There are no second layers on this type of paint.
- Alkyd. In construction it appeared before acrylic. High demand is ensured due to affordable prices. At the end of painting, a thin film with hydrophobic properties is formed. It is not used for so long, since due to rapid drying (8-12 hours) it does not penetrate into the deep layers of wood. It is best used for wooden elements that need protection from moisture. In addition, the material is famous for its good resistance to frost. Recommendation: painting with alkyd paints should only be done on a dry surface, otherwise the chance of bubbles and flaking increases.
- Acrylic. The most favorite paint in European countries. The percentage of erected buildings painted with this type is actively moving towards the figure of 100. The material is environmentally friendly. The main component is water, and the bonds are supported by acrylates. Acrylic paint has no unpleasant odor. It has a good effect on wood, which at the same time “breathes” and is protected from moisture. There is a large selection of shades. Working with the material is not particularly difficult, and it dries quickly. The service life is from 5 to 10 years.
Recommendation: Storing acrylic paint at subzero temperatures negatively affects its protective properties.
Epoxy
Such dyes can be powder, aerosol and two-component. The latter solutions consist of a hardener and resin. For painting wooden products, compositions based on cold-hardening epoxy resin are used. Under standard conditions at room temperature and normal air humidity, they harden within a day after application.
The main advantages of epoxy paints are:
- high strength and durability of the coating;
- waterproof;
- resistance to mechanical stress;
- good adhesion to any surface;
- wide selection of colors and shades.
Epoxy paints are used for painting floors and walls, household appliances, heating radiators, wooden garden figurines, and cars. The cost depends on the type of composition and its technical characteristics.
Care will help you avoid many mistakes.
Very often on the Internet you can find negative reviews about the painting compounds used. Some complain about significantly exceeded drying time, and manufacturers respond by assuring that this cannot happen. It's all in the instructions! It needs to be carefully studied and information extracted that will save you from unreasonable spending.
An example is special waxes that need to be diluted in water and used in dry rooms. Mainly for processing doors, ceilings and panels. The second layer is applied every other day. Rubbing the surface to add shine is allowed only after a week. By purchasing a different brand of material, you can save time twice as much.
If the surface being treated is a valuable type of wood, then dryness is strictly contraindicated. Therefore, you need to buy the appropriate paint or wax. Sometimes it’s a matter of inattentive reading of the instructions, and sometimes it’s a simple lack of knowledge of the materials.
Advantages of painting wood while maintaining texture:
- Destruction of pests that negatively affect the product.
- Prevention of the development of mold, fungi and rot.
- Painting prevents the development of cracks in the wood.
- Protection from moisture.
- Safety for people living in the house.
- Nice appearance.
The downside is that the coatings are not very resistant to aggressive liquids and fire. In most cases the material is flammable. But there are brands that do not have these disadvantages. The question is the price, which is always high for higher quality materials.
Polyurethane
Despite their high cost, polyurethane compounds have a lot of positive characteristics; they are used to protect wood, metal, stone and concrete, and can be used for painting smooth and loose surfaces. The material consists of environmentally friendly components. Only the solvent contained in the paint can cause harm to human health, but the hazardous substances completely evaporate after the film dries.
Polyurethane dyes form a durable, externally resistant, plastic coating. What is the cost of paint for flexible skirting boards? It does not collapse after deformation of the product. Polyurethane materials are suitable for painting wooden and concrete floors.
Walnut wood: basic principles in work
The topic of today's article will be walnut wood. We will talk about the main types, principles of operation and coating for this type of wood.
Woodworkers often have favorite types of wood that they prefer to work with. Just like auto mechanics. Those who prefer to work with cars of certain brands and models. In many ways, it all depends on habit and subjective preferences. It often turns out that a carpenter gets high-quality results with one type of wood and does not even try to work with other types of wood.
Each type of wood has its own characteristics. And each of them involves its own operating technology. Which the master ultimately adheres to. This is especially evident at the coating stage. Thus, maple can be very capricious when applying coating. It is also quite susceptible to seasonal fluctuations in humidity and, as a result, expansion and contraction.
When working with oak, tools can become dull quite quickly. As a result, the wood can tear, flake, and char if you don't run the piece through the tool quickly enough. In addition, the appearance of treated oak wood is very dependent on how the tree was cut.
Cherry requires gentle handling rather than brute force. Then this material allows you to get a high-quality result. Additionally, choosing multiple boards of the same color can be a challenge.
Poplar is excellent for most standard tasks and at the same time works well with paint. However, this type of wood is difficult to stain.
Exotic varieties such as Brazil nuts can cause respiratory problems if wood dust enters the lungs. And tropical woods should be avoided altogether.
And so, walnut wood.
Finishing wood decor: Apply primer first
Wood primer is an excellent base for applying varnish. Its formula is designed in such a way that the composition dries quickly and forms a harder surface than a varnish coating. In addition, this coating is easy to sand. Choose a primer that will work well with the topcoat, preferably the same brand. Once dry, sand the primer using fine-grit sandpaper and sanding pads. Remove dust with a lint-free cloth.
Do you want to age a tree? This article will help you! Click here!
Walnut wood and basic principles of operation
The lower part of the black walnut trunk is often quite wide and very distinctive. Due to this, the cross-section of this part of the tree often has burls - nodules. Such cuts are in great demand among carpenters. They like to make tables, chairs and other pieces of furniture of non-standard shape from them.
Although the finished product is highly durable, walnut wood is not particularly associated with high-strength hardwoods. The thing is that walnut wood is quite sensitive to the effects of steam. Which leads to deformation of the material. At the same time, walnut wood absorbs glue well. But its excess should be immediately removed from the surface. If the glue dries, it will appear after coating as dark, almost brown spots on the stain.
What is the choice of paint based on?
Painting wooden products should begin with the choice of dye. This procedure must be approached with special responsibility, because a low-quality composition will quickly fade, lose its original appearance, and will not be able to perform protective functions. When choosing paint, you need to pay attention to the color, raw material composition and purpose of the solution.
It is also necessary to take into account the most important factors:
- the type of wood that was used to make the house or other wooden structure;
- operating conditions of the product (temperature, humidity conditions, mechanical load);
- the presence or absence of an old layer of paint, the possibility of combining the coating with other paints and varnishes.
When choosing a pigment dye for painting wood, you need to ask the seller about the color of the film after application to the base. Impregnations can be transparent or covering. The latter solutions better protect the material, but cover the texture of the product.
Coating
As you know, walnut wood behaves quite capriciously when applying a coating. So if you want it to last, you'll have to do a little more work than just applying stain or polyurethane varnish. Many older walnut products that have been coated with drying oil or tung oil are beginning to show gray hair. Most people don't find this attractive.
Walnut wood often has amazing grain structure. With proper coverage, it can look especially beautiful. The first step towards bringing out this structure is to sand the surface properly.
We recommend choosing hand sanding. This will allow the wood grain to show through in the best possible way. With each subsequent stage, it is necessary to choose increasingly finer sandpaper. It is ideal if you vacuum or blow wood dust out of all pores before each next step. For example, using an air hose connected to an air compressor.
After sanding the surface with very fine sandpaper (320 grit or higher). And when removing wood dust, lightly lift the wood fibers by wiping the surface with a damp cloth. Wait a few minutes for the tree to settle. And then lightly sand the surface to lower the pile.
As a rule, walnut wood is coated with shellac at the first stage. It allows you to prepare the surface for applying other types of coatings. For example, gel stain or varnish. Sometimes shellac is mixed with dyes. To lighten dark walnut wood.
Apply shellac evenly to the surface and wait until it dries completely. This will take several hours. Then lightly sand the surface (strictly along the grain) using sandpaper with the finest abrasive. Vacuum or blow away any sanding dust before applying another coat of shellac or gel stain.
Many woodworkers apply special fillers to raise the pile. It is better to do this after applying several layers of shellac. After removing excess filler or stain, additional coats of shellac or mineral oil can be applied. This will give the surface a beautiful shine.
Do you like walnut wood as a working material? What features of this type of wood can you highlight? Share your experience in the comments!
Source: allremont59.ru
Can car paint be used on wood?
Car paints are supplied to hardware stores in spray cans. The paintwork material consists of a pigment dye, a binder and a solvent. These are reliable, high-quality, durable compounds. The advantages of this composition are strength, density and resistance to mechanical damage. The only drawback of the paint is its high cost.
Car paint can be used to coat decorative wood products, but it is better to use a cheap alternative, such as silicone paint. Before painting, you need to sand the surface and apply a layer of primer.
How to paint a wooden surface while maintaining texture
Buildings and structures made of wood need additional protection. They can be negatively affected by the environment and harmful organisms. The clear finish highlights the natural grain of the wood, which was not as prominent. Painting wood while maintaining the texture creates a layer that acts as a protective barrier against bugs, mold and mildew.
Why impregnate wood?
The material is popular in construction due to the following advantages:
- environmental friendliness;
- hygroscopicity;
- heat capacity;
- sound insulation;
- aesthetics (even without additional finishing);
- ease of processing and installation;
- affordable price.
However, a wooden structure that is constantly located on the street is destroyed over time under the influence of:
- ultraviolet rays;
- high humidity;
- fungus, mold;
- insects, bark beetles;
- precipitation;
- dust, dirt;
- sudden changes in temperature;
- damage;
- fire.
To prevent spoilage, an impregnation was developed.
It is needed to extend the service life of the material by forming a protective layer on the surface or penetrating deep into the structure.
The drugs are produced in a narrowly targeted manner, when some resist moisture, others – fungus (antiseptics), others – fire (fire retardants), there are decorative ones and more. Complex action impregnations are also available. They are more expensive, but more effective.
It is recommended to work with the product at a temperature of +10 degrees. It will absorb evenly and dry quickly.
In addition, impregnation can be an excellent base for painting. The paint applies well, giving the wood the desired color.
Two in one: beautiful appearance and protective barrier
To give wooden surfaces a brighter appearance and increase their service life, the following types of treatments are used:
- Glazing is the application of a colorless coating.
- Varnishing.
- Waxing.
- Polishing.
- Stain treatment.
Transparent paints are usually used to preserve texture on wooden surfaces. Their composition includes various oils, synthetics, natural ingredients and wax. Insects and pests can damage wood. To protect it, preparations are added to the composition of the treated product, which perform both a preventive role and rid the wood of existing pests.
With the development of the painting industry, new types of multifunctional paints have appeared, which include:
- antiseptics;
- light stabilizers that save the tree from direct sunlight;
- oils and other trace elements.
All additives are created for biological protection, water resistance and preservation of natural shade. Thixotropy is one of the properties of modern paints, which allows you to carry out work without smudges and with the necessary accuracy.
Wood and ancient recipes for processing its surfaces
This information can be very useful for those who work with wood or build a house themselves, for example.
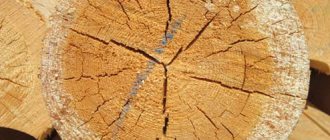
let's look at some options for processing wood with natural substances, which can be very useful in the absence of special ones. means: * FLAX OIL (very good for wood) Linseed oil is a classic method using natural preparations for treating types of wood such as birch in order to achieve a durable, strong and moisture-resistant surface. possible options: 1. Raw linseed oil, undiluted oily drying oil. application example: The handle of a knife (or other product) should be placed in linseed oil for several days. To do this, the knife can be placed in a jar with a screw-on lid with a thin slot for the blade, which, after placing the knife in it, must be hermetically sealed. When the wood is soaked through, it must be wiped with a smooth, dry rag. After this, let it dry completely for several weeks. When the oil evaporates, oxidation and polymerization of the surface occurs, which after some time becomes strong and elastic. 2. Flaxseed oil diluted 50% with turpentine. A liquid prepared from linseed oil, real natural turpentine (do not use substitutes!) in a 1 to 1 ratio. With the help of turpentine, the time for drying the wood and oxidizing the oil is reduced. Application: (see 1). Drying time is 1-2 weeks. 3. Linseed oil with tar. The addition of 50% tar gives the wood a red-brown tint. (for use, see 1) Use only natural tar; after use, thoroughly wipe off any remaining oil with a soft, smooth cloth. ! WARNING: When using linseed oil, there is a risk of spontaneous combustion of rags soaked in linseed solution. Therefore, discard with extreme caution so as not to cause a fire! * WOODEN PRODUCTS CAN BE WAXED, here is one of the varnish recipes: VARNISH. COMPOSITION: wax - 100 hours rosin - 25 hours turpentine 50 hours (parts are indicated by weight). Grind rosin and wax and melt, mix, then remove from heat and pour in turpentine, mix thoroughly. Coating recipes are different and here you can and should try different compositions. Another method of such folk varnish is rosin dissolved in turpentine. The chopped log does not require processing. The rounded log is treated to prevent cracking, rotting and darkening. * SEVERAL OLD RECIPES OF CHEAP AND DURABLE PAINTS FOR WOODEN SURFACES: - COOK-LIME: Equal quantities of fresh cottage cheese and slaked lime are thoroughly kneaded. A white, quickly drying liquid is formed. It must be used on the same day because it spoils quickly. Ocher and some other paints can be mixed into this composition. In this case, it is necessary to consume as little water as possible, as it negatively affects strength. The paint dries very quickly and does not leave the slightest odor. Therefore, you can cover the surface with two layers in one day. To make the paint more durable, after applying two layers it is polished with pieces of coarse cloth. — STARCH-MARKING: From 10 parts by weight of wheat starch, poured with cold water, a composition is obtained whose consistency resembles thick sour cream. Stirring constantly, add boiling water until the composition reaches the desired thickness. For greater strength, you can add 1 part of alum or borax to the warm paste. To prepare the paint, add zinc white and any colored paint, vegetable or mineral, to the still hot paste. Then zinc chloride is dissolved in water and a small amount of tartaric acid is added to it. Before use, mix the first mixture with this solution. The amount of material and proportions do not matter much. The paint is applied in the usual way. It is not flammable, is not afraid of dampness and cold water, but can be washed off with hot water and soap. — POTATO PAINT: Take 1 kilogram of potatoes and boil it. Peel while it is still hot and add 4 large mugs of water. After this, you should mash everything into porridge and rub through a sieve so that there are no lumps left. Add 1.5 kilograms of powdered chalk, which is pre-diluted in 4 cups of water. The result will be about 8 mugs of grayish, durable, well-covering and very cheap paint. All these paints have been tested and give excellent results. * PROCESSING WOODEN (etc.) PRODUCTS: 1. To prevent the wooden product from cracking and crumbling into pieces, it was boiled for 1-2 hours in a solution of ash alkali. After this, they dried it, and, if necessary, continued processing of thinner parts. ASH LYE is an ancient recipe of our ancestors, used both for washing woven products and for processing wooden products. The lye is made simply by burning wood (birch is best) until it becomes white ash (ash). Ashes (ash) are filled with water, into which, during soaking, all alkaline groups of substances pass. After this, the sediment can be used to fertilize the soil (it is not dangerous for plants, since it does not contain “soap”), and the water can be used for washing or for treating wood products. 2. In a strong decoction of crushed OAK BARK, our ancestors either boiled (for a couple of hours) or soaked (for a day) products not only made of wood, but also all kinds of wicker - from bast, flax, hemp, reed... Tannins strengthened the product so much that, for example, ropes and ropes increased their strength by an order of magnitude. TAKE NOTE :)
Copied from the VKontakte group Slavic Terem slav_terem
How to choose the right paint?
Before buying paint, you need to know that you need antiseptic impregnation of wood into the soil. This is done to ensure even application of the coating and many years of service without peeling.
The required amount of material must be calculated based on the area of the treated area. The instructions indicate paint consumption per square meter. We multiply the resulting area by the consumption - the required amount of material. At the end, you need to take into account the number of layers and multiply the previously obtained value by it.
Recommendation: it is better to purchase paint in excess. This will be useful for future repairs (full or partial). Every year new types of products are released, the shades of which often do not match. After some time, the paint used may go out of production altogether.
Paints are generally classified into three types:
- Oily. At the moment, only domestic companies produce it. The fundamental components are toxic drying oils that have a pungent odor and form smudges. The cost is much higher than modern competitors due to the raw materials used. Drying time is one day. It is recommended to work in a cool, dry climate. A significant disadvantage is that during future repairs, you will have to use only oil paint or remove it to the base. There are no second layers on this type of paint.
- Alkyd. In construction it appeared before acrylic. High demand is ensured due to affordable prices. At the end of painting, a thin film with hydrophobic properties is formed. It is not used for so long, since due to rapid drying (8-12 hours) it does not penetrate into the deep layers of wood. It is best used for wooden elements that need protection from moisture. In addition, the material is famous for its good resistance to frost. Recommendation: painting with alkyd paints should only be done on a dry surface, otherwise the chance of bubbles and flaking increases.
- Acrylic. The most favorite paint in European countries. The percentage of erected buildings painted with this type is actively moving towards the figure of 100. The material is environmentally friendly. The main component is water, and the bonds are supported by acrylates. Acrylic paint has no unpleasant odor. It has a good effect on wood, which at the same time “breathes” and is protected from moisture. There is a large selection of shades. Working with the material is not particularly difficult, and it dries quickly. The service life is from 5 to 10 years.
Recommendation: Storing acrylic paint at subzero temperatures negatively affects its protective properties.
The best products on the Russian market
These water repellents are very popular among professionals and home craftsmen.
V33 Extreme Climate
Water-based impregnation for extreme wood protection has a 12-year guarantee. The product imparts moisture-repellent properties to wax. The drug forms a microfilm that allows the wood to breathe.
Anti-corrosion components protect metal parts from corrosion. The line is available in 12 colors. The product also contains UV filters. Extreme Climate can be used inside and outside buildings.
In earlier versions, the product was called azure, impregnation, the new name is antiseptic.
Flugger Wood Tex Transparent
Glazing impregnation based on alkyd oil and acrylic resins dispersed in water creates a semi-matte protective film on the surface. The texture is thick, jelly-like, easy to apply. The product is designed for exterior work. If application technology is followed and two-layer coating is used, the service life of the coating reaches 10 years. Complete rejection occurs within 48 hours.
Goodhim TEXTURE 651 BASE A
The basis of the covering antiseptic is acrylic dispersion. The composition also includes biocides, fungicides, oils, and wax emulsion. The product is used on unpainted, painted, darkened wood materials, as well as for painting in light colors. The water repellent is not suitable for floor treatment. The drug is available in two variations: A - white, C - transparent.
Dufa Wood Protect
The product protects the wooden surface not only from moisture, but also from dirt.
The impregnation is made using new technology. The alkyd component promotes deep protection of materials from the inside, and the acrylate dispersion forms a film. The product is intended for walls and ceilings only, and should not be used on floors or other surfaces subject to mechanical or chemical stress. Dufa Wood Protect is also suitable for exotic wood species.
The product has a viscous, jelly-like (thixotropic) structure and does not form drops when applied. The texture of the coating is matte. The collection includes 8 shade options - from white and colorless to rosewood.
Pinotex Ultra Lasur marigold
The composition forms a moisture-repellent layer that does not hide the wood texture. The manufacturer included a UV filter and components that prevent the growth of algae and mold. Protective properties are provided by alkyd resin and linseed oil. The coating layer resembles varnish and gives the painted surface water- and dirt-repellent properties. The product is recommended for outdoor use.
Tikkurila Eko Wood
A glazing antiseptic based on an organic solvent helps protect the wood outside the building. The product penetrates deeply into the wood and slows down the decomposition of fibers caused by exposure to moisture. Tinted compounds also ensure that the material is resistant to ultraviolet radiation.
Care will help you avoid many mistakes.
Very often on the Internet you can find negative reviews about the painting compounds used. Some complain about significantly exceeded drying time, and manufacturers respond by assuring that this cannot happen. It's all in the instructions! It needs to be carefully studied and information extracted that will save you from unreasonable spending.
An example is special waxes that need to be diluted in water and used in dry rooms. Mainly for processing doors, ceilings and panels. The second layer is applied every other day. Rubbing the surface to add shine is allowed only after a week. By purchasing a different brand of material, you can save time twice as much.
If the surface being treated is a valuable type of wood, then dryness is strictly contraindicated. Therefore, you need to buy the appropriate paint or wax. Sometimes it’s a matter of inattentive reading of the instructions, and sometimes it’s a simple lack of knowledge of the materials.
Advantages of painting wood while maintaining texture:
- Destruction of pests that negatively affect the product.
- Prevention of the development of mold, fungi and rot.
- Painting prevents the development of cracks in the wood.
- Protection from moisture.
- Safety for people living in the house.
- Nice appearance.
The downside is that the coatings are not very resistant to aggressive liquids and fire. In most cases the material is flammable. But there are brands that do not have these disadvantages. The question is the price, which is always high for higher quality materials.
Before finishing the wooden decor begins, clean up the room!
If possible, try to apply coating and sanding in different areas. The dust that is generated when sanding the product settles on the surface when the composition is applied. If you do have to sand and coat in the same room, it should be cleaned before applying primer and varnish. If the room is a garage, lift the door and remove dust by blowing it outside using a garden vacuum cleaner. To clean the flooring, use a regular vacuum cleaner and then mop the floors to avoid dragging dust on your feet.
Brushing equipment
The procedure is considered the simplest and most accessible method of visual aging of wood at home.
It is enough to have a minimum of equipment. Even using only manual labor, you can achieve excellent results. To work you will need:
- Metal brushes of varying hardness. With their help, the primary (rough) removal of soft fibers from the treated wood is carried out.
- Sandpaper with different grain sizes. It is needed for rough cleaning after initial processing and final (final) polishing.
- To give the surface being treated maximum decorativeness, you need to prepare stain and other similar products.
- For final processing, you will need varnish, which is applied to the work surface after the brushing procedure is completed.
Power tools
All work on aging wood can be significantly simplified by mechanization. To do this, you can use either electric drills or angle grinders (grinders). To go with them, you will need to purchase wide or flat brushes of the following types - metal, polymer with an abrasive coating, sisal or hair.
Glaze
The glazing technique came into decoration from painting, and consists of applying paint in translucent layers. I didn’t have to look far for an example - a beautiful chest of drawers, painted in this style, stood right in the studio. Those gathered repeated this technique on tablets. The sequence of actions turned out to be simple: apply a base coat of paint to the item, dry it, and then work on top of it with a wet brush with a small amount of paint. Each layer should be allowed to dry so that the paint is applied in gentle layers without mixing.
Advice. Instead of water, use a special thinner - it will allow the paint to maintain its thickness and color saturation, the drawing will be transparent, but more clear.
Transparent finishing materials for wood
It is preferable to select transparent finishing materials for wood in order to preserve the decorative natural texture of the wood. Of course, in times of global shortages it was easier to make repairs - whatever materials were available in the store, they bought them. With the current variety of products, buyers' eyes run wild. In this article we will try to understand transparent finishing materials for wood.
Varnish is a material that forms a uniform transparent film. At the same time, the varnish itself will not necessarily be transparent; sometimes it looks like PVA glue. If the varnish is mixed with various miks (pigments), then this composition is called glaze. Oil varnishes are included in a separate group. They contain less resin and more oil, and this coating takes up to 4 days to dry.
You need to choose a varnish based on the load that the surface treated with it will experience. For flooring, it is better to buy a varnish with high wear resistance; for furniture, a varnish that can withstand medium or low loads is suitable.
Before applying varnish, the surface must be thoroughly sanded and sanded, then apply the coating along the grain with a wide brush. Usually the varnish is applied in 2-3 layers.