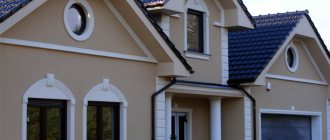
Of course, one of the most important elements in arranging a bathhouse is the stove.
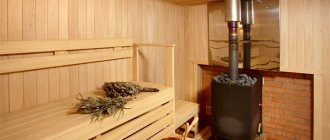
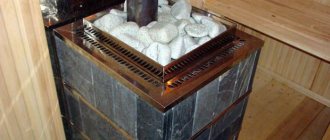
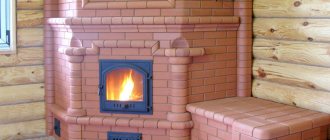
Metal stove lined with brick (in the steam room)
Before you begin to study the instructions for proper brick laying, you should answer the main question: why is it necessary to line the stove in a bathhouse with bricks? Perhaps your particular stove model does not require this action?!
Before and after
Compared to metal, brick retains heat much longer, which means the stove will cool down much longer.
The stove in the bathhouse plays no less important role than in the house. The effectiveness of all bath procedures and a comfortable atmosphere depend on how quickly it heats up and retains heat. Being in a cold room is unpleasant, and being in an excessively overheated room is dangerous to your health.
Metal stove in a steam room with 1/2 brick
Why cover with brick material?
Any work must be done thoughtfully, and before execution it is necessary to understand the reasons. The designs are easy to install, heat up quickly and are accessible to everyone due to their low price, but they have a lot of disadvantages.
In addition to the high heating rate, the surface is a source of infrared radiation, which is unpleasant for humans and burns the skin at a considerable distance.
Steel heaters dry out the air, which prevents the creation of the correct conditions in the bathhouse necessary for a comfortable procedure. When heating quickly, such a stove instantly gives off heat and has to be heated regularly, which increases the consumption of firewood and creates a lot of inconvenience.
Brickwork acts as a protective screen, allowing you to retain heat for a long time and rid you of infrared rays. Covering a sauna stove with bricks is inexpensive.
Types of masonry
If you decide to line a metal stove with bricks, then you should decide on a method that will serve as a guide for laying out the masonry in the bathhouse. Cladding a metal furnace with brick is often called creating a screen. There are several technologies for performing such work. Basically, two options are used: continuous masonry method and discharge cladding. But in any case, the distance from the screen to the oven should be 3-10 cm.
Continuous cladding
This type of masonry significantly reduces the thermal efficiency of the furnace. The design of the device is designed for faster heat transfer, and when creating the cladding, a significant obstacle appears in the path of warm air. The warm air has no choice but to go into the chimney. This option is used very rarely when the efficiency of the furnace is not of great importance. For example, if the stove is used only for decorative purposes. For such masonry, a foundation is required. To speed up the heating process with solid masonry, you can use a little trick - leave windows closed with special doors or bricks.
Facing in discharge
This is a more acceptable option for lining a furnace if quick heating of the room is required without loss of heat. Laying in discharge means that windows will be left in the wall of the screen. Their location is chosen arbitrarily; some manage to create beautiful drawings. In this case, the room will heat up very quickly, but the radiation will be very harsh.
Calculations for choosing a base
For the correct distribution of parameters, knowledge of the basic parameters is necessary:
- dimensions of the furnace and its weight;
- weight of stones in the heater;
- the mass of the container for heating the liquid and the volume of water (further calculations are based on the condition that a liter weighs 1 kilogram);
- the weight of the brick wall (depends on the type of stone, but standard fire brick = 4 kg).
When all the information is received, the specialist can easily carry out the necessary calculations. He will need to add up the weight of the stove, stones, brickwork, container and liquid. 20% is added to this amount to create an additional safety margin. It should be remembered that pressure is applied constantly, and if the boards do not meet the required characteristics, then sooner or later they will be pressed through.
If the resulting number does not exceed 600 kilograms, you can line a metal stove in a bathhouse with bricks without manipulating the foundation. For detailed calculations, you can use the information below.
Preparatory stage
Preparation for finishing a metal furnace begins with preparing the site for its major installation and developing a project (drawings) with order. The following standards and recommendations are taken into account:
- The distance from the combustion chamber to wooden walls or partitions must be at least 40 cm, and if there is fireproof protection (metal or asbestos sheet) - at least 30 cm.
- A gap of 4-10 cm must be left between the metal of the stove and the brickwork . The lack of clearance leads to excessive heating of the metal.
- The base (foundation) must be calculated based on the total weight of the entire installation with finishing. It should not be connected to the foundation of the structure. The minimum gap between the foundations of the house and the stove is 5 cm .
At the preparatory stage, it is important to provide a reliable foundation for the stove . Brickwork significantly makes the entire structure heavier, which leads to increased requirements. First of all, the load is calculated. This includes estimating the weight of the brick trim.
To do this, the required number of bricks is determined, which is multiplied by the weight of one element. The weight of a standard solid red brick averages 3450 g, but can vary between 3.3-3.6 kg; facing brick – 1450 g.
If the design load (brickwork, the stove itself, a water tank) does not exceed 750 kg, then you can do without a foundation, limiting yourself to strengthening the floor covering and installing fireproof protection. For large design loads, a foundation should be erected.
The foundation is erected in the following order:
- The floor covering is dismantled and the joists are cut out at the construction site. The remaining logs are strengthened by tying them together with jumpers.
- A hole of the required size is dug, 30-40 cm deep. A cushion of sand and gravel 15-20 cm thick is poured onto its bottom and thoroughly compacted. A reinforcing mesh is laid on top.
- The formwork is being installed . Cement-sand mortar is poured. The thickness of the concrete layer is 20-30 cm. The solution is prepared from cement (not lower than M300) and sand in a ratio of 1:3. The surface is carefully leveled using the rule, and the horizontalness is checked with a level.
- Roofing felt waterproofing is laid on the concrete base
- 2-3 rows of bricks are placed on top of the waterproofing so that they cover the entire surface of the concrete. In this case, the rows are tied, i.e. the seams of the bottom row fall on the body of the brick in the top row. The surface is carefully leveled horizontally.
At the preparatory stage, the tightness of the chimney is also checked. If necessary, the joints are covered with a heat-resistant sealant that can withstand heating up to 1200 ºС. Screens made of fire-resistant material are fixed along the perimeter of the entire floor adjacent to the prepared base.
The final preparatory stage ends with the procurement of the necessary tools and the preparation of mortar for masonry.
Calculation of dangerous load on floors (kg/m2)
To assess how much load your floor can support, the technician needs to know what kind of joists are used. In the table below you can see the capabilities of different types of joists to support weight in kilograms per square meter.
| Section (cm) | Beam length between supports | ||||||
| 2 m | 2.5 m | 3m | 3.5 m | 4 m | 5 m | 6 m | |
| 10×5 | 734 | 585 | 490 | 420 | 367 | 325 | 293 |
| 15×5 | 1650 | 1321 | 1101 | 942 | 827 | 733 | 665 |
| 20×5 | 2930 | 2347 | 1955 | 1675 | 1464 | 1303 | 1172 |
| 20×10 | 4867 | 4690 | 3910 | 3353 | 2933 | 2733 | 2607 |
| 20×20 | 11730 | 3987 | 7821 | 6705 | 5866 | 6215 | 4691 |
| Cylindrical shape 20 | 6912 | 5528 | 4608 | 3950 | 3456 | 3070 | 2765 |
| Cylinder. f. 22 | 9200 | 7360 | 6132 | 5256 | 4600 | 4090 | 3682 |
Strengthening
To strengthen the walls, reinforcing mesh, reinforcement pins or flexible metal plates are used . The first option is preferable, but the thickness of the masonry does not always allow it.
To strengthen the external and internal structures, the reinforcing mesh is laid inside the seam every 4-5 rows, buried in the solution. Since the wall near the stove is thinner, it is reinforced across a row.
Since the walls for construction are thin, they need to be strengthened so that the weight of the structure does not destroy the masonry.
Construction on foundation
If a metal sauna stove lined with brick is not suitable for installation according to the table, then in this case it is necessary to make a foundation. This task is simplified if you have just started building a building with your own hands and you do not need to dismantle the stove and floors.
To build a foundation, a hole about half a meter deep is dug around the perimeter of the masonry and filled 3/5 with crushed stone or a mixture of gravel and sand. It must be taken into account that contact with the bathhouse foundation is unacceptable.
After laying the cushion, a cement screed and a layer of waterproofing are made, after which formwork is made, which is filled with concrete mortar. For such a product to harden properly, it must be regularly moistened with water to avoid cracks.
The next stage is the construction of brick pillars that serve as support. It is recommended to do the masonry using clay mortar. All work must be carried out taking into account the level, avoiding distortions.
When everything is ready, the metal product is installed and covered with brick.
Some useful tips
To ensure that the brick lining is correct and lasts for many years, you should use the following recommendations:
- the masonry is carried out in the usual way with dressing in half a brick;
- the structure cannot be connected to the bath walls;
- withstand a seam thickness of 5 mm;
- leave a gap of 3-5 cm between the metal walls of the stove and the screen;
- in the lower rows it is imperative to make openings through which cold air can freely enter. Accordingly, in the upper ones there are the same holes for the release of hot heat. Both below and above there should be no more than 2-3 openings, otherwise the wall, as a heat shield, will not fulfill its direct function;
- after laying each row, it is necessary to check it with a level: verticality and horizontality must be maintained everywhere;
- Carefully remove any remaining solution from both the inside and outside.
Important! If there is a convection casing in the stove, it should be removed before covering.
Floor base
If the weight of your structure does not exceed the established standards, you can place the stand directly on the surface. If the bathhouse is many years old, the technician will still have to open the floor and inspect the joists and boards for damage. You also need to remember that the brick base also has its own weight and will put pressure on the floorboards.
If the wood is not suitable for the job or is not in perfect condition, it is not necessary to replace it. It is possible to reinforce them with a metal channel or additional wooden beam. It is worth considering the distance between the beams. If they are located more than a meter apart, the specialist will need to install additional ones so that the clearance between them is about 600 mm.
To lay the base, floorboards are placed ten centimeters larger than the size of the structure with the lining. On the firebox side, it is necessary to increase this distance to avoid burning elements from hitting the wood. Then a sheet of refractory material is placed on the marked area, on which brickwork is made about 200 mm high.
It is recommended to use refractory bricks without hollow sections for these purposes. You need to use a clay mortar, to which you can add a little cement mixture. All actions must be performed using a level. After preparing the base, you can think about how to properly brick a stove in a bathhouse.
Overlay methods
In essence, stone cladding is used to act as a heat shield for a furnace. Due to the fact that such a structure is not susceptible to the main thermal effects, it can be constructed in the form of:
- Continuous lining, which is characterized by rapid heat transfer, which causes a decrease in furnace performance. In this option, cladding is rarely performed, and most often to give the metal stove elements of a decorative nature. At the same time, the quality of heating is in the background.
- A heat shield that will look like a small stone fence. This option is quite comfortable for others and helps to increase heat transfer.
- Convector facings with vents. This structure is the most optimal for bathing needs and is suitable for any metal structure, regardless of the size of the steam room.
Construction process
If you plan to cover it with bricks on all sides, then it will be a full covering, if only some sides are partial. When completely surrounded, it is possible to control the movement of warm air masses. To do this, doors are made at the top and bottom of the screen to stop the movement of air when closed.
The model, completely covered with masonry, creates an ideal microclimate typical for a Russian bath. If at least one open wall remains, it will be more like a sauna, and the stone will protect you from burns and accumulate heat.
Full or partial lining
Finishing of a metal stove can be complete or partial .
In the first case, the installation is completely covered with a brick casing. The walls are erected on all sides, rise above the upper platform and are covered with a slab through which the chimney is discharged. In essence, a brick oven is created, the “heart” of which is a metal installation.
Partial lining can be done in different ways. Most often, the back wall is not erected in the gap between the furnace and the wall of the structure. Often the bricklaying is completed below the upper platform of the furnace, especially when it has an increased body height.
The category of partial lining also includes a structure with numerous windows (lattice system). This lining protects against touch, but practically does not limit heat flow.
Of interest is a metal stove with a remote firebox . Such an installation is mounted in the wall opening between the rooms so that its main part is located in the main room (for a bathhouse - a steam room), and the firebox door is located in the adjacent room (for a bathhouse - a dressing room).
This design has certain advantages: saving space in the main room, moving “dirty work” and fuel storage to the utility room, the ability to service the stove without disturbing the conditions in the main room.
A stove with a remote firebox can also be lined with brick. On the front side, 3 walls are erected adjacent to the main wall of the structure.
On the other side, a wall is erected, restoring the previously existing partition, and an opening is formed for kindling, through which the combustion door opens and access to the window for cleaning the stove is provided.
Screen construction options
To determine the answer to how to line a metal sauna stove correctly and with what kind of brick, it is necessary to consider all existing classifications.
By distance:
- solid - interferes with circulation, which reduces the heating rate;
- randomly - the brick is placed with holes, this type reduces the quality of shielding;
- a screen with doors at the top and bottom is an ideal option with the ability to adjust convection.
By arrangement of bricks:
- in size - increases the heating time of stones and consumes a lot of raw materials during construction;
- half a brick - the most suitable option with a durable wall and rapid warm-up;
- in a quarter of a stone - has good heating characteristics, but the strength of the masonry is reduced.
It is worth noting that an overly unstable option can be corrected using reinforcement with a special network, but still, a thin-walled lining should not be erected without good preparation.
Thermal insulation of a brick house from the outside
external wall insulation
The outer part of the house must first be insulated in places of contact with the ground (ground floor, external walls of the foundation) and only then, if necessary, the walls themselves. Before proceeding with the installation of the insulation layer, it is necessary to clean the surface of dust and debris in order to improve the contact between the thermal insulation material and the wall. At the same time, do not forget that the insulation layers must be vapor-tight.
In most cases, for outside work they use polystyrene foam or extruded polystyrene foam, before installation of which a number of preparatory measures should be carried out, namely:
- clean the surface from dust and dirt;
- plaster the walls, leveling out any existing unevenness;
- remove construction waste;
- treat the surface with a primer solution.
thermal insulation material
Next, using dowels or glue, fasten the heat-insulating material to the wall. We carry out the entire procedure in a bottom-up direction, arranging the sheets in a checkerboard pattern. This nuance will further strengthen the structure. After the sheet is glued to the wall, it must be additionally attached with a dowel, and the locations of the caps must be covered with reinforced mesh and plastered with a finishing mixture.
An equally popular method of insulating external walls is the construction of a ventilated facade. The insulation process is carried out according to the following scheme:
- vapor barrier layer;
- fastening using frame anchors made of metal or wood;
- a heat insulator (mineral or basalt wool) is placed in the frame slats;
- waterproofing layer.
warm plaster installation diagram
After installing all of the above layers of the “pie,” you can begin installing the outer cladding, which can be used as siding, porcelain tiles, etc.
The most budget-friendly insulation option, which is available to all segments of the population, is the use of “warm” plasters. The work is not at all difficult, and can be completed even by a person who has absolutely no skills in this field. The first step, of course, is to clean the surface of all kinds of contaminants, and then thoroughly soak it with the soil mixture. Using simple tools, a plaster mesh and beacons are attached to the wall, on top of which plaster will subsequently be applied. After the layer of “warm” plaster has completely dried, you can begin finishing the facade with other decorative materials or simply paint the surface.
What kind of brick to cover a stove in a bathhouse
Before the main procedure, you must first prepare all the materials. On the modern market you will find a huge variety of bricks, varying in size, aesthetic qualities and properties.
The choice of brick must be made based on the distance from the metal to the screen being built. If it is less than 250 mm, then this will lead to strong heating of the masonry and therefore it is better to use fireclay.
The optimal is 500 mm. For such buildings, an ordinary fire-resistant red stone is perfect. If you plan to install vents from below, then this material can be used closer.
Insulation
Insulation of a bathhouse is carried out in several stages:
- Exterior walls. The insulation is laid inside lightweight masonry.
For it, you can use sheets of expanded polystyrene, which are cut to the desired shape and filled with them into the space inside the lightweight masonry as the internal walls are built.
Mineral wool is also good for these purposes. External structures must be insulated so that when warming up the bathhouse there is no need to spend money on heating the entire building. The task of a sauna stove is to warm up the air inside the room. Internal walls. Here it is necessary to make a high-quality finish so that the heat does not escape into the walls. To do this, the rough masonry is waterproofed with coating materials (for example, bitumen mastic). Next, a layer of plaster is applied, a lathing is attached to it, and fiberglass is placed inside the resulting cells.
A layer of thermal insulation is laid (expanded polystyrene, ecowool, basalt wool). Next, the wall is covered with a vapor barrier (for example, foil), on top of which the finishing is placed. Experts recommend using lining, which quickly warms up and will become an obstacle to the transfer of heat to the brick.
The wall near the stove is insulated with a denser layer of heat-insulating material, according to the same principle as the internal surfaces of the bathhouse. Foil must be used as a vapor barrier, since the steam room is the wettest part of the bath and is subject to the most dramatic temperature changes.
The steam room must have high-quality ventilation so that when heated the room does not turn into a kind of thermos without air access.
Characteristics of building materials
You can calculate the main indicators that a brick has for lining a metal or iron stove in a bathhouse using the following table:
| Options | Facing | Textured | Raised | Ceramic |
| Strength | M-250 | M-250 | M-250 | M-200 |
| Size, cm | 25×12×6,5 | 25×12×6,5 | 25×12×6,5 | 25×12×6,5 |
| Frost resistance | F35 | F35 | F35 | F75 |
| Moisture absorption,% | 8,5 | 8,5 | 8,5 | 6 |
| Weight, kg | 4 | 4 | 3,8÷4 | 4,1 |
| Thermal conductivity, W/(m×°C) | 0,61 | 0,61 | 0,61 | 0,72 |
Features of a wooden partition
The partition in the bath between the steam room and the sink is the simplest and most affordable design option, requiring minimal time and financial investment.
To ensure sufficient thermal insulation between the washing room and the steam room, it is better to build partitions from a wide board or timber. This design does not provide for the presence of technological gaps in the inner part of the wall, which helps prevent the accumulation of excess moisture in the room.
In this case, the refusal to use a heat-insulating layer in the walls is explained by the fact that during operation the bath structure requires maximum heat accumulation in all functional rooms. Since a lower air heating temperature is maintained in the washing compartment, the lack of heat is compensated by the heated steam room.
Choice of solution
The most common option for carrying out such work is clay. It is mixed with sand, adding a little cement. A cement mixture with the same clay ratio is also used. For the cementless option, make a clay mixture with twice the amount of sand, which is diluted with water to the desired consistency.
Fireclay powder is best used for refining seams, because it binds bricks less firmly.
A simpler option is to purchase a special mixture. It is inexpensive and easier to use. Thanks to a wide selection of similar products, you can easily select the optimal solution. It is worth noting that the diluted mixture must stand for some time before use so that the substances contained in it dissolve better and the solution takes on the necessary properties.
Design nuances
The design of baths is regulated by the document SNiP II-L.13-62, which has recently been amended. According to the document, the steam room should be located in a separate building, its height should not exceed 2 floors. If, nevertheless, there is a bathhouse on 2 floors on the site, then according to the rules, rooms with a wet regime should be located above rooms with a wet regime.
To draw up a bathhouse project, you need to take into account several factors:
- placement of the building on the site;
- Consumables;
- layout of rooms and their number;
- the presence of window openings and doors;
- type of heating devices;
- communications supply;
- climatic conditions.
You can draw up a project yourself or contact a design bureau. The latter option is considered preferable, since the bureau has contacts of organizations where the project can be confirmed and construction can begin legally.
Fencing an iron stove in a bathhouse
Before starting construction, it is recommended to thoroughly wet the bricks with water for 12-13 hours. This will allow them to achieve the desired level of humidity. Otherwise, they will dehydrate the solution.
The quality of the mixture is checked as follows: it is applied to a new brick, and if it does not spill or crack, then the specialist has created the correct consistency.
Now you can begin the laying process itself. It is important to check each row for evenness using a level.
If you are interested in what to line a stove in a bathhouse with (except for brick), you can always find a replacement. There are special casings that are cut to suitable dimensions. They are made from different rocks, are easy to install, and you will definitely find the right option for yourself.
Insulation inside and outside
In modern houses, the wall is a multilayer structure made of various materials. The main rule of combining them is: the vapor permeability of the layers increases from the inside to the outside. Insulation from the inside is considered the worst option, since it is very difficult to fulfill this requirement.
Insulation scheme
The second major drawback of this solution: if you insulate the wall from the inside, then the dew point - the conditions for the formation of condensation - will be inside the room, and not outside. The third drawback is that thermal insulation takes up at least 15 cm of internal space.
You have to take this step in cases where you need to insulate a finished, tiled house. Moreover, if the cladding is made with siding, it is recommended to donate it and insulate the building from the outside.
If we are talking about a project, or about a house that is at the stage of building a foundation, then the issue of thermal insulation must be resolved in favor of another method.
Finishing
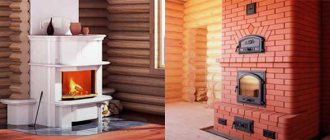
After setting, you need to make a lining so that the sauna stove, lined with brick, becomes a real decoration.
It is most convenient to remove excess solution using a drill with a special attachment. It is important to use personal protective equipment during the process. If after this procedure there are stains left on the brick, they can be removed with a brush dipped in a solution of laundry soap.
In order for the stone to retain its appearance for a long time, it is better to melt it slowly for the first time after lining, allowing the material to gradually warm up. Otherwise, the mortar may crack and the brick may lose its aesthetic qualities and properties.
Brickwork looks very beautiful regardless of the interior style. It does not require decorative finishing, and a huge selection of facing building materials will satisfy the most sophisticated tastes. All you need to do is keep it clean and protect it from damage.
Now you know how to cover an iron stove and boiler in a bathhouse with bricks. Regardless of the masonry method you choose and the materials used, you will immediately feel the pleasant comfort of the updated stove.
Construction of a frame wall for installing a furnace with a remote firebox
A wise proverb says: “A bathhouse is built around a stove.” Adhering to this rule, arrange a foundation and a protective screen, and then begin to build a frame partition between the steam room and the dressing room.
For the partition, use timber soaked in antiseptic. The length of the beam is according to the height of the room, section 100 x 600 mm. Install two beams vertically, attach them to the floor and ceiling with perforated corners and self-tapping screws. Between the two beams you need to install a horizontal jumper and fix it with the same corners.
The result will be a frame in the shape of the letter H. At the bottom between the beams there will be brickwork and an exposed fuel channel; insulation and sheathing will be located on top.
Frame example
Use basalt wool 100 mm thick.
Thermal insulation basalt wool Paroc (Steam) thickness 100 mm
Install the slabs between the beams. Nail the horizontal battens of the sheathing 20 mm thick to install the lining. Using a construction stapler, secure the foil vapor barrier on both sides of the frame wall. Use clamps or nails to secure the lining, thus sheathing the upper part of the wall on both sides (vertical installation is assumed).
Fastening insulation and lining
There should be a distance of 3-4 cm between the brickwork and the fuel channel. Do not place the brick directly on the steel channel. The same distance must be maintained between the brick and the timber.
Masonry tools
For masonry we will use a solution of sand, fireclay clay and cement:
- soak 2 parts sand and 5 parts clay in water for one day;
- After 24 hours, add 1 part of cement and mix.
Before laying, soak the brick in water. Carry the masonry level and bandaged.
Types of brickwork
Correct dressing
If necessary, cut the brick with a grinder. It is most convenient to do the overlap using steel corners (it is on their shelves that the brick will rest).
Covering the opening
To ensure beautiful seams (and the masonry will be visible on both sides), use a factory plastic jig or steel square rod.
Drawing of a device for bricklaying
Don't forget to unstitch the seams after laying.
Furnace installation diagram. Brick portal. Recommended distances
The wall is being laid. The stove was installed immediately, for ease of work
The photo shows a brick portal and the firebox door of an installed stove. Gaps between brick and wood are visible, not yet filled with insulation.
The photo shows how the brick is laid between the wall of the log house and the stand (a vertical beam that also serves as a door frame)
Brick portal
When the masonry is completed, install pieces of basalt cardboard or mineralite into the specially left gaps. Do not use glass wool or polystyrene foam for these purposes under any circumstances.
The photo shows insulation around the brickwork
The last step will be the installation of platbands that will hide the insulation between the timber and the brick. The platbands just need to be sawed down at 45 degrees and nailed to the timber from the dressing room side with finishing nails.
Example of original finishing
Installation of the stove, its leveling and alignment are carried out after all construction and finishing work has been completed. But if not only the portal is being laid, but at the same time a brick screen is being erected around the stove, then the unit is immediately installed in its place and covered with film (so as not to get dirty with the mortar during operation).
Installation of a furnace with a remote firebox
Installing a sauna stove in its original location
Brick portal and oven - photo. Some craftsmen recommend building brick walls first, and only then covering the walls with clapboard
Ceramic tile
Perhaps this is one of the universal materials that are often used for any purpose. This tile gained its popularity due to its relative cheapness and good characteristics. The only limitation of this material is its maximum heating temperature. The tiles do not have any locking connection or hook that would help the material resist deformation at high temperatures. That is why it is not recommended to use it for stoves that become very hot during operation. But for a fireplace this is a suitable option.
Ceramic clinker tiles cope much better with this task. In addition, it can imitate any type of finish. There are products with imitation brick, tile, wood, granite or marble. In addition, clinker tiles are more wear-resistant, stronger and more durable. And the coating can be matte or glossy.
If you want to have an original and inexpensive finish for your fireplace or stove, you can combine the option with decorative brick and ceramic tiles. This neighborhood also looks beautiful.
An important point: when finishing the stove with tiles, you need to choose a high-quality glue or composition that is not afraid of high temperatures. Otherwise, no matter how high-quality the tile is, it may fall off due to cracked adhesive. You shouldn't skimp on this.
But you can learn how to properly tiling a stove with your own hands from this video. This will help you complete the task quickly and efficiently, while saving some money on hiring workers.
Preparation for construction
The amount of material can be accurately calculated if you make a project plan. You need to think through each step and transfer it to the drawing. Any miscalculation is critical, since it is impossible to remake a ready-made portal. It can be destroyed and rebuilt. During the calculation, a number of factors need to be taken into account:
Oven dimensions (width, height)
You need to take into account the presence of legs of the furnace equipment. Width between metal surfaces, brickwork. You need to leave 3 cm for fireproof material. Leave the gap necessary to expand the furnace walls. Masonry, which should protrude beyond the dimensions of the stove by 25 cm on the sides, on top. You need to buy more building materials in case of failure.
Technologies
There are several proven technologies for bricklaying around metal furnace equipment:
- Heat shield. A brick fence that does not exceed the dimensions of the furnace in height. Promotes better heat transfer.
- Continuous cladding. It quickly releases heat to the surrounding space, which increases the cost of heating the premises. This technology is used when it is necessary to make a beautiful decorative design, sacrificing the performance of the furnace equipment.
- Convector masonry, which has vents. Suitable for metal heating units. In this case, the size of the steam room is not important.
Cast iron stove lining