If you use gas cylinders at home, then you probably know that safety should come first. Agree, nothing adds confidence more than peace of mind for yourself, your loved ones and property. In this sense, everything is decided by the gasket on the gas cylinder - a very cheap and simple remedy. The safety of using the equipment directly depends on its quality and size. It would be nice to protect yourself from explosion, destruction or possible fire, wouldn't it?
We will tell you about the requirements for gaskets and the rules for their use. You will find out what sizes, types they come in, and what features they have depending on the materials used. Together with this information, it will be easier for you to make a choice whether to buy a new or replace the old seal.
Gaskets are used on many connections. In the gas industry, seals are used on cylinders, hoses, and pipelines. This is done for the sake of safety and to minimize fuel losses. Read the article and find out more about it.
Gasket replacement procedure
Changing the O-ring on the body neck often coincides with replacing the valve. The gasket is updated if a problem with it or the faucet is identified.
Before connecting a gas cylinder to any gas-using appliance, worn parts on the container should be replaced: their appearance will be the best guide
They resort to replacing the valve if:
- it is not possible to move the flywheel, it has become more difficult to turn it;
- there is deformation of the valve or its parts;
- there is a smell of gas in the room;
- The scheduled technical inspection did not take place.
Gaskets are changed with a precise algorithm of actions. First, the cylinder itself is taken as far as possible from buildings. The valve flywheel is slowly unscrewed, after which the gas is released. The valve is carefully removed, smoothly and without damaging the housing.
The condensate remaining in the cylinder is poured out. Then simple technical steps remain: install a new gasket, another valve (if necessary). Finally, check for leaks.
Independent manipulations are prohibited by the rules, but in extreme cases and if you have the skills, you don’t have to wait for specialists. Some types of valves can be partially disassembled indoors and without releasing gas, for example, to replace internal seals.
Replacement of cylinder parts may be necessary at least once every two years, and, in addition, there are restrictions in terms of independent actions and storage conditions for the container
Replacing the gasket between the valve and the gearbox will take less time. It will be enough to close the flywheel, disconnect the gearbox and install a seal between its nut and the valve fitting.
Some gearboxes do not operate through a valve, but directly from the cylinder. In this case, it should be taken outside to release the gas.
What are cylinder gaskets for?
They are used as sealing parts at the points of connection of the valve (faucet) to the neck of the gas cylinder and to the reducer. In the first case, the seal is mounted on the tank body and in a horizontal position, in the second - between the valve fitting and the gearbox, vertically. There are also gaskets inside the valve: under the flywheel, in the unit body and in its valve.
The seal eliminates or prevents gas leakage. Rubber gaskets increase tightness, improve mechanical characteristics, and keep connection parts in working condition. You cannot do without oil seals in rooms with small or no windows, rooms with stagnant air, and unventilated areas.
Consequences of a gas cylinder explosion: what can happen as a result of a small leak, violation of storage conditions and incorrectly selected premises
Gaskets improve the performance of gearboxes. The latter are connected when gas is supplied through a hose to reduce or stabilize pressure. In the process, the usual indicator of 16-50 or the maximum of 150-250 atmospheres reaches values from 1 to 16, and the probability of an explosion increases compared to the state when the cylinder is not used. The seal reduces the risk.
After prolonged use of the cylinders, the seals become deformed. They are changed about as often as cylinder taps.
In addition to sealing gaskets, transportation gaskets are used with gas cylinders: the rings are placed on the wide part of the body, in 2 places.
What is better: exchange or refill?
There are two ways to obtain a cylinder of gas necessary for the operation of a gas boiler, stove, outdoor lighting lines, etc.: fill your container or exchange it for another that has already been filled. In the first case, the cylinders are left at the station for 1-2 days, the consumer receives his full container.
In the second - a quick exchange of an empty container for a filled one. Consumers can make their own choice about which method to use. The second method is faster, but you get someone else's equipment, which may not be the newest. The cost depends on the type and volume of gases. Standard case: 200-300 rubles.
What problems can occur when refueling?
Nuances that are important to know about filling gas cylinders:
- Some Chinese cylinders have thin walls. They are not designed for heavy loads. It must be remembered that cheap equipment may not pay off due to high risk.
- Active gases are prone to fire and explosions, so you need to especially carefully monitor the volume (85%) when filling with propane, oxygen, methane.
- To use household gas at low temperatures, it is better to use winter propane-butane mixtures, with the advantage of propane, since butane is of little use for winter use.
In order to prevent the occurrence of the listed problems and risks associated with replenishing the supply of liquefied explosive substances, it is necessary to think through the process in advance and provide for all the nuances.
A high-quality cylinder and compliance with operating rules are the key to safety
This characteristic should be treated with special attention.
Replacement of the cylinder with a new one, repair
Sooner or later the cylinder wears out, the valve may fail, and the surface will begin to delaminate. Almost every city has a cylinder replacement or repair point. You can give away the old one and get a new product, with an additional payment of approximately 1,500 rubles. This is a good alternative to buying new equipment.
If the valve is repairable, it is repaired or completely replaced. The cylinder itself can be sanded and painted. The cost of a new empty propane cylinder: from 2,500 to 600 rubles, depending on the manufacturer’s materials.
It is more profitable to purchase large cylinders - a 50-liter container is enough to cook food on the stove for a small family for 2 months
Requirements for sealing products
The gasket must correspond to the drawing. Shape displacement is allowed within the limits indicated in special tables.
Reducer on a gas cylinder: the gasket at the junction of the converter and the valve has to be changed more often - usually disposable seals are used, but some models of reducers do not need a gasket at this connection at all
Do not place washers with cracks, bubbles or porosity on the working surfaces (P). In the case of non-working ones (NR), only gaskets with cracks are not used, but exceptions are made for other parameters.
On surfaces of both types, gaskets with some defects can be installed if they do not exceed the permissible values:
- Imprint on the surface of the product. With depth, length and width allowed for the gasket size.
- A chip up to 0.3-1.5 mm long, depending on the thickness of the seal.
- Pressing out up to 0.3-1.5 mm high. The value also depends on the thickness of the washer.
- Depressions, elevations and inclusions. Up to 0.3-5 mm.
- Under-formation. Up to 0.3-5 mm, based on the thickness of the gasket.
- Retracted edge. With a size of up to 0.3-1 mm.
Before installation, the gaskets are cleaned of dirt and dust and the target surface is prepared in the same way. The rings are fastened without shock loads, with short stretching.
The condition of the sealing gasket can be determined by the unit in which it is installed. After changing the unit or removing the product itself, it is subject to further use if the appearance remains unchanged and the dimensions are maintained.
The criteria also apply to seals and transport rings for propane gas cylinders of 2, 5, 10, 12, 15, 20, 27, 40, 50 liters and more. Products for methane cylinders of 47, 50, 67, 80, 85, 96, 100, 123, 132, 160 and 185 liters fall under the standards.
Installation and connection
Often gas hoses come on sale with gaskets, but not in all cases. The user should connect the hose to the device and connect the device and the gas riser together, using various components. The angle when working must be correct and comply with the standards.
In order to correctly connect the coupling or bushing with the tap at the junction of the gas pipe and hose, it is worth performing a number of steps one by one.
- Shut off the gas supply.
- Leave the burners open to ensure complete combustion of the gas.
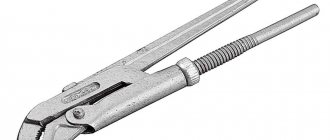
- Prepare several adjustable wrenches.
- Using the first key, you need to support the tap located on the tube, and with the other, unscrew the nut on the flexible device.
- Screw the hose nut to the end of the coupling.
- Carry out a thorough check of the seal quality. This is done by applying a soap solution using a brush.
- After all the above steps, it is necessary to open the valve and check the operation for the absence of bubbles.
Installing clamps on gas hoses does not require any special skills.
It is important not to forget to follow these rules:
- maintain the correct distance between devices;
- using a screwdriver, you need to tighten the clamps, but do not overdo it;
- It is worth inserting a main element into each of the clamps;
- Pull the bolts through the holes, screw in the clamps, ensuring a tight fit.
The diameter of the gas hose fitting 9 mm must have a 3/8″ thread, and the nut must be made of steel. It would be optimal to install a fitting made of brass.
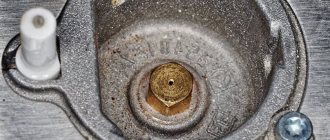
Why do cylinders become covered with frost?
Here you can also debunk one of the most common misconceptions. It is generally accepted that if such a device “freezes,” it becomes covered with frost. Some even argue that such equipment should be insulated with blankets, old coats and other improvised items. So, the frost will disappear faster if you leave the gas container as is, without helping it “thaw” with warm things.
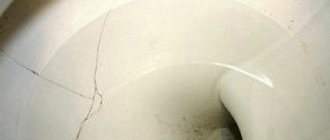
The bottom of a gas cylinder that is covered with frost
The appearance of frost can be explained by a number of physical processes that occur inside the structure when it is connected to stoves or burners. At such moments, active fuel consumption is observed, therefore, large volumes of gas liquid turn into a vapor fraction. And this phenomenon is always accompanied by high heat consumption, which is why the surface of the cylinder becomes much colder than the temperature in the surrounding space. Moisture in the air space begins to appear in the form of condensation on the walls of the installation, subsequently turning into frost. This is an absolutely natural phenomenon that you don’t need to do anything about.
Moreover, all attempts to use artificial “insulation” violate safety standards during operation, and also affect the deterioration of heat exchange between the device and the environment and affect the gas supply conditions. If your burner did not delight you with a grandiose flame, then after your “maneuvers” with the blanket, it may stop working altogether.
Do not insulate gas cylinders with anything!
In general, when connecting high-power gas devices, you need to be aware that the gas cylinder has limitations on the speed of release. This means that the liquid fuel turns into the vapor stage gradually. For example, a 50-liter cylinder can provide about 500 grams of gas in 60 minutes. This is equivalent to a power of 6-7 kW. In the cold season, this figure is halved if the equipment is located outside. In summer the situation is reversed: the maximum flow rate increases.
In any case, we can conclude that frost is evidence that the cylinder cannot cope with high fuel consumption. This may cause a temporary drop in gas pressure and equipment failure. If this happens, it is better to stop consumption and wait until there is a sufficient vapor cap.
Types of sealing gaskets
On the modern market you can purchase a gasket for a heating radiator of absolutely any type - made of cast iron, aluminum or bimetal.
Depending on the material of manufacture, the following types of products are distinguished:
- Silicone gaskets
. Such products are resistant to high coolant temperatures and well compensate for the thermal expansion of the metal. Such gaskets are used, as a rule, in autonomous heating systems with low operating pressure. - Paronite products
. They are made from pressed rubber containing asbestos and special powder. Such gaskets are used in radiators connected to a centralized heating system, where the temperature of the coolant can rise to 90-100 ℃. Paronite gaskets are suitable for cast iron heating radiators, as well as for aluminum and bimetallic products. - Fluoroplastic gaskets
. This type of product is made from heat-resistant plastic. They are intended for installation on bimetallic and aluminum radiators, without prior lubrication. They are characterized by high heat resistance, resistance to aggressive factors and pressure changes. - Cardboard gaskets
impregnated with oil paint for durability are used for aluminum and bimetallic radiators in autonomous heating systems. The production of products is regulated by GOST No. 9347-74.
Typical connection instructions
Ideally, it is better to invite a specialist to install gas and gas-electric stoves, but if you are still determined to make the connection yourself, then the installation instructions will help with this. By following it in detail and carefully observing the mandatory points, it is quite possible to cope with this task yourself.
The standard sequence of actions is as follows:
- Free the “object” from packaging materials and all components (baking tray, tray, dividers, etc.), leaving only the protective film, which must be removed after completing all repair work.
- Install the stove in the intended place, maintaining the distance from the wall specified in the attached documentation.
- Using a level and adjustable feet, the working surface is leveled horizontally.
- A flexible hose is connected to the gas pipeline. To do this, the threaded connection is wrapped with a sealant (FUM tape) and tightened with the appropriate wrench.
Then the gas hose is connected to the device in the same way, using a seal and tightening the locknut with two open-end wrenches. It often happens that the thread at the outlet of the plate has a pitch of 3/8′, then an adapter is installed that comes with the device.
- The last step is to check both connections for leaks, which is carried out using a soap solution. In this case, thick foam is generously applied to the joints (with a brush or hand) and the gas supply valve is opened on the lower side. If bubbles appear at the joint, the tap is turned off and the defective connection is redone. If the surface remains level, then there is no gas leak, which means the new stove is installed correctly.
- At the end, the functionality of the burners and oven is checked.
The video will help you understand more clearly how to properly install a gas stove yourself.
What you need to know: valuable tips
Before purchasing a flexible hose, it is necessary to check the size of the thread at the outlet of the plate, its classification and whether it is straight or angular. If the outlet is of a direct type (directed into the wall), you must purchase a sleeve with a square at the end.
The gas hose should not be painted - this will accelerate its cracking. A more attractive look can be created by covering it with special paper or oilcloth.
It is also strictly forbidden to tightly seal gas communications with false plasterboard panels and other structures - this will make it difficult to carry out service work on individual elements.
To camouflage the gas supply system, a collapsible box is used, which can be easily dismantled if necessary. In this case, there will be constant access to all structural elements of the gas system.
It is forbidden to use unnecessary connections. Independent complication of a gas structure, according to technical regulations, may entail a fine or disconnection from gas supply
If a technician has been called to connect a gas water heater or stove, it is necessary to check that the work is being done correctly: the excess tap from the tap on the lower side must be unscrewed, the flexible line must be directly connected exclusively to the tap located on the branch pipe, and its other end - only to the outlet of the gas stove .
It is also possible to use an adapter. Any additional installations are prohibited.
Burner connection guide
Gas cylinders are usually used in everyday life for cooking. But nothing prevents you from connecting to them a torch for soldering copper pipes. A similar tool is used for roofing work, singeing animals during slaughter at home, etc.
The reducer for the burner should be selected not an ordinary household one for a stove, but a special one for welding machines. From the first the pressure will be too low
Before connecting a burner to a gas cylinder, you should carefully examine it and the hose to it. The bottled gas in the container is under a pressure of 15–16 atm. If the burner and outlet are not designed for such parameters, then you will have to connect an adjustable reducer for propane. According to TB rules, you can’t do without it.
If the gas reducer is not connected at all, the gas will be consumed too much. Of course, you can adjust its supply using the valve on the cylinder, but it is difficult to talk about any safety of work in this situation.
Conclusions and useful video on the topic
Eliminating gas leaks using available tools and replacing the internal valve gasket:
Gas cylinder seals should be replaced at the first sign of damage or loss of seal. They are made from highly flammable materials such as paronite, fluoroplastic and special rubber. Rings are produced for containers and units of any size, so there is no doubt about the quality of the seal.
In hardware stores there are gaskets for gas cylinders of 12, 27, 50 liters and containers with less common sizes. The cylinders themselves should be stored outside residential buildings, apartments and technical floors, away from escape routes.
Write comments on the topic of the article, ask questions, exchange important information. If you bought a gasket for a gas cylinder, tell us what material you purchased the product from and whether you are satisfied with its quality. The communication block is located below.
Types and design of valves
The threads of valves for gas cylinders are standardized, but they themselves can have a variety of designs. The choice of valve model is influenced by the type of chemical substance being stored, production features of operation and the amount of money. Before purchasing new equipment, you should familiarize yourself with the design options and internal structure of the valves.
The design features of gas cylinder valves are determined not by the whims of engineers, but by safety considerations.
Gas valve model VB-2. This valve model has proven itself positively back in Soviet times. It has been used in everyday life and industry for decades, causing a minimum of problems.
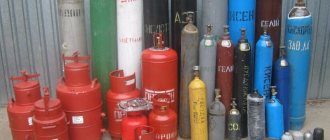
The choice of metal for the manufacture of the valve body is determined by the type of gases contained in the cylinder. There are the following types of shut-off valves, depending on the type of chemicals stored:
- Acetylene. The body of such cylinders is painted white. Special valves are used in cylinders containing acetylene, chlorine, ammonia and other aggressive substances.
- Oxygen. The cylinders are painted blue and are intended for storing oxygen, argon, hydrogen, nitrogen, carbon dioxide and other inert gases.
- Propane-butane. They are painted red and are intended for storing substances corresponding to the name and other gaseous hydrocarbons. The most common valve type model for such a cylinder is VB-2.
Valves for acetylene cylinders are not made of brass because the substances they contain may react chemically with copper. Typically, carbon or alloy steel is used to manufacture shut-off valves of this type.
The lower fitting of the valve is used to connect to the gas cylinder, the upper one is used to attach the flywheel, and the side one is used to connect communications for gas outlet and injection. The valve design for a gas cylinder is quite simple. Shut-off valves usually consist of the following general elements:
- Brass or steel body.
- A stuffing box valve or flywheel connected to the body with a union nut.
- Internal locking mechanism with valve and stem.
- Sealing gaskets.
- Plug for the outlet.
You can look at the design of valves on gas cylinders of each type in more detail in the presented images.
Image gallery
Photo from
The release of poisonous gases through a safety valve can be harmful to health even in open spaces
Acetylene valves use maximum seals to prevent toxic gases from getting out.
The seals on propane cylinders are simple, so they must withstand a maximum pressure of only 16 atmospheres
Worn valves can leak small amounts of gas, which can lead to unpredictable consequences in enclosed spaces. To prevent such situations, a plug is used on the side fitting, which serves for additional sealing of the cylinder during transportation and long-term storage.
The direction of the threads on the outlet holes depends on the chemicals contained in the cylinders: the right is used for non-flammable gases (oxygen, nitrogen, argon, etc.), and the left is used for flammable gases (hydrogen, acetylene, propane, etc.)
The principle of operation of the assembled gas valve is unremarkable. To supply gas and shut it off, simply slowly turn the flywheel in the appropriate direction.
Range of sizes and gasket models
The effectiveness of a gas cylinder gasket depends on its size and the dimensions of the unit. In the case of transport rings, the inner diameter should be slightly smaller than the diameter of the cylinder. For sealing rings inside connections, exact matching dimensions are important.
Washers for external structures are selected according to the outer and inner diameter. All types of sealing gaskets are subject to heavy loads, so their compatibility with equipment depends on pressure indicators.
Rings for necks and reducers have a flat configuration. Their sizes are regulated by GOST 15180-86. The document described the parameters of flat elastic gaskets made of fluoroplastic, paronite, rubber and materials based on them. Standardized products seal flanges and connecting parts, which are elements of the gas cylinder valve and various fittings.
Gas cylinders can be high and low, wide and narrow, with parts of different proportions - the gaskets for them are noticeably different in configuration, even if they have the same purpose
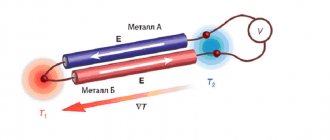
The size range of gaskets corresponds to the nominal bore (DN, Dу) in millimeters and the nominal pressure (PN, Pnom, Pu) in MPa. Both indicators are also called nominal.
The first displays the internal diameter of the structural element through which the gas moves. The nominal pressure acts as a conditional indicator, which was established based on strength calculations at a temperature of +20 °C.
Dimensions of sealing gaskets according to GOST:
| Nominal diameter (DN), mm | Nominal pressure (PN), MPa | Outer diameter of gasket (D), mm | Inner diameter of gasket (d), mm |
| 10 | 0,1 – 0,63 | 38 | 14 |
| 10 | 1,0 – 4,0 | 45 | 14 |
| 15 | 0,1 – 0,63 | 43 | 20 |
| 15 | 1,0 – 4,0 | 50 | 20 |
| 20 | 0,1 – 0,63 | 53 | 25 |
| 20 | 1,0 – 4,0 | 60 | 25 |
| 25 | 0,1 – 0,63 | 63 | 29 |
| 25 | 1,0 – 4,0 | 69 | 29 |
| 32 | 0,1 – 0,63 | 75 | 38 |
| 32 | 1,0 – 4,0 | 81 | 38 |
| 40 | 0,1 – 0,63 | 85 | 45 |
| 40 | 1,0 – 4,0 | 91 | 45 |
| 50 | 0,1 – 0,63 | 95 | 57 |
| 50 | 1,0 – 4,0 | 106 | 57 |
| 65 | 0,1 – 0,63 | 115 | 75 |
| 65 | 1,0 – 4,0 | 126 | 75 |
Shipping spacers are used during transportation and storage. The rings protect the container from damage, damage to the paint layer, and impacts against other containers. Products for gas cylinders are produced in accordance with TU 2500-376-00152106-94. The peculiarity of these rings is their circular cross-section.
Some products:
- OH-1101: 25 ±1.3, 215 ±3.
- OH-1102: 25 ±1, 210 ±3.2.
- OH-2202: 15.6 ±1, 285 ±3.
- OH-3303: 25 ±1.6, 140 ±2.5.
The first indicator displays the cross-sectional diameter of the ring in millimeters, the subsequent indicator displays the internal diameter (mm). These products are used under conditions of normal external pressure and temperature range -40…+40 °C.
Gas line service life
After installing the hose, you should check its service life and remember the installation date. The product, depending on the type, is designed for a period of 5 to 15 years
It is important not to forget to replace it on time
p, blockquote 39,0,0,0,0 —> p, blockquote 40,0,0,0,1 —>
Guaranteed service life is indicated in the product passport and in the certificate of conformity.
- rubber hoses (with and without sheath) – 5-year warranty, service life up to 10 years;
- PVC eyeliner – 12-year warranty, lasts up to 20 years;
- bellows gas hose - 15 year warranty, does not require replacement up to 30 years.
The gas heating boiler is connected to the main line using a flexible hose.
Selecting and installing a hose for a boiler is a very important matter, because we are talking about gas.
An incorrect connection to the gas pipeline may result in an explosion.
To supply household gas, flexible gas hoses specially designed for this purpose are used. The use of water hoses for this purpose is strictly prohibited.
Connection Security Basics
Any gas equipment, including related ones, must be connected in compliance with safety rules. Gas is an explosive substance, when working with which you should be extremely careful.
READ MORE: Do-it-yourself hidden wiring finder (detector)
This requirement also applies to devices for its connection, which must be of high quality and provide the appropriate level of protection:
- It is not recommended to hide the gas hose; it is important to ensure access to it.
- The product cannot be painted.
- When installing, you should pay attention to the tension of the sleeve - it should sag a little.
- During the installation process, do not bend or twist the eyeliner too much.
- Metal parts of the product must be protected from condensation.
To install a flexible hose, only tools, materials and components designed for working with gas equipment are used. This is worth paying special attention to, because many parts are almost identical to materials for plumbing.
Instructions for self-connection
Paying a gas technician for installation work is not too high, but many home craftsmen prefer to do everything themselves. This is a feasible task that requires the purchase of components and theoretical knowledge.
To connect, you will also need to prepare the following tools and buy materials:
- keys: gas No. 1, adjustable 22-24;
- a screwdriver for tightening the clamp, if required;
- sealants (Loctite 55 thread, flax, FUM - tape);
- gasket ½;
- gas sleeve;
- ball valve 1/2′;
- a brush and soap solution, which will be required to control the work.
A rag and a plastic stopper will also come in handy. The rag will be used as a temporary seal against gas leaks. The narrowed edge of the plug must be adjusted to fit the hole in the supply pipe. If during the extraction process a homemade part gets stuck, you can easily remove it with a corkscrew.
Step #1: Removing the old slab
Shutting off the crane when lowering is a primary task to ensure the safety of the work being performed. Next, you need to unscrew the locknut located on the outlet and remove the coupling. If the old slab has a coupling and locknut that were previously painted, this will significantly complicate the process of dismantling them.
Sometimes it is not possible to complete this procedure, then you will need to cut the eyeliner with a grinder.
The gas stove is dismantled after disconnecting the gas main from the conductor pipe. Difficulties that arise with unscrewing the lock nut on a metal pipe can be solved by cutting off the liner
In the process of unscrewing the squeegee located in the lowering valve, it is necessary to hold the valve itself with a key. It does not have to be removed unless you plan to replace the faucet. When they plan to delay the installation of the slab, an additional plug is installed on the lower side.
Step #2: Replace the faucet
There are situations when the wall is located very close to the tap and there is no way to dismantle it. In this case, it is necessary to bend the fastening and install a wedge between the wall and the pipeline. However, this is done in such a way that it is possible to continue doing the work.
It is necessary to prepare a piece of rag sufficient to completely block the pipe after dismantling the old tap. The next thing will be to tear it off without completely unwinding it. You will also need to prepare the selected type of seal. Do not forget to thoroughly ventilate the room during work to eliminate gas vapors.
After unscrewing the tap, the outlet from the pipe is tightly fixed with a finger and then with a wet rag. The main actions are aimed at eliminating gas escape from the pipe as much as possible. In this case, the thread on the branch should not be closed, since it will be covered with the selected sealant.
Before winding the seal, the threads on the lower end must be thoroughly cleaned. Next, its winding is carried out directly. This process ensures a reliable and airtight fixation of the new faucet, which is then tightly screwed on. The last step is to install the previously removed handle on the faucet.
Using soap foam, the tightness of the connection of the faucet and the gas pipe is checked. If the work was completed correctly, installation of the gas hose can continue.
If gas equipment is connected to the mains for the first time, you will definitely need to call a gas technician. In his presence, the equipment is checked for gas leaks when the valve is open. If the gas service worker does not find any violations, he must enter the established brand of stove into the register.
Step #3: Connecting the Flex Hose to the Stove
The external thread of the hose fitting is wrapped with a sealant. After this, it must be screwed into the tap on the branch pipe. The flexible hose is connected to the manifold at the finishing stage.
Next, the stage of test opening the tap on the lower side is mandatory to check for gas leaks. Using soap foam, the joints are treated with a brush. If foaming occurs when opening the gas tap, the work must be redone.
It is necessary to check the threads located on the manifold of the plate. Quite often it is 3/8′. In this case, you will need to install a 1/2′ adapter with a seal
If the work of replacing a gas hose is carried out in a private house where bottled gas is used, an additional replacement of the nozzle with a smaller diameter will be required. If this is not done, the burners will produce too much soot, which likes to settle on furniture and dishes in the kitchen.
Gas stove connection diagram
Schematically, connecting the stove to gas is as follows: a gas riser passes through the kitchen room, from which a branch pipe with a tap at the end is connected, which is connected to the stove. This piece is also called a drop or tap.
In older houses, a petal type faucet is installed on the slopes. When reconnecting, it is recommended to replace it with a ball one. It takes up less space and is more convenient to use
A rubber-fabric hose is screwed into the faucet, through which gas is supplied. For old houses, it is common to place the slab on a metal pipe. This method is inappropriate to use, because in this case the location of the device will be stationary.
In remote areas of the private sector, where there is no access to a main gas pipeline, gas is used in cylinders. Only a gas service specialist is allowed to connect to such equipment.
Free replacement
Utility services in some regions provide the opportunity for certain categories of citizens to replace outdated and faulty gas equipment without paying a penny for it. The rules of procedure will need to be clarified in advance with the city gas service.
Who is eligible for the benefit?
Only certain categories of citizens can use the free stove replacement service. The benefit is obtained in the following cases:
- apartment owners receive subsidies from housing and communal services, are WWII veterans, have the titles of heroes of the USSR, socialist labor, the Russian Federation, or have received the Order of Glory;
- existing gas equipment is the property of the state, regardless of whether the apartment is municipal or owned by the tenant;
- the apartment is occupied by persons who have received it by right of queue for housing;
- in a family that needs to replace the stove, or a person living alone, the income is less than 1.15 of the subsistence level;
- single pensioners or families of pensioners who have reached retirement age and do not receive additional social assistance to pay for housing and communal services and living space.
Installation of a stove for pensioners
In practice, there are very few such persons, and a replacement benefit can only be made if there is a package of documents confirming the right to receive such a service.