Modern technologies cover all spheres of human life. They also had their say in construction work. Porcelain stoneware, a new generation finishing material, firmly holds its position in the construction market, displacing ceramic tiles. Due to its high strength, it has wear-resistant qualities and resistance to aggressive chemical environments, which greatly extends its service life. Having studied the technology and all the intricacies of the work, you can lay large-format porcelain tiles yourself.
What you need to know about laying porcelain tiles
When starting installation, you should take into account the features of large-format porcelain tiles. This will help you avoid common mistakes.
Thanks to manufacturing technology and composition, porcelain tiles are highly durable and waterproof. The variety of types of this material significantly expands the scope of application. It can be used as a floor covering, for cladding walls and fireplaces, after leveling the surface.
When choosing porcelain tiles, you should consider their thickness. It varies from 3 to 30 mm. Thin tiles are suitable for finishing vertical surfaces. For indoor flooring, tiles with a thickness of 12-20 mm are used, and for cladding steps and the entrance to the building it is better to use thicker material. At the same time, there are manufacturers who claim that laying thin porcelain stoneware on the floor is acceptable and prove this by the presence of a coating of thin material in their showrooms.
It is also necessary to take into account the properties of the material, depending on its type. So, when planning to use porcelain tiles as a floor covering, you should remember that this is a “cold” material and it is necessary to consider a floor heating system. But rectified porcelain tiles are not suitable for heated floors, since the technology for laying them requires a seamless method. Temperature changes may affect the integrity of the coating.
Tiles with a polished surface can be too slippery, so they are not used for tiling floors in bathrooms and on open balconies.
When choosing a material, you should focus on the following criteria:
- Tile weight. Porcelain tile is a heavy material. Its standard specific gravity is 2400 kg/m³, which is indicated in the certificate attached to the material. If this parameter does not correspond to reality, a violation of the manufacturing technology should be suspected. Such material will not meet its physical qualities;
- The inside of the tile. It should be smooth, without significant depressions. If it has deep flaws, it is better to refrain from purchasing such material, no matter how attractive the price may seem;
- Size. Tiles from the same batch must have the same size and shape.
Observations from practice and our experience
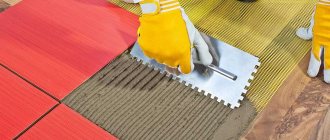
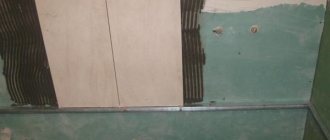
We admit that the technology for laying tiles given below will raise doubts among some readers, but nevertheless, the trial, rather risky experience withstood all sorts of tests, including a 4-year period after the completion of the renovation and finishing of the bathroom. We will talk about laying tiles made of natural marble, dimensions 305x305x10 mm, laid using the “comb” method on pre-plastered walls with Teplon gypsum plaster.
Once, during the work, we encountered the peculiarities of marble tiles, which were difficult to install even with special Knauf-MARBLE adhesive, since the back side of the marble was not treated with special water-repellent chemicals. During the drying period, the subsequent, almost perfectly leveled tiles “sank” in the plane in relation to the previously laid and dried row.
As it later became clear, the reverse side of the marble tile, like a sponge, actively absorbed moisture from the slowly setting solution, due to which unplanned “shrinkage” occurred.
There have been attempts to treat the working side of marble tiles with primers in order to prevent increased moisture consumption. However, the result was still unsatisfactory, and chemical spraying in that case was not possible.
Unusual experience of laying marble tiles
Everything worked out using Flizekleber
solution from gypsum putty
“Pufas”
, used exclusively for preparing plastered walls for wallpaper, leveling plasterboard surfaces, sealing joints, etc., that is, for painting work. But it was the putty’s ability to quickly harden that helped solve the problem with laying marble tiles - moisture was also absorbed, but the putty set faster, preventing the marble tiles from “sagging.”
Results of the experiment
However, there remained one more controversial issue that could nullify all efforts - the natural humidity of the bathroom, under which conditions the use of gypsum solutions is not recommended. The solution was found to be very simple - a banal tile grout for joints, blocking the access of air and moisture to the back side of the marble tiles.
As for the degree of adhesion between marble and putty, the result here exceeded all expectations - during a trial dismantling, before which several tiles were repeatedly doused with water and kept for the appropriate time, the Pufas solution tore out decent pieces of plaster, while remaining integral with the marble . It is likely that the described technology for laying marble tiles will be useful to someone in the future.
Continuation of the topic:
- Waterproofing for bathroom
- How to cut wall tiles correctly
- Secrets of laying floor tiles
- Examples of cutting floor tiles
- Examples of threshold-free floor tile installation
Laying porcelain tiles with or without a seam: what to consider
There are two technological methods for laying large-format porcelain stoneware: with a seam and without a seam. Both methods are successfully used in different types of finishing work and each has its own advantages and disadvantages.
The seamless method involves laying slabs with minimal gaps between them. For such installation, rectified tiles are considered the best option. As a rule, the seams between such slabs are very small. Such seams are grouted with matching grout, which visually creates the impression of the integrity of the floor covering. But it should be remembered that this installation method is not used when tiling surfaces in unheated rooms, and it is also undesirable when using porcelain stoneware flooring. Temperature changes and high loads on floors can lead to deformation of the coating, causing the seams to separate and the visible integrity to be compromised. It is better to use the seamless method to cover vertical surfaces indoors, where a constant temperature is maintained.
Laying with a seam is preferable to use when tiling floors. In this case, it is necessary to take into account the load on the working surface and operating conditions. The higher the load on the floors, the wider the joint should be to reduce the deformation load. Generally, the size of the floor covering seam is 3-6 mm.
If the deformation is expected to be minimal, a small gap can be left.
When finishing walls, the seam size can be from 1.5 to 3 mm. In this case, you need to take into account the size of the porcelain stoneware. Large format tiles are laid with large gaps.
Types of combs for tiles
Renovating a bathroom or kitchen is not a frequent occurrence, so the choice of construction tools should be approached carefully - otherwise, you will have to change the tiles every two to three years. To prevent such a scenario, you need to choose a spatula that will be convenient to work with. Typically, experts divide toothed construction tools into two categories:
- Spatula made of high quality stainless steel. This tool allows you to distribute the adhesive evenly over the tile, and its teeth do not deform over time. A stainless steel spatula can be safely washed under running water - it is not afraid of corrosion. Such a tool is expensive, but it will last a very long time.
- Spatula made from plastic. A budget option for construction tools - purchased for several hundred rubles. The main disadvantage is the low strength of the material. During operation, the teeth may break off or wear off over time. The tool is considered disposable and is not suitable for a professional builder.
The construction tool also differs in the shape of the handle and where it is attached. There are specimens whose handle is located on the working surface, which is quite convenient - you don’t have to put a lot of effort into working. On other varieties, the handle is attached just above the metal plane - it’s not very convenient, but it won’t break.
Features of working with large-format porcelain tiles
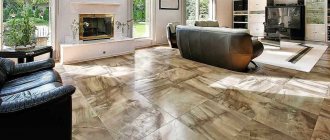
Large sizes of porcelain stoneware slabs are most preferable for surface finishing. Being large in size, it fits organically into the interior of modern apartments and is convenient for installation. But the installation of slabs of this size will have some features.
Note! It is better to lay complex slabs together, as the material may split at the point of bending or cutting. After applying the glue, the slab becomes quite heavy to work alone
First of all, you need to choose the right adhesive mixture. The label must indicate that this is an adhesive for porcelain tiles.
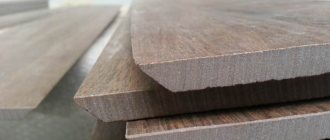
Also, some difficulties may arise when laying tiles on walls that have previously been coated with gypsum plaster. Due to its porous structure, plaster can make it difficult to firmly fix the slabs to the wall. Therefore, the plastered surface must first be prepared for the installation of porcelain stoneware.
Comb for tile adhesive
Recommendations for using a comb from the most popular manufacturers of adhesive mixtures. Recommendations may differ from generally accepted ones due to the different composition of the adhesive mixture, which affects shrinkage, setting time, mixture density, and viscosity. Carefully study the manufacturers' recommendations, which are indicated on the packaging of the mixture.
Ceresit CM11 Plus
| Tile size, cm. | 5 | 10 | 15 | 25 | 30 |
| Tooth size, mm. | 3 | 4 | 6 | 8 | 10 |
Ceresit CM12
| Tile size, cm. | up to 30 | 60 |
| Tooth size, mm. | 10 | 12 |
Ceresit CM 14 Extra
| Tile size, cm. | 15 | 25 | 30 | 45 |
| Tooth size, mm. | 6 | 8 | 10 | 12 |
VOLMA-Keramik+
| Tile size, cm. | up to 60×60 |
| Tooth size, mm. | 12 |
MOMENT
| Tile size, cm. | 5 | 10 | 20 | 30 |
| Tooth size, mm. | 3 | 4 | 6 | 8 |
KREPS reinforced
| Tile size, cm. | 5 | 10 | 20 | 30 | 40 | 60 |
| Tooth size, mm. | 3 | 4 | 6 | 8 | 10 | 12 |
BEERSMIX ceramics
| Tile size, cm. | 10 | 30 |
| Tooth size, mm. | 3 | 6 |
What tools are needed to work with large format tiles?
To cover surfaces with porcelain stoneware, you need a certain tool with which you can perform the work efficiently.
For these purposes you will need:
- mixer – necessary for preparing the working solution for installation;
- notched spatulas with large and small teeth - needed for applying glue to work surfaces;
- tile cutter or grinder;
- crosses for aligning seam sizes;
- floor leveling system;
- grout float, foam sponge - needed to clean the seams from excess glue and grout.
In addition, you will need a tape measure, a bubble level, a level, a rubber spatula, wire cutters, a mallet and a container for diluting the solution.
All of the above equipment is necessary for high-quality installation of porcelain tiles.
Features of fast-hardening tile adhesive
The choice of tile adhesive is of no small importance for quality installation. The reliability of the fixation of the slabs and the quality of operation of the coating depend on this. If the composition of the adhesive mixture is incorrectly selected or the expiration date has expired, the reliability and quality of the work cannot be guaranteed. In this case, the tile will not adhere well to the surface and will begin to peel off.
The choice of adhesive mixture depends on the operating conditions, the size and thickness of the porcelain stoneware, as well as the surface on which it will be laid.
Important! Porcelain tiles are less porous in structure and therefore have low absorbency. The adhesive for its installation must have high adhesive (adhesive) properties.
For floor coverings, it is better to choose cement-based adhesive. This glue has high moisture resistance, elasticity, and quick adhesion. These properties of the adhesive allow it to bear the full load within a few hours after application.
What kind of spatula is needed for laying tiles on walls and floors?
When laying ceramic tiles, several tools are used. One of them is a spatula-comb, which is used to remove excess glue or mixture. The solution is distributed more evenly over the surface and is spent more economically. Let's figure out how to choose the right notched trowel for laying tiles. Important criteria are the shape, size and material of the tool.
Types of combs for laying tiles
Notched trowels are made from:
- stainless steel (the most common and durable option);
- metal with a colored coating (the top layer comes off over time and ceases to protect the instrument from corrosion);
- plastics (break easily and are too flexible).
The following types are produced in the form:
- trapezoidal with a handle on the side, in the same plane as the working surface;
- rectangular with a perpendicular handle;
- with teeth of different sizes, but without a holder.
An innovative way to lay porcelain tiles
One of the newest methods of laying tiles on both floors and walls is SVP and is suitable for porcelain tiles of any thickness. Its advantages are:
- perfectly smooth cladding surface;
- when the glue shrinks during drying, the surface of the tile does not deform;
- identical and uniform seams;
- reduction of tile laying time.
A domestically produced hovercraft consists of a wedge and a clamp. At the same time, this method has its advantages and disadvantages. Among the advantages are reliability of fixation, ease of operation and strength of the material. The disadvantage is that it is inconvenient to remove the plastic in the gaps after the glue has dried.
How does the floor leveling system work?
The use of SVP consists in the special alignment of two adjacent surfaces of slabs at the same level. After laying the tiles, two clamps are placed under its base on each side. The adjacent tile is laid so that it rests tightly against the clamp leg. After this, the clamps are fixed with a wedge, which performs a leveling function, leveling the differences between the edges of the slabs. After the glue has completely dried, the wedges and the outer part of the clamps are removed using a rubber mallet.
How to prepare an adhesive composition for facing work
In order for the glue to better fix the tiles to the surface, it is necessary to follow the technology for preparing the working solution. The dry mixture must be diluted with cool water and mixed well using a construction mixer. It is important to avoid the formation of lumps. After preparing the mixture, it must be left to stand for five minutes (let the glue harden). After this, the mixture must be mixed well again and you can begin finishing work.
Reasons for use
First, the glue is applied to the tile or wall with a regular spatula, and then the excess is removed with a comb. This allows you to leave a certain amount of glue on the surface, which will be evenly distributed. After pressing the tile, the glue will be evenly distributed and fill the entire space. It is quite reliable enough to avoid getting holes when the pan falls, but the enamel will most likely get chipped.
This achieves:
- Quality of installation. Since the layer of glue will be the same, the tile will automatically lie flat (if you have a flat base).
- Speed of work. There will be no need to squeeze out or remove excess glue.
- Connection strength. If there is an excess, it gets worse.
- Economical. The amount of glue recommended by the manufacturer will be applied, and there will be no need to overpay for overuse.
It is more convenient to work with a toothed comb with a handle in which two sides are serrated and the other two are smooth. You don't have to constantly change between a regular spatula and a serrated one.
Why do you need to try on tiles before installation?
Installation of large-format porcelain tiles begins with preliminary dry installation. This allows you to evaluate the future result, see how organically the pattern fits into the overall interior of the room and what is the best way to lay the tiles to achieve maximum visual effect.
At the same time, the dimensions are adjusted and the working canvases are prepared. To determine the place where installation will begin, the first tile is placed where the eye immediately falls. With this installation method, the coating will look neat and fit organically into the overall concept.
What are the benefits of comb styling?
First of all, it saves tile adhesive. The savings are not financial; this is a dubious question, which depends on the cost of preparation. The savings are primarily reflected in lower labor costs and movements of the tiler. Make less batches, apply less, etc. - this saves a decent amount of time.
Secondly, it takes less time to level the glued tiles. In fact, the tile is only slightly adjusted to an acceptable result.
Third: due to the fact that the amount of glue is clearly measured, during adjustment there is no need to expel excess glue from under the tile. This means that the seams will be cleaner to begin with and there will be much less hassle in preparing for jointing.
It is unlikely that it will be possible to achieve such clean seams when working with layers of tile adhesive.
And the fourth advantage is quality. Of course, with a fairly level base, the facing plane will be smoother than when working with layers. After all, a thick layer (more than a centimeter) tends to float and shrink when dried. After all, a thick layer of adhesive takes longer to set and the tiler can easily disturb the position of previously laid slabs while leveling the newly glued one.
How to lay large format porcelain tiles
Due to their size, laying large format tiles has its own characteristics. The main subtlety lies in the correct application of the solution. It is better to use deforming types of glue for these purposes. This will reduce the deformation of the tile itself under load.
The technology for laying large tiles involves applying glue twice, on the surface of the tile and on the base.
You must first make sure that the surface of the tile is clean and free of mechanical particles.
The working solution is applied with notched spatulas. To wet the base with glue, use a spatula with wide teeth. To apply the solution to the tile itself, it is better to use a fine-toothed tool. This will ensure even distribution of the glue over the surface. The optimal thickness of the solution should be at least 1 cm.
At the same time, 70% of the tile area must be covered if it is mounted on the wall. If porcelain stoneware is laid on the floor, in this case the entire surface of the tile must be 100% filled with glue.
During installation, no voids should form under the tiles, as this increases the risk of breakage when heavy objects fall on it. To ensure that the tiles adhere securely to the base and remove all air, it is advisable to “tap” the surface or use a manual vibrating machine for this purpose.
For better fixation of large slabs during installation, it is advisable to use vacuum suction cups, which provide reliable fixation.
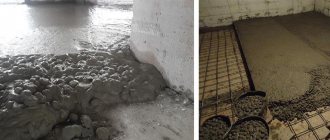
Preparing walls before installing large-format tiles
Before you begin laying porcelain stoneware on vertical surfaces, you must first prepare them. First of all, the walls are cleaned of remnants of the old coating: wallpaper, oil paint, and heavy dirt is removed. Next, the walls are leveled. In this case, you need to take into account the size of the tiles. The larger the tile, the smaller the deviations should be.
Applying primer is the final step in preparing the working surface. Moreover, if the walls for cladding are prepared in a bathroom or kitchen, where there is always high humidity, the primer must have moisture-proof properties
How to lay tiles on a wall
Cladding walls with porcelain stoneware is a painstaking and time-consuming process that has its own rules and must be followed.
The slabs are usually laid from bottom to top, unless another layout is provided.
Initially, the tile is laid tightly against the side edges of the adjacent tile, and then, using sliding movements, it moves to the place of its marking. This allows you to minimize the amount of glue in the grooves. After fixing, the tile is tapped with a rubber hammer to compact the fit and remove any remaining air from under the tile.
Perfect seams
The dimensions of the tile joints depend on the thickness and type of finishing tiles and the method of laying porcelain stoneware. Also, the size of the seams directly depends on the size of the sides of the cladding.
Laying rectified tiles requires minimal joints of up to 1.5 mm. For other types of finishing slabs, there is a pattern according to which the longer the side of the covering, the larger the seam. So, if the length of the side of the tile does not exceed 10 cm, then the width of the seam will be 2 mm. If the side length exceeds 60 cm, the seam will accordingly increase to 5 mm. This is due to the reduced possibility of deformation of the finishing surface.
Cutting, grinding and drilling of large format porcelain tiles
No matter how perfectly selected the finishing tiles may seem, during installation they will reveal inconsistencies with the dimensions of the working surface. In this case, you have to resort to cutting the tiles. This is a delicate job that requires care, skill and special equipment. For these purposes, a tile cutter and a grinder are usually used.
Whatever tool is used, it is important to remember that when cutting porcelain stoneware, chips always form, so the cut must be sanded. To ensure that the dimensions of the tiles are not affected, the cut must be made at a distance of 2 mm from the edge markings.
Important! When cutting porcelain tiles with a grinder, you should try to minimize vibration. Otherwise, the disk will get stuck in the tile, which can lead to its sudden splitting.
What is the difficulty when cutting with a tile cutter?
Most tile layers consider the tile cutter to be a capricious mechanism that cannot be used to cut porcelain tiles. In fact, the main difficulty lies in making a precise cut, with the help of which the crack extends along the entire length of the tile. For large-format pieces, this is quite difficult to do, and additional tools are needed, such as a special cutting staff for large pieces and a strong separator with which you can separate the pieces along the cuts.
How to joint grooves between tiles
During installation, the width of the joints between the slabs is fixed using special crosses. After the installation of the tiles is completed and the glue has dried, you can begin processing the seams. To do this, the seams are cleaned of glue residues, if any, and a jointing mixture is applied using a special grater, filling the seam space. Excess mixture is removed with a damp sponge and the material is allowed to dry. It is necessary to remove excess jointing mixture as quickly as possible, otherwise its prolonged contact with the surface of porcelain stoneware can spoil the quality of the surface.
Alternative to a notched trowel
If you cannot find a suitable toothed tool, and the dubious prospect of working with an ordinary spatula is not encouraging, it is recommended to create a comb yourself. A homemade tool may be even better than a factory one, since stores do not always offer a wide selection of spatulas for various types of work. To create a comb you will need the following tools and materials:
- a metal plate of small thickness will serve as the base of the spatula (it should be sufficiently smooth and rigid to be comfortable to work with);
- a pencil or marker and a ruler - will be needed to apply markings on the metal (it will serve to cut out the ridge);
- a wooden block and a jigsaw - with their help you can create a simple and convenient handle for a spatula (do not forget to sand the wood and varnish it);
- a screwdriver and small self-tapping screws - used to attach a wooden handle to a spatula (an alternative is to use high-quality construction glue);
- A disc grinder is an important tool needed to cut a comb from a piece of prepared metal.
Marking a metal plate
For experienced craftsmen, the entire stage of work should already be clear. But in order not to forget anything in the process, it is better to have before your eyes instructions with a specific algorithm of actions:
- Using a pencil and a ruler, create a drawing of the future spatula on a piece of paper. It is necessary to indicate the exact dimensions of the teeth, their number and calculate the size of the tool.
- Carefully transfer the markings from the drawing to the metal using a ruler and marker. It is important not to make a mistake here so that there are no difficulties with further stages.
- Using a grinder, carefully cut out the ridge of the spatula. Remember to follow safety regulations.
- Using a jigsaw, we cut out a blank for the handle, grind it and coat it with varnish - this will increase the service life of the spatula and prevent splinters from getting under the skin.
- We attach the handle of the spatula to the metal part with self-tapping screws. For convenience, you can use a wooden strip of the required thickness, placing it between the handle and the plate.
There is an easier option for creating a comb with your own hands - you will need a regular flat spatula and a grinder. We simply apply markings to the metal, and then make the necessary cuts of the required size.
Making a comb using a grinder
A comb spatula is an indispensable tool that allows you to evenly distribute the adhesive solution and eliminate the appearance of air voids under the tiles. In order for the job to be done efficiently, you will have to choose the right tool, with the desired shape and size of teeth. Only in this case will the mixture consumption be close to the recommended mark, and the tiles will remain securely on the floor or wall for many years.
Important points in laying porcelain tiles
Thus, we can highlight the most important points that need to be taken into account when laying large-format porcelain tiles.
- The surface for laying tiles must be pre-prepared: cleaned of mechanical particles, leveled and primed.
- When choosing an adhesive base, it is important to make sure that the adhesive is intended for porcelain tiles and has not expired. When laying tiles on drywall, it is better to use dispersion adhesive that does not penetrate deeply into the structure.
- The glue must be applied correctly, using a special notched trowel. In this case, you need to take into account the size of the teeth.
- Decide in advance which installation method will be used and what width of seams will be optimal for finishing.
- Select a method for laying out the tiles of the pattern.
- If it is expected that the cladding will deform, expansion joints should be installed to help minimize the consequences of deformation.
- Select a high-quality jointing mixture and grout the seams.
- To extend the life of porcelain stoneware, you need to organize proper care of the lined surface.
A selection of tile comb manufacturers
Below are the most popular manufacturers of notched spatulas.
Russia
- Polytech. Russian company - manufacturer. Among other things, also hand tools.
- Sibrtech . Siberian Technologies presents more than 5,000 types of hand-finishing tools.
- Bison Probably one of the most popular manufacturers on the Russian market.
Europe
- Forbo. Association of companies from Germany, Sweden and Switzerland. They work on flooring, as well as hand tools.
- COLOR EXPERT. The homeland of the brand is Germany. They produce professional hand tools. The company is confident that there is a professional in everyone, the main thing is to work with a quality tool!
- Hardy. The country of origin is Poland. They produce professional hand and painting tools at affordable prices.
- STANLEY. Not exactly a European manufacturer, but it was impossible not to mention! American company producing professional hand tools.
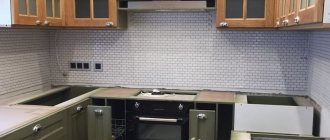
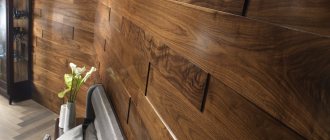
Myth 1. Large-format porcelain tiles are boring colors and faceless
This opinion arose at a time when large tiles were used only for finishing shops, offices, warehouses and ventilated facades. Today, manufacturers offer dozens of different textures and colors for the most current interiors. As evidence, here are a few collections:
- Grande Marble Look. An exquisite collection from the Italian brand Marazzi with a magnificent interpretation of marble design.
- Grande Metal Look. Another series from Marazzi with a polished metal texture for fashionable urban design.
- Iron. Spanish large-format porcelain stoneware with a patinated metal surface.
- Onice Giada. Porcelain tiles from Italy in extra large format with onyx texture for elegant classic interiors.
- Ultra Onici. Another variation on the onyx theme – from another Italian brand.
However, these are not all the options that manufacturers offer. Wood, stone, terracotta, semi-precious minerals and artistic panels are just some of the design options.