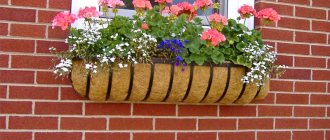
Hi all! Quite often in apartments and houses you can find niches in different rooms. They are found in the bathroom, often along with sewer pipes, in the kitchen and hallway, less often in the living room and bedroom. And if you make shelves in a niche, this will maximize its practicality.
Agree that simply covering an existing niche, or leaving it without shelves, storing all things only on the lower edge, is an extremely irrational way to use this interior element.
Yes, a niche is a kind of recess in the wall. Therefore, the shelves will be built-in and not protrude beyond the walls of the toilet, bathroom, living room or other room.
The only question is how to make a shelf and what material to choose from.
How to make shelves in a niche with your own hands: choosing material and technology
Hi all! Quite often in apartments and houses you can find niches in different rooms. They are found in the bathroom, often along with sewer pipes, in the kitchen and hallway, less often in the living room and bedroom. And if you make shelves in a niche, this will maximize its practicality.
Agree that simply covering an existing niche, or leaving it without shelves, storing all things only on the lower edge, is an extremely irrational way to use this interior element.
Yes, a niche is a kind of recess in the wall. Therefore, the shelves will be built-in and not protrude beyond the walls of the toilet, bathroom, living room or other room.
The only question is how to make a shelf and what material to choose from.
Niche design. General rules
Modern niches in the wall are not just a cavity, but a special space that harmoniously fits into the stylization of the interior of the room. But still, when designing such a recess, it is necessary to follow some general rules, in particular:
Decorative niches are best used as a corrective element in rooms that have layout flaws or technical deficiencies that need to be hidden. It is important to maintain proportions. If the need arises, you can adjust the geometry of the room. The color scheme of the recessed area should not be darker than the walls of the room
Otherwise, it will feel like there is a hole in this place. Cavity arches can be coated with paint a shade darker than the base color. When using decorative coatings of different textures, it is necessary to ensure their compatibility. You can visually expand the space using mirrors.
A niche in the wall will add special attractiveness and individuality to any room, which is clearly visible in the photo.
Materials used
First, let's talk about what kind of shelves there are.
There are actually several options:
Mainly used are plasterboard shelves, as well as wooden and glass structures.
You can make them yourself, buy them from the manufacturer, or take them to order if you need something very original and individual. For example, you want to install a dozen shelves in a narrow niche.
Mounting methods
Having decided what the shelf will be made of and paying attention to the material of the niche itself, you can begin installation.
The question now is this. How to secure the shelf better? There are several options here. Each of them is quite easy to implement with your own hands.
The mounting itself in a niche is usually done using:
Now I will try to briefly talk about how to install shelves in a niche in one way or another.
Glue or liquid nails
Perhaps the easiest option to implement is installing shelves in niches.
Here you will need to do the following:
This method is suitable for the lightest shelves made of thin plywood, plasterboard and even glass. You just can’t put anything heavy on them.
Load the shelf below at least 5-7 hours after installation.
This is necessary so that the glue has time to fully set.
Dowel-nails
This installation method is suitable for shelves made of thin wood, chipboard and MDF.
Again, they withstand a small load, but demonstrate greater endurance than glue.
Here you will need to do the following:
The shelf can have hidden hooks for invisible installation, or regular ears. It depends on which option you chose when purchasing.
Expansion dowel
Perfect for massive shelves made of wood and MDF. Withstands increased load.
This method will require purchasing several drop-down butterfly fasteners.
Here the technology is not complicated:
Depending on what type of fastening the shelf itself is used, you may need to first tighten the screw and hang the shelf on its head. Either a shelf is first applied, and a fastening element is screwed through its hole for fixation.
Shelf supports and brackets
Exquisite metal brackets are suitable for massive wooden shelves for wine or books, for example.
And if we talk about pelican shelf holders, then this is the best choice for glass shelves.
The principle of working with them is almost the same. First, the holders themselves are mounted in the niche in the form of a bracket or shelf holder. Dowels with self-tapping screws are used here. The shelf is then attached to the holders themselves.
Pelican gently presses the glass on both sides in special holes where gaskets are provided so that the glass does not crack. It's even easier with brackets.
The only question is whether it makes any sense to use beautiful metal brackets or shelf holders when it comes to installation in a niche. Here it is just better to make the fastening invisible.
Just a few more words about installation in the groove. In theory, this option is also possible. To do this, a recess is made along the perimeter of the niche using a grinder, and a shelf is inserted inside it. But implementing such an idea is difficult. It must be provided for at the stage of redevelopment or the start of repairs. So many people naturally reject this idea.
What ideas can you offer? What did you think of necessary for the niche?
Write your stories and suggestions in the comments.
Source
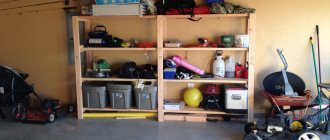
Basic elements of the rack and its installation
First of all, a solid base is built, for which a thick board is taken along the length of the future rack. Wooden racks are not spread wide; their usual spacing is up to 60 cm; when using metal corners of 50x50 mm, it can be increased to 1 m. For a simple shelving, the optimal material would be planed boards, the cross-section of which is 5x5 cm; for making shelves - wooden boards, chipboard or slab OSB. The back wall is most often not made; if necessary, it is cut out of a sheet of plywood.
A small wooden shelving rack with a reinforced shelf frame with a cross bar
First, a solid base is installed. The frame is fastened with self-tapping screws, the corners are reinforced with additional strips. When assembling, you need to use a level to avoid distortions. The finished base is attached to the wall. The side walls are cut from chipboard, furniture board or plywood, grooves are cut into them with a router, shelves are installed in them and secured with self-tapping screws. The thickness of the shelves should be at least 2.5 cm.
The rack assembled in this way is placed on the base and securely fixed. If you drill plywood trims onto the side walls and cover them with laminated chipboard, the rack will become much more attractive. You can also finish the front part, and decorate the top and bottom of the rack with wooden figured plinth.
The structure is also easy to assemble: first, install the frames, then use a level to level them vertically and attach them to the wall. If the load is expected to be significant, then the rack is connected with a longitudinal profile, which will create the necessary stiffening belt. The size of the equal angle angle is 40x40 mm, if we take a square tubular profile, then it will have a cross-section of 254x25, with a wall of 2 mm.
You can learn more about the process of creating different racks by reading various video instructions, which clearly demonstrate all stages of the work.
Plasterboard niche with shelves
The longer people live in a house, the more small things accumulate. Figurines, photo frames, things. Then the redevelopment of the house begins, because children appear and relatives come. There is a need for additional shelves and cabinets. Drywall replaced metal and wood. It is very practical, long-lasting, and harmless to health.
Design and decoration of a plasterboard niche with shelves The question arises: “how to make a niche with plasterboard shelves”? It's simple, although looking at the photo it seems impossible. A niche with shelves will help:
Types of niches with plasterboard shelves
A niche with shelves can be different:
If the niche is illuminated, it uses spotlights and LED strips. Sometimes both are illuminated, creating an extraordinary range of light. When decorating a niche with shelves, various materials are used for decoration. Wallpaper or painting, wood or plastic, metal or glass.
Design options for a niche with plasterboard shelves
Features in drawings and accurate calculations
When you come up with the idea of creating a niche with shelves, you need to decide what it will be like? Where will it stand? Why is it needed? When all the answers to these questions have been received, you need to start designing, drawing and drawing. In order to design a drawing on which the entire installation will be based, it is initially better to draw a drawing with the number of shelves, the color of the light, and the installation location. To install shelves, you must take into account the interior of the room.
So, for the drawing you will need: a ruler, a pencil, a square, an eraser, a meter. Accuracy in calculations is required, because they will be transferred to the walls. All the numbers must be put on the sketch: depth, width of the shelf, height, location of the shelves in the niche. If you plan to install lighting, you should draw the wiring and the places where the lighting device is planned, as well as the location of the switch.
Diagram showing the dimensions of a niche with plasterboard shelves. In some cases, it is necessary to mark on the drawing the location of the socket in the plasterboard or the cable connectors. After completing the sketch, you should carefully check everything again, down to the smallest detail.
Preparatory work
In order to begin preparatory work, you need to establish yourself with the design of the niche. It will be very good if you make a sketch of this component of the room.
- After the sketch, you can start drawing.
- To do this, you need to prepare the room (free up space to create a niche).
- Take all measurements.
- It is necessary to clarify how deep the niche will be (this depends on its functionality).
- If the niche will be made for installing equipment, the depth should be increased (for air ventilation and wire drainage). Otherwise, the same TV may heat up and burn out.
A TV or other electrical equipment should not “stick out” from the niche. The facade of the equipment is flush with the edges of the niche.
- In the drawing you should write the weight of the object installed on the niche shelf. If it's not a wardrobe.
- You should also immediately decide on the wiring under the drywall. This is especially true if there is backlighting.
Conducting wires in a niche
is RULE! All measurements and numerical data should be recorded. This will make it possible to easily calculate the amount of material required.
Creating shelves with stiffeners
After installing the base, you should begin installing the shelves. To do this, according to the width of the shelves, additional profiles are vertically attached to the wall for the strength of the structure. The profile must have stiffening ribs. These are mainly galvanized profiles, which have a thickness of 0.55-0.8 mm. Between the vertical posts, horizontal sections of the profile are inserted, connecting the verticals.
The base of the shelf is 10 cm. In order for the horizontal profiles to be reliable, corners are attached at the bottom. The recess of the shelf will be as shown in the diagram. This will be the thickness of the entire structure. Jumpers should be installed as often as possible to ensure the reliability of the structure. Let's say every 30 cm.
Scheme for creating plasterboard shelves with stiffeners. Basically, around a niche, a wall or corner needs to be sheathed with plasterboard for an impressive appearance.
Basic elements of the rack and its installation
First of all, a solid base is built, for which a thick board is taken along the length of the future rack. Wooden racks are not spread wide; their usual spacing is up to 60 cm; when using metal corners of 50x50 mm, it can be increased to 1 m. For a simple shelving, the optimal material would be planed boards, the cross-section of which is 5x5 cm; for making shelves - wooden boards, chipboard or slab OSB. The back wall is most often not made; if necessary, it is cut out of a sheet of plywood.
A small wooden shelving rack with a reinforced shelf frame with a cross bar
First, a solid base is installed. The frame is fastened with self-tapping screws, the corners are reinforced with additional strips. When assembling, you need to use a level to avoid distortions. The finished base is attached to the wall. The side walls are cut from chipboard, furniture board or plywood, grooves are cut into them with a router, shelves are installed in them and secured with self-tapping screws. The thickness of the shelves should be at least 2.5 cm.
The rack assembled in this way is placed on the base and securely fixed. If you drill plywood trims onto the side walls and cover them with laminated chipboard, the rack will become much more attractive. You can also finish the front part, and decorate the top and bottom of the rack with wooden figured plinth.
The structure is also easy to assemble: first, install the frames, then use a level to level them vertically and attach them to the wall. If the load is expected to be significant, then the rack is connected with a longitudinal profile, which will create the necessary stiffening belt. The size of the equal angle angle is 40x40 mm, if we take a square tubular profile, then it will have a cross-section of 254x25, with a wall of 2 mm.
You can learn more about the process of creating different racks by reading various video instructions, which clearly demonstrate all stages of the work.
Technology of covering a niche with plasterboard
Before you start covering the niche with shelves, you need to prepare the gypsum board. To do this, plasterboard sections are cut to size. You can cut gypsum board sheets either with a hacksaw or a construction knife.
The edges of the cut part should be processed (sanded), after which, using self-tapping screws, each part should be attached according to the planned plan in its place.
If you plan to backlight, you should make holes in the places of the lamps, but so that the diameter of the lamp matches the diameter of the hole.
Finishing a plasterboard niche
First, finishing should begin to mask the fastening points. They are carefully plastered using putty.
Final plastering of the plasterboard niche After which you need to begin finishing the plasterboard joints and corners. For this, reinforced mesh is used. It is secured with glue or a thin layer of plaster. After each step taken with putty material, you should wait until it dries completely. As a result, you need to putty the entire surface of the drywall and, after drying, go over it with grout. This can be a special mesh or sandpaper - zero. It removes all the errors left during putty (small pebbles, stripes).
An example of finishing a niche made of plasterboard with stone. If you plan to decorate a niche with stone or facing tiles, then special adhesives are used. Before applying the adhesive, in some cases it is necessary to use a primer. This is also used when covering drywall with wallpaper. If painting is intended, then after the putty has dried, the paint of the desired tone is diluted.
DIY plasterboard shelves
DIY plasterboard shelves often have an unusual appearance and can accommodate a large number of different items. Thus, even equipment can be installed on a rack with additional metal reinforcement. In order to make a structure with your own hands, you first have to decide on its shape, then purchase all the materials. Of course, such work requires certain skills, so it is better for beginners to choose the simplest shelf option or turn to specialists. Below we will tell you how to do this work yourself.
DIY plasterboard shelves
Corner wooden shelves
Often, to save space, shelves are made corner, and they can be mounted both in the inner and outer corners.
Corner shelf
Corner wooden shelves
The blanks are made according to the scheme described above, only the upper and lower boards consist of two elements, with the ends cut at an angle. The process of making such a shelf is quite simple:
- the halves of the top board are coated at the ends with glue and clamped with clamps;
- repeat the same actions with the bottom board;
- when the glue dries, all workpieces are covered with stain or primed;
- Attachment lines are marked on the upper and lower workpieces and holes are drilled;
- insert the side walls and secure them with self-tapping screws.
Next, screw the brackets and secure the shelf to adjacent walls.
Corner shelf made of wood
Advantages and disadvantages of drywall
Drywall is classified as a universal material that has various purposes - ceilings, niches, and all kinds of shaped structures are made from it. This popularity is due to the following advantages:
Plasterboard construction can also be durable
Despite the large number of advantages of this material, some of its disadvantages should be highlighted:
Types of plasterboard shelves
There are several main parameters by which such designs differ. Before choosing one option or another, you should familiarize yourself with them.
Table No. 1. Types of gypsum plasterboard shelves
| View | Description |
| Open | Such shelves mainly have a decorative appearance; they are placed to display various souvenirs, cups, photographs and other decorations. |
| Closed | These are already more functional shelves, so they are often made deep to accommodate many items. |
Table No. 2. Types of shelves by type of placement
| Accommodation | Description |
| In the center of the room, a large structure consisting of many shelves is most often installed. This option will best fit into the interior of the living room. | |
| Such plasterboard structures will fit perfectly into the interior of a small room. Moreover, they are not only decoration, but also perform a functional task. Quite often, a bookcase is placed in the corner. |
Position of shelves in the corner
In this case, any plasterboard structures can be designed as follows:
LED lamps are often used for lighting
Shelves made of gypsum plasterboard are:
An unusual version of plasterboard shelves
Video - Shelves made of gypsum plasterboard: original ideas
Types of shelves
The variety of types of shelves today is very large. If we take as a basis the material from which the shelf is made, then they can all be classified as follows:
- Glass and mirror;
- Wooden (chipboard, MDF, plywood);
- Polymer and plastic;
- From other materials that can be combined with each other.
If we take the design, appearance, structure and method of fastening as a basis, we can distinguish the following types:
Wall mounted
Wall shelves supported by other stable furniture or the floor. A positive feature of such shelves is that their special design allows them to withstand quite a large load, which makes them indispensable assistants in the house when you need a place to store something large and heavy.
A rack for books and other small items will never be superfluous, especially if it fits perfectly into the interior
Built-in “niche-shelves” in a plasterboard structure will look advantageous in any interior
A huge bookcase will be an excellent addition to the living room interior
Classic (rectangular)
Classic rectangular wall shelves attach directly to the wall. The advantage of this structure is that you can use both internal and external surfaces. The back wall may be missing, leaving the wall exposed.
You can put various interior items on top: vases, clocks, photographs, lamps, books, night lights and figurines. It is precisely these shelves that, due to their functionality, add coziness to the apartment.
The original black shelf contrasts perfectly with the white wall
Recently, open wall shelves in the kitchen have become a vital necessity when developing retro interior design.
Simplicity and conciseness are the main strength of the interior in the style of minimalism
Multi-tiered
Multi-tiered shelves on the wall look very original and also combine many different functions. This type of shelves can combine a combination of various horizontal, vertical and inclined planes, which turns out to be very convenient in everyday life.
However, they often simply make identical horizontal planes, which, firstly, have an equally beautiful appearance, and secondly, are very functional. In this case, you should give free rein to your imagination to make something that is both comfortable and beautiful, matching both your preferences and the surrounding interior.
Yellow goes well with black, use this color harmony on your wall
Classic rectangular shelves with hidden mounting type
Stylish multi-level shelf in a modern living room interior
Corner
Corner shelves make it possible to use all the empty corners in the apartment. They are most often used in bathrooms, but this type of shelf can be used anywhere. They are reliable and stable. They can even be made transparent, which will look very modern.
Unusual shelf design in loft style
Having the necessary tools at hand and using ingenuity, you can make a corner shelf from scrap materials with your own hands
A wall-mounted model for storing books will look good next to the column shelf in the corner.
Making shelves from plasterboard
In the process of creating shelves you will need the following materials:
In addition, we will need the following tools:
If you have all the tools, you can get the job done faster
Prices for popular hammer drill models
It is worth noting that not all devices and materials may be useful, because if we plan to make a structure for heavy objects, then we will need a metal profile to create the frame. For decorative shelves, a simple rack profile with guides will be sufficient.
Important! In order to make the final finish, you will need putty, paint, a set of brushes, and rollers.
Create a project
First we need to develop a design for the finished shelf. It is recommended to do this in the following ways:
Approximate design diagram showing all shelf sizes
Important point! It is advisable to design a universal design that will be not only decoration, but also a functional element of the interior. That is why it is recommended to strengthen it.
Typically the following parameters are displayed on the drawing:
Important point! When drawing up a drawing, it is necessary to take into account the thickness of the materials used (gypsum board sheets and metal frame).
Sheets can be of different thicknesses
Regardless of the choice of one option or another, creating a diagram is an important step, thanks to which it will be possible to make a structure of an ideal shape. This way you get the opportunity to evaluate the correct placement of the shelves and avoid various problems during the installation process.
Surface preparation
Before starting installation work on the manufacture of plasterboard shelves, you will need to prepare the walls. Here, any irregularities can become an obstacle to the normal fastening of the frame, causing the structure to turn out crooked.
It is necessary to assess the condition of the surfaces. If there are all kinds of cracks, sagging, and depressions, they should be eliminated. In addition, it is better to treat the walls with several layers of primer so that they do not crumble in the future.
It is necessary to plaster the uneven areas
Important point! In some cases, preliminary floor preparation is required.
Step-by-step instruction
Frame installation
Step 1. Mark the wall. In order for the base for our shelves to be reliable, it is necessary to take the markings with special responsibility. At this stage we will use a building level, mark the location of all heights, and fasten the dowels. To mark the surface, you must use a marker or a simple pencil.
Leaving marks on the wall
Step 2. Calculate the load. Calculating the load on the shelves is not difficult - it is important to know what these shelves are supposed to be used for. For example, if a TV is installed in a niche, it is important to make it durable. For such purposes, it is better to strengthen the frame with metal jumpers.
If you plan to make a small shelf for shoes or other not very heavy objects, then a standard sheathing for drywall will be sufficient. The shelf for various postcards and souvenirs does not have to be strengthened at all.
Calculating the load is of great importance, because the durability of the plasterboard structure will depend on it
Step 3. Assembling the frame. The basis of the frame is made up of metal profiles that serve as guides. Thanks to the use of such beams, you can make a structure of any shape - for this you will need to make notches on the metal. It turns out that the more different bends there are, the more such notches will need to be left. It is recommended to use metal scissors when working. All parts of the frame are secured to each other with self-tapping screws. It is necessary to carefully tighten the fasteners to ensure a strong base.
You should check the correct location of all parts using a building level
Prices for building levels
Step 4. Attach the profiles to the wall. It’s not difficult to fix the shelf on the wall, because it already has markings that we set in advance. In any case, even at this stage you can still slightly change the location of the structure.
The frame of the shelves is fixed to vertical posts, which are first fixed to the wall
In the case of assembling built-in structures, it is necessary to secure the racks along the facade. To do this, lay a jumper according to the markings and then attach a jumper. Supports are fixed at its ends:
It is worth noting that the more you plan to load the shelf, the more dowels and screws you will need to use to secure the frame. Typically the pitch between fasteners is about 200-250 millimeters.
Installing drywall sheets
Step 1. Mark the gypsum plaster boards. Some craftsmen prefer to calculate the required amount of material at the stage of creating the project. The standard length of sheets ranges from 200 to 450 centimeters, and the width is 120-130 centimeters. Since additional changes are often made during the frame assembly process in order to mark the sheets, it is necessary to measure the frame. In this case, you will need to leave a few centimeters for gaps, because the entire base must be covered with plasterboard panels.
In order to avoid inaccuracies, it is recommended to use a cardboard template for this purpose (boxes from large household appliances will do). These parts can then be attached to the frame and some changes can be made if desired.
These patterns should be transferred to gypsum board sheets - for this we need a marker or a simple pencil
Step 3. Installation of lighting. It is at the stage of creating the frame that it is necessary to carry out wiring for the lamps. Of course, this step is not mandatory; it is only necessary if lamps are included in the project.
Holes of the appropriate diameter should be made in the plasterboard panels for spot light devices
Important point! There is an easier way to install lighting - using LED strip.
Step 4. Install the parts on the frame. It is important to be especially careful at this stage. The sheets are used either immediately after cutting, or they are additionally given different shapes. If you choose the second option, it will be necessary to carefully process the sheet with a wet roller on all sides, as a result of which it will become very plastic.
This is an example of installing gypsum board panels on a frame
After preparing all materials, it is necessary to begin installation:
We fix the sides of the structure
Shelves inside the frame
Prices for the range of drills
Here, too, it is necessary to calculate the optimal distance between the screws depending on the purpose of the shelves - it is important to remember that they should be no further than 100 millimeters from each other. However, it is recommended to take a minimal step between them.
Finishing
Prices for popular types of putty
When the entire structure is securely fastened, you can begin the finishing stage.
Step 1. Prime the surface. In order for the putty to adhere reliably to the plasterboard sheets, they should be pre-treated with a primer (a total of 2 layers will be required). It is better to apply the primer using a roller, this way you can quickly distribute it even over a large structure.
Choose a universal primer
Step 2. Apply putty. Now we have to apply the first layer of putty to the structure. It should be quite thick to hide all fasteners, joints, and irregularities. It is better to use a spatula to apply putty. The result should be a smooth surface.
It is better to take a medium-sized spatula
Step 3. Sand the surface with sandpaper. When the first layer of putty has dried thoroughly, it will need to be sanded using sandpaper - this will allow you to achieve an ideal surface.
For this work, it is recommended to purchase a special sandpaper holder
Next, you will need to putty this structure again. If desired, you can apply decorative plaster because the next step will be painting. The design of the shelves can be different, here everyone can show their imagination.
Video - Making shelves for a children's room
Assembly of the entire structure
To make a chipboard shelf, you may need a screwdriver, tape measure, level, screws, pencil, corners, etc.
Tools and materials:
- roulette;
- chipboard;
- screwdriver;
- pencil;
- furniture screws;
- the screws are short;
- corners;
- plugs;
- edging;
- iron.
The initial assembly (drawer) is carried out in a lying position, because in a vertical position the cabinet will be very unstable. It is most convenient to start from the rear shield, because it covers the entire working area, so it should be laid out on a flat surface so that it can be approached from all sides, and future walls and shelves should be marked (each 30 cm high).
The entire installation will be carried out using furniture screws from the side invisible to the eye, but aluminum corners with plastic attachments will be required as support. In any case, small diameter holes are initially drilled for the screws, and then the coupling is made. If this is not done, then the plate will split when screwed in.
All further work happens step by step:
Diagram of a chipboard shelf with dimensions.
- 2 side panels are screwed to the back shield. The screw fastening pitch is 20 cm.
- The top panel is fixed exactly along the edge, while the bottom panel is 1 cm indented from the floor. If you do not make an indent, the structure will lose stability. The fastening pitch is 25 cm.
- Horizontal and vertical panels are connected to each other using screws embedded in the sides. These are the only 4 screws that will be visible on the sides.
- Partitions are being installed. They are fixed at the bottom, top and back. Fixed in this way, they will no longer tilt during operation.
- The box is installed in the position in which it will be used, but is not yet moved to the wall. Despite the considerable weight of the structure, even a physically weak person can perform such an operation, because there is a reliable point of support.
- Basic fixation of the shelves is carried out at the marked locations. To do this, first make 3 holes for each, and then grab them from the back side. This procedure takes the longest during assembly, because... in total you need to make 54 holes, and then tighten 54 screws.
- The shelves from below are secured with aluminum corners. To do this, you need to correctly calculate the drilling depth so as not to break through the slab. If the drill does not have a depth gauge, then you can use blue electrical tape, which is wound around the drill (no more than 14 mm) and, when drilling, limits the immersion depth of the drill.
- All screws are closed with special plugs matching the color of the material used, and plastic attachments are put on the corners. This move will provide not only visual perception, but will also protect books from damage due to accidental snagging.
- All open ribs are glued with edging. To do this, the edging is applied perfectly along the line, after which you need to run an iron along it several times. The polymers in the base will adhere tightly to the chips.
Article on the topic: Tambour doors to the site and entrance to the entrance