Before purchasing or assembling a barrel sauna yourself, the question arises: is a special foundation needed for a barrel sauna and what can it be placed on? The questions are correct, let's figure out together what to install a barrel sauna on and what options there are.
The weight of a barrel sauna can be from 750 kg for the MINI model (2-meter steam room), to 2250 kg for a 6-meter barrel sauna of the Okta Exclusive model (with a side entrance). Therefore, you need to pay attention not only to leveling the site for the bathhouse, but also to building a foundation for its base stands.
Now we will look at several options for the foundation for a barrel sauna that can be made on your site.
Paving slabs or gravel area
The weight of an average barrel bath does not exceed 1500-2000 kg, which means the design does not require a special foundation. The only condition is that the platform on which you install the barrel bath must be level. You can place the bathhouse on a well-leveled compacted area, covered with paving slabs or filled with gravel for beauty.
The tiles are laid on a sand cushion or concrete screed. To lay paving slabs on sand:
- Remove the top layer of soil (10 cm for normal soil) and compact it well,
- If you do not want to subsequently pull out the grass growing between the tiles, lay geotextiles or other protective filter over the entire surface,
- Lay two slats parallel to each other along the edges of the pit with a height up to the top edge of the pit minus the height of the tiles. They will serve as a level,
- Cover the entire area with a 5-6 cm layer of sand and level the sand with a rake. If you want to add cement to the sand, then take a ratio of 1 bag of cement to 5 wheelbarrows of sand. Then, for a finer alignment, use a wooden or metal ruler, sliding along the two guide rails that were previously laid. At the same time, you yourself are on an area that has not yet been leveled, moving backwards,
- After leveling, carefully pull out the slats and fill the resulting void with sand. You cannot walk on the leveled surface!
- Lay the tiles as close together as possible, adjusting them using a rubber hammer or board. Move row by row forward on your knees, placing a board under you. Try to stay further from the outer rows of tiles so as not to displace them,
- As you progress, check the surface of the new row using a level, adjust the height by adding sand or level the tiles using a rubber hammer,
- Make borders. The site is ready!
To lay tiles on a concrete base:
- Pressure wash the concrete,
- Place a 1.5-2 cm layer of cement mortar on the wet concrete. The ratio for the mortar is: 50 kg of cement + 200 kg (volume 135 l) sand + 25 l of water,
- Lay the tiles in the same way as on a sand bed.
Types and sizes
In such a bathhouse you can equip the following types of health procedures:
- Traditional Russian steam room with washing area. The steam room is filled with wet steam at temperatures up to 85°C. It gives special pleasure to whip yourself or a friend with a birch or oak broom. After the steam room, be sure to splash yourself with a bucket of cold water in the washing area. Such a bathhouse consumes a lot of water; you should consider a way to drain it into the drainage.
- Finnish sauna. Dry and very hot steam is used here - up to 120°C. It is necessary to consider a ventilation and thermal insulation system in order to quickly warm the room to the required high temperature. If space allows, then install a font for dipping. Otherwise, they will equip a dousing font - a bucket of water suspended from the ceiling.
- Ofuro. Single heated mini-sauna from Japan. The half-barrel is placed vertically, a seat and a water heating system are installed in it. Ofuro is often placed outdoors, in which case the barrel is closed on top with a lid with a cutout for the head.
Japanese bathhouse Ofuro
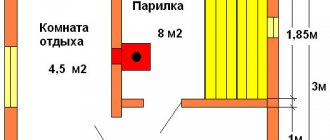
The size of the structure determines its capacity and the ability to accommodate additional amenities and premises. The steam room itself occupies 2 m, and this is the length of the minimum module.
- Mini - from 2 to 2.5 m, 2 (lying on shelves) to 4 (sitting) people of average build fit into the steam room. Such a bathhouse weighs up to half a ton.
- Standard - up to 3.5 meters long. In addition to the steam room, there is a modest dressing room that helps place clothes and keep warm. This design weighs about a ton.
- Maxi-up to 6 meters long, has a full soap compartment and a dressing room of increased length, which can be used as a resting place.
- Two six-meter modules are mega-joined, with a vestibule between them. On one side there is a bathhouse with a steam room, washing and shower rooms, on the other there is a relaxation room
Despite the large size of individual models, they do not require powerful foundations and can be installed on lightweight support structures the size of railway sleepers.
Concrete bathhouse area
If you do not have paving slabs and you do not want to simply place the bathhouse on a compacted and gravel-filled area, then you can make a concrete base. To fill the area under the bathhouse with concrete:
- Remove a layer of soil - 15-20 cm,
- We install the formwork,
- Pour a drainage layer: 5 cm of sand (compacted) and 10 cm of crushed stone,
- We lay the fittings,
- Fill with solution. Proportions for the concrete mixture: cement 10 kg, sand 30 kg, fine crushed stone 40 kg, water 40 l (50% of the weight of the mixture). If the solution is very thick, add water.
The finished site must harden for at least 20 days.
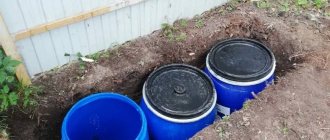
Here it is important not to forget that under the steam room and the washing compartment of the barrel bath there are drainage holes. You can find out how to organize a drain under a barrel sauna on your site on the page How to make a drain in a barrel sauna
What is included
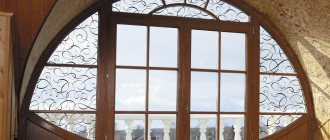
The sauna barrel is supplied as a complete kit for assembly. From different manufacturers, some elements may be pre-assembled.
Turnkey barrel bathhouse in the form of a set of parts
The kit contains everything you need for assembly:
- High quality Nordic spruce board.
- Metal tightening straps (hoops) that firmly hold the structure.
- Two or three stable supports.
- Front door.
- Lining made of linden, alder or aspen for finishing the steam room.
- Two seats outside under a canopy.
- Ventilation grates.
- Soft roof.
- Oven with stones.
- Fastening elements.
Such a barrel sauna is inexpensive for the buyer.
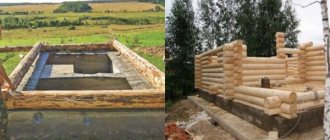
Columnar foundation for a barrel sauna
The barrel bath can be installed on a columnar foundation or on poles.
To do this, it will be enough to make 2-3 piles for each support leg of the barrel bath. The number of supports (stands) depends on its length and model: two stands for a 2-meter barrel sauna and four or five for a 6-meter one.
Each support for the barrel bath is installed under the ends and partitions. Also keep in mind: if the bathhouse has a veranda, then an additional stand is provided for it. The length of the support leg is 1800 mm. Now you can calculate the number of piles that need to be made.
It should be remembered that not every soil is suitable for a columnar foundation. It cannot be built on waterlogged or loose soil.
It is not difficult to make a columnar foundation with your own hands, you just need to follow the construction technology. This is a good solution for such light buildings as barrel baths. There is only one limitation for such foundations - heaving soil.
The degree of heaving shows how much the volume of soil increases when it freezes. If, when freezing to a depth of 1 m, the volume of the soil increases by more than 1 cm, such soil is heaving.
If the soil on your site is characterized by increased heaving, you should replace most of the soil in the places where the pillars are installed with sand .
Advantages of a columnar foundation
- Versatility, it will suit any landscape,
- Minimum amount of waterproofing and preparatory work,
- High installation speed. No need to involve additional assistants,
- Ease of execution. It is enough to have modest skills in construction work that do not require special knowledge, because... The design of such a foundation is technologically simple.
The material for making pillars can be: brick, wood, monolithic concrete, rubble stone, flagstone. The choice of material depends on your budget and what you want to install on this foundation:
- light frame structure - canopies, gazebos,
- two-story building,
- bathhouse, terrace, outbuildings.
The cheapest columnar foundation made of wood. But it is short-lived and impractical. Wood, if it is not treated with an antiseptic and waterproofing materials are not used, will quickly rot
Types of columnar foundations that are really worthy of attention:
- Monolithic, with maximum compressive and tensile strength, if the base is reinforced,
- Brick,
- Rubble concrete,
- From rubble flagstone,
- Made from natural stone.
For a brick foundation you need to purchase a special burnt brick. Its service life is 100 years. The main disadvantage of this type is the labor-intensive installation process. Installation of such a foundation will require a large amount of excavation work.
Pillars can be made: round supports; square; rectangular. They can be the same size at the top and bottom, or they can have the shape of a truncated pyramid or a truncated cone. The truncated form is used on heaving soils; the sides of the pillars are covered with sand or other non-heaving compound.
According to the depth of the supports, the foundation can be:
- recessed,
- shallow,
- not buried.
For barrel baths, a shallow foundation is used with a support depth of up to 40-70 cm from the ground level. It is applicable to most types of soils with low groundwater levels. And also for all buildings that have little weight. To distribute the load evenly, it is advisable to tie the columnar foundation with a grillage. This will ensure the reliability of the design. Many clients cover the grillage with boards or lay a terrace board on it, creating a podium for a barrel sauna:
Do-it-yourself columnar foundation: step-by-step instructions
- Site preparation is an important stage of work. Clean the area, level it, if you have clay soils, make a bedding.
- Marking - secure the axles according to the drawings. Strictly observe corners and diagonals. Position the holes exactly along the axes.
- We dig holes for pillars. You can use a shovel or a mechanical drill, depending on what type of columnar foundation you choose. When the depth of the pillars is up to a meter, there is no need to strengthen the walls. If the depth is greater, then the pit must be dug downhill, securing it with wooden spacers. Make the holes a little larger than the size of the pillars. This is necessary for the installation of spacers and formwork.
- It is also necessary to provide protection against subsidence, for example, by making a special pillow under the pillars. To do this, pour sand in a layer of 100 - 200 mm at the bottom of the dug hole, moisten it and compact it. A 150 - 170 mm layer of concrete mortar is poured onto the sand cushion.
- We make formwork. Formwork is usually made of boards, chipboard, moisture-resistant plywood, roofing felt or iron sheets. You can also use asbestos-cement pipes with a diameter of 100 mm or more.
- We make reinforcement with rods in the longitudinal direction with horizontal wire bridges. To connect to the grillage, the rods must extend 15 cm above the foundation.
- Concrete must be poured in layers of 20 cm. After this, the mixture is compacted. Waterproof with roofing felt. If you have wet soil, you need a double layer. On ordinary soil, one layer of waterproofing is sufficient.
- Installation of grillage. Make a frame from rebar. To do this, connect the jumpers with pieces of reinforcement and weld them with mounting loops. Make formwork and monolithic belt. After pouring concrete, take a break to gain the necessary strength. Perform waterproofing and fill the hole with soil.
Advantages and disadvantages
Barrel-shaped baths have a number of advantages. Among them:
- small dimensions, the bathhouse fits even in the smallest gardening area between the garden bed and the greenhouse;
- mobility, the design can be transported in the back of any truck, and the Mini version can be transported in the trailer of a passenger car;
- installed on any flat area with organized drainage without a permanent foundation;
- speed of construction, assembly takes a day or two;
- the absence of corners ensures quick heating up to 80°C (up to an hour) and long-term heat retention;
- sufficient comfort, despite the small dimensions, rounded walls serve as natural backrests;
- original and aesthetic appearance;
- easy care, no corners makes cleaning easier;
- cost-effectiveness during construction and during operation.
Among the advantages of a barrel sauna are the speed of construction and easy maintenance.
The disadvantages include:
- problems with additional thermal insulation;
- tightness in small models;
- the impossibility of impregnating the sheathing boards with potent agents that prevent rotting and fungal attack;
- the difficulty of replacing sheathing boards that have become unusable, especially on the floor.
The advantages of the design significantly outweigh its disadvantages when an inexpensive, compact, prefabricated and mobile bathhouse is required.
Pile-screw foundation
A pile-screw foundation can be made on any soil except rock. Often this is the foundation that is used to prepare the site for a barrel sauna. Invited craftsmen will make you a foundation from screw piles in 1-2 days. And it will serve you for at least 50 years.
A screw pile is a metal pipe treated with a special anti-corrosion compound. Its lower end is pointed and has a tip with blades. The pile is screwed into the soil like a self-tapping screw, without damaging it, but only compacting it as it sinks.
Screw piles come in several types:
- With a screw blade imitating threads along almost the entire length of the pile. They are used on soils with poor bearing capacity, usually in northern regions with permafrost,
- With different pipe diameters. The larger diameter of the pile is selected for the greater weight of the building. It is not possible to tighten a pile with a diameter of more than 108 mm by hand; special equipment is required.
- With different blade diameters. The less durable and more saturated with water the soil, the larger the diameter of the blade. For dry and dense soils, the diameter of the blade should be smaller,
- The type and shape of the screw pile depends on the manufacturer.
Installing a foundation on screw piles
- In corners and at the intersections of internal walls, piles are screwed into the ground in increments of 1 to 3 meters,
- Screwed-in piles are cut to one level and fastened with metal or wooden beams. This creates a single rigid structure - a grillage,
- Between the ground and the grillage there is a free ventilated space.
In order not to overpay for piles of greater length and diameter, or to prevent your structure from “swinging” due to instability, piles should be selected strictly in accordance with the calculation. It is necessary to take into account the depth of soil freezing on your land plot and the weight of the future structure.
If you carry out the work manually, you also need to take into account the presence of large trees and tall shrubs with a powerful root system, as well as fences or other buildings in the immediate vicinity of the foundation construction site. All this can create additional difficulties for you.
It is better if this is done by a specialist designer based on hydrogeological studies of your site. When ordering the installation of screw piles through contractors, carefully choose a company, since not all of them follow the technology and do their job efficiently. Everything you need to know about screw piles can be seen in this video:
Advantages of screw pile foundations
- No extensive excavation work is required;
- There is no need to pre-level the site;
- You can carry out work at almost any time of the year,
- The foundation can be made on any soil. The exception is rock formations.
This video explains all the pros and cons of screw piles:
Design Features
The main feature of a barrel sauna is its barrel-shaped or cylindrical shape. Two round end panels with a diameter of 2.5-3 meters are sheathed with boards, forming a cylindrical body. The boards are tied together with bandage tape. Minimal contact with the ground provides good thermal insulation. Inside the barrel, a floor is laid, benches, a sauna stove, and, if necessary, partitions are installed.
The light summer cottage option is limited to this; 1-2 people can steam in a 2-meter barrel with minimal amenities. More advanced structures up to 12 meters long are connected to electricity, water supply and drainage, have a steam room, soap bar, shower, forced ventilation and a relaxation area. They can accommodate up to 5-6 people.
The doors in the partitions are made of wood; in expensive models, they are made of tinted or frosted glass. Sometimes, instead of a small window in the end panel, it is made entirely or completely from tempered glass or double glazing.
Barrel baths also include miniature single-seat baths made from a half-barrel standing vertically. Ofuro, or Japanese heated bath, is gaining popularity outside of its native country.
Spruce
Spruce belongs to the category of coniferous tree species. One of the positive qualities is that it is an accessible and pliable material. Its popularity is explained by its ease of processing and high strength, since after drying the wood, cracks do not form on it.
Spruce has the property of natural filtration, which helps prevent the appearance of dampness in the bathhouse. In addition, you can save on mobile foundation blocks due to the fact that this material is the lightest of those used in the construction of baths.
This species also shows itself positively in the visual component, because it retains the whiteness and integral structure of the board texture longer than other woods, regardless of the temperature and volume of incoming moisture.
In addition, the cessation of resin discharge is also associated with deformation of the boards - they will settle by 15-20%, which will negatively affect the appearance of the structure.
Video description
Watch in the following video how the floors in a barrel sauna are installed:
Advice! Ventilation openings in the body, doors, windows, as well as thermometers and smart climate control technologies that independently regulate temperature and humidity conditions depending on the specified settings help improve the comfort of staying in the bathhouse.
Drainage system
The very round shape of the barrel-shaped bath facilitates the rapid collection and removal of water to the outside. It improves the accumulation of water at one point by giving the body of the structure a slight angle of inclination at the installation stage. For effective drainage, a hole of about 50 mm in diameter is made at the lowest point, and a pipe or hose is connected to it from the outside. Next, it discharges the flow to a receiver - a septic tank, drainage or a specially equipped pit.
Nuances of arrangement
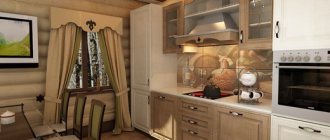
The internal arrangement of the sauna-barrel is determined by the needs and capabilities of its owner. If the bathhouse is planned to be used only in the warm season, insulation will not be required. Otherwise, it is necessary to insulate the walls with basalt wool, and in the lower part it is better to use penoplex that is not afraid of moisture.
In addition to the shelves in the steam room, it is necessary to make benches and a table in the dressing room. If there is a rest room, it is also better to equip it with wooden furniture that is not afraid of moisture.
The surfaces of walls and furniture can be impregnated with linseed oil or special compositions for baths.
It is imperative to equip the oven with protective guards to prevent burns.
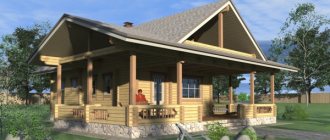
For relaxation in the summer, a canopy-veranda is equipped at the entrance. To do this, the roof and wall boards are released above the entrance end wall.
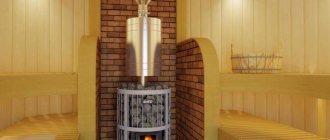
Characteristics of the wood-burning stove GRILL'D Aurora 160
| 1 | Power | 16 kW |
| 2 | Estimated volume of heated room | 6-16 m3 |
| 3 | Dimensions (D x W x H) | 615 x 460 x 782 mm |
| 4 | Weight | 44 kg |
| 5 | Mass of stones for laying | 58 kg |
| 6 | Chimney diameter | 115 mm |
| 7 | Heat exchanger | No |
| 8 | Door | steel with glass |
| 9 | Kamenka | open |
| 10 | Frame | casing-convector |
| 11 | Firebox material | structural steel |
A chimney with a 50-liter hot water tank is installed on the wood-burning stove. The tank has a tap for draining water. In half an hour, the steam room warms up to +90 degrees Celsius, while the water in the tank heats up to +70 degrees.
The oven is installed on a heat-resistant stainless steel screen. A thermal screen is also provided on the wall side to protect it from overheating.
The chimney is usually brought out through the roof, but in some cases it is also made through the side wall. More detailed information on barrel sauna stoves and step-by-step instructions for assembling a chimney can be found in the article.
Stage 3 - frame assembly
Frame assembly
Next you should lay the embedded boards on the prepared base. All elements are connected using the tongue and groove method.
Boards pre-cut to the required size are laid on the bottom. Fasten them along the required circumference until it is sufficient to install the end partitions. The boards must be nailed to the base or screwed.
Once this height has been reached, install the end partitions in the desired places and continue assembling the structure, securing the boards around the partitions. Each board must be nailed or screwed to the end of the partition.
To simplify the task of installing partitions on the inside of the embedded boards where the partitions will be installed, you need to cut grooves whose width is equal to the width of the partition. Then installing it will be much easier and faster.
The barrel is tightened with clamps
After you have laid the last board, you need to ensure the rigidity of the structure. To do this, the barrel is tightly tied with iron hoops. To connect the ends of the hoop, use iron clamps. After a long period of use, when the wood dries out a little, the clamps need to be tightened so that the gaps are minimal.
Selection of materials
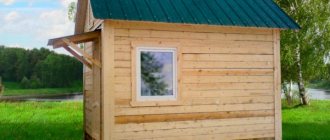
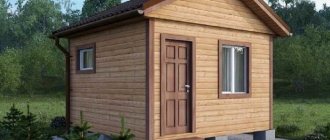
A linden barrel sauna with a roof.
For construction, only deciduous wood is chosen. Pine and spruce wood contains too much resin. When the temperature rises, the resin releases and contaminates the surface. The board becomes too hot and absorbs dirt.
Most suitable:
- Oak is the strongest and most beautiful wood, insensitive to water and steam and extremely durable. The downside is the high cost; such a bathhouse cannot be called budget.
- Larch is inferior to oak in beauty and strength, but is also insensitive to moisture. Water only makes larch harder.
- Linden - perfectly tolerates the action of water and steam, does not heat up, and is resistant to mold.
- Aspen - almost does not shrink, its properties are similar to linden.
Aspen is prone to rotting during growth. When choosing material for a bathhouse, you need to select boards very carefully. High-quality material does not subsequently rot.
The exception among conifers is cedar. The wood is very beautiful, has high disinfecting properties, but heats up somewhat more than linden.
Tips for use
Caring for a barrel sauna is quite simple. The most important thing is to thoroughly ventilate the premises after use every time. Residual moisture in stagnant air can lead to mold and mildew.
From time to time, surface impregnation with linseed oil should be renewed. This will help extend their service life.
You need to carefully monitor the formation of soot and soot in the chimney, especially when using resinous firewood. The chimney should be cleaned once a season.
Also, once a season you should check the condition of electrical equipment by measuring the insulation resistance.
Making a barrel sauna with your own hands is a serious test of the construction and installation skills of a home craftsman. A bathhouse, built quickly and inexpensively, and made with your own hands, will be able to delight family and friends for a long time with pleasant relaxation and healthy procedures.