The first row of blocks requires increased laying accuracy, since the accuracy and ease of laying subsequent rows and the wall as a whole depends on it.
The installation of waterproofing units between the foundation (basement, plinth) and aerated concrete masonry must be carried out in accordance with the decisions made in the project or in accordance with the album of technical solutions.
A mooring cord is stretched between the lighthouse (outer) blocks.
The blocks are laid on opposite sides of the wall, further laying is carried out from the outer blocks to the center using a cord.
The height of the beacon blocks is selected based on the block located at the highest point.
If it is necessary to obtain a cut block, the cut is made with a hacksaw for aerated concrete using a square. In multi-story construction, the use of a band saw is recommended. After cutting, be sure to clean the surface with a sanding board.
The first row of blocks is laid on a leveling layer of cement-sand mortar.
The height of the first row of blocks is adjusted using a mooring cord stretched between the outer blocks of the wall. The position of the blocks is controlled by a level and adjusted using a rubber mallet.
Existing unevenness in the masonry is eliminated using a sanding board or plane. Small dirt and dust are removed with a brush.
Subsequent rows are laid on a special adhesive solution.
Pros and cons of aerated concrete as masonry blocks
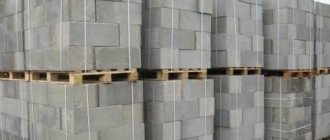
The positive characteristics of aerated concrete make it possible to effectively use this material for the construction of country houses and summer cottages. The technology for laying aerated concrete blocks is quite simple, thanks to the following material characteristics
- the low weight of aerated concrete blocks ensures not only ease of transportation and loading and unloading, but also ease of laying;
- aerated concrete is easy to process ;
- precise geometric dimensions increase the ease of execution, the quality of installation work and the high speed of their implementation;
- the ability to take on any shape allows you to easily solve any design projects.
Also, when constructing walls from aerated blocks, the following disadvantages :
- the fragility of the material and low resistance to mechanical stress requires compliance with protective measures during transportation, storage and installation work;
- any natural movements of the soil, shrinkage of the material, errors during the construction of the foundation cause the formation of numerous cracks on the surface of the walls;
- high hygroscopicity of the material, which is why unfinished structures do not tolerate winter well and require conservation of the object;
- when building walls, reinforcement ;
A house made of aerated concrete has a rather impressive number of disadvantages. However, most of them can be completely eliminated or their influence can be significantly reduced if the technology for building a house from aerated concrete blocks is strictly followed, from the construction of the foundation to the interior finishing. Involving experienced craftsmen with many years of experience working with this material will ensure high-quality performance and reliability of construction.
Common Mistakes
In the process of laying gas blocks, inexperienced craftsmen often make the same type of mistakes. As a rule, there is no one to take lessons on how to work with the material, so you have to act according to your own understanding. Often users forget about important details of the process, or try to do things differently than the technology requires. The most popular mistakes are:
- lack of waterproofing cut-off between the foundation and aerated concrete;
- laying blocks without bandaging rows;
- lack of reinforcement of masonry rows at every meter of height;
- the use of inappropriate types of adhesives for aerated concrete (for example, in cold weather they use summer glue);
- lack of reinforcement of lintels over windows and doors;
- the side (vertical) joints of the masonry are not filled.
As a rule, users know what to do in a given case. Errors occur due to inattention or forgetfulness. Therefore, you need to work with the material with maximum attention and care, not forgetting about all additional procedures. This will help achieve automation and get high-quality and reliable results.
Types of compositions
For the construction of walls made of aerated stone, 2 types of compositions are used:
- Winter . It is produced in gray color, as anti-frost additives are added to its composition. Winter glue can be used at temperatures down to -10 degrees - it will not set quickly and will allow construction to be carried out even in the cold season without losing its properties.
- Summer . Available in white powder, it is best used at positive temperatures.
It is better to use summer glue for laying walls inside, and winter glue for exterior work.
You can read about the prices and ratings of adhesives for laying aerated blocks here.
Materials and tools for application
To lay out aerated stone walls yourself using glue, you also need to prepare the following tools:
several plastic buckets;- drill with mixer attachment;
- spatula with teeth;
- Master OK;
- building level or laser level;
- rubber mallet;
- square - for laying out corners;
- plumb line and cord;
- grater;
- wall chaser;
- hacksaw with blade for cutting stone.
In addition, you will need consumables - waterproofing, reinforcement bars - to strengthen the walls, water. Water cannot be taken from a river or sea; water from a tap is best, at medium temperature, but not cold or hot. Screws or self-tapping screws can also be useful: for installing beacons when laying the first row of stone.
Cement-sand mixture
The laying of aerated concrete blocks is carried out using a cement mixture, which may vary in composition. To impart plasticity, clay is added to the main components, thanks to it the solution does not crumble and is placed evenly on the surface.
In construction stores they sell ready-made mixtures in bags, choose masonry ones with a certain percentage of cement (the more, the faster it hardens - M4, M10, M25, etc.) and binders (Portland cement and Portland slag cement according to GOST 10178). They allow high-quality installation of facade walls and fastening of aerated concrete blocks.
The cement-sand mixture is economical, plastic, easy to use, and provides good insulation properties.
Composition of adhesive for aerated concrete blocks
When choosing adhesive for aerated concrete blocks, you need to understand that the base of the compositions is always the same. Manufacturers change additional components that give the mixture special properties and characteristics. Four main components are used:
- fine sifted sand;
- Portland cement;
- polymers;
- modifiers.
On a note!
Portland cement is a complex mixture of cement, gypsum and calcium additives.
Therefore, when determining which adhesive for aerated concrete blocks will be better, it is worth understanding that the base is always the same. Modifiers can give it the properties of frost resistance, hydrophobicity, and so on. Polymers can be more brittle or rigid, more elastic, or vice versa. Therefore, it is better to start from the construction conditions and the individual characteristics of the project.
Brief characteristics of the material
Let's start with a brief description of the products. After all, in order to understand the essence of the work process, it is worth thoroughly studying the material itself. This will help determine why you need to do it this way and not some other way.
Basic properties and types
Aerated concrete is one of the varieties of cellular concrete. It has a special porous structure, which is achieved during the production process. The cells are formed as a result of a chemical reaction between lime and aluminum powder.
Thanks to their special composition, manufacturing technology and some other factors, the blocks are endowed with properties that differ from other materials, which largely also depend on the type and scope of the product.
Let's consider what aerated concrete can be. In accordance with GOST 21520-89 “Cellular concrete wall blocks”, the material is divided into several types, depending on the characteristics of the material.
According to density, the material can be:
- Thermal insulation. Such products have a density of 300-400 kg/m3. They are used as a material for insulation, since they cannot withstand any loads other than their own weight.
- Structural and thermal insulation. This type of product is characterized by a higher density - 400-800 kg/m3. It is used in the construction of walls and partitions.
- Structural. The most durable material of all types. Its density varies from 900 to 1200 kg/m3. It can withstand significant loads and is used in the construction of buildings up to 12 meters high.
Depending on the type of binder component, the material is distinguished:
- On a cement binder;
- On limestone;
- On slag;
- On ash;
- On mixed.
This means that the concentration of the main component is from 15 to 50%. The content of the silica component also determines the special varieties.
Products can be manufactured:
- On sand, most often quartz;
- On the ashes;
- On other secondary industrial components.
Also, the gas block is divided depending on the type of hardening.
Products can be:
- Autoclave;
- Non-autoclave.
How to plaster aerated concrete correctly
To protect aerated concrete from cracking and shrinkage, it is necessary to limit the flow of moisture into it. To do this, aerated concrete blocks are plastered. However, this must be done correctly, otherwise you can only ruin the whole job.
The plaster solution must have high vapor permeability to avoid the accumulation of dampness inside the house. First, the walls must be coated with a special acrylic-based primer. It improves the adhesion of the plaster and does not impede the passage of air.
Then a solution is applied to the walls, into which the reinforcing mesh is embedded. After this, the final plaster layer is applied. After it dries, the walls are cleaned and painted with facade paint, which has special properties of increased vapor permeability.
The production of this material is a complex and responsible process. Only if all conditions are met, high-quality products will be obtained that can be safely used in construction. Find out about equipment for the production of aerated concrete blocks.
You can find various brands of aerated concrete blocks on sale. In addition, they can be not only standard sizes, but also with additional elements that help facilitate the process of building houses with your own hands. Read more…
Finishing
The peculiarity of an aerated concrete house is that this material strongly absorbs moisture and easily allows steam to pass through it. Therefore, proper finishing should not interfere with the removal of steam and prevent the walls from getting wet.
On the inside, materials that are poorly permeable to steam are most often used to reduce its penetration into the walls, and the room is ventilated through ventilation systems and windows. Exterior finishing should not prevent steam that has penetrated the walls from escaping, while at the same time protecting against atmospheric moisture.
For this reason, polymer heat insulators are not used for additional insulation of aerated concrete houses. The ideal material is mineral wool, which is installed behind the external frame sheathing or facing masonry. In both cases, it is necessary to take care of the ventilation of the facade, which occurs through ventilation gaps. You can read more about this in specialized articles on our website.
If the building is heated, under no circumstances should you install facing bricks close to the aerated concrete.
Aerated concrete masonry technology
The technology will be as follows. First, the foundation of the structure is made, on which the first row of masonry is placed. The base on which you will place the aerated concrete should be raised from the ground surface by about 50-80 cm. Waterproofing must be done between the foundation of the house and the masonry. See what types of waterproofing there are here.
The first row of masonry should rest on the mortar laid on top of the waterproofing. Laying aerated concrete walls always begins at the corner of the building being constructed. In the corners for laying each row you need to pull a mooring cord. It is along this cord, checking everything with a building level, that the correct placement of each block is monitored. The position of each block is adjusted using a rubber hammer. If the blocks have a tongue-and-groove system, they are connected to each other without the use of an adhesive mixture. After laying each row, any irregularities that appear must be removed by rubbing the surface with a sanding board.
Useful tips
All the steps listed above can be completed independently without any problems. However, if you do not have the skills to work with building materials, as well as tools for laying aerated concrete with your own hands, it is recommended to entrust the laying of at least the first row to professionals. This will avoid the most serious problems, which are the hardest to fix. Also, to simplify the process of constructing a building from a similar material, it is worth:
- Use blocks that have clear and uniform dimensions;
- Mix the glue using electronic tools. This will reduce the likelihood of lumps and uneven consistency;
- Place blocks on each subsequent row according to a clearly chosen pattern. Start doing this from the corners, and then lay out each wall level;
- It is worth reinforcing not only external walls, but also joints with internal ones;
- Using a plane, grind the blocks in order to achieve their maximum compaction.
Reinforcement of aerated concrete masonry
The reinforcement of aerated concrete masonry is determined only by the designer at the planning stage. This must be done if:
- additional load will be placed on the walls;
- the length of the walls is significant, i.e. it is necessary to provide resistance to wind loads;
- The first row is reinforced and laid directly on the foundation of the house.
It is necessary to reinforce all support lintels whose length is 900 mm or more. Reinforcement is required at the bottom seams of window openings, and the length of the rods must be at least 900 mm on each side of the opening. When laying walls, the reinforcement is made from reinforcing bars of type A-III, their diameter is 8 mm. The blocks are pre-cut with special grooves for the rods. The groove is first filled with glue, then the reinforcement is laid, after which the next row is laid as usual. Such grooves should extend 60 mm from the outer surface of the blocks.
Step-by-step masonry instructions
The order of laying the blocks depends on several indicators, the main one of which is the thickness of the wall being built.
Masonry schemes
In low-rise private construction, a single-row scheme with one layer of blocks with a density of 500 kg/m3 is most often used. The same masonry order is used in buildings based on a reinforced concrete frame. When masonry is carried out according to this scheme, a classic chain ligation of blocks is performed in adjacent rows with a minimum overlap of seams of 100 mm.
If you decide to lay the wall in two blocks, then it is necessary to ensure bandaging in two planes. For clarity, the diagram above shows two options for such a dressing.
- The first uses blocks of different thicknesses - 300 and 200 mm or 240 and 150 mm. The dressing occurs due to the fact that in each subsequent row the blocks are swapped, which gives the necessary overlap.
- In the two-layer version, in every fourth row the blocks are turned 90 degrees and laid perpendicular to the axis of the wall. Due to the fact that the standard length of an aerated block is 600 mm, you can get a wall of the same thickness using blocks with a width of 200 and 400 mm. First, a bond row is laid, and then it is covered with spoon rows of 200+400 blocks. Two-layer masonry is carried out to a height of 100 cm, then again a bonded row.
- To make walls 400 mm thick from the same blocks, wide blocks are laid in the bottom row, and then several rows of 200+200 blocks. Then the two-layer rows are overlapped with single-layer rows - blocks 400 mm wide. An example of this masonry option is shown in the picture below.
Some manufacturers offer their own masonry schemes, but all of them, in one way or another, are derived from the three described options; usually the sizes of the blocks themselves and the final thickness of the wall differ.
First row
The starting row of blocks determines the evenness and strength of the entire wall, so you should pay attention, strictly follow the technology and place the blocks with maximum accuracy. Before starting work, an experienced mason will make the following preparations:
- He will install serial vertical slats with risks that will correspond to the height of each row, although experienced craftsmen can do without them.
- A cord will be pulled tightly between the slats, which will help guide the masonry evenly.
- Will make intermediate beacons and mark the locations of window and door openings.
A layer or two of dense waterproofing is laid along the top level of the foundation - roofing felt is more often used. This will protect the walls from getting wet due to the capillary rise of moisture through the concrete.
Laying should begin from the highest corner of the foundation. A water level or laser level will help determine it. This is done so that builders have the opportunity to bring the level of the top row clearly horizontal using masonry mortar. For this reason, the first row must always be laid on a cement-sand mortar, the layer thickness of which can reach 2-3 cm.
The installed block is sunk into the solution with a mallet, at the same time this increases the adhesion of the materials. Blocks laid on DSP layers must be recessed with care so that they do not sag below the required level. It is unacceptable to leave row differences, as they lead to the creation of internal stress in the walls, due to which cracks form. The position of each block is additionally controlled by the building level. Small differences are removed using an aerated concrete float.
The last block in a row most often does not fit, so it is necessary to make additional elements, which are cut with a hacksaw from a regular ordinary block. Before installation, the cut edges must be floated and cleaned from dust. The master applies glue to the base and side walls of the additional block, after which he installs the additional element and taps it with a mallet.
Subsequent rows
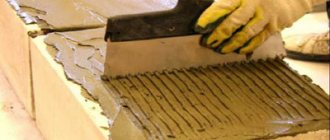
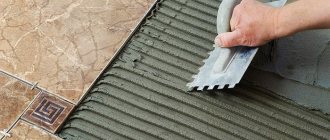
The alignment of subsequent rows is carried out along the mooring (a cord stretched between the vertical slats or the blocks themselves). An adhesive solution is used, applied with a special comb. The aerated concrete screed corresponds to the width of the blocks and has restrictive sides along the edges that prevent the pulled mixture from falling down. At this stage, the work speeds up significantly, since you can apply glue to a large area at once and quickly lay the blocks.
- The easiest way is to work in tandem with an assistant. Distribute the order of work as it is more convenient, but as practice shows, things go faster if one person quickly brings the blocks and mixes the glue, and the second carries out the laying. This is especially true when you have to work at height.
- To obtain a dressing, the first blocks in the corners of the row are installed offset, that is, they are directed in the other direction when looking at the previous row. The pokes and spoons of blocks giving rise to adjacent walls, and adjacent to each other, constantly alternate from row to row.
- The blocks installed in the corners are beacons. If several masons are working, intermediate beacons are used, installed at the boundaries of each plot.
- The additional block, which is needed to ensure the required dressing of the seams, is laid at the end of the row, or at the border of the opening. It is recommended to start laying the next row from the same place, but from a solid block.
- Each next row begins to be laid out only after the glue in the previous row has set - this usually takes 1.5-2 hours, depending on the ambient temperature.
The squeezed out glue must be cleaned off with a spatula, otherwise it will be difficult to remove after complete hardening. Do this simultaneously with laying the next row - the dried glue will not spread over the surface of the material and create a lot of dirt.
When masonry is made from smooth blocks, all seams must be filled with mortar. In tongue-and-groove products, the seams are left partially empty.
Internal walls and partitions are laid out according to the same rules. The main task of the master is to securely connect them with external load-bearing walls. Several techniques are used for this. Galvanized steel strips are very popular, which are laid in the right places between the rows of masonry. They and similar devices are used in single-row masonry.
Internal walls can be laid out simultaneously with external ones, performing serial dressing. This technique is also possible on single-row schemes if grooves are cut through the rows in the blocks of external walls. It is recommended to use fiberglass mesh or steel mesh as additional reinforcement. The second option is worse, since it has a thickness that makes it difficult to make the seam as thin as possible.
Vitaly Kudryashov
Builder Author of the portal full-houses.ru
Ask a Question
Don’t forget to trim the blocks of each row using an aerated concrete float.
When maintaining double-row masonry, the first and last rows must be bonded.
Door, window openings and reinforcement
An increase in the load-bearing capacity of masonry is achieved through reinforcement. It is also produced in areas that bear increased loads - window sill areas, doorways, places where lintels and rafter systems support.
- Every fourth row of masonry needs reinforcement if the blank wall is more than 3 meters high and 6 meters long (armouring joints). An armored belt is installed above the last row of each floor, including on the gables.
- Armoshov consists of reinforcement bars sequentially laid in pre-prepared grooves. The grooves are cut with a wall chaser or grinder. Their depth should be sufficient to completely drown rod AIII in the solution, the diameter of which is 10 mm when reinforced in 1 row, or 8 mm when reinforced in 2 rows. The number of rows is determined by the thickness of the wall - at least 6 cm must remain from the reinforcement to the edges of the block.
- Protects against cracks and expansion joints. These are voids left between blocks that act as a damper when internal stresses arise as a result of shrinkage and thermal expansion of the material. To maintain the energy efficiency of the structure, these seams are filled with soft thermal insulation material. They are installed in places where there are differences in heights and wall thicknesses, on walls without reinforcement, on walls connected to structures made of other materials, at the junctions of heated and unheated rooms.
- The spatial rigidity of the house is also ensured by floor distribution belts made of reinforced concrete. The armored belt, which must be looped, has a three-dimensional frame, which resembles the structure of a strip foundation. Bent elements are used in the corners, which additionally connect adjacent walls.
- The reinforcement of the last row and areas above window and door openings differs by order. Here, for ease of pouring, special U-shaped blocks are used, inside of which frames made of reinforcement are installed.
Tools needed when laying aerated concrete
The first thing to start construction with is preparing tools for work. In fact, their list is not very large, but they are all necessary. Here's what you'll need to work with aerated concrete:
- roulette;
- level;
- drill;
- buckets or basins for glue;
- wall chasers for laying reinforcement;
- rubber mallet or mallet;
- a carriage with a serrated edge, or a trowel;
- corner;
- attachment for a drill (mixer) so that you can prepare the mixture;
- grater;
- hacksaw.
As you can see, there is nothing special in this set. For those involved in construction, these tools are very familiar.
Preparation for construction
Self-laying of gas silicate blocks is possible even for people with a basic understanding of construction technologies. You just need to put in the effort, hard work, and enthusiasm.
To erect a building you need the following tools:
- whorl for mixing glue;
- notched spatula for applying glue;
- a hacksaw with a large tooth for sawing;
- coarse emery to eliminate unevenness and roughness;
- brush;
- level and square;
- vapor-tight insulation - we put the first row on it;
- plane;
- wall chaser;
- rubber hammer;
- fiberglass reinforcement or mesh.
The process of laying aerated concrete
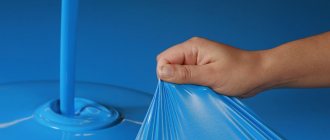
Laying walls from aerated concrete blocks is based on traditional technologies, but has its own specifics due to the properties of the material. A special aerated concrete adhesive is used as a connecting composition. It is sold under different names - “adhesive composition for cellular concrete” or simply “adhesive for aerated concrete”. It is distinguished from ordinary sand-cement mortar by the presence of specialized additives to retain water and impart some elasticity. Laying aerated concrete blocks with glue serves 2 purposes:
- retaining moisture in the mixture;
- ensuring minimum thickness of seams.
Aerated concrete blocks are laid with a joint thickness of no more than 4-6 mm. To do this, you need a flat and straight surface of the row. This method is needed to prevent the formation of cold bridges. If you use a regular mortar with an average seam thickness of 1.5 cm, the energy of the blocks will not be enough to heat such a layer. Cold areas will appear where condensation will settle. The adjacent blocks will gradually become wet, the wall will lose its working qualities and begin to collapse. Therefore, thin-seam masonry technology with a specialized adhesive composition is used.
In addition, walls made of aerated concrete blocks can be laid using regular tile adhesive (moisture-resistant). Recently, another, more effective type of glue has appeared - foam. Outwardly, it resembles an assembly room; it is a composition that foams and hardens in air. Laying aerated concrete on foam greatly simplifies the process and completely eliminates the occurrence of cold bridges. In addition, the seams are as tight as possible, and the joints have elasticity, which does not allow the joints to diverge due to movements of the base or due to shrinkage processes.
How to choose glue for gas blocks?
The solution to the issue is complicated by the significant variety of adhesive compositions on the market.
The easiest way to decide is to conduct small tests.
Test 1
. Take several types of glue and glue two aerated concrete blocks with each. After a day, break the connection and look at the location of the break. If the fracture goes along the seam, this glue is not suitable for use. If partly along the seam, and partly the blocks themselves are deformed, then the use of such glue is questionable. If the seam remains intact, but the aerated block is damaged, this is the best adhesive for aerated concrete. This is the glue that should be preferred.
Test 2
. Prepare for use 1 kg of each type of glue being tested. Fill identical containers with them. After hardening (24 hours), weigh. Preference should be given to glue from the container that weighs less. Low weight indicates that most of the moisture has gone, which means the mixture is less thermally conductive.
Anticipating a healthy dose of irony from readers, we note that testing several adhesives is, of course, troublesome and expensive. But it will be useful for those who have a couple of types of glue and don’t know which one to choose.
We will indicate those brands of adhesive for aerated concrete blocks that have been tested by professionals and have earned their approval.
Ceresit CT 21
Adhesive for aerated concrete Ytong-economy
Adhesive for aerated concrete Osnovit Selform MS112
Bonolit aerated concrete adhesive
Adhesive for aerated concrete Baumit PorenbetonKleber
Winter aerated concrete adhesive AEROC
Manufacturers and cost of aerated concrete adhesive
Today you can buy adhesive for aerated concrete in many online construction stores. Before placing an order, we suggest that you familiarize yourself with the top three, according to the number of positive reviews (the table shows manufacturers and average prices at the end of 2015)
| Manufacturer | Glue cost | Glue consumption kg per 1 sq.m. with a layer of 2 mm | Seam thickness, mm |
| Ceresit CT 21 (+ “Winter”) | 300 RUR/25 kg | 2,6 | 2-10 |
| Baumit PorenbetonKleber Baumit PorenbetonKleber Winter (winter) | 200 RUR/25 kg 270 RUR/25 kg | 2,5-3 | 2-3 |
| KREISEL 125 (Kreisel) | 250 RUR/25 kg | 2,5-3 | 1-3 |
| Good reviews about glue for gas blocks (second three) | |||
| Found Selform MS112 (T-112) | 199 RUR/20 kg | 2,6 | 1-5 |
| AEROC winter | 240 RUR/25 kg | 2-3 | 1-5 |
| Ytong-economy (winter solution) | 260 RUR/25 kg | 3-3,2 | 1-3 |
| Bonolit | 220 RUR/25 kg | 2,6-3 | 2-8 |
As you can see, adhesives are presented in different price categories, despite approximately the same composition and purpose.
Adhesive foam for aerated concrete H+H LimFix It is worth noting that a modern adhesive material for laying blocks made of cellular concrete has appeared - polyurethane adhesive foam in cylinders.
The unique technology of using foam allows you to make a very thin seam and eliminate cold seam bridges, along with incredible efficiency (1 cylinder = 1 cubic meter of masonry) and high adhesion.
The new product is still being treated with caution. Due to the lack of time-tested confirmation, manufacturers are limited to recommendations for the use of adhesive foam for internal self-supporting walls. In European countries, foam is already actively used for laying blocks.
Material prepared for the website www.moydomik.net
Adhesive consumption for aerated concrete
A 25 kg bag of dry mixture is dissolved in 5-6 liters of water, resulting in 18 liters of finished glue from the bag.
Consumption of glue (dry masonry mixture) for thin-seam masonry (seam 1-3 mm) per cubic meter. is 16-17 kg.
The lifespan of the finished adhesive mixture is 2-3 hours. The time for adjusting blocks after laying is 10-15 minutes.
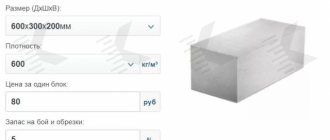
The consumption of aerated concrete adhesive directly depends on the dimensions (the indicated calculation data are based on blocks 600 mm long and 300 mm high) and the quality of the aerated block surfaces (poor geometry, chips and defects increase consumption), as well as on the professionalism of the mason. Therefore, calculated values may differ from actual ones. It is better to calculate with a reserve.
Formula for calculating glue consumption
Where:
P – consumption of dry adhesive mixture kg per cubic meter of aerated concrete masonry; L – length of aerated block (m); H – height of aerated block (m); d – seam thickness (mm); 1.4 – calculated value of dry mixture consumption for glue (kg/m2 with a layer thickness of 1 mm).
What affects the price of aerated concrete adhesive?
- place of purchase (retail store, wholesale warehouse, online store);
- delivery (pickup);
- purchase volume (pieces, wholesale);
- brand awareness.
Technology for preparing adhesive for aerated concrete
Each manufacturer puts instructions for use on the packaging. But as general rules we indicate:
- the required volume of water is measured;
- the mixture is poured into water in small batches;
- mix with a mixer until a homogeneous mass is obtained for 5 minutes;
- the mass should “rest” for 5-10 minutes, during which time the polymer additives will open;
- mix the solution again;
- Stir the solution periodically during operation.
The optimal consistency of the glue is such that the teeth that appear on the surface after applying the glue with a notched trowel (comb) do not spread.
Advice. It is unacceptable to add water to the mixed adhesive solution during work, as this will reduce its adhesive properties. Therefore, you should prepare a small portion of glue, sufficient to work for half an hour.
When can you lay aerated concrete?
When deciding on the choice of adhesive for aerated concrete, you should remember that external factors also affect the adhesive ability of the adhesive. Many people are interested in whether it is possible to lay aerated concrete in winter, in frost, in rain, at what temperature, etc.
External factors:
- ambient humidity
. Laying walls made of aerated concrete should be done in the dry season. Then the glue will harden at the optimal speed. During rain, snow and strong winds - not possible. Actually, it is also undesirable to work with dirty, wet and icy blocks;
- air temperature
. The hotter it is, the faster the hardening process will occur, which can lead to shrinkage cracks. During the cold season, the glue will harden more slowly.
Advice. If you are laying blocks in winter, use summer glue to cover the container with glue and seal it with hot water.
How to correctly lay aerated concrete with glue
- block preparation. An aerated concrete block suitable for work must be of the proper size and free of contamination (dust, dirt, snow are not allowed). Excessive moisture in the block is also undesirable;
- the block is not moistened before applying the glue (!);
- to reduce glue consumption, it is applied to the surface of the aerated concrete block with a notched trowel or carriage;
- Excess glue is removed after hardening. They are cut off with a trowel (the exception is spreading glue over the front surface of the block).
Having thus compared adhesives for aerated concrete and a cement-sand mixture, one can make an unambiguous conclusion in favor of using ready-made adhesive solutions.