It is difficult to imagine modern construction without the use of polyurethane foam, which is used as an excellent insulating material that fills cracks and has adhesive, moisture-proof and dielectric properties. It is necessary when installing windows and doors, where its ability to glue and increase in volume allows you to securely fix the installed structure. Polyurethane foam for penoplex is also necessary when performing a complex of works, including when soundproofing walls made of penoplex is performed. Polyurethane sealant in aerosol cans has already become a necessary element in most construction and repair work, and its ease of use allows you to “blow out” foam boards, literally gluing them to vertical surfaces.
Disc dowels are durable for a long time
The use of disc-shaped dowels is justified in the case of a large insulation area or uneven façade surfaces. For fastening to dowels you need: a hammer drill (impact drill), a drill of the appropriate diameter and length, and a hammer. Holes are drilled with a recess of 50-60 mm into the base. The holes are filled with polyurethane foam. Then the dowel is driven in with a hammer so that the dowel fungi do not protrude above the surface of the slab. It is best to use dowels in combination with metal screws to increase the reliability of the connection. Installing 5 dowels per slab is sufficient. Adjacent sheets are fastened with one dowel. It must be installed in the seam between the slabs.
Fixation methods and types of glue
When figuring out how to glue foam to a wall, you should know that there are three main ways to fix the material:
- using glue;
- using dowels;
- with the simultaneous use of glue and dowels.
The first option is practiced more often for interior work, the third - for exterior work. Fixing heat-insulating boards only with dowels is rarely done, as it does not provide the required level of reliability. When insulating the roof, foam plastic can simply be inserted into the sheathing.
It is permissible to use various means for gluing polystyrene foam. They can all be roughly divided into two groups - dry compounds and ready-made adhesives.
Dry products
If the question arises about how to glue foam plastic to concrete during facade thermal insulation work, you should opt for dry mixtures. They contain cement, sand and polymer fillers. Well-known products are Ceresit CT 83, T-Avangard-K, Armierungs-Gewebekleber.
For interior finishing work, dry gypsum-based compounds are used. Their main purpose is installation of drywall. Popular mixtures are Knauf Perlfix, Volma.
To prepare the glue, the powder must be diluted with water according to the instructions. After drying, the mixture hardens, forming a strong, rigid connection between the foam and the main surface.
Using dry mix Ceresit CT 83 for working with foam plastic
Advantages of powdered products:
- time required to prepare the glue - it should be properly combined with water and mixed thoroughly, achieving a uniform consistency;
- the need for additional equipment and tools - mixing containers, construction mixer;
- release of cement or gypsum dust during work.
Ready-made adhesives
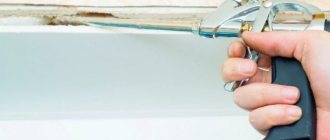
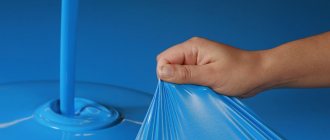
When solving the problem of how to quickly glue foam plastic, it is recommended to pay attention to ready-made adhesive compositions. The main option is an aerosol product based on polyurethane foam in cylinders
Foam for attaching foam to various surfaces
This foam adhesive for polystyrene foam is very convenient to use. One cylinder is enough to fix about 10 m2 of slabs. The mixture hardens in an average of 30 minutes, providing reliable fixation that is resistant to moisture and temperature changes. The only negative is the relatively high price. Popular products are Penosil, Titan Stiro 753, Ceresit ST 84 Express.
Foam based on polyurethane foam can be used if there is a problem with gluing foam to polystyrene foam, concrete, brick, cellular blocks, OSB panels. It is suitable for indoor and outdoor use.
Other ready-made adhesives:
- Silicone sealant. It is advisable to use it if you need to fix small elements made of thin foam plastic on a flat surface.
- Universal construction polymer adhesive or “liquid nails” (Dragon, “Montazh Moment”). It is indispensable when solving the problem of gluing foam plastic to metal. To improve adhesion, the surface should be cleaned of rust, paint and grease. In addition, using “liquid nails” it is convenient to fix the insulation to the ceiling.
Liquid nails Moment
Mastic: the basics
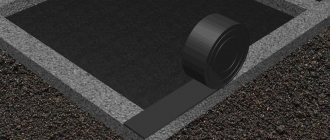
Bitumen-polymer mastics are one of the most common materials due to their price and ease of use. This technology has found wide application in insulating the plinths of buildings operating in extremely unfavorable conditions of constant humidity, the presence of reagents, and mechanical stress. They provide quick and reliable installation of penoplex with stable resistance to harmful external factors. Mastics are sold in tubes, ready for use. The tube is installed in the sealant gun.
The composition is applied around the perimeter and pointwise to the center (when laying the second one and then next to it, it is also applied to the grooves). Then the installed insulation is pressed for a short time. The glued insulation can be repositioned within one hour.
Tips and instructions for gluing foam
First of all, you need to remember a number of general rules for gluing foam plastic, which must be taken into account regardless of the chosen adhesive composition:
Before gluing the sheets, you need to prepare the surface. First of all, it is cleaned of old paint, dirt, rust, etc., and then degreased.
It is this distance that allows for the most reliable gluing of the foam to the metal surface. If dry mixtures are used, the sheet will need to be additionally pressed over the entire area with plywood.
For work you will need the following materials:
- Degreaser. The metal surface can be treated with technical alcohol, gasoline, white spirit, kerosene and compositions specially developed for this.
- Means for gluing sheets. To choose from: foam, silicone sealant, aerosol glue, PVA, liquid nails.
- If possible, burlap.
- If foam or spray adhesive is used, you need to prepare a special cleaning solvent.
During work you will need the following tools:
- Wooden board or sheet plywood in case of using dry adhesive mixtures.
- Unnecessary clean rags.
- Protective gloves.
- Knife for cutting foam boards.
- Spatulas.
- Gun when using polyurethane aerosol adhesive.
- Yardstick.
Gluing is very simple, everything is done in the following sequence:
- The metal surface is cleaned and degreased.
- The selected adhesive composition is applied to the foam sheet.
- The sheet leans against the surface with slight pressure. When using a dry mixture, it is additionally pressed with plywood or a wooden board until the glue dries.
Thus, working with foam is simple, easy and profitable. The set of tools and materials is minimal. Before purchasing a composition, be sure to make sure that it is suitable for use in your climate zone and does not contain gasoline, acetone or other solvents. Good luck!
Liquid nails: will be a bit expensive
Liquid nails can be used to attach thermal insulation to a well-leveled and primed base. Glue is applied using a sealant gun pointwise around the perimeter and center of the sheet. Fastening is done by briefly pressing it to the surface.
Expensive adhesive significantly increases installation costs. Even with high-quality bonding to the surface and ease of use, the technology of using “liquid nails” is economically feasible for small areas of insulation.
Houses are different, and they need to be insulated in different ways.
The use of various technologies and materials in construction leads to the fact that it is impossible to give a universal answer to the question: what to consider when attaching penoplex to the walls of a house? Methods for fastening and preparing surfaces have been developed for different surfaces and operating conditions. You need to know this in order to control those who insulate the house. And even more so for those who insulate the house with their own hands, using their potential.
Houses can be made from stone and wood building materials. Already at the stage of surface preparation, peculiarities in the work begin to appear.
When preparing concrete and brick surfaces, you must:
- clean the walls from dirt, deposits, paint, fuels and lubricants, and then remove dust;
- treat the areas where the fungus is spreading with copper sulfate (antiseptics);
- remove efflorescence on brick;
- clean and seal cracks in the insulated wall;
- apply a deep penetration primer;
- smooth out unevenness with putty;
- apply a deep penetration primer after filling.
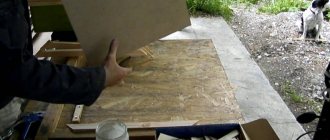
Preparing the tree is much easier. It is treated with impregnations that prevent wood rotting. Wall material such as oriented strand board or thermal wood may not be treated. Then a base of impregnated timber is installed, which ensures ventilation of the facade.
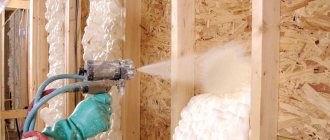
Advantages and procedures for working with aerosol adhesives
More convenient and easier to use is glue that comes in the form of an aerosol. Working with this glue does not require special training; it is applied very quickly and easily. Polyurethane aerosol adhesive can be used for both external and internal work with polystyrene foam. One such cylinder is enough for an average of 10 square meters of foam. The glue hardens in no more than 30 minutes.
The work is very simple - you just need to insert the cylinder into the mounting gun and you can get started. The glue is applied in strips along the perimeter of the foam sheet at a distance of 2-4 cm from its edges. Also, stripes must be applied diagonally. You need to try to do everything quickly. After applying the glue, the sheet must be pressed against the wall with slight force.
A bottle of this glue costs a little more than a bag of dry mixture. However, spray adhesive is more economical and convenient to use.
Conclusion
Now you know which Penoplex glue is best to use in your case. I recommend watching the video in this article, and if you have any questions, ask in the comments.
| The composition is excellent for attaching Penoplex to difficult surfaces . Plywood, corrugated sheets, plastic - you can attach insulation to all these bases with liquid nails. |
| Gluing is simple and quick . A small amount of liquid nails is applied in dots or lines to the base, then the sheet is pressed for 10-20 seconds. |
What and how to glue
It became known that polystyrene foam has a number of positive qualities. Now you need to understand how difficult this insulation is to install and what composition is best for gluing it. During the insulation process, it may be necessary to glue foam to any surface: plastic, wood, metal or concrete. The most difficult material in this regard is metal. How can you glue foam to metal?
First, it’s worth considering the general rules for gluing polystyrene foam to any surface:
- glue is applied to the panel in at least five places;
- until the glue has completely dried, no work should be carried out on the panels, so as not to provoke their shift;
- if gluing will be done outside, you need to select the adhesive composition so that it matches the weather and temperature conditions of a particular area.
You can glue foam to the surface: with liquid nails, polyurethane foam or silicone sealant.
To glue the foam, liquid nails, silicone sealant or polyurethane foam are suitable - any glue that does not react with the foam. Otherwise, glue containing acetone, gasoline or other solvent will “burn through” the foam and the work will be ruined.
In the preparatory cycle, you need to clean the metal surface from dirt, old paint and rust, and then degrease it. Liquid nails, glue and silicone are applied in strips or dotted at a distance of 5-7 cm from each other. This method will ensure the best attachment of the foam sheet to the metal surface. To glue the slab as securely as possible, you should press it over the entire area with wooden boards or plywood.
Polyurethane foam has the amazing ability to adhere to any material. This substance has many positive qualities:
- the foam is easy to use and does not require special skills;
- using foam, you can quickly and efficiently install a foam board on any surface, even glue it to a metal plane;
- the foam is relatively cheap, sold in cylinders and, in addition to gluing to the main surface, it can also be used to seal the seams that arise between the plates.
But there is one peculiarity of working with this material - the foam dries quickly, the tube becomes clogged and the cylinder becomes unusable, although the composition itself is not completely used up. To solve the problem, there is a special cleaning solvent, which must be purchased at the same time as the foam bottle.
Along with foam, one-component polyurethane adhesive is used. It is also available in cylinders, but to use this building material you should also purchase a special gun.
Some craftsmen use a skillful combination of liquid nails and glue. Liquid nails set quickly, and there is no need to support the foam sheet with plywood, as is done with glue. But the reliability of liquid nails is lower than that of glue, so the method of fastening only with nails is not very reliable, especially if you glue the panels to the ceiling. If 2/3 of the panel is spot-treated with glue and 1/3 with liquid nails, then support is not needed, and the structure is more reliable and durable.
Scheme for applying glue to polystyrene foam.
Double-sided tape may be suitable for gluing small metal surfaces inside buildings. This material is quite expensive compared to other adhesives, so it makes sense to use it in case of very minor repairs.
If it is possible to glue burlap to the metal, then there will be no problems with the subsequent attachment of the foam. The usual construction PVA adheres perfectly to burlap and polystyrene foam.
So, the necessary materials:
- degreasing agent: gasoline, kerosene, technical alcohol, white spirit (only alcohol does not leave a thin film) and special products are suitable;
- composition on which the slabs will be glued: a can of glue, foam, liquid nails, silicone sealant, PVA;
- sackcloth;
- Solvent-rinse for cleaning a container with foam or glue.
Tools:
- grinding machine for cleaning metal surfaces;
- a sheet of plywood or a wooden board to press the glued part until it dries completely;
- gloves;
- rags;
- gun for a can of polyurethane glue;
- spatulas;
- knives for cutting foam;
- roulette.
Surface preparation before installing drywall on foam
Having decided to mount drywall on a wall or ceiling using foam, you need to familiarize yourself with the features of this type of fastening. This is a good method of installing sheets, because the surface of the wall may have differences of various levels. In case of very large deviations, special guides are used for gluing sheets.
It is important that the foam be of the highest quality: its characteristics should appear immediately after application.
Fixing drywall must be very reliable, because the characteristics of the foam affect its ability to push the material away from the wall. Of course, it is better to carry out preparatory preparation of the surface. The walls, ceiling and sheets need to be primed.
- Remove old trim from the wall.
- Cover the wall with primer.
- Attach a sheet of drywall to the wall and drill at 9 points.
- Drill holes for fastenings according to the marks.
After completing the preliminary work, you can begin attaching the gypsum board sheets. When installing it yourself, experts advise first installing one sheet and letting it dry. If the next day you are satisfied with the result, then you can continue working.
Mounting options for penoplex
Cement-based dry mixes
By giving preference to dry cement-based adhesives, you choose low price, availability and reliability of fastening. In order to proceed with installation, you will need to dilute the mixture according to the instructions using a construction mixer, and then simply apply it with a spatula to the back of the plate and press it against the wall surface. The insulation glued in this way will be secured more than securely.
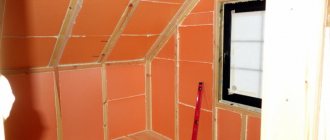
Adhesive foam
Another common method of attaching insulation. The principle of fastening is similar to the two described above - the plate is also glued to the wall. A special feature of this type of fastening is the material of the wall surface; it is recommended to use foam adhesive for gypsum and plastic coatings. Adhesive foam is sold in cans and applied using a glue gun. It's fast and convenient.
“Mushroom” or disc-shaped dowels
Previously, we looked at four types of fastening for penoplex, they were based on one method - gluing the sheet to the wall with various compounds. For the highest quality installation, we recommend the fifth method, namely, fastening using disc-type dowels or, as they are also called, “fungi” or “umbrellas”.
Penoplex has a low weight and there is an opinion among builders that any adhesive method will be sufficient, but in the final version the layers of insulation and cladding will weigh quite a bit and it is necessary to consider more reliable options - fastening with dowels. In order to properly secure a sheet of penoplex, you will need five mushrooms - four in the corners and one in the center, a hammer drill, a hammer and a drill.
Dowels for fastening penoplex - varieties
Let's look at the types of dowels for attaching penoplex to surfaces. The most important difference is the material used to make the dowel. So, the dowels are:
Plastic "fungi". These fasteners are recommended for use on brick and concrete surfaces, but only for light types of insulation. Plastic is a less durable type of material than metal, so its reliability is somewhat lower.
Metal dowels. An excellent option for attaching any insulation, including the heaviest options. Metal, unlike plastic, is highly durable and will last for many years. The only disadvantages of a metal dowel are the high cost and the possibility of metal corrosion. Dowel with a thermal head. The body of the dowel is made of steel, and the head of the nail is made of metal with low thermal conductivity. This option is technologically the most preferable, but expensive.
What are the advantages of using foam in the case of penoplex?
Penoplex is used as a soundproofing material, and polyurethane foam is used to blow in the seams between the plates. At the same time, it qualitatively seals the seam. Another useful function offered by foam is gluing the foam board to surfaces, even vertical ones.
Even an inexperienced builder can do this kind of work. The slabs are glued unnoticed, however, the penoplex is securely fixed and they proceed to the next stage.
Application of foam with penoplex
Using this product instead of glue will help save money, applying the foam is much easier and requires less time to dry completely than glue. The use of foam is in no way inferior to specialized glue in terms of adhesive properties. Why do they buy it to simultaneously use it both for gluing penoplex and for blowing in seams and joints.
Self-tapping screws are cheap and cheerful
Fastening with self-tapping screws using a screwdriver is permissible when insulating a wooden wall over a previously installed sheathing. In this case, it is recommended to install a washer under the screw head to avoid surface destruction and increase the reliability of fastening.
The most widely used method of fastening is the use of bitumen (adhesive) compounds and disc dowels.
The resulting insulation layer is airtight, able to withstand large mechanical loads and has an increased insulation coefficient.
After installing the insulation, a reinforcing mesh is installed followed by cladding.
Now you don’t have to think: “How to glue penoplex? How to mount it correctly? The use of materials specifically designed for penoplex to the walls will allow you to avoid unnecessary waste of effort, money, time and get a durable layer of thermal insulation made by yourself.
Video on the topic:
General installation rules
Correctly attaching penoplex is very important to obtain a high-quality layer of thermal insulation. First of all, you need to secure the starting bar. It can be made independently (we use a wooden beam), or factory-made from perforated metal. In the second case, it is better to purchase a strip in accordance with the width of the insulation, complete with the required number of corners (the corner can be external or internal).
Installation of the strip is carried out as follows. A horizontal line is drawn along the perimeter of the building according to the level. To fasten the “starter” it is better to use dowels. Its use will prevent the insulation from sliding down and maintain the “geometry” of laying the insulation, which is especially important when doing work yourself.
The side of the penoplex on which the adhesive composition will be applied must be rolled with a needle roller to create roughness. The slabs must be installed from bottom to top with an offset of half a slab in each horizontal row.
During installation, the plates are pressed against each other as tightly as possible. For a more durable and “warm” connection, the second row is inserted into the grooves of the first. In order to save adhesive composition, it is possible to seal the joints with polyurethane foam upon completion of installation.
Types of glue
We list the currently most commonly used glue options.
- For rooms with high humidity, MV-40 is suitable, which has moisture-resistant properties. You can also choose T-Avangard-K.
- For residential premises, “Express” or “Universal” are usually used.
- If we are talking about installing external building structures, then it is best to choose liquid nails or assembly adhesive. For example, Moment Montage would be suitable.
- Titanium is good for reinforced concrete base.
- Neoprene-2136 in the form of a spray or Acrol contact type are selected for gluing to penoplex.
- Olfix and Ceresit are universal glue options. They are perfect for working with any type of surface, including concrete.
- Atlas Stopter K-2 kley is selected if you plan to glue the insulation to a mineral base.
- Weicon Easy Mix PE-PP-45 is selected for gluing polypropylene to polyethylene.
After the work, the seams will need to be treated using Tilit or adhesive tape specially designed for this.
The choice of adhesive is largely determined by the purpose of the room that you plan to insulate, whether you will attach it to wood, metal, concrete, etc. It can be difficult to choose on your own without much experience in construction and installation work. Therefore, it is always advisable to consult with specialists.
View full version : What to glue
For this I use bitumen mastic, either Cordon or Barrier. Now I don’t remember which one is anti-noise with rubber crumbs, and which one is just mastic. You need the one without crumbs. I don’t recommend taking cheap mastic from Bikar - it’s very liquid, you can’t stick anything. Last summer I covered the roof like this, and in the winter I covered the engine shield. First, 2-3 layers of anti-noise, dry everything, then penofol.
Thanks for the links!
Good day to all. Interested in how you can glue penofol to metal? (or whatever it is called. This one with foil is sold on construction markets) I want to glue the engine shield on the engine side.
Liquid nails also work well. Before use, test to see if they dissolve penofol.;)
If you haven’t bought it yet, then find a self-adhesive one on the same market. It sticks tightly to a clean surface. I insulated the entire roof with it, I wanted to tear off one place a little, figs, just in shreds. It costs significantly more.
Is it called the same?
Yes, only with the “self-adhesive” additive.