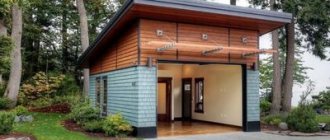
Today, houses with a bay window are considered very fashionable, but when building them, difficulties arise in the process of decorating the roof over them. The roof structure should be in harmony with the design of the overall structure and the structure of the main roof, complementing and improving the style. Depending on the shape of the bay window, different types of roofs are used, but the hip roof is considered the most common.
Bay window: origin and advantages
A bay window is usually called a part of a room that extends beyond the plane of the facade. The prototype of the bay window became a popular architectural detail in the early Middle Ages; placed high on the fortress wall, it provided all-round visibility and a convenient firing angle. The fashion for houses with projections has continued to this day; bay windows have changed and become a popular architectural solution in private housing construction.
The shape and size of the bay window depends on the construction project. In appearance, the bay window resembles a covered balcony; By design, it is part of a room with solid walls. It can occupy one or several floors, be wall-mounted or corner; the base is a trapezoid, semicircle, rectangle or polyhedron. A bay window extension provides the following advantages:
- Additional space with interesting design possibilities.
- Improved access of natural light to the room; The extension most often has glazing along the entire perimeter, often with panoramic windows.
- The original appearance of the house.
On the outskirts of London Source thewalls.ru
The disadvantages of this architectural element include the following facts:
- Increased cost of design and construction work.
- Increased heat loss . There are limitations to the complete insulation of a room, since not all methods of insulation and heating are suitable. The problem is partially solved by using energy-saving (multi-layer) double-glazed windows.
Bay roofs and methods of their construction
The roof over the bay window can take one of the following forms:
- Multi-pincer. Structurally the most complex form .
- Decorative . Decorated with various elements - turrets and spiers.
- Hemisphere (dome).
- Hip . The form preferred by most owners of country houses. The hip design is the most economical option in terms of capital investment and labor costs.
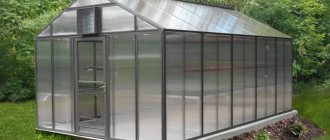
House made of corrugated timber with a bay window Source iobogrev.ru
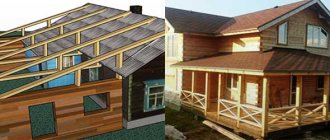
Bay window roofing can be done in two ways:
- Associated with the main roofing structure, more complex in calculations.
- Independent . In this case, the rafters of the decorative roof do not bear large loads, so timber with a smaller cross-section is used to install the rafter system. For finishing, the same material is used as for the main roof.
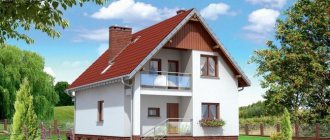
The method of covering a bay window with a gable roof spread in the 17th century and existed (in mass construction) until the beginning of the 20th century. In modern projects, a gable roof with a bay window is not often found, although this method has some advantages over a hip roof. A hip (multi-gable) bay roof requires highly qualified carpenters, since in this case it is assumed that rafter beams will be used, and the structure requires careful adjustment.
Associated bay roof Source s-stroit.ru
See also: Catalog of companies that specialize in roof design and repair.
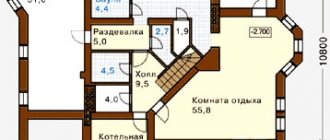
Details
Introduction, calculations, estimates
Rafter roofing house system with bay window
The structure of the bay window rafter system is made of ridge beams, as well as rafters with different purposes. How to make a bay window on the roof with your own hands? Since roof slopes can have different angles of inclination, there are several types of rafters, the main ones being:
- Intermediate central ones - they are attached to each end of the ridge beam, 3 pieces.
- Sloping (that is, corner) rafters - serving as the main load-bearing structural parts, are located at the corners of the frame, and also have the smallest slope compared to intermediate rafters.
- Intermediate - located from the trim to the ridge, between the rafters of the central type.
When installing the roof rafter system, the following is additionally installed:
- Ridge-type purlins are crossbars that are directed horizontally and create support for corner and central rafters.
- Short (that is, outer) rafters are structural elements that are attached to the corner rafters and trim, and also have the same slope.
- Mauerlat is a beam that is attached to the top of the walls from the outside and evenly distributes the rafter load, which serves as the base, that is, the connecting frame link between the walls and the roof.
- The brace is a support for the legs of rafters with large spans, and also makes it possible to cover more spans and at the same time save sections of the main beams.
Let's look at how to calculate the total area.
How to calculate the area of a bay window
To measure the area of a bay window, you need to use the following tools:
- A ruler is a minimally accurate measuring device that gives a large error.
- Construction tape - suitable for measuring small areas.
- A laser rangefinder is a tool that shows the most accurate measurement results, and also makes it possible to carry out work without the help of a partner.
The main problem when calculating the bay window area will be its complex shape, rounded or beveled. If it is not a triangle or a rectangle, but a more complex polygon, it is important to divide it into several simple shapes. The following actions are:
- Measure all sides.
- Make drawings and mark the data obtained on it.
- Using calculation formulas, perform calculations for ordinary figures.
Let's consider a step-by-step algorithm.
Making a bay window with your own hands
The first stage of the bay window construction process is making the design, as well as planning the shape. In certain cases, additional paperwork is required. If you build structures that run parallel to the house, then there is no need for them. if a bay window extension is being made to a building that has been in use for some time, it is important to make amendments to the design and get destruction for the extension.
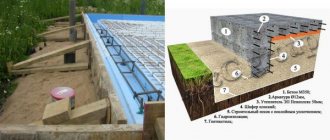
Laying the base
The structure of the foundation for the bay window structure is similar to the base of the building. A monolithic strip one is suitable, and there are stages of construction. The foundation is in great need of shrinkage, after which it will be possible to treat it with waterproofing materials.
How to build a bay window
If you build a roof bay window with your own hands, it is not recommended to do everything above one floor with your own hands. the most suitable materials are aerated concrete or bricks, and masonry has many features that are important to consider:
- For internal walls, you can use gas silicate blocks or aerated concrete.
- For the external type of masonry, it is best to take high quality facing bricks.
- When using both aerated concrete and brick simultaneously, it is necessary to correctly calculate the load on the base.
- Thermal insulation should be in the middle layer, and this can be mineral wool or other, much more modern spray-type materials.
- It is necessary to provide waterproofing - a membrane-type film or other similar solutions.
- The walls of the building and the bay window must be a monolithic structure. This makes it possible to avoid problems during the operational process.
We should also talk about the roof over the bay window.
Roof over bay window
The main rule for application is that the roof must fit correctly into the main roofing style. In practice, you can find several types of roofing over a bay window. The simplest option for roofing over a bay window would be to make a continuation of the roof of the main building. Its shape will depend on the shape of the bay window (trapezoidal, semicircular, triangular or rectangular).
Roofing varieties above the bay window
You can distinguish the following popular types of roofs over bay windows:
- Hip - it is made in buildings with an oblong roof, has ridges and four slopes, two of them are triangles in shape, and two are trapezoids.
- Hipped - used for bay windows with a small area, and also gives the building a similarity to a tower, and also has a large number of edges.
- Multi-gable - a complex roofing structure for a bay window with valleys and gables, a type of pitched roof with two or more gables, gable-type elements with ridges.
- Decorative - it is equipped with additional structures, for example, the same towers.
The main criterion when choosing a type of roof over a bay window is the performance of its own functions. Most often you can find the roof of a one-story house with a bay window, which is the simplest in terms of design. It will not require large material and labor expenses.
Scheme of the rafter roofing system above the bay window
Dimensions, the exact location of each frame element and cross-section - all this is provided by the rafter system diagram. Moreover, the rafter system drawings include the following characteristics:
- Roof height.
- Span width.
- The angle of inclination of each slope.
- Dimensions of the ridge run.
- Methods of structural strengthening.
- Features of fixing structural elements.
The photo shows a diagram of the rafter system on the bay window of the hip roof.
How to make a roof with your own hands
When installing the roof truss system and bay window, the same materials are usually used as for the main roof. In addition, to make the roof of a house with a bay window, the following materials are required:
- Lathing beams.
- Galvanized iron.
- Rafter type beams.
- Self-tapping screws, screws and nails.
Working steps:
The initial working stage will be the preparation of the belt for reinforcement. This beam support, which also makes the masonry much stronger. The belt material will be reinforced mesh and concrete.- Next, it is important to start installing rafter beams; here they use timber and boards, which are connected using screws and self-tapping screws. It is important to cut them with small gaps, which are removed after the beams have been secured.
- Before you begin installing the rafters, check the angle of the roof slope. The rafters need to be adjusted on the ground, and after lifting, sewn onto the roof ridge using metal plates and self-tapping screws, and also attached to rafter-type beams.
- Afterwards, the rafter system needs to be covered with waterproofing material and the sheathing is made.
- Now you can move on to the most difficult installation stage, and also install valleys using different gutters. Bottom strips are required to drain snow and water. The top bar will serve a decorative function and also perfectly hide imperfections. They are attached to the valley board, and the joints are also treated with sealant.
- At the final stage, the roof above the bay window needs to be insulated and also hemmed.
Now some useful things for beginning craftsmen.
Bay window hip: features and varieties
The classic hip roof is formed by four pitched planes converging at an angle to two peaks connected by a ridge. A pair of main slopes has the shape of a trapezoid, a pair of side slopes have the shape of a triangle.
A hip roof with a bay window undoubtedly decorates the house and allows the use of original interior solutions; At the same time, adding a bay window to the project complicates the design; it becomes multi-sloped. The slopes, intersecting, form an internal corner, the most vulnerable place in which precipitation tends to accumulate. The corner connection is called a valley, and a roof with a similar architectural element is called a valley roof. Its main disadvantage is the complexity of construction. During design, the requirements for the quality of calculations increase; minor errors can lead to reduced reliability and deformation of the roof. At the same time, the hip roof boasts the following advantages:
- Attractive appearance and the possibility of expanding the living space - attic.
Endova - the junction of the slopes Source board.infox.by
- Durability and resistance to wind and rain loads. The smaller the slope of the slopes, the more streamlined the shape becomes and the less load falls on the rafter frame.
- Large overhangs look organic on such a roof , providing protection for the façade walls from rain moisture.
- Due to the absence of gables, the load of the roofing system on the walls and foundation of the housing is distributed evenly .
In addition to the classic one, there are other types of hips, each with its own characteristics of the rafter structure and possibilities for arranging a bay window:
- Tent . The slopes converge at one point and form a multifaceted pyramid. The ridge is missing; instead, a more difficult to implement ridge knot is formed. The hip roof is used for small bay windows, which take on the appearance of decorative turrets attached to the house. It looks the most organic.
Tent structure Source yandex.ru
- Broken (attic) hip . The most difficult design to implement, in which the slopes at a certain height change the angle of inclination (to a smaller one); the number of individual planes doubles from four to eight. The broken hip provides maximum under-roof space and is well suited for arranging a bay window that protrudes significantly beyond the plane of the facade.
- Half-hip . On the side (triangular) slope there is a vertical pediment in which it is convenient to install a window. Gable (Dutch, with a shortened triangular slope and pediment) and hipped (Danish, pediment ends with an end slope) half-hip roofs are common. Depending on the device, the half-hip can be combined with a bay window.
Half hip Source viksar.ru
Comparative characteristics of frame types: tent and hip
The category of roof with four slopes includes 2 types of frame systems, which schematically look like square (hipped structure) and rectangular (hip roof) envelopes. In our country, the envelope roof is quite popular. The main feature of hipped roofs is the absence of gables. To construct the rafter system of a hipped roof, in both cases hanging and layered rafters are used. Their assembly methods are standard for roofs with any number of slopes.
Distinctive features of hipped roofs of various designs:
- In the case of a hip frame, the roof consists of four isosceles triangles whose vertices touch at one point. In this case, the functions of the ridge are assigned to the central support beam in layered structures, or to the top point of the hanging rafter truss.
- A hip-type roof assumes the presence of two triangular and two trapezoid-shaped slopes. In this case, the trapezoidal slopes are adjacent to the ridge beam with their upper ribs, and the triangular slopes with their vertices. In this case, all four slopes touch each other with lateral ribs.
Studying the plan of the rafter system of a hipped roof, we can conclude that the choice of the configuration of a hipped roof depends on the shape of the building. That is, square houses are covered with hipped structures, and rectangular houses are covered with hip roofs. In this case, you can use any roofing materials, both hard and soft.
When drawing up drawings of the rafter system of a hipped roof, you should clearly indicate the geometric shape, as well as indicate the position of individual elements and projections of the slopes with exact dimensions.
To support a hipped structure, you can use a mauerlat, which is the top frame on concrete or brick walls, as well as the top crown of a log frame. Layered technology is used in cases where it is possible to install upper and lower supports under each rafter leg.
Some recommendations for installing layered rafters:
- The Mauerlat must be reinforced to withstand thrusting forces in the event of rigid fixation of the rafter legs with wooden plates or metal corners.
- If the upper part of the leg is fixed rigidly, and the lower part is hinged, the Mauerlat can be fixed in the usual way. In this case, when the load on the frame increases, the rafters will be able to move slightly.
- The bursting load and pressure on the Mauerlat will be leveled by using rigid fastenings on the lower part of the rafters and hinged fastenings on the upper heels.
When constructing hip and hip frames, the following specific components of the rafter system of a hipped roof are used:
- Diagonal legs from which the ridges of the slopes are made. In hip-type frames, such slanting legs combine the corners of the roof with its highest point. Hip frames involve joining the ridge beam consoles to the corners using diagonal rafters.
- Cornices (half-legs) are elements mounted at an angle of 90 degrees to the cornices. Since they connect to diagonal rafters and are parallel to each other, their length will vary. Roof slopes are created from such elements.
The same structural elements are used to create valleys, with the only difference being that the corners are made concave.
It is the installation of slanted rafters that poses the greatest difficulty. Moreover, these elements will bear an increased load, since they serve as a supporting element for fastening in the upper part of the ridges, that is, they act as a ridge. Therefore, before starting work, it is necessary to calculate the rafter system of a hipped roof.
In general, the process of erecting a roof with four slopes includes the following steps:
- Laying mauerlat on walls made of brick or concrete. In log houses, this element is the upper crown.
- Installation of a central support beam under a hip frame or assembly of support structures for a hip roof.
- Installation of layered rafter legs under one or another structure.
- Attaching diagonal rafters that align the corners of the roof with the central peak or ends of the ridge.
- Marking and installation of spigots.
If a hanging type of rafter system is assumed, then the first stage of creating a tent structure will be the placement of a central truss in the shape of a triangle. When creating a hip-type structure, several trusses are attached at the starting stage.
Yandovaya (bay window) roof: preparatory work
The manufacture of the bay window frame and the construction of the roof begins after the design work has been completed and the roofing material has been selected. Design work begins with determining the following parameters:
- Selecting the roof angle by region . It is set taking into account local climatic conditions: the minimum angle (2-5°) is selected for dry places with strong winds. In regions with long and snowy winters, the roof angle is increased.
- Selecting the roof angle based on the material . The selected roofing material also influences the angle of inclination. For each type of coating there is an optimal laying angle. For example, for metal tiles it is 14°, for corrugated sheets - 12°, for slate - 22°. Membrane roofing can be laid at any angle.
- Determination of proportions . Based on the slope, the length of the rafters is determined.
Roof calculation
Before calculating the area of the roof envelope, it is very important to first calculate the convergence points of the roof ridges, because they need to be built first. To make the task easier, you can use various special engineering tables, for example:
Photo - roof calculation table
You may also need a table that can be used to calculate the hip angle:
Photo - calculation of the angle of inclination
This roof has many advantages :
- Economical;
- Stable, used for installation in strong wind conditions;
- Beautifully complements the exterior of the house.
But there are also disadvantages, mainly the complexity of the design.
A wooden and metal envelope roof looks very nice, its design is quite simple, but before you make such a structure yourself, you need to develop a project and have it approved by a specialist. Metal tiles, corrugated sheets, bitumen shingles and other materials are used to cover the roof.
May 21, 2014 Author: Vladimir Bakaev
Video description
About designing a roof with a bay window in the following video:
- To ensure that the house does not resemble a birdhouse after completion of construction, the appearance of the future roof is assessed at the design stage, using three-dimensional modeling .
- Determining the pitch of the rafters . It is affected by the weight of the finishing coating; the gap between the rafters can vary in the range of 0.6-1 m.
- Definition of sheathing device , which is determined by the roof covering. Calculation of the size and number of sheathing elements.
- Calculation of building materials . It is carried out based on the area and slope of the roof. Any details are taken into account: dormer windows and chimneys will require an increase in the budget.
Diagram of a bay window with a gable roof Source domax-fahverk.ru
Preparation for construction: materials
In order to eliminate annoying downtime in roofing work, even before the construction of a hipped roof with a bay window begins, they stock up on the necessary materials, which include:
- Lumber . Board and timber; care must be taken to pre-treat them to protect them from moisture.
- Hardware . Self-tapping screws, screws, roofing nails, studs.
- Tie wire and galvanized plates for additional fastening.
- Materials for roofing pie , including waterproofing membrane. The choice of a two-layer waterproofing film eliminates the need for a ventilation gap; in this case, the insulation layer and the membrane are placed closely.
- Roof covering.
Bay window under a soft roof Source yandex.kz
Supports for diagonal rafters
Either struts or vertical posts made of timber or paired boards can be used as support for diagonal rafters. The stand can rest directly on the ceiling , through a layer of waterproofing and a wooden lining.
This requires sufficient rigidity and strength of the floor. If such conditions do not exist, then a strut is used, resting on the beam and supporting the slanted rafter at a given point.
The angle of inclination of the strut does not play a role in this case , the main thing is the connection point, i.e. Load concentration location. For a rafter length of up to 7.5 m, a brace from the top point of maximum load is sufficient, but for a length of more than 9 m, an additional support is required at the bottom.
This can be either support on the ceiling, if it allows, or support on the truss - the so-called. truss truss - a stand reinforced with struts on the sides.
Supports for diagonal rafters
Yandovaya (bay window) roof: installation
Installation is carried out in accordance with the developed roof design with a bay window; the rafter system of this design consists of the main roof rafter system and the bay window rafter system. The design determines whether the systems will be separate or whether they will need to be connected to form connecting points. Installation of roofs of different designs follows the same algorithm (the difference lies in the number and shape of the rafters) in the following sequence:
- Markings are made on the top trim: axes, projections and the location of the main elements are outlined. The rafter system is installed .
- . It is convenient to assemble individual rafters on the ground. The finished rafters (in the shape of a triangle) are lifted to the assembly site, where they are interconnected into a single structure and attached to the beams located at the base. The parts are fastened with self-tapping screws and, additionally, with plates made of galvanized metal.
Mauerlat: how to attach it
The envelope roof begins to be built with the installation of the Mauerlat. Mauerlat is the basis of the structure, consisting of paving or log elements fastened together, laid on top of the outer wall of the house along its perimeter. The function of the Mauerlat is to distribute the load concentrated in the places where the rafters are supported over the entire upper surface of the building wall. Most often, the Mauerlat is made of wood, but if a metal roofing frame is being built, a channel, I-beam, etc. can be used. Parts of the roof structure are attached to the Mauerlat, thus the roof is tied to the walls of the house. It serves as the extreme lower support for the rafters. Place the Mauerlat along the outer edge of the wall with some indentation. The amount of indentation depends on the design features of the roof and wall of the building. But a margin of less than 5 cm is extremely undesirable.
There are 3 main ways to attach the Mauerlat to the wall:
- Fastening with studs to concrete. Suitable for very large roofs - more than 250 sq.m. A concrete screed is poured on the upper surface of the wall - armored belt. Immediately, studs are vertically embedded into it - metal pins with threads (for example, M12). They are distributed at least every 2 m along the entire length of the armored belt. Be sure to have one at the ends of the Mauerlat. The height of the stud should exceed the thickness of the beam itself by more than 3 cm in order to properly tighten the Mauerlat with a nut and washer. You don’t have to embed the studs right away, but attach them later to the concrete using anchor bolts.
- Embedding studs into the wall masonry. The method is less reliable than the first. Suitable for roofs with an area of less than 250 square meters. The pins are embedded directly into the brick wall during the laying process. It is safer to take longer reinforcement (studs) in order to embed them deeper into the wall.
- Fastening using wire rod (thick wire). In the process of laying a wall, 3 rows or more of bricks to the top, between the rows, lay the middle of a piece of thick wire so that both ends are enough to tie the mauerlat at the top. This method is quite reliable, especially for small roofs.
Video description
About the bay window rafter system in the following video:
- The sheathing is being filled . If a flexible material is chosen for the roof, the sheathing is made solid. If the material is hard (corrugated sheet or metal tile), sparse (cellular) sheathing is installed.
- A roofing pie is formed . It consists of sequentially fixed layers of film vapor barrier, insulation and waterproofing.
- The counter-lattice is attached . It holds the roofing pie and is a system of wooden slats that are laid across the rafters.
- The lower valley strips are installed . They are placed at the joints of negative angles and connect the bay window and the main roof. The valley is additionally protected from sagging by installing a continuous sheathing (regardless of the chosen finishing coating).
- The finishing coating is being laid . After the roof is completely laid, the upper valley strips are installed. They perform a decorative role, covering the joints of the slopes.
Corner bay window Source pxhere.com
Construction of a four-slope rafter system
The four-slope rafter structure consists of the following elements: mauerlat, ridge beam, central and hip rafters, slanted legs, as well as beds, racks, crossbars, struts and other reinforcing parts. Let's look at the most basic elements.
I. Mauerlat
The Mauerlat is the most important part of the structure, since the entire rafter system rests on it. It is a powerful wooden beam 100x200, 100x250, 100x100, 150x250, 200x200 cm. The mauerlat is made from solid high-quality wood, mainly coniferous. The rafter system of a hip roof, like any multi-pitched roof, requires thorough fastening of the base beam. The procedure for installing the Mauerlat in this case: the formation of a monolithic foundation at the end of the load-bearing walls with the installation of spiers; laying waterproofing; processing and installation of Mauerlat around the perimeter of the entire house; reinforced with anchors and other fastenings for maximum reliability of the base.
The Mauerlat can be laid on the edge of the wall, or in the pocket provided when laying bricks on the inside of the load-bearing walls.
II. Sloping legs
Sloping legs are the four corner rafters that rest on the edges of the ridge and the corners of the mauerlat. They are the longest among all the rafter legs of the system, therefore they must have a cross-section of at least 100x150 mm for maximum rigidity.
III. Ridge beam
Ridge purlin is a horizontal beam that connects all the rafters, the top of the rafter system. The beam must be strengthened with racks and struts. The ridge must be positioned strictly parallel to the plane of the attic floor and perpendicular to the racks.
IV. Rafters
Rafters for a hipped roof are divided into: central (attached to the mauerlat and ridge); main hip ones (attached to the ridge axis and Mauerlat); intermediate and shortened (installed on sloping legs and Mauerlat, connecting the corners of the slopes).
V. Strengthening elements
Additional reinforcing elements include ridge beam posts, crossbars or floor beams, rafter struts, wind beams, etc.