The article was prepared with the participation of specialists from LafargeHolcim
The “warm floor” heating system is popular both among city residents and owners of country houses. This is due to the fact that, thanks to the optimal vertical temperature distribution (from floor to ceiling), it helps to create comfortable conditions in the house. One of the options for a heated floor can be an electric one, with a heating cable laid in a sand concrete screed. Many users have questions about how to properly make such a system, avoid installation errors and pour a reliable and durable sand-concrete screed. In this article, with the help of a specialist from LafargeHolcim, we will tell you:
- How to choose the right “pie” of an electric heated floor with a heating cable.
- What should be the thickness of the sand concrete screed when using a heating cable.
- How to choose high-quality sand concrete and cement.
- How to make your own mortar from sand and cement.
- Why is fiber added to sand concrete?
- The main stages of work on pouring sand concrete onto a heated floor screed with a heating cable.
Water heated floor
Water heated floors are the most common system for heating an individual home. Its important component is pipes made of polypropylene or metal-plastic. The system also includes a circulation pump, a manifold-mixer, and three-way valves (according to the number of water circuits).
Here's how this system works: the heated liquid moves along the heating circuit and transfers its heat to the screed. The cooled water goes back, flows into the boiler, heats up again - the cycle repeats. Limiters built into the system prevent the floor from heating above the set temperature.
Pros and cons of a water heated floor system in a private house
| Flaws | Advantages |
| Difficult installation. If using a concrete screed, you need to wait at least a month until it dries completely. Need a boiler room. | Compatible with different types of floor coverings. |
| The initial costs will be several times (3-5) more expensive than an electric floor. | Very effective system. The temperature of the circulating fluid is 35-50 degrees, this greatly reduces heating costs. |
| When this is the only way to heat a house, complex calculations are needed. | May be the only SO at home. |
| In case of leakage, complete dismantling of the covering and removal of the screed will be required. | Does not generate an electromagnetic field. |
| A wide variety of floor coverings are compatible with hydronic heated floors, and you can lay a carpet on it. | Does not dry out the air in the room. |
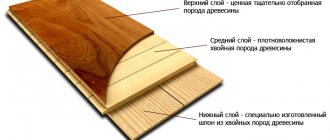
Water floors are divided according to the type of installation: usually the pipes are poured into a screed, but there are also flooring systems, wooden or polystyrene.
sly2kFORUMHOUSE Member
A 50 mm board is placed on top of the logs, recesses for laying tubes are milled into it, then foil is laid into the recesses (as waterproofing and for better heat distribution), and metal-plastic pipes are laid. All this is covered with boards (20 mm pine), the boards are coated with polyurethane varnish on both sides.
Each type of water heated floor is good in certain conditions.
Lightweight and quickly warmed up, the flooring system is considered an ideal solution for panel houses.
The polystyrene system is recommended for wooden floors.
The concrete system is chosen for capital, powerful buildings. It, as already mentioned, is more expensive, but it is an indispensable element of an energy-efficient home.
Installing a hot water system is an extremely important task: a leak will mean repairing the subfloor, covering and finishing.
The nuances of choosing high-quality sand concrete and cement in bags and the features of pouring screed
To the stage of pouring the screed so-called. Some developers do not treat the “wet type” responsibly enough, making mistakes when choosing a ready-made sand concrete mixture M300 or violating the proportions when preparing the solution themselves. For example, they use a lot of water to give the mixture greater mobility and increase its life time during the laying process, which leads to a decrease in the strength of the screed and an increase in the likelihood of cracks.
Maria A
I want to make my own mixture for pouring sand concrete screed. Questions: how to choose the components of the mixture and what additives are best to use?
Another common question from portal users is: what is better - using ready-made sand concrete or preparing your own mixture from high-quality cement in bags.
Anna Ruzhitskaya
In terms of convenience, reliability and stability of the result, it is better to use ready-made dry mixtures (sand concrete). For these mixtures, the maximum sand grain size is regulated, i.e. In production, seeded sand is used, the cement-sand proportions are strictly maintained, and the crack resistance parameters of the hardened mortar are checked.
Please note that mixtures from trusted manufacturers undergo thorough quality control at all stages of production and meet all GOST requirements. The mixture, precisely measured by weight, is delivered to the site in reliable packaging - 40 kg bags.
To install a screed on a warm floor, it is better to use a “wet” screed.
A semi-dry screed differs from a wet screed in that it uses a small amount of water necessary to mix the cement-sand mixture.
Therefore, it is difficult to distribute and compact the semi-dry screed efficiently, taking into account the installed underfloor heating system - mounting tape and thermal cable. When the density of the cement stone decreases, due to the formation of air cavities, the heating efficiency decreases, because The thermal conductivity of the screed decreases.
When preparing sand concrete for screed yourself, special attention should be paid to the quality of the ingredients. The sand should be coarse, sifted, without clay and other harmful impurities (shells, plant remains, contamination with petroleum products, etc.). When choosing the proportions of the mixture, you should remember that sand can have different humidity levels, which affects the required amount of mixing water.
When working with ready-made dry mixtures, pay attention to the availability of information with recommendations on basic recipes and exact proportions for preparing the main types of solutions. This simplifies the work of builders.
The quality characteristics of sand concrete and screed can be improved by using plasticizers and fiberglass.
Electric heated floor
Electric heated floors are divided into:
- Cable. The heating element in them is a resistive heating cable with a conductive core protected by a sheath.
- Heating mats – cable on a mesh backing.
- Infrared film floors – film with carbon stripes.
- Infrared rods. The heating element is a carbon rod.
Video: installation of heating cable
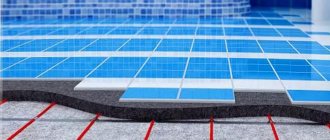
The screed is an important element of a heated floor, on which its quality depends. When installed correctly, it will ensure comfortable conditions and durability of the heating system. The thickness of the screed is of great importance. If the surface is uneven, it can be improved with a leveling layer. The base must be strong and durable, since it is subject to constant alternating temperature influences. It should be erected according to certain rules, maintaining the thickness, ratio of screed components and the time of its maturation.
Cable floor
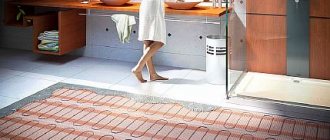
Electric cable flooring is usually installed in city apartments and country houses as part of a combined heating system. It is good where minimal screed or tiles with glue are planned (that’s why it is so often installed in the kitchen or bathrooms).
This heated floor in the house is not suitable for main heating, but it is good, for example, for heating in the off-season.
SubnusFORUMHOUSE Member
A cable to the floor is not heating, but additional heating with all that it implies.
An electric floor may use resistive or self-regulating cable. Resistive can be single-core or two-core (the method of laying a heated floor depends on this; two-core is much more convenient), self-regulating - only two-core.
| Variety | Advantages | Flaws |
| Single-core resistive cable. The unheated end is connected to the temperature regulator, the main cable is placed in a “snake” under the floor, the second unheated end is pulled into the initial connection and also connected to the thermostat. | The maximum heating temperature is several times higher than that of a two-wire one. Consumes little electricity. It's inexpensive. | A resistive cable has uniform heat transfer in all areas; overheating of the floor covering under the furniture is possible and the system may fail. It is better that there is no heating cable under large furniture - this will have to be taken into account during the design. |
| Two-core resistive cable. It is enough to connect it to the thermostat at one end. This is convenient for large areas and complex house layouts. | Easy to install, you can lay a highly complex heating channel. The voltage that passes through the wire does not affect the electromagnetic pulses. | |
| Self-regulating cable (two conductive cores are in contact with a matrix made of a special polymer material). | Depending on the temperature in the room, it independently changes the heating power. Well protected from mechanical impact. It cannot overheat due to the design features. It lasts a long time and almost never needs repairs. Compatible with any surface and under any furniture. You can make contours of different sizes (and less than 1 sq.m). Easy installation of heated floors. | Expensive. Special ballasts are required. Provides a comfortable temperature only on the floor surface and is not able to quickly warm up the room. |
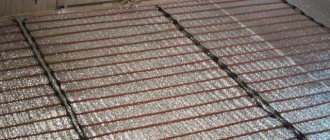
When installing a resistive cable floor, it is important:
- calculate cable length
- pay attention to the material (brass, nichrome or copper). They have different properties and electrical resistance indicators
- strictly observe the permissible distance between heating elements specified by the manufacturer (usually no more than 12 cm)
- perform the calculations correctly - it is impossible to remove or add part of the wire at the installation stage
When making calculations, they usually rely on the following data (per square meter of room):
- Bedroom – 100-150 W/sq.m;
- Kitchen, hallway, corridor - 150 W/sq.m;
- Bathroom - 150 W/sq.m
- Balcony -200 W/sq.m
Flaws
- Available for a specific heating area: 0.5 m2, 1.0 m2, etc.;
- The area is limited by the width of the mat; when laying on an area of complex shape, a certain level of skill is required.
- Do not lay it on insulation, as this may lead to overheating of the cable.
- The mat is easier to damage than the cable, which should be taken into account during installation, including when laying tiles.
- The shallow installation depth can also be considered a disadvantage, since the floor cools down quickly after turning off the power.
Both systems are reliable and their service life is approximately the same, from 15 to 20 years. Electricity consumption for small heating areas is also approximately the same. That is, the main selection criterion is the installation conditions.
Warm floors under tiles: heating cable mats
Heating cable mats are the best heated floor for laying under tiles, because they can be laid directly into a layer (up to 1 cm) of tile adhesive. Thin cables can also cope with this task, but their range on sale is usually limited.
kjr11FORUMHOUSE Member
Manufacturers prefer to glue thin cables onto mats and sell them at a higher price.
The mats are suitable for all finishing coatings. Compared to a simple cable floor, they are much faster and easier to install - the cable is already fixed to the polymer mesh, and you just need to roll it out on the floor. The mats use both single-core and double-core cables, and with the same power, single-core cables are about 15% cheaper. So the difference is only in price and the magnitude of the electromagnetic field - for single-core ones it is much stronger. If this factor is important, it is better to overpay and buy heating mats made from a two-core cable.
Another big plus is that if any part of this system breaks, the rest will work.
There is only one minus, but a big one - quite high cost.
Thermostats
Thermoregulator (thermostat) is a device designed to control the heating system. Allows each user to control the heating temperature level, reducing or increasing it at will.
In the modern market, accessories of this type are offered in a wide range by various brands. The cost of devices largely depends on the country of origin. The cheapest models are made by China; in the middle price segment, products from Belarusian and Russian enterprises predominate, and the highest prices are asked for products from Danish, Finnish and Swedish brands.
Another cost component is the type of thermoregulatory device. Simple and unpretentious devices with a minimal set of functions will cost the client significantly less than ultra-modern programmable models with an extensive package of capabilities and a memory base that allows you to set the desired heating mode for 3-7 days.
The third pricing factor is the management method. Today, mechanical, wireless, push-button and touch-sensitive thermostats are available for sale. The more complex and sophisticated the design of the device, the more money you will have to pay for it. You can find a mechanic for a fairly budget price, but a modern touch-screen version with the ability to program the system on/off several days in advance will cost a tidy sum.
Before purchasing a thermostat, the user must clearly decide which functions of the device will be used regularly and only then make a choice. There is no point in overpaying for unclaimed features.
Infrared carbon floors
Infrared floors consist of heating elements filled with a carbon mixture and fixed to a polypropylene base. When exposed to current, carbon emits heat waves with a length of 8–14 microns; the waves pass through the floor covering and warm up the objects in the room (the air only slightly). A room heated by an infrared carbon floor is always very comfortable - there is no dry air, which is why we suffer so much in winter.
RavaFORUMHOUSE Member
It heats up objects: tables, stairs, walls, that’s the whole point. You open the windows wide, ventilate, and when you close everything, it’s warm again. Because not only the air is warm, but everything around it.
Infrared floors are not afraid of frost: you can come to a cold country house in winter for the weekend after a week of hellish minuses, turn on the system and it will work normally, and a comfortable temperature will be established very quickly (the system enters operating mode in 5-7 minutes, but it also cools down such a floor immediately).
Film and rod floors have their own characteristics.
| Film floor | Rod floor |
| Installed without wet processes, on a dry, flat surface under the finishing coat. Installation is quick, with the ability to dismantle the system and use it again. | Laying is carried out in a screed or a layer of tile adhesive (2 cm) with mandatory thermal insulation of the rough base. Foil materials are not allowed for the coating substrate. |
| It is not recommended under carpet, carpet tiles, linoleum on felt - these coatings reduce the heating efficiency several times. Parquet and solid boards are possible if the operating temperature of the system is not higher than 28 degrees. | Self-regulating system: if the floor temperature rises in the area under the furniture, the power consumption of the heating elements decreases. And vice versa. |
| It can be cut into pieces and placed arbitrarily - this allows you to heat only some local areas of the room: passages, places where children play, etc. | A core floor can be installed in any room; large furniture and equipment can be placed on top. |
| If any section breaks, the floor will work as before - you won’t even notice it. | Thanks to the parallel connection scheme, the system will operate stably even if several heating elements fail. |
Heating coatings of this type are used to heat stairs and porches in private homes, to prevent the formation of ice.
General requirements for installation work
There is one very important rule that applies to any heated floors - the horizontal surface must be ideal. This must be ensured even before the installation of heat insulation and other work begins. And the reason here is that if the floors are leveled with a screed on top of the cable, then a very unpleasant situation can arise when in different corners of the room the thickness of the screed will be different. As a result, to heat the surface, the cable will work in opposite corners of the room with different intensities. This situation very quickly leads to equipment failure.
Leveling the floors is carried out with a cement-sand screed with a minimum thickness of 4 cm. Please note that the time for the screed to fully mature is calculated using the formula 1 cm thickness - 1 week. To speed up the process, you can use quick-drying mixtures that gain full strength at a thickness of up to 10 cm within 2-3 days.
Attention: all further instructions will assume that the floors in the target room are leveled horizontally.