A simple DIY boiler. Ordinary boiler
First, let's look at how to make a simple wood-burning boiler with your own hands. The model consists of two cylinders placed inside each other. The first is used as a firebox. When positioned horizontally, it can be lined with fire-resistant bricks from the inside.
The second acts as a convection carrier or is used to heat the coolant. Firewood is placed directly into the firebox.
Available materials
To reduce the amount of welding work, you can use a thick-walled pipe or barrel. It is also possible to use other available materials.
A rectangular firebox welded from a thick sheet can be easily placed inside a cylindrical container.
Design Features
The wood-burning boiler is equipped with a vent for fresh air and a chimney for exhaust gases. The ash pit is located at the bottom of the chimney and allows the bottom row of wood to smolder, generating additional heat. Firewood is placed in homemade boilers through the top. A special hatch is prepared for this purpose.
To ensure that each pile of firewood burns for as long as possible, a special load is often provided, shaped like a disk with blades and a hole with a diameter of 20 mm. When the load is pressed, the burning fuel is compressed. In this case, the volume of incoming air is significantly reduced, since it can only pass through the existing hole.
Connection method
Such a boiler can be connected to the heating system in two ways:
- cutting water pipes directly into the barrel. Circulating between the pipes, it will heat up, so that later, when it enters the heating system, it heats the radiators;
- cutting the chimney into the coolant tank. Exhaust hot gases will enter the container, gradually heating the coolant.
Installation and commissioning
Installation conditions for long-term, safe operation of the boiler are as follows:
- Solid foundation. A reliable option is a concrete floor.
- Effective ventilation.
- Safe chimney - insulation of the passage in the ceiling or wall.
- Protecting adjacent surfaces from fire - attaching durable, non-flammable, heat-insulating materials to them.
The housing is installed strictly vertically, the chimney pipe is installed coaxially with the receiving pipe of the main channel, excluding a reverse slope, otherwise a loss of draft is possible.
The heat exchanger is connected to the heating system and filled with water. Check the tightness of threaded connections and welding seams. All that remains is to light the boiler and monitor the heating system until the fuel burns out.
For safe operation of the boiler you need a solid foundation.
Premises requirements
The operation of the boiler provokes the appearance of dust. Brief emissions of smoke may occur.
Therefore, a separate room is required:
- equipped boiler room;
- technical, utility space in the house.
Only with low power and an acute shortage of space is it possible to install the unit in a well-ventilated corridor. Free access for loading, servicing the boiler, and cleaning the chimney is important.
Do-it-yourself water heating boiler using wood. Welding a wood-burning boiler - self-installation
The simplicity of the process also lies in the availability of materials and tools for the job. Welding skills will be required. So what you need:
- An old fuel barrel or a self-welded box. The container is pre-burnt from the remaining oils - filled with firewood and the future boiler is melted.
The future housing must be airtight - this is checked at the burning stage. If there are minor defects in the form of holes, then they are welded and the barrel is filled with water - there should be no leaks.
Sheet, thick-walled metal. The heat exchanger will be made from it. By the way, an alternative replacement for this is old, outdated cast iron radiators. Five to six sections will be enough for the body.
Profile pipes. They will be needed to make the chimney and assemble the frame on which the boiler will be mounted. The diameter and thickness of the walls must be impressive to support the weight of the boiler filled with fuel and water. Grate bars, dampers, and doors are purchased. If the room is large or the building has two floors, then a circulation pump will be required - without it the carrier will not rise to a height, and there is a risk of the system defrosting in cold weather. It’s a good idea to install a pressure gauge and thermometer on the finished boiler to monitor the pressure and temperature of the medium. For piping, you will need metal-plastic pipes and radiators - wood-fired heating boilers with a water circuit are unacceptable without this.
Operating principle of the boiler
First of all, let's understand how exactly firewood and other types of solid fuel can be made to burn longer? The first thing that comes to mind is to increase the volume of the stack, that is, to make the firebox more spacious.
Indeed, if an ordinary boiler with a power of 20 - 22 kW is equipped with a firebox with a volume of slightly more than 50 liters, then for devices with long burning at the same power this figure reaches 100 - 150 liters, and for some “mastodons” - more than 250 liters .
Long-burning boiler Bourgeois - operating principle
But a simple experiment will show that this measure by itself will not give a positive result; you need to come up with something else. There are several options.
Provide the boiler with forced air supply (fan)
The idea is as follows: the boiler burns as usual, but when the coolant temperature reaches its maximum values, the air damper is tightly closed. At the same time, the heat in the fuel is barely warm - the boiler goes into standby mode and produces almost no heat.
When the coolant temperature drops to a certain value, the damper opens.
But in order for the wood to flare up again, air must be supplied forcibly, because there is almost no draft. This is why we need a fan. This solution has two disadvantages:
- the boiler requires power supply to operate;
- The design contains purchased components: a fan, a controller that drives it, and a temperature sensor (such kits are produced by many manufacturers).
Ignite the fuel not from below, but from above
This technology is called “top combustion”. The idea is simple: thanks to convective currents, the fire tends to move upward and is much less willing to spread downward, so that the fuel during the upper combustion will last for a longer period. To slow down combustion even more, air is also supplied from above - strictly into the combustion zone.
Convert solid fuel into gaseous fuel
A very effective, but at the same time extremely simple solution.
No chemicals or sophisticated equipment are required.
It turns out that if firewood or other organic matter is heated to a high temperature with limited access to oxygen (so as not to catch fire), they will begin to decompose into various gaseous substances (this mixture is called wood gas), many of which are capable of burning.
Thus, the boiler furnace will need to be divided into two parts: in one, gas generation (pyrolysis) will occur, in the other, wood gas combustion will take place.
This scheme will not only allow the boiler to operate longer on one charge, but will also ensure more complete combustion of wood (higher efficiency and relatively cleaner exhaust). And there is very little ash left in gas generator boilers.
Solution 5. Kitchen interior: how to hide communications
Solving the issue of camouflaging the body is half the battle. Communications coming from the appliance spoil the interior of the kitchen no less than the boiler itself. Gas pipes, water hoses, and a bulky chimney are an integral part of the unit and remain visible.
You can decorate communications with a box. To do this, purchase a plastic one of the required size or make it yourself from drywall. The second method has a more solid design, which can later be covered with decorative film or covered with tiles.
Chipboard box for pipes and hoses
The gas pipe is usually hidden by furniture and only a small part is visible between the shelf and the desktop. This place is covered with chrome paint or decorated in any of the ways described above.
Corner elements of communications are successfully masked in different ways:
- artificial flowers;
- dummies of fruit;
- hanging panels;
- painted over to match the interior.
Brick chimney: pros and cons
The traditional option remains in demand, despite the emergence of more modern models. The indisputable advantages of this design can be considered:
- Long service life. It will last at least 30 years.
- Relatively low cost, especially compared to steel or ceramic counterparts.
In addition, a brick chimney is a traditional architectural element of a home that is not only functional, but also beautiful. Some types of roofing, such as tiles, work well with it.
Instagram bannie_chertogi
A brick chimney can decorate a building
- Country cottage area
Do-it-yourself outdoor stove: features of different types and construction tips
The system also has disadvantages, and significant ones. Its mass is very large, for this reason it is necessary to build a reliable foundation. It must withstand significant load. Construction is quite complex and time-consuming, while steel parts are much easier and faster to install. But this is not all the disadvantages. The internal cross-section of the pipe has the shape of a quadrangle.
This is not good, since the optimal option in this case would be a circle. In the corners of the quadrangular chimney, vortices are formed, which interfere with normal draft and impede the movement of gases. In addition, the inside of a brick chimney for a gas boiler, like any other, is always rough, even if it is plastered. Soot is easily deposited and accumulated on such a surface, which leads to a decrease in the cross-section of the passage and a deterioration in traction.
And one more significant minus. Ceramics are sensitive to acid condensate and are quickly destroyed under its influence. The aggressive substance is formed in flue gases whose temperature is below 90 C. For traditional furnaces and boilers, this is irrelevant because the flow does not have time to cool down enough. But for modern economical models with low-temperature smoke, this is significant. In such cases, it is necessary to line the chimney, otherwise it will quickly become unusable. Sometimes, to simplify the work, a steel pipe is lined with bricks.
Instagram dachazhuk_
The brick smoke duct is only good for stoves with high smoke temperatures. For low-temperature models, the chimney is lined
- Baths, saunas, swimming pools
How to make a boiler for a bathhouse with your own hands
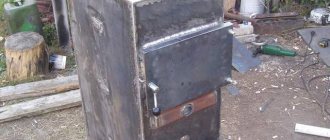
DIY solid fuel boiler
Let's look at the example of the most popular top-combustion boiler (Fig. 3). If necessary, the dimensions can be changed in proportion to those indicated in the drawing. A distinctive feature of the design is the pipe, which serves as an air supply regulator and a heat exchanger at the same time. Gases released during the smoldering process of fuel rise upward and ignite in the upper firebox.
For manufacturing, the materials described in section 2 are required: pipes, sheet steel, angle, insulation, asbestos cardboard, electrodes.
The first stage of a homemade boiler includes the following steps:
- A cylindrical body is welded from a pipe with a diameter of 45 cm and a length of 150 cm.
- The bottom is covered with a circle cut out of sheet steel using welding.
- A rectangular hole is cut out in the lower diameter pipe (lower part) for the ash pan door. It can also be made from steel sheet or purchased ready-made to size.
- The firebox is located in the upper part; a rectangle is also cut out under its door. The door must be insulated with asbestos cardboard and asbestos cord around the perimeter. All doors must be closed with latches.
- A smoke outlet pipe is welded from a profile pipe, which will be inserted into the chimney.
Important! Due to temperature changes, moisture (condensation) will form on the surface of the pipe, leading to corrosion, so welding seams must be of high quality
- Legs from an equal angle angle are welded to the boiler body.
- Cut out the top cover with a diameter of 46 cm, which will fit on top of the cylindrical body.
DIY heat exchanger for a solid fuel boiler
The second stage is the production of the heat exchanger:
- A heat exchanger pipe with a diameter of 40 cm and a length of 130 cm is welded from a metal sheet.
- Insert it into a cylindrical body, fix a gap of 5 cm between the pipes, due to which a “water jacket” will form.
- The difference in the length of the heat exchanger pipes and the external one should be at least 20 cm. The pipe in the pipe is fixed by welding using prepared metal rings.
- Nozzles are installed in the upper and lower zones of the water jacket: one for supply, the other for outlet of coolant. To make them, a pipe with a diameter of 5 cm is used; a thread is screwed on the outside through which they will be connected to the pipes of the heating system.
- The distribution pipe through which air will be supplied is welded from metal of greater thickness than for the body and heat exchanger (at least 5 mm with a diameter of 6 cm). The length of the pipe is made 10 cm less than the length of the heat exchanger pipe (120 cm).
Important! The distribution pipe is located in a high-temperature zone and over time deforms and burns out, so metal with a thickness of 5 mm or more is used for its manufacture
- The pipe is inserted into a prepared disk with a finished hole. A metal steel disk with a diameter of 38 cm is welded to the pipe.
- At least 4 corners are welded to the base of the disk, acting as an impeller.
- A valve is installed to the top of the pipe for portioned air supply and a loop is welded on which a chain is fixed to lift the pipe.
Attention! To improve heat transfer, a forced-air fan is installed at the top of the pipe
How to assemble a boiler correctly
After completing the two main stages, they begin the final one.
The third stage is boiler assembly:
- Select a location for installing the boiler, check the level to ensure that there are no differences that could impair the operation of the heat generator.
- The cover with the distribution pipe is pulled onto the body, having previously laid an asbestos cord. The cover can also be welded to the body.
- The smoke pipe is inserted into the chimney.
- Through threaded outlet pipes, the boiler is connected to the heating system of the house.
- The system is filled with water and the operation of the boiler is checked when it is not fully loaded.
- If the test went well, the boiler is loaded at full capacity.
“Smoke stack” in section or “Where is the diagram, brother?”
This paragraph provides a diagram of a chimney for a solid fuel boiler - it is quite universal and can be used in many installation cases. This option is suitable for installation in any type of house, with any type of wall material - from brick and monolithic concrete to a wooden frame.
A typical chimney diagram for a solid fuel boiler implies the possibility of leading the chimney through the wall to the side and then upward, or through the ceilings vertically upward and then through the roof.
If we talk about the effective removal of flue gases from the furnace, the main factors influencing the efficiency of this process will be:
- Chimney height
- Chimney diameter
- Length of acceleration section
- Chimney insulation
These 4 points are important, the rest are optional.
Manufacturing instructions
When starting the production process, you need to start by preparing all the essentials:
- Pipes with the following diameters - 30 cm, 5-6 cm, 10 cm (the wall thickness of each is at least 3 mm)
- Steel sheet with a thickness of more than 4 mm
- Bulgarian
- Welding machine
- Hand tools
It is recommended to place the boiler on a level, hard surface. If such an installation will be installed at home in a boiler room, you should think about arranging the foundation, a few words about which will be said later.
Let's start making the boiler:
- Take a pipe suitable for its characteristics and cut off a piece from 70 to 100 cm. A short length will not allow you to load a sufficient amount of firewood, a large length will make loading extremely inconvenient
- Now you need to build a distributor. In order for it to move freely, its diameter is made 15-25 mm smaller than the main pipe
In the center of the circle you need to drill a hole with a diameter of 15 mm - air will flow through it into the combustion chamber. To ensure that the disk does not fit tightly to the panels and there is space for air circulation, it is necessary to weld an impeller to its inner side - several plates up to 5 cm high
A pipe with a diameter of 5-6 cm is welded in the center of the regulator, while its height is made 10-15 cm larger than the boiler. As mentioned earlier, it is recommended to make a damper at the top, which will allow you to adjust the draft at any time, thereby controlling the smoldering process. A door is cut out at the bottom with a grinder, through which ash will be removed
Also, the bottom is securely welded at the bottom of the boiler. At the top it is necessary to run a horizontal chimney pipe with a diameter of 8-10 cm and a length of no more than 40 cm (this is what is passed inside the heat exchanger)
The finishing touch of the design is the boiler lid, in which a hole is cut for the air intake pipe. It should lock the camera as tightly as possible
A good alternative to firewood is heating briquettes - see our review
Chimney and reflector
The walls of the boiler will constantly heat up and radiate thermal energy. If the installation is installed to heat a small room, reflectors should be placed around it - they will distribute the flow, increasing the heat flow inside.
If the oven will be located in a room where people are constantly present, you should think about their safety. One solution to the problem is to cover the structure with brickwork.
The chimney can be made from a 20 mm pipe. The horizontal straight section should be 5-10 cm larger than the diameter of the combustion chamber. It is necessary to take it outside with a minimum number of bends - 2 x 45 degrees.
A few other features:
- It is recommended to make the chimney collapsible so that it can be easily cleaned of soot 2-3 times a season
- The chimney sections must be connected in the direction opposite to the gas movement
- All structures and objects that are easily flammable must be kept at a safe distance
We are building the foundation
It can be assumed that a long-burning wood-burning stove will constantly heat up to high temperatures. A simple leveled floor is not the best solution for it - a foundation should be built.
The base can be made of burnt brick or rubble. They do not heat up when exposed to elevated temperatures. All those who want to make a more solid foundation can pour a solid monolithic slab.
The boiler can also be installed on legs, which can be easily welded from channel wood. They hide from view behind brickwork.
Using the boiler
Unlike a classic stove, air must enter a long-burning wood-burning boiler in a certain quantity. To achieve this, the filling must be done in full, trying not to leave any free cavities. It is recommended to add sawdust, pellets, peat or combustible waste to the logs.
Fuel must be added according to the following instructions:
- Remove the cap and remove the regulator from the tank
- Pack the fuel tightly
- Spray flammable liquid on top
- Install the regulator, cover with the lid and open the damper
- Throw a splinter into the air pipe and when it starts to smolder, close the damper
Let's sum it up
A simple long-burning wood-burning boiler is ready. You can install such a structure in any unheated room: from a small garage to a workshop. If everything was done correctly, there will be no doubt about the efficiency and high efficiency.
Sandwich installation diagrams
You can make a chimney from modular sandwich pipes in 3 ways:
- The vertical part is located on the street, attached to the outer wall of the building. The horizontal chimney crosses the external fence, enters the house and is connected to the boiler (stove) pipe.
- The vertical smoke channel passes through the roof, descends into the boiler room and ends with a condensate collector. The heat generator is connected to it by a horizontal pipe.
- The trunk again crosses all roof structures, but is connected to the heater directly, without a pocket or horizontal sections.
Installation diagram of a wall chimney (left) and an internal duct passing through the roof (right)
The first option is suitable for ready-made houses of any type - frame, brick, log. Your task is to place the boiler against the outer wall, take the sandwich outside, and then secure the main pipe. In terms of financial and labor costs, this is the most profitable way to install a chimney.
Installing a modular system according to the second scheme is much more difficult. In a one-story house, you will have to go through the ceiling and roof slope, arranging fireproof cuts. In a two-story house, the piping will get inside the room and make you think about decorative cladding. But you won’t need to go around the roof overhang and secure the end of the chimney with guy wires.
The latter option is suitable for sauna stoves and fireplace inserts. The former get very hot and practically do not condense, the latter are hidden behind a fire-resistant plasterboard finish. To organize cooling of the sandwich channel, ventilation is provided in the space between the lining and the pipe. The photo above shows convection grilles that remove heated air from under the fireplace insert casing.
Correct installation of the boiler: step-by-step instructions
Many consumers, purchasing a solid fuel boiler and expecting from it the effect of long-term and economical burning of raw materials up to the stated up to 7 days, after some time pay attention to the fact that the device does not provide the declared efficiency. And the point here is not at all the poor quality or defective boiler, but the mistakes made during connection
Do-it-yourself TT boiler installation
Of course, given the complexity of the design and the responsibility of this event, many entrust the installation of a long-burning TT boiler to craftsmen. However, following our detailed step-by-step instructions, you can install the boiler yourself, without outside help. Although you can’t do this without an assistant, because the device weighs at least 50 kg.
At the stage of preparatory work, you should immediately think about where the boiler will be installed. Ideally, of course, to equip a separate boiler room.
boiler room in a private house
Considering that solid fuel does create some dirt, such a heating system should be installed in a separate non-residential building. But if the boiler power is small (does not exceed 30-35 kW), then you can simply separate (zone) the main room from the “boiler room”.
Ventilation diagram in the boiler room
To ensure that people servicing boilers and igniting them do not have breathing problems, the boiler room must be equipped with a ventilation system. Clean air must come from the street.
Prepare the following tools:
- Locksmith set (adjustable, open-end, ring wrenches).
- Building level.
- Circular Saw.
- Screwdriver and set of bits.
- Marker.
- Caulk gun.
Locksmith tool set
In addition to the solid fuel heating boiler itself, you will also need to purchase materials to connect the boiler to the heating system.
- Steel coupling (3 pieces).
- Ball valve with drive (2 pcs) with a diameter of 50 mm.
- Metal pipe for connecting the boiler.
- Sealant (fireproof).
- Plumbing winding.
Stage 1. Preparing and protecting the premises.
The issue of fire safety should be approached with all responsibility.
- We decide on the place where the boiler will be located. If an outdated model is being replaced in a house with a more modern and efficient one, then the place along with the chimney has already been prepared. If the heating system is designed from scratch, then you should immediately consider the gas exhaust system and the location of the boiler in the room. The location for installing the boiler should provide convenient operation and direct access. The room where the solid fuel boiler is installed must be non-residential.
- The base on which the boiler will be placed must be covered with a metal shield. In this case, the dimensions of the shield should be 25% larger than the device itself. If the power of the device exceeds 50 kW, then such a unit should be installed on a concrete screed foundation. As a rule, the height of such a foundation should be 100-150 mm above the floor level. In this case, the foundation must have a screed separate from the floor.
Installing the boiler on a metal sheet
When installing a low-power unit, it is allowed to install the boiler on a rough concrete screed.
Be sure to check the level of the foundation slope. It should be perfectly smooth. If necessary (if the floor is not level), a brick foundation should be laid.
- Draw a marker or chalk on the floor where you will install the boiler and carefully double-check all distances. Maintain distance from walls (regulated by SNiP). The distance from the combustion door to the wall must be at least 125 cm. The distance between the side parts and the back of the boiler and the wall must be at least 700 mm.
- Apply a layer of plaster 25 mm thick to the wall adjacent to the front of the boiler (where the firebox and door are located). Additionally, we install a metal sheet at a level 25-30 cm above the boiler.
- Remove the new boiler from its original packaging.
- Place the boiler on the prepared foundation and again check with a level how level the device is. The gas outlet pipe must be at the same level as the chimney pipe. If the line is not smooth, traction may be disrupted during operation.
- Insert all the necessary boiler elements supplied separately (ash pan, doors).
Fire safety standards
Chimney connection
The chimney is connected to the boiler through the acceleration section. It is recommended to install it at an angle of approximately 60⁰ to the horizon to eliminate sharp transitions that slow down the smoke.
During installation, the connection is directed upward, from the combustion zone to the hood. The cross-section of the acceleration section must correspond to the outlet in the boiler. The upper end of the connecting unit is inserted into the chimney. All joints are sealed with heat-resistant materials.
What is the real efficiency of solid fuel boilers
Manufacturers of heating equipment, in particular solid fuel boilers, offer a wide range of products with different characteristics.
Based on the design of the solid fuel boiler, all products can be divided into the following groups:
- traditional heating units;
- wood boilers with pyrolysis type of combustion (gas generator);
- long burning;
- pellet
A traditional solid fuel boiler, including a homemade one, in appearance resembles a stove or potbelly stove with the most necessary elements - a combustion chamber, a door, an ash pan and a chimney. Using the ash pan, you can regulate the draft by opening and closing the damper. Such designs are considered quite reliable because they do not contain any technological elements, such as temperature sensors or thermometers, an automatic control unit or electronics. In this case, the main design element of a solid fuel boiler is a heat exchanger that transfers thermal energy to the coolant. The heat exchanger can be tubular or made in the form of a container made of solid steel sheets.
There are, however, more complex devices that can also be classified as traditional. They are equipped with baffles and throttle valves to make it easier to regulate the draft, and the hot air travels a greater distance before exiting the chimney. Such partitions significantly increase the efficiency of the boiler, since more thermal energy is transferred to the coolant, and does not just “fly out into the chimney”. You need to understand that boiler efficiency is a very important indicator.
For such boilers, you can use almost any fuel - wood, coal, pellets and even garbage. The main thing is that it is as dry as possible. In terms of performance, boilers of simple designs can hardly claim 50% efficiency, and in most cases it is only 15-20%. The problem is that the fuel burns too quickly, without having time to transfer all the thermal energy to the water in the heat exchanger. As a result, more heat is simply released into the chimney or its excess causes the coolant to boil. For example, firewood needs to be added to the firebox every hour, and coal will last for 2-4 hours, but it still burns with excess energy and large heat losses.
Useful tips and general recommendations from experienced craftsmen
For long-term stable operation of the heating system with a homemade boiler, it is important to remember that:
- Gaskets and latches that seal open lids and doors improve installation efficiency.
- If a wood-burning boiler is used in conjunction with an electric one, the damper on the chimney will reduce heat loss.
- Automatic control increases the operating comfort of the unit.
- Installation on a concrete floor eliminates distortions and ensures the durability of the heat exchanger pipes.
Accurate and high-quality in-house execution is important to obtain an equivalent alternative to factory assembly.
System inertia
Another disadvantage of a solid fuel boiler is hidden in the cyclical nature of its operation and the inability to independently replenish fuel reserves. Because of this, either a high heat capacity of the house structure itself is required, or solid insulation, close to a passive house, or a way to store a reserve of heat for the period of cooling of the system.
Since the volume of the heat exchanger itself in the boiler is small, the displacement of the system can be increased mainly by increasing the diameter of the pipes. Another alternative of this kind is the installation of a heat accumulator. With the right approach, it is possible to realize heat accumulation only after heating the main system, which will help speed up the heating of the house and solve the problem with condensation.
Underfloor heating systems have their own high inertia, which increases with the thickness of the accumulating screed. With a thermal cut-off under the floor, this can be a truly long-term heat source. With a sufficiently thick layer, even the use of water at a higher temperature will not cause discomfort and thermal zebra, but along with the inertia of the system, the time it takes to reach the operating mode increases. On the other hand, connecting a heated floor to a wood-burning boiler requires a rather complex piping that prevents overheating of both the boiler and the pipes in the floor.
Advantages of a brick chimney
A chimney made of bricks is most often mounted on a stove, taking into account its advantages such as:
- the ability of the material to resist fire;
- duration of operation;
- ease of brick laying;
- no need for specialized maintenance;
- easy repair.
A brick chimney can withstand high temperatures, but relatively often gets clogged.
A brick chimney can also be characterized on the negative side: it is rough inside and therefore quickly becomes contaminated with soot, the accumulation of which negatively affects the draft force. The disadvantages of a brick chimney also include its heavy weight, which often requires placing the stove on a separate base.
How to do it yourself?
You will need iron sheets and pipes with a metal thickness of at least 4 mm. It’s better if it’s 6-8 mm and heat-resistant grades.
The simplest design is a vertical pipe 0.8-1 meter high. An ash pit with grates is installed at the bottom, and a self-lowering air distributor with a pipe for feeding the combustion chamber with oxygen is installed at the top. Ideally, you should make double walls; the boiler will last longer with them.
The heat exchanger can be made:
- in the form of a coil in the upper, hottest part of the boiler;
- making a water jacket around the entire firebox (inserting another pipe inside with a diameter 5-10 cm smaller than the main one, and filling the space between them with water);
- or by forming it around the chimney pipe immediately behind the firebox.
Design Feature
Any long-burning boiler is equipped with an impressively sized chamber into which fuel is placed. The larger the chamber the boiler is equipped with, the longer the wood will burn.
Today you can find two technologies implemented in long-burning TT boilers, which successfully compete with each other. This is the Buleryan principle and the Stropuv method.
Due to the high price of Stropuv and the complexity of the design, this method is not so popular in Russia. But using the Buleryan method, craftsmen with great dedication construct units for heating dachas and country houses.
Boiler TT diagram
A boiler using the Buleryan method looks like this: a metal body, inside of which there are two chambers. In the lower chamber, fuel is burned, and in the second, gas flowing through the tube from the first chamber is burned.
The door for loading fuel is located in the upper part of the boiler body, since the entire lower part is reserved for a large storage of resources.
At the top of the boiler there is a smoke pipe, which connects to the chimney. An ash chamber is built into the lower part, through which the boiler is cleaned.
One more nuance should be mentioned. In standard furnaces, the ash pan acts as a blower through which the air necessary for combustion is blown in. Here the ash chamber is absolutely sealed, since air enters through the upper air chamber, which plays the role of a recuperator.
The supply of oxygen to the boiler is regulated by a damper located at the top of the air chamber. As the wood burns, the fuel gradually settles and the distributor lowers. This ensures a continuous supply of oxygen.
When loading fuel again, simply pull it up and return it to its original position. By the position of this lever, you can easily determine how much fuel is left in the boiler and when to load it next.
Separately, it should be said about the environmental friendliness of this heating option. Due to the complete combustion of fuel and gases, virtually no carbon dioxide is released into the atmosphere.
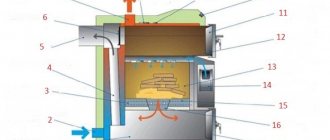
Main elements of long-burning TT boiler
Main elements of the TT boiler:
- Combustion chamber. This is the main element of any boiler and furnace where direct combustion of fuel occurs.
- Gas combustion chamber. Hot gases from smoldering wood enter here.
- Ash pit - ashes are collected here. This unit must be systematically cleaned to maintain the boiler in good technical condition.
- A chimney is a unit through which combustion products are discharged outside.
boiler device
All these components are enclosed in a steel case, which is made of sheet metal 5-6 mm thick.
Material for heat exchanger installation
You can make a boiler yourself if you choose the right materials. It is necessary to take a responsible approach to the choice at the stage of creating a heat exchanger. The combustion process involves high temperature, which affects the condition of the metal.
Cast iron
This is why modern builders rarely use cast iron. There are many reasons for this and the main ones are:
- Low efficiency indicator. A cast iron boiler element will practically not be able to heat even water to the required temperature.
- Low heat transfer rate. A cast iron product is not capable of transferring heat into the room as correctly as possible. Instead, it evaporates to any other place.
- Modern boiler design implies minimal weight of the finished structure. Using cast iron will not achieve the required characteristics.
A striking example will be the cast iron section of the radiator for heating in the house, which was used during the Soviet era. Its area is quite small and is approximately 0.25 m2. To ensure high-quality heating of the room, you will need a structure that is equal in area to 3 square meters. The twelve individual parts of the battery are quite large and heavy, and now you just have to imagine the design of the boiler.
Floor load is also taken into account in the rules and regulations. If the boiler is made of cast iron, then the weight of the product will require the construction of a special foundation. By means of exclusion, we can achieve results about the construction of gratings and cast iron, but not as a heat exchanger itself.
Steel
A modern solution is to create a boiler heat exchanger in production using specially hardened and treated steel. Unfortunately, it is not possible to create such material at home. You can process standard steel with your own hands. But this material, already at a combustion temperature of 400 degrees Celsius, begins to corrode.
The only option is to create a boiler heat exchanger from steel, but gradually increase the temperature load. It should be gradually heated so that the steel lasts for a long period of time without the need for replacement.
A boiler with a steel heat exchanger will ideally transfer heat into the surrounding space, rather than carrying it away into the chimney. This allows us to talk about an excellent efficiency indicator. On the other hand, a problem arises: the structure should not cool too quickly. If the readings drop below 65 degrees Celsius, acid condensation will begin to accumulate in the pipe. It can damage a cat's pipe in a matter of hours. There are two ways to correct this omission:
- If the boiler is no more powerful than 12 kW, then a special valve should be built in it, which will control the operation of the reverse process and supply.
- In case of increasing power, it is necessary to create a special elevator unit. In this case, the operation of the boiler will involve constant overheating of the water.
70 degrees Celsius
A boiler with an elevator unit has a special specificity of operation, namely the reverse of the technology of using the valve described above. During the combustion of fuel, the water here heats up to 120 degrees Celsius. Thanks to the pressure, it does not boil. The combustion temperature should increase, and during the return flow of water it mixes with hot water, thereby increasing its performance and reducing the risk of harmful deposits forming on the pipes. It is difficult to create something like this with your own hands.
A prerequisite in both cases is the installation of a boiler system with circulating water. The structural features of such a product with long burning make it possible to build it with your own hands for household needs. In this case, you can use a water pump, which will be powered not by electricity, but from another source.
The choice of material depends on the personal views of the builder's design. In some cases, there is only one metal at hand, and therefore it remains to work with the available material.
Stabilizer draft limiter in the chimney
The valve is a limiter, a draft stabilizer in the chimney.
The opening force of the valve is regulated by moving the weight below. to install an automatic limiter or draft stabilizer in the chimney . A draft limiter is a valve that is installed in the chimney. During draft surges, the valve opens under the influence of a pressure difference and lets cold air from outside into the pipe. The intake of cold air reduces the draft in the pipe. Automatic draft limitation stabilizes the boiler operating mode.
Three options for installing a draft stabilizer valve in the chimney
The valve must be placed in the same room as the boiler. On sale you can find valves for different chimney designs. Home craftsmen come up with designs and make them themselves.
How to make a long burning boiler
This group includes heat generators with a firebox, the dimensions of which are increased compared to ordinary models. A larger amount of solid fuel ensures a longer combustion time and a larger volume of heat generated. Manufacturers offer ready-made boilers with the following indicators for the duration of fuel combustion until the next fuel filling:
- firewood and wood industry waste – up to 12 hours;
- coal - up to 24 hours.
Other alternative fuels are used for heating:
- briquetted peat;
- bagged pressed wood waste – sawdust, shavings, bark;
- birch charcoal;
- packaged landfill waste products.
Reference! The cheapest fuel is considered to be ordinary sawdust, provided that its moisture content does not exceed 20%.
You can make a boiler with the same operating parameters yourself. When starting work, you need to decide on the characteristics of the future unit. The following are considered significant parameters for boilers:
- power;
- burning duration;
- coefficient of performance (efficiency);
- maximum permissible operating pressure;
- nominal pressure in the system;
- total and useful volume of the firebox;
- firebox depth;
- maximum log length;
- volume of the tank;
- boiler weight.
These parameters will be individual for each type of boiler.
Reference! The heating area depends on the boiler power. A boiler with insufficient power will not be able to heat the entire building completely.
The operation of this type of heat generator is based on the physical property of the heat generated during fuel combustion being transferred to a heat exchanger. The method of heat transfer depends on the design of the heat exchanger.
The duration of combustion is affected by:
- fuel tank volume;
- the degree of isolation of the chimney draft from air entering it (solid fuel in the firebox should smolder slowly and not flare up).
The manufacture of a boiler begins with the choice of its design and the problem it must solve:
- For small premises (garage, country house, outbuilding), a simple boiler without a water jacket is suitable, operating on the principle of an ordinary furnace, when heat is transferred through the walls of the structure by convection of thermal air.
- To heat a house, a more complex and reliable design is required. In this case, it must be taken into account that the heat generator will operate continuously over a long period of time.
Depending on the location of the firebox, boilers are:
- with top combustion;
- with lower combustion (less productive in terms of loading volume and burning time until the next filling).
According to the body shape:
- cylinder;
- rectangle.
Required materials and tools
The first stage of work is the procurement of materials and components. To work you will need:
low carbon steel 3-4 mm thick;
Important! Steel grades St 35 and higher are unsuitable for conventional welding due to the high carbon content
- pipe DN50, 150 – for models with a tubular heat exchanger;
- rectangular pipe 60x40 mm - for making an air channel;
- equal angle corner - for grates;
- steel strip 20x3 mm;
- basalt insulation 2 cm thick (density not less than 100 kg/m³);
- metal sheet (can be coated with polymers) 4-5 mm thick - for making doors;
Attention! You can buy ready-made cast iron doors, matched to the size of the firebox
- asbestos cardboard - for thermal insulation of doors;
- asbestos cord;
- electrodes;
- control Panel;
- fan;
- temperature sensor;
- door handles.
Reference! The control panel, sensor and fan will be used to automatically control the operation of the boiler.
Basic tools you will need for work:
- Bulgarian;
- grinding wheels;
- welding machine;
Attention! It is better to cut the metal sheet into blanks using guillotine cutting in the production workshop. Hand cutting takes a long time and requires additional sanding of the cut edges
- drill;
- roulette;
- marker;
- calipers;
- compressor (for boiler testing).
Conclusion
A solid fuel boiler needs a properly installed chimney. In this case, it will be able to work as efficiently as possible - burning all the fuel and transferring the required thermal energy to the coolant.
Often, homeowners choose a brick chimney, although its laying requires a lot of effort and time, but it fully copes with its task for a long time. The video in the article will help you find additional information on this topic.
Did you like the article? Subscribe to our Yandex.Zen channel
Pyrolysis boilers - we get gas from firewood
Pyrolysis boilers for the home operate on the same solid fuel, but use a completely different operating principle, delivering an order of magnitude more thermal energy and heating the house on one bed many times longer. It is not surprising that such units cost one and a half to two times more than classic solid fuel devices. What's the trick? The essence of the operation of a pyrolysis (gas generator) boiler is the so-called dry distillation of fuel - under the influence of high temperatures and with a lack of oxygen, wood releases pyrolysis gas, and charcoal remains in the combustion chamber.
The pyrolysis reaction takes place at temperatures from 200 to 800°C, and this process occurs with the release of thermal energy, which is used to dry the wood and warm the air. Then the pyrolysis gas enters the combustion chamber, where it mixes with air and ignites - this is how the bulk of the thermal energy is obtained. It should be noted that during the combustion of pyrolysis gas, active carbons also participate in oxidation processes, as a result of which the smoke exiting the pipe contains virtually no harmful compounds and consists mainly of water vapor and carbon dioxide. However, CO2 emissions into the environment are three times less than in the case of using conventional wood or coal boilers. The pyrolysis unit will have to be cleaned much less frequently - in the process of such stage-by-stage combustion of fuel, a minimum of ash and soot is formed, almost everything burns out.
In addition to the advantages associated with high efficiency, it should be noted that high temperatures can be obtained even from wet wood. Secondly, the combustion processes of pyrolysis gas are easily controlled by automation, which allows timely regulation of combustion intensity and saving fuel.
The maximum power of pyrolysis units is achieved when using dry wood (10–20% moisture content). In general, the use of raw fuel reduces the boiler power by almost 50%, while fuel consumption doubles. Is it possible to make a pyrolysis boiler for your home with your own hands? This is not only difficult, but also dangerous - errors in the design can even lead to the explosion of such a homemade unit.
Semolina casserole with pumpkin and dried fruits
If children do not want to eat healthy pumpkin, you can hide it in a delicious semolina casserole. Dried fruits in the recipe are not only a “zest”, but also additional vitamins. If desired, they can be replaced with pieces of fresh fruit. For example, pear and apple, plum and peach are suitable. Any combination of fruits in semolina dough will be useful.
Ingredients:
- 200 g semolina;
- half a glass of milk;
- 50 ml filtered water;
- 25 g butter;
- 60 g pumpkin;
- 1 tbsp. l. Sahara;
- a pinch of salt;
- 100 g of any seedless dried fruit (dried apricots, prunes, raisins, dogwood);
- two raw chicken eggs;
- 50 g of premium wheat flour;
- 11 g baking powder.
Cooking method:
1. Rinse in warm water and soak dried fruits. Cut them into small pieces (except for raisins, do not cut them).
2. Cook semolina porridge in a saucepan. To do this, mix water with milk (take cold), add semolina and butter. Add sugar and salt. Stir and leave for now.
3. Peel the pumpkin and grate it on a fine grater or, using a blender, grind it into puree. Add to porridge.
4. Place the pan on the fire and, constantly stirring with a whisk or tablespoon, bring the porridge to a boil. Remove from heat and cool for a few minutes, stirring with a whisk.
5. Add eggs, flour and baking powder to the porridge. Stir until smooth and add dried fruits. Mix again.
7. Place the semolina porridge casserole dough on a baking sheet lined with paper or foil. If desired, grease it with additional oil.
8. Place the dish to bake until done.
You can serve semolina casserole with pumpkin and dried fruits with a glass of milk or a cup of tea. Casseroles prepared according to these recipes will become your favorite breakfast. It’s easy and simple to delight your loved ones with a new casserole recipe every day. Just write down the recipes and create amazing desserts from ordinary semolina!