In any apartment a situation arises when it is necessary to replace the old faucet. Calling a specialist costs money. And you can do this simple job yourself. Connection options are studied in advance before the faucet is installed on the sink. Choose between rigid wiring or flexible wiring. Installing the faucet on the sink in one way or another depends on the model of the water distribution mechanism.
For example, it is recommended to choose a single-lever kitchen faucet with a high spout. We must not forget about the size of the washbasin. If the washbasin does not match, then drops of water will fly in different directions. The small size of the spout reduces the power of water pressure. For exclusive models, the installation method may differ from standard ones. Each device is supplied with instructions from the manufacturer for its installation.
When you can't do without replacing the faucet
Not all crane breakdowns require replacing it with a new model. Sometimes repairs can be made and the device functions well. But there are breakdowns that cannot be repaired.
- A broken faucet does not stop the flow of water. The water in the tap does not shut off in the “closed” position.
- A clogged faucet aerator significantly reduces the water pressure when supplied.
- The service life of a water hose is from 3 to 7 years. It is called an unreliable place, and it breaks and leaks.
- The faucet's attachment to the sink has broken and it's wobbling.
The listed breakdowns can be repaired, but it will be so problematic that it is better to install a new device.
- The device case burst.
- The model simply fell out of favor and seems outdated to the owners.
In this case, repairs will not help at all. A new mechanism is being installed.
Attaching the shower head holder
How to attach the holder to the wall depends on what material it is made of. If it is concrete, then dowels and screws will be required. Installation steps:
- Mark the location of the fasteners on the wall. A pencil or marker is suitable for this. The holder must be placed at the installation site at the required height and marks must be made through the holes for fasteners. To prevent the drill from sliding on the surface of the tile, you need to slightly damage the smooth coating of the tile using a self-tapping screw or a pobedit drill. It should be placed in the center of the mark and knocked down with a hammer.
- Drill holes and insert dowels into them.
- Secure the watering can holder with self-tapping screws.
Installing a holder in a plasterboard wall lined with tiles is more difficult - you need to know the location of the rack profile or mount it in advance, at the stage of constructing the partition. Only in this case is the secure fixation of the holder guaranteed. The first two stages of installation in drywall are similar to mounting on a concrete wall. You only need to drill the tiles and the adhesive layer. In this case, the holder is attached to metal screws with fine threads.
This completes the self-assembly and installation of the faucet in the bathroom. All that remains is to turn the water supply valve and use the device for its intended purpose. If all the work is done correctly, the tap will not leak for a long time.
Advice! If you need bathroom renovation specialists, there is a very convenient service for selecting specialists from PROFI.RU. Just fill out the order details, the experts will respond and you can choose who to collaborate with. Each specialist in the system has a rating, reviews and examples of work, which will help with the choice. Looks like a mini tender. Placing an application is FREE and does not oblige you to anything. Works in almost all cities of Russia.
If you are a master, follow this link, register in the system and be able to accept orders.
Tips for choosing a faucet
- The water distribution mechanism is easier to install and replace later without removing the sink if it is selected with two pins instead of one large nut. Models whose price is average and above average are usually attached with pins. They can be installed and dismantled without disturbing the position of the washbasin.
- A cheap faucet comes with unreliable hoses. It is recommended that you purchase new hoses before installing the faucet on the sink. This will help avoid having to replace them quickly.
- An easy way to choose a reliable faucet is to choose by weight. Several models are selected and their weights are compared. The heaviest mixer will be made of brass. The rest are made of aluminum and its alloys.
- Non-standard models are more difficult to repair, as there may be problems with spare parts. Then only installing a new mechanism will help correct the situation.
Problem #1: choosing a new device
Before installing a faucet in the bathroom, you need to buy it. It seemed like nothing complicated, but when I went to a plumbing store, I changed my mind about this. I’ll try to make the task a little easier for you and describe the main criteria that you should pay attention to:
Three main components of the optimal choice
Material
In general, the materials for the faucet can be steel, glass, fiberglass, ceramics, plastic and even granite. But the most popular are the following two options:
- Brass . A brass device has a decent weight and a relatively high cost, but it has high strength properties and excellent resistance to various types of chemical influences. Having made such a purchase, you do not have to worry that the thread will crack during the process of tightening the nuts, and the gib will break off as a result of careless handling;
- Silumin . It is a very cheap alloy of aluminum and silicon. Models made from it are light and fragile. Such a choice cannot be called reliable; by making it, you may end up not saving, but, on the contrary, ending up with even greater costs;
Beautiful and cheap, but absolutely unreliable silumin mixer
Externally, brass and silumin models can be very similar. To distinguish them, just pick them up and try them by weight. The heavy product is brass, the light product is silumin.
Control
Here you also have to make a choice in accordance with your financial capabilities and preferred functionality:
- Two valves . Just recently, this tap water mixing system had no competition at all. In it, each water pressure is provided with its own axle box, with the help of which its intensity is regulated. Replacing such parts in the event of their failure is easy to do with your own hands. Also, the advantages include lower cost and compliance with the classic style. The downside is the complexity of control, which eliminates the possibility of setting a weak flow of the desired temperature and requires the use of two hands;
Photo of a mixer with two taps
- One lever . Here, the connection of different water flows occurs using a special cartridge, which is easily controlled by just one movement of the hand. These are the models that are the most popular today due to the optimal balance between ease of use and price. By the way, I also settled on this option;
Single lever plumbing fixture
If you want to use water more economically, I recommend buying a two-stage model. In it, up to a certain moment, as long as the water pressure is not too strong, the lever moves easily; in order to open the tap completely, you will need to make a noticeable effort.
- Thermostatic control . One knob is responsible for the pressure force, the other for its temperature. Although such a system is not cheap, it completely eliminates the possibility of burns, which is of no small importance if children live in a home;
Thermostatic model
- Contactless control . In this case, to turn on the device, you just need to bring your hands to it, after which the infrared sensors will do everything necessary. But you should remember about the high cost of such equipment and the need to regularly replace batteries.
The touchless mixer is the most convenient to operate
Geometric dimensions
The height can be adjusted during installation, if, of course, you are doing it from scratch. If replacement occurs, then be guided by the location of the old device. But pay attention to the length of the spout so that the water flowing out of it does not hit the side of the bathroom , and at the same time, so that it itself does not interfere with your stay in it .
Selection of eyeliners
The tap is connected to the water supply system using flexible and rigid connections. Rigid hoses are reliable, and flexible hoses are easy to install.
The standard length of flexible hoses is 86 cm. This is enough to prevent the hoses from breaking. They are laid in a semicircle.
If the kit comes with short eyeliners, 30 cm long, then they will have to be sharpened. Extra connections and problem areas for leaks appear. Therefore, it is recommended to immediately purchase hoses of the required length. The eyeliner should not be stretched.
The compatibility of the mixer materials and connecting hoses is taken into account so that corrosion does not appear on the elements.
Preparation for installation
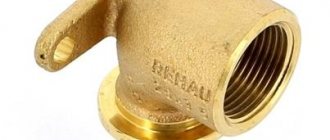
To install the mixer, you need to purchase a complete device. The set includes: body, spout, eccentrics, shower hose and watering can, fasteners, seals. The main thing you need to pay attention to when choosing a device is the distance between the centers of the fittings for connecting the water supply pipes. GOST 25809-96 provides a distance of 100 and 150 mm. Water pipes are not always routed perfectly, so eccentrics are included with the mixer; with their help, you can adjust the distance by 1-2 cm.
Adjusting the center distance using eccentrics.
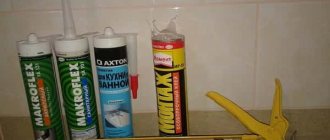
The only installation tool you will need is an adjustable wrench. And to waterproof the connections you need FUM tape, plumbing flax or thread.
Algorithm for removing an old crane model
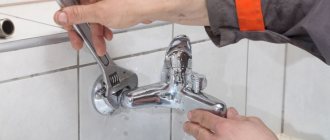
- Installing a faucet on a sink begins with shutting off the water supply in the riser. To make sure that it is absent, just open the tap.
- The old device is unscrewed from the hot and cold water pipes. After this, the threaded connection on the pipes is cleaned. If the threaded connections are stuck and they are difficult to unscrew, then the places are pre-treated with kerosene. After 20 minutes the thread unwinds.
- It is recommended to mark the location of the cold and hot flow pipes. Only after this is the eyeliner disconnected.
- The device is secured in place with a nut. It is unscrewed with a small adjustable wrench. Sometimes the mixer is secured with a pin or a pair of pins, onto which nuts are screwed for fixation.
Installation of eccentrics
The best option is if the water sockets are installed at a distance equal to the center distance on the mixer. Experienced plumbers recommend thinking about this at the stage of installing water pipes and using ready-made water sockets; all that remains is to secure them level.
A ready-made water socket will help you install the mixer evenly.
If the distance between the pipes is less or more than required, you can center the eccentrics. It is better to do this before winding. At the same time, remember the number of turns and orientation in space; it is better to mark it with a marker. This operation can cause you to lose a level. If the mixer deviates slightly from level, it will not be very noticeable. But moderation is important here. The device must not be installed too crookedly.
Next, the eccentrics need to be wrapped with FUM tape, flax or thread and screwed in. The part should fit tightly with force. First, screw in the eccentric by hand, then with an adjustable wrench.
It is better to check the tightness of the connection immediately rather than after installing the mixer. To do this, you will need plugs with rubber gaskets. You need to screw them onto the eccentrics and open the tap; if water does not drip, then the connection is reliable and you can continue working.
Plugs for checking thread tightness.
Before installing the mixer itself, it is necessary to seal the gap between the tiles and the water sockets with silicone sealant. This is important so that water flowing down the wall does not get behind the tiles.
Areas that need to be sealed.
Eccentrics can have different lengths; it is best to choose them so that after installing the mixer, the eccentric thread is completely hidden under the body of the device. If necessary, the eccentric can be shortened with a grinder, but only on the side that is screwed into the pipeline.
For some types of eccentrics, a hex wrench may be useful; instead, you can use a bolt with a suitable head and a gas wrench.
Types of eccentrics.
Installation of a new model
- Before installing the bathroom faucet in the sink, the device is assembled. At the initial stage, a flexible hose is screwed into the mixer. Particular care is taken when working with rubber cuffs. They are located on the eyeliner fittings.
- Before screwing them in, it is recommended to immerse them in water. The mixer is secured at the bottom with stud fasteners. A ring-shaped rubber seal is installed.
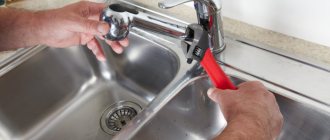
- In the sink, hoses with hot and cold water supply are threaded into the hole. After this, the crane is installed in its place.
- A clamping nut under the sink or under the washbasin secures the position of the tap. A rubber gasket is placed between the washer and the sink to prevent leakage. After this, the clamping nut is screwed onto the stud. The mixer takes a more stable position.
- The tap nuts are tightened carefully. After they are fully tightened, the faucet is fixed to the sink.
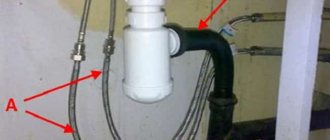
1 – fastening pin; 2 – hot water supply hose with red streak; 3 – cold water supply hose with blue streaks.
Installation of the new device ends with connecting flexible hoses to the cold and hot water supply pipes. The nuts for supplying the hose are screwed onto the threaded connection of the pipes of the water supply system. The nuts have rubber seals. Therefore, they are twisted without using force so that they are not damaged.
The threaded connection is covered with FUM tape. This seals all connections. After connecting the flexible line, a check is carried out to ensure that the work was done correctly and that there are no leaks in all places where the connection was made. The water supply in the riser opens and the mixer lever is moved to the “open” position. The absence of leakage confirms the correct installation of the faucet on the sink.
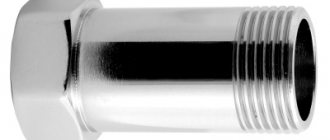
To prevent the surface of the mixer from being scratched during installation, it is recommended to cover it with regular electrical tape.
If the tightness of the connections is not broken during use of the faucet, it will last for more than one year.
Mixer installation instructions
First you need to screw in the reflectors. Then the mixer itself. In the holes of the device under the nut you need to put gaskets with a metal mesh (sometimes without it). The smooth side of the gasket should be on top, the raised side should be directed inside the mixer body. The mixer nuts are screwed evenly to the eccentrics, this is necessary to avoid distortion of the device. First, the nuts are tightened by hand, then with an adjustable wrench. To avoid scratching the body of the device, the key should be used through a cloth. You need to tighten it in the same way - step by step. First half a turn on one side, then half a turn on the other side. At the last turns it is important not to overtighten, otherwise the gasket inside the nuts may be cut, which will lead to leakage.
The fabric will protect the chrome coating from damage.
The next step is connecting the shower head hose. The end with the nut is screwed to the mixer. The second end - with a cone-shaped part - goes to the shower head. The connection must be sealed with rubber gaskets. This connection does not tighten too much.
Next you need to connect the spout. To do this, just tighten the nut that comes with the gander. The shower head and spout can be purchased separately if their appearance or size is not suitable.
Complete installation of a bathroom faucet takes no more than 20-30 minutes.
Work order
If you need to install a water socket in an old and not very strong wall, it is necessary to carry out preparatory work. To do this, all weak areas and seams are cleaned, defects are eliminated, and weak spots are strengthened with a special cement-based compound. Pipe installation begins only after the wall has completely dried.
Most mixers have a center-to-center distance of 150 mm. This length should be taken into account when installing water sockets. But there are faucets that are slightly narrower or wider than others. There should be no problem here, since almost any mixer can be installed on a standard outlet using an adjustable offset of the eccentrics.
On a flat wall, holes for fastening water sockets are marked and drilled (at least 3 pieces, regardless of the material of the system). A small rubber gasket 3–4 mm thick and 7 x 7 mm in size must be glued to the installation surface on the back side of each water socket.
After this, the water sockets are attached to the wall, leveled according to the recessing depth and slope using self-tapping screws. The resulting gap between the installation platform and the water socket is filled with thick polyester putty.
Pros and cons of a faucet installed in the bathtub
Advantages:
- Minimum injury . Considering that in many models, after installation, few parts remain on the surface , it is almost impossible to get injured during water procedures .
- Aesthetics . All communications are mounted into the wall and are not visible on the surface.
- Ease of repair . The internal unit of the device has a simple design and easily repaired if necessary . Often repairs come down to replacing seals .
- Easy to clean . The number of visible elements is small , which means removing splashes and stains from chrome surfaces will not take time .
- Space saving . Reception is relevant in small rooms , since the minimum number of parts of the device visually increases the space .
The disadvantage is the need to make a professional wiring diagram and install pipes into the wall , which is not always possible to do yourself .
Attention! Some models designed to be placed on the wall are not cheap .
Tools, materials and accessories for installation
It is possible to install the mixer, like a regular water tap, with a minimum set of tools, which should include:
- 2 gas keys No. 1;
- a set of imbus keys - hexagons - 8, 10 and 12 mm;
- set of open-end wrenches;
- pliers;
- building level, at least 250 mm long.
Installation Tools
To protect the decorative surfaces of the mixer parts from damage by the corrugated jaws of the gas wrench, you need to have a strip of durable leather 15-20 mm wide and 80-100 mm long. It is advisable to seal threaded connections using fluoroplastic sealing material - FUM. It is available in the form of tape or thread and effectively seals the joints. There are 2 types of fluoroplastic seals: for gas and liquid media. Water sealant is painted white or blue-gray in contrast to gas sealant, which has a yellow tint.
FUM tape
Installing a mixer involves sealing not only threaded connections. It is also necessary to seal the joints of the eccentric planes and the contact surfaces with which the valve is adjacent to the fitting. The use of gaskets allows the connection to be reliably sealed. The material for gaskets is:
- rubber;
- silicone compositions;
- PON brand paronite;
- fluorine-containing polymers – fluoroplastics.
The presence of die cuts of various diameters in the tool arsenal allows you to cut out gaskets from sheet materials yourself. Otherwise, you will have to use factory-made sealing elements.
General structure and principle of operation
Depending on the type, plumbing connections may vary slightly in design.
Its main components include:
- metal tube or rubber hose with braid;
- union nut with O-ring - used to tighten connections;
- fitting - a metal pipe that connects the tube and the mixer;
- nipple - is attached to the tube and has a movable connection with a union nut.
The fittings are located on both sides of the liner and are fixed to it by crimping using a crimp sleeve or welding. For connection, the fitting has an external thread and a rubber sealing washer.
For installation on a fitting with an external thread, a union nut is used, which, when tightened, provides a tight connection with the nipple at the end of the connection. An O-ring is also installed between the nipple and the union nut.
Since the nut rotates independently of the tube, the latter remains motionless when tightened. Therefore, installation must be done in the correct sequence.
Before purchasing, you need to accurately select the required standard size of connecting elements, and also check the compliance of all characteristics in the product data sheet
Depending on the type, the liner can withstand pressures of up to 50 Bar and temperatures of up to 150 °C, which is more than enough for a hot water supply system. Indeed, according to GOST, the working pressure in the water supply pipes of apartments should be 4 Bar.
What to consider when connecting pipes to the mixer
- It is important to remember the height of the faucet above the bathtub. The location of the corner fittings for a new faucet depends on the length of the spout. If it is needed only to fill the bathtub, it can be installed low above its edge. If the faucet has a long spout, it needs to be fixed much higher.
- If external installation of pipes is planned, then the walls are tiled first. Water inlets are attached to the wall and aligned horizontally at a distance of 150 mm between their centers.
- If the pipes are laid through a wall, then you need to take into account not only the placement of the fitting at a certain depth, but also the angle of inclination of the mixer to the tiled wall. In this regard, the central axis of the water socket thread must be positioned at an angle of 90° relative to the wall.
- Particular attention must be paid to aligning the corners. To do this, a calibrated tube is screwed into the water socket, the end of which has a thread. You need to pay attention to the inclination of the tube relative to the horizontal line, which is marked on the side wall according to the building level, and set the angle of vertical inclination. The horizontal tilt angle is set according to a line on the floor, which is drawn using a construction angle relative to the plane of the installation surface. It is impossible to set the corners correctly without using construction tools.
Problem #4: disassembled faucet
The bathroom faucet is sold unassembled and installed assembled. It consists of the following elements:
| Element | Purpose |
| Watering can | This is a component of the soul, it is with its help that a single stream of water will be transformed into a pleasant rain of many thin streams |
| Spout | He is also a gander or spout, directs the mixed liquid into the bath |
| Hose | Another component of the shower that delivers water to the watering can |
| Main block | It is here that hot liquid is mixed with cold liquid in the required proportions and the pressure power is set |
| Decorative lampshades | Cover and decorate the connection points of the device to the pipes |
| Rubber gaskets | Responsible for the tightness of connections |
| Eccentrics | Allows you to align the position of the mixer if the fittings are installed with errors |
Mixer equipment
I assembled all the components together, except for the eccentrics, since they are exposed when connecting to the fittings. And here, by the way, you should not use FUM tape or other sealing agents; rubber gaskets are quite enough.
Conclusions and useful video on the topic
The video shows how to replace flexible faucet hoses with metal ones:
Despite the fact that, due to their low cost, practicality and ease of installation, in most cases flexible versions of the liners are chosen, the rigid version will always be in demand. This is due to its reliability and durability.
At high-risk facilities, in places with large and sudden pressure changes, for example, in basements and first floors of buildings, for trouble-free operation, preference is given to metal rigid connections. Such products are more expensive than flexible ones, but even their most budget options are superior in terms of price and quality.
Still have questions about the topic of the article? Or maybe you have valuable information that you can share with our readers? Please leave your comments, ask questions, and share your experience in the block below.
Types and brief characteristics of mixers
You need to have this information in order to select exactly the device that meets the operating conditions and preferences of the owners.
Bathroom faucets
They vary in installation location and engineering design; they can be fixed on walls, sides and racks.
| Illustration | Description |
Wall mounted | Installed in bathtubs and showers, they can have a long, medium or short spout. |
Onboard | They are mounted on wide sides of bathtubs and have a small spout. |
On special racks | An exclusive option, the leg may have additional decorative elements. They are rarely used and only when creating prestigious interiors. |
In principle, they can be single-lever or double-valve.
| Illustration | Description |
Single lever | Modern models use one lever to set the water pressure and temperature. They have a ball regulation mechanism. |
Two-valve | Classic models. They are distinguished by high reliability and maintainability. |
Modern innovative faucets can automatically maintain the water temperature within specified limits - saving hot water consumption and increasing the comfort of taking water procedures.
Another type of faucets - the water is turned on by sensors. Advantages: increased hygiene and ease of use. Disadvantages - high cost, difficulty in connecting.
Touch taps are a luxury accessible to everyone
Touch mixer power supply
Bath faucets
Shower faucets
There are no fundamental differences. The only peculiarity is the small linear dimensions. Some models do not have a spout, only a flexible shower is installed.
Faucets with shower
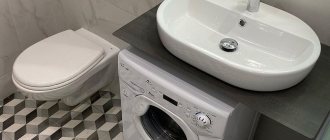
Basin faucets
Distinctive features are a short spout, mounted only on the sides. You can choose any options regarding the mixing method and pressure adjustment.
Interesting models of washbasin faucets
After choosing a specific model, you can begin installing the devices. We will not dwell on specific types of mixers based on the principle of operation; this does not matter for installation. We will only tell you about the stages of installation on walls and sides.
Basin faucets