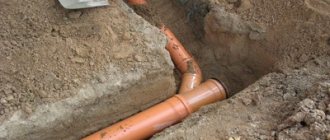
To properly install a sewer system in a private house, they first dig a trench.
All standards - depth, wall reinforcement - must be met in accordance with regulatory documents.
If you organize the digging of a trench and its further arrangement incorrectly, there is a risk that an emergency situation will arise in the future.
To avoid consequences, they adhere to SNiP acts and also follow digging technology.
Which cable can I use?
To lay cables in the ground, you need to use products with a high degree of protection from moisture, in a hard shell. Vinyl and polyethylene shells satisfy these conditions. These are the cables that are usually used: VVB (armored), VVBbG (armor + waterproofing), VBBShv (armor + polyethylene hose). But they are expensive, although they last a long time. It is advisable to use them to supply electricity from the pole to the house.
These types of cable are not suitable for underground installation, but they are still used
When choosing the type of armor, you need to pay attention to the acidity of the soil, the amount of large stones and construction debris. For neutral soils with small inclusions of stones, steel armor is suitable
It is also suitable for clays and loams. For acidic or alkaline soils, lead or aluminum armor is needed. The same cables are best used on soils with normal acidity but with a large number of stones.
Wiring around the site can be done using cheaper conductors. NYM and SIP feel normal. They can work up to 5 years. VVG is definitely not worth using for underground installation. It lasts for a maximum of a couple of years, which, given the volume of land work, is not at all pleasing.
In general, it makes more sense to install more expensive cables, but with a better protective sheath. It may cost more at the installation stage, but there will be no problems and you won’t have to think about replacing it with a new one in a couple of years.
Lump connection
For installation, it is better to use a solid cable, but if it is not possible to find a piece of wire of the required length, it is better to connect the two wires on the surface of the ground, inside a sealed junction box. Such a connection is easy to maintain and, if necessary, rework. It is not recommended to place it in a homemade coupling and bury it in the ground - the contact will quickly be broken, and to restore it the trench will have to be dug out each time.
For comparison, the video shows the production of a full-fledged coupling that can be hidden underground:
Minimum order
Minimum order within Moscow and the Moscow region:
10,000 rub.
When connecting a residential building, industrial or commercial facility to the power supply network, it is often necessary to resort to excavation work to lay the cable from the distributor to the consumer. According to current legislation and existing rules, before starting to dig a trench for a cable, you must obtain special permission for this. Responsibility for documenting excavation work lies with the owner of the property. But even if permission has already been obtained, you need to entrust the construction of the trench to qualified excavators, since this work requires certain knowledge and responsibility of the performer.
Which conductor is best to use for installing underground electrical lines?
Installing an underground power line requires considerable effort and time. In order not to suffer in the future with constant repairs, it is better to immediately choose a high-quality wire that will be able to properly perform its function for many years. Therefore, the issue of selecting a cable that will be used for laying underground should be approached with maximum responsibility.
Using an armored cable from a reliable manufacturer, you can be sure of its proper and durable operation. However, the cost of such a conductor is quite high, and if a person cannot afford such a purchase, he uses simple wires of the NYM or VVG brand. To increase the reliability of such lines, you should use a double-walled corrugated hose DKS, into which the electrical wire is placed along its entire length.
In places where the likelihood of damage to wiring due to heavy loads is quite high, protective cases are recommended. These devices will protect the current-carrying conductors, taking on most of the load. When laying several cables, each of them must be equipped with a separate case.
Running power lines inside corrugated hoses or pipes has the added benefit of easy cable replacement. If the old wire has become unusable, it is enough to open the ends of the route and tie a new one to the end of the non-working cable. After this, the faulty conductor is pulled out, and a new one is installed in its place. Of course, this is only possible if a long period of time in the ground does not lead to the destruction of protective devices.
Design
You must draw up a detailed project for the future sewer system with a detailed location of the pipes under the floor. You cannot count on the master to figure it out on his own and decide how best to install the sewer pipes. The sewerage project must be drawn up before installation work begins, otherwise you will not be able to avoid troubles in the future.
Laying of internal sewerage.
Determine in advance your requirements for how your sewer system will work. Resolve the following issues in a timely manner:
- is it possible to connect your home to a central wastewater treatment plant;
- whether you use the house as a living space all year round or only during the summer season;
- how large is your family, which is planned to live in the house (the volume and quantity of drains depends on this);
- what type do you prefer of all possible treatment facilities (storage tanks, biological station with aeration, septic tank);
- how the sewer pipes will be laid - on your own or you will involve specialists in this work.
List and order of work
There are a number of rules for laying cables on the site. First of all, you need to make a plan for the trenches on the site. The paths along which the wires will be laid must be located at a distance of at least 1.5 m from large bushes and trees. If it is not possible to bypass such obstacles in an arc, a metal pipe should be laid in the problem area. HDPE can also be used to lay cables in the ground. It is worth avoiding areas subject to increased stress, incl. parking places for a car, access for a sewage truck, etc.
If it is not possible to go around such areas, special protective cases should be used. When planning to lay the cable in trenches, it must be taken into account that it must be located at least 60 cm from the foundation.
When digging a ditch, the depth of the trench must comply with the standards. The recommended laying depth is 70 cm. If necessary, the laying depth can be reduced. The width of the trench for laying is about 20-30 cm.
When the question arises of how to lay a cable underground over a large area, more technologically advanced methods of digging a trench can be used, because using a shovel in this case is extremely labor-intensive. In this case, trenchless cable installation may be recommended. This method uses a special mechanism that pulls the wire in a protective pipe underground without the need to form a trench.
About twisted pair
Twisted pair has been used for over a hundred years, even if it originally looked a little different. It was first used on American telephone lines. It got its name due to the fact that the paired conductors through which the signal travels were twisted together along the entire length of the line. This protected against interference and interference, and if changes did occur, they affected both cables equally.
Twisted pair is still used to build low-current networks up to 24 V: telephones, Internet, cameras, alarms, security and industrial networks. For a home, the conductors are too thin to organize electrical wiring. Will not withstand high stress.
Has the following characteristics:
Advantages and disadvantages
Cheapness
Difficult to damage until the signal is completely lost
Can be bent at large angles
Resistant to interference
Often receives microdamage when bending too much or when pinched by heavy objects, which leads to a weakening of the signal
Susceptible to electromagnetic fields as standard
Twisted pair cable ensures stable data exchange between devices in the apartment and the Internet at a speed of 1 Gbit/s, if all devices have the appropriate connectors. A good choice for carrying out the last few tens or hundreds of meters to the final equipment. For longer distances or connection speeds, optics are used.
Methods for laying a line under the road surface
When connecting a site, say a dacha, to electricity, it sometimes happens that the supports with electric lines are located on the opposite side of the road. How to bring electricity into the house in this case? Let's start with the fact that you do not have the right to unauthorizedly lay a line under the road; this must be agreed upon with the administration of the city or village or other responsible body.
The first option for laying a cable line under the road is simple and does not require destruction of the asphalt. It is called trenchless installation, puncture method or HDD method. Stands for “horizontal directional drilling”. The technology is that the soil under the road is drilled with special installations, thus avoiding opening the asphalt surface. It is used for laying communications under railways, under reservoirs, under buildings.
The second option is simpler, but leads to certain destruction. You need to dig a trench by removing the top layer of asphalt.
According to PUE standards, the depth of the trench must be at least 1 m, and the cable must be located in a protective pipe.
Finally, we recommend watching a video that shows how to lay a cable under the road yourself:
What should be done before laying the pipeline?
Development of the project and its approval is the first stage that the owners must complete. Any construction project must have a detailed, accurate plan for laying communications.
Getting approval
Preliminary coordination with local administration authorities will avoid all problems in the future:
An “amateur” connection to the highway without project approval can lead to the same result.
Soil research
If you plan to contact specialists, then such surveys are usually carried out by representatives of a company specializing in pipeline laying. Another option is to invite employees of an organization conducting geodetic work. As a result, the master will know:
All this knowledge will not be superfluous in any case. If we talk only about laying a pipeline, then awareness of the characteristics of the soil will give a 100% chance of avoiding the collapse of a “freshly made” tunnel.
What cable can I use?
In order for a cable in the ground to remain functional for a long time, it must comply with a number of GOST parameters. Only armored cables that have a high-quality waterproofing coating meet all standards. When selecting a wire, you should take into account the characteristics of the soil in which it will be located. Under gentle operating conditions, i.e. at a normal level of soil acidity, the following brands of armored cables can be used for laying in the ground:
- AVBbShv;
- VBBShv;
- PvBShv;
- AAShp;
- AAB2l.
The AVBBShv brand is most often used in such conditions. This is a wire with aluminum conductors. It is armored with two galvanized strips and a protective shell. Another frequently used brand is PvBShv. This wire is distinguished by the presence of aluminum cores covered with steel tapes and polyethylene insulation.
On soils with a high level of chemical activity, incl. in swamps and salt marshes, you can use the following types of cable for laying in the ground:
- AABL;
- AAB2l;
- AAShv;
- AApl.
If cable laying is required over a short section to connect a barn, cottage or bathhouse, you can use an unarmored wire covered with a PVC sheath. This wire is highly durable and airtight, so it can last for a long time. When connecting street lighting, you can use SIP or NYM. However, they are not suitable for installing high-voltage lines. When laying cables in the regions of the Far North, grades specially adapted to such aggressive conditions should be used, incl. PvKShp.
How to enter the house?
There are several ways in which underground cables can be introduced into a building. At the same time, it is unacceptable to simply carry them through the foundation. There are several methods:
If the house has a basement on a strip foundation, it is necessary to make a hole into which a piece of metal pipe will be walled up. In this case, the edges of the pipe should protrude slightly above the level of the foundation. Cables will be routed into this pipe, and the remaining space must be sealed. Installation of a curved metal pipe through which the cables will be routed. This must be done in the place where the underground cable approaches the house. At the required height, lead the wires into the house through the wall
Particular attention should be paid to the bend radius - bends at an angle of 90 degrees are unacceptable. In the case of a pile foundation, this process is greatly simplified. So, the trench should be pulled to the entry point, and a small hole needs to be made in the floor of the house, through which the supply line will be inserted. With a shallow foundation, you will need to run a route underneath it
To do this, lay a metal pipe in which the cable will be laid.
Laying a cable underground is a very responsible and difficult task, in which it is important to pay attention to many little details, without damaging the insulation, since in this case the whole process will have to be redone from scratch
We are developing the route
The route for underground cable laying from the pole to the house will be drawn for you in the project and all that remains for you is to follow all the instructions. But when distributing electricity along the site, you have to design the route yourself. The most economical option is a straight line from one point to another. But a real route like this practically never happens. Most often this is a broken line, since you have to go around many obstacles.
Laying cables in a trench
How to lay a route
When planning a route, you must adhere to the following rules:
- Avoid crossing with other cables. If this is not possible, the distance between the cables must be at least 15 cm (one is higher than the other). At the intersection, hard cases are put on both conductors - made of plastic water pipes or asbestos-cement pipes. You can put an asbestos pipe sawn lengthwise onto the previously laid cable, then connect it with ties or tape. Please note that the cases should protrude 1 meter on both sides of the intersection.
- When crossing water, sewer, or gas pipes, the distance to the cable must be at least 0.5 m if it is laid without a protective sheath, and 0.25 m if it is laid in a pipe or sheath. Moreover, the protective shell should extend 2 meters in both directions from the intersection.
- If laying cables in the ground is needed along pipelines (water, sewerage, gas), the distance to them must be at least 1 meter. When laying in pipes, the distance can be reduced to 25 cm.
- If the underground power supply route runs along the heating main, the distance between them must be at least 2 meters. Moreover, the heating main must be well insulated.
- It is worth walking around the perimeter of the parking areas and the entry points for cars (including sewage trucks). If you can’t get around them, you need to either lay the route deeper or use a hard case.
- Large trees should be walked around in a large circle with a radius of at least 2 meters or a route should be laid so that the trunk is 2 meters away. There is another option - at the required depth under the tree, drive a pipe at least 2 meters long through which to pass the cable.
- There must be at least 0.75 m from the place where the conductor is laid to the bushes.
- If the cable is laid in the ground along the foundation, the distance to it must be at least 60 cm.
If you follow all these recommendations, the route will not look like a straight line. You mark it on the site (with pegs, chalk, a stream of sand), check once again for compliance with the requirements, after which you can dig a trench.
Drawing a plan
Once you have a rough idea of the route, transfer it to a piece of paper. This plan should also include main structures, water supply, sewerage, etc. After you dig a trench and lay the cable (before backfilling), measure the distance to all “long-term” objects and transfer them to the plan.
Cables for different purposes can be marked in different colors
Professionals call this process “localization.” This plan with distances can be very useful later - when redeveloping the site, planning new buildings, etc. He will also be there if there is a need to repair the transmission line. According to the plan, you will restore the location of the route.
Requirements for underground cable installation in a country house
The basic set of rules for laying in the ground is based on safety precautions and the ability to quickly get to the cable in case of an emergency.
- It is allowed to lay the electrical conductor underground to a depth of at least 70 cm. Deviation from the standard is possible only if the line length is more than 5 m and the cable is additionally protected by a pipe. In this case, a depth of 50 cm is sufficient.
- For laying in the ground, it is permissible to use only an armored conductor specially designed for this purpose. This way the cable will be provided with reliable protection from mechanical damage and from underground rodents.
- The trench should be at a distance of 60 cm from the foundation. This is not allowed directly under the foundation of the house. In the case where such a route cannot be avoided, the transit power line must be enclosed in a steel pipe.
- In one trench, a distance of at least 10 cm should be maintained between two conductors.
- When laying electrical wiring in the ground, it is necessary to retreat at least 2 m from trees, and 75 cm from bushes.
- The conductor should be located at a distance of 1 m from water and sewer pipes, and 2 m from the gas pipeline.
- If several lines intersect underground, the layer of soil separating them must be at least 50 cm.
- The winch must be additionally equipped with a limiter, which will ensure cable laying without tension, with a reserve.
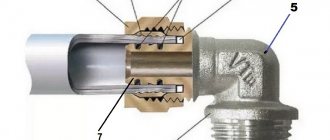
- To connect electrical wiring, special couplings should be used.
- To provide the cable with reliable protection, you can use an asbestos-cement pipe. A brick is also suitable as an option, but it should not be hollow.
- It is not advisable to lay the conductor in places with high load: garden paths, car parking, etc.
Note! A warning tape must be laid on top of the conductor laid in the ground. If after some time they dig here, it will warn workers about the passage of an electrical cable
If you liked the article, please share it
Previously on the topic:
Share
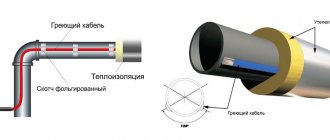
Lay the cable underground in winter
Of course, it’s better not to do this; the warm season is the optimal time. But, if circumstances force you, see the following tips on this matter.
- Before laying, it is necessary to warm up the cable or wire. It is enough to keep it indoors for several hours.
- When the cable has heated up, it must be laid and buried very quickly. If the temperature is -10 - one hour, -20 - half an hour. The temperature is lower - do not install under any circumstances.
- You can install the cable without heating if the air temperature is not less than -5.
These are the tips that resulted. Apply them, then you will definitely succeed.
Also read: classification of wires and cables.
Types of insulation. Which cable to choose?
To extend the durability and increase the reliability of the cable, it is protected with insulation. Today, two types of insulation are used: impregnated paper (ASB) and plastic (cable VBbShV and AVBbShV).
The advantages of impregnated paper include good electrical performance and relatively low cost. This cable has proven itself in high temperature conditions and is quite durable. But this type of electrical cable has its drawbacks, which call into question the possibility of using them underground. Their main disadvantage is increased hygroscopicity. Accordingly, if the question arises of how to lay a paper impregnated electrical cable underground, then you need to know that it must be protected with a completely sealed sheath. Another, most significant, disadvantage of such a cable is the peculiarity of the impregnation of its sheath, which over time flows into the lower part of the cable, which significantly reduces the durability and insulation strength.
Armored power cable VbbShv
Armored aluminum cable AVBBShv
Plastic insulated cable has the most acceptable technical characteristics for underground use. In addition, VBBShV and AVBbShV are widely used to supply electricity in conditions of high humidity and fire hazard. Since polyethylene or polyvinyl chloride is used to produce the insulating part of such a cable, the most dangerous conditions for its operation are constant or periodic contact with sharp and edged solid bodies of various origins. If such a cable is not properly protected before being laid in the ground, then after some time it may suffer mechanical damage and fail.
There are also brands of cable that, although they have fairly good characteristics, are completely unsuitable for laying in the ground. These brands include KG and PUNPa.
Based on the foregoing, we can conclude that armored copper cable VBBbShV and armored aluminum cable AVBbShV are considered optimal for carrying electric current underground. Their advantage is that they are sufficiently protected from all possible mechanical damage by steel armor. Thanks to this, laying such a cable in the ground does not require the use of a solid pipe, which greatly simplifies the process.
Safety precautions and sequence of actions
How to lay a cable underground and avoid unpleasant situations and accidents during its operation, it is recommended to carry out the installation process in the sequence given below.
1. It is necessary to outline the location of the future cable laying, taking into account the following rules:
- The distance from a large tree to the cable is more than 1000 mm.
- The distance from the cable to the foundation of any building is 600-800 mm.
- You cannot lay the cable in places where increased load on the ground is expected (for example, a parking lot, road, arable land, future construction site). Places like this need to be avoided.
- Intersections of the route with another utility network or another cable must be excluded.
- When placing two parallel cables, a distance of 10 cm should be maintained. When cables intersect, they should be located at a distance of more than 15 cm from each other and should be protected with cases 2 m long.
- The armored cable must be laid, making sure to ground the armor.
2. Preparing the trench. It is most convenient to equip a special communication channel that can be opened at any time and eliminate a possible problem. If this is not possible, then dig a trench 80-90 cm deep and clear it of various stones, fragments, bricks and other objects that could damage the cable sheath.
3. Backfilling the sand cushion. The thickness of the sand cushion is about 10-15 cm. It is quite difficult to fill the trench evenly along the entire length, but the thickness of the sand should not be less than 5 cm. Sand for the cushion should be used the most ordinary, quarry sand.
4. Cable preparation. It should start with a careful check of the outer sheath of the cable. If defects are found, they should be eliminated immediately. Next, using an ohmmeter or a conventional tester, a short circuit between the conductors and the armor is checked.
Important! The cable must initially be solid. It cannot consist of two or more pieces
If, after all, it is not solid, then the connections must be made in above-ground junction boxes.
5. Cable protection. There is no strict rule for laying cables in a trench only in a protective pipe. There is a recommendation to protect the cable with a case in those places where it is necessary. But it is best to use additional protection in the form of HDPE corrugated hose. Cases and pipes are placed on top of it, which should be installed at the intersection of the route with paths and roads, various communications, where contact with a large tree or concrete slab is possible, and where the depth of the trench does not reach 50 cm.
6. Laying the cable in the trench. The main condition is to never put the cable in tension and use the following knowledge on how to lay the cable freely underground. The cases are placed in the designated places, and if an additional case is needed somewhere, it can be made from asbestos-cement pipes, cut lengthwise and laid in the required place, putting it on the cable.
7. Layout plan. At this stage, it is necessary to draw up and draw to scale an exact plan for the location of the route with all measured distances: from cable exits and trench turns to a pole, corner of a building or large tree. It would be a good idea to mark it on the wall of the building where the cable enters the ground.
8. Backfilling with sand. At least 10 cm. If the cable protrudes, it can be fixed with a wooden peg and then sprinkled.
9. Backfilling with soil. Thickness 15 cm. The soil should be free of large solid objects. You can compact it with your feet.
10. Laying warning tape. You need to make sure that the middle of the tape goes exactly above the cable. You should also check for a warning label along the entire length of the tape. The tape is used instead of the traditionally used brick protection.
11. Final backfilling with soil. The soil will settle over time, so it is better to pour more of it right away.
12. Final check of cable insulation resistance. Now you also need to check for a short circuit between the cable and ground. It is necessary to do all the work from the very beginning, if any is discovered.
Cable protection on top
When laying a cable in the ground, there is always a high probability that it may be damaged during any excavation work. Therefore, the PUE provides for the presence of protection above the route. For powerful cables - 1 kV (1000 Volts) and above - protection is required with concrete slabs or solid bricks. For low-power lines, which usually power our homes, it is allowed to lay the cable in the ground with signal plastic tapes. This method of protection is permitted if there are no more than two conductors in the trench.
Laying the cable in the ground must be accompanied by laying protective plastic tape
Signal tapes are laid along the cables at a distance of 250 mm from their outer cover. If there is only one power line, the tape is placed above it; if there are two or more, two or more tapes are placed. Their edges should protrude beyond the cable by at least 50 mm, and adjacent tapes should be laid with an overlap of 50 mm.
Backfilling the trench with sand
Mistake #5
The bottom layer of the trench must be filled with sand; do not skip this step.
Otherwise, sharp pebbles and other foreign elements in the ground will damage the insulation after some time.
Mistake #6
The sand must be compacted. Do not lay the cable on a loose base.
What to do if you don’t have sand in stock and don’t want to order it? In this case, sift the excavated soil.
The fraction of individual elements after sifting should be no more than 5 mm.
Is it possible to do without this sand pillow or its equivalent? Why is it even needed? No you can not.
In addition to protecting the insulation from sharp objects, it plays another important role. The layer of sand under and above the cable is practically not subject to heaving.
It can be easily compacted, as a result of which there is no subsidence of the soil in the trench. No drawdown - no voids.
Namely, they lead to local overheating of the cable. The result is a situation where, in the place where a shallow hole is formed, the cable heats up significantly more than in the same area, but a couple of meters away.
Due to the temperature difference, the cable begins to “pull”. Under significant loads, the PVC insulation bursts and subsequently begins to actively suck moisture through these microcracks.
Well, don’t forget about the drainage properties of sand. Even if water reaches a depth of 0.7 m, it will pass through the sand without stopping near the cable line itself.
How to enter the house?
The process of introducing an underground cable into a house or outbuilding has some subtleties. The wire should not be allowed to run under the foundation, as shrinkage of the house will lead to a violation of its integrity. It is advisable, even when pouring the foundation of the house, to bury embedded parts in it, that is, pipes whose diameter is at least 4 times larger than the cross-section of high-voltage wires. If the mortgages were not installed during the construction of the house, you should make a hole in the foundation yourself and place a pipe of the required diameter in it.
After this, a wire is inserted into the house through the hole. It is imperative to seal the gasket area. To do this, you can fill all the remaining cavities in the mortgage with rags moistened with cement mortar. In addition, polyurethane foam can be used to carry out this procedure. This will prevent dirt, water and rodents from getting into the mortgage.
There is another method of introducing the cable into the house. To do this, it should be laid along the wall of the house to the place where the introductory cabinet is located. After this, the wire rises along the wall to the desired level. At the required height, a hole is made in the wall into which a metal or plastic pipe is laid. Through it, communications are introduced into the house. Be sure to seal the entrance with foam.
The armored wire must be grounded. This will avoid accidents when underground wires are damaged. To do this, a wire is welded to the armor, which is led to “zero” in the shield.
Wiring after repair
Running an Internet cable through an apartment after renovation is more difficult. Mainly because you will have to move the furniture and lay it out so that it does not get in the way and is not conspicuous. There are two options here:
- Modern skirting boards have channels for multiple cables. Open them one at a time and route the wires inside the baseboards to their destination. There will be problems with doorways; you will have to lead directly or around the door.
- Cable channels. Buy small cable channels, raise them to the ceiling or hide them behind furniture. Then run all the wires through them. More work, but it will turn out nicer than hanging wires.
If there are no options at all, then leave the router in the hallway and place a repeater in the desired room. Connect all the necessary devices to it. Connection speed and stability will suffer, but this may be the best option.