Modern technologies create equipment for a comfortable life in private housing and ensure the full functioning of electronic devices outside it. A wireless bell for a private home is an integral element of a “smart” set of electronic devices. The presence of a modern gadget in the equipment of a cottage or dacha maintains the comfort and convenience of country housing for its owners and people who come to visit.
- What are wireless calls?
- The principle of operation of devices on the street
- Need to purchase
- Technical features
- Pros of use
- Kinds
- Video calls
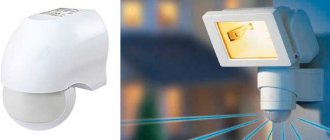
- With motion sensors
- Frost-resistant
- With sound transmission
- Anti-vandal
- Moisture resistant
- How to choose?
- The main differences between street and apartment devices
- Which is better, wired or wireless calls?
- DIY installation features
- Connection
- Fastening
- Operating rules
What it is, scope of application
A wireless call is a device consisting of a group of elements:
- SPEAKER A sound comes from it when the contacts close.
- BUTTON. This is a mechanical element that ensures the product operates.
- TRANSMITTER. With the help of this element, a signal is transmitted from the button (located outside) to the speaker (mounted indoors and emits sound).
Wireless calls are used in the following cases:
- For a private home (for example, when the gate is located at a distance from a residential building).
- For a dacha where the entrance to the site is distant from the building on the site.
- On the door to the apartment. The option with a wireless call is convenient for ease of installation, the ability to avoid drilling holes and laying wires.
- In warehouses and offices. Giving a sound signal allows employees to be informed of the client’s arrival.
The scope of application is very wide. The wireless bell can be used wherever notification of the arrival of a guest or visitor may be useful.
The safety of every home begins with the front door!
In the light of various events, everyone thinks, sooner or later, about the safety of their home. The first thing that an invited or uninvited guest and the owners of apartments and houses encounter is the front door. And here is the first, and most importantly effective security measure - a video call.
When we say video call, several associations arise: intercom, video intercom, video call, video peephole.
On the Internet in Ukraine and in the Okhrana store you can buy a video doorbell , a video intercom, an intercom, and a video peephole.
Let's figure out what each device is, and understand which one you need.
Advantages and disadvantages
Before purchasing a wireless call, it is important to study its features, evaluate the pros and cons, and then decide on the possibility of use.
Advantages:
- No wires. During the installation process, you can do without a drill (except for the case of attaching the button using self-tapping screws), pulling wires or cables connecting the button and the speaker. This is convenient when the product is purchased for a summer house or private home. When installed on an apartment door, you can avoid tearing off wallpaper or damaging the interior. The device is self-powered, so there is no need for a separate voltage supply (except in some cases).
- Easy and fast installation. Fixing the product takes a few minutes. This is due to the absence of wires and complex fastenings.
- Convenience. The use of such a product does not cause difficulties, both for guests and for owners of the house (cottage, apartment).
- Easy to move to another place. Due to the absence of wires, the wireless call can be reset at any time.
- Possibility of use in combination with complex devices. Wireless calls can be used for intercom or equipped with two buttons (if necessary).
- Nice design. Modern models have an attractive appearance, so they fit into any interior. A large selection of models allows you to choose a product that matches the shape, color or material of manufacture. You can be sure that a wireless call will only decorate your interior or exterior.
- Independent nutrition. Regular bells operate without batteries and require wires to supply voltage. In the case of a wireless device, this is not necessary. The voltage is supplied from batteries, so even if the lights are turned off, guests will be able to notify of their arrival. This feature is useful for private homes or for summer cottages where there is no electricity. An alternative option is to use a wireless call without batteries, when power is supplied from special batteries (purchased separately).
- Possibility of additional equipment. If desired, wireless calls can be supplemented with other devices (depending on the model). We are talking about connecting a video camera, TV or other equipment.
Flaws:
- Installing a wireless button is not possible in all cases. No wires are used during the installation process, and the signal is transmitted wirelessly. If there are obstacles in its path, the product will not work. Under such circumstances, you will have to install a classic wired bell or eliminate the cause of the interference (if possible).
- The need to change the battery. The autonomous power supply tends to discharge, so from time to time it requires replacement. If you skip this point, the wireless call will not work.
- Poor fastening. Some models are fixed with a sticky base. This option is suitable for a door to an apartment. When installed in a country house or used for a private home, the button is fixed on the street. When exposed to cold, it often disappears. In addition, the Velcro fastener does not withstand even light physical impact.
- Possibility of jamming. The presence of negative influences (for example, moisture entering the product, the influence of low temperatures, or displacement of the contact group) leads to the button getting stuck in the actuated position. As a result, the call works until the battery runs out or the defect is eliminated.
- Ease of theft. The wireless bell model is easier to steal because there are no wires connected to it. To prevent theft, you can install a video camera at the entrance. It will be doubly useful. Firstly, it allows you to look at the guest personally, and secondly, it will reduce the likelihood of theft.
- No signal transmission. Problems with the circuitry may result in difficulty sending the signal from the button to the bell. Another situation is possible when the command arrives, but there is no sound.
A wireless call is not a perfect device, but its advantages more than cover the disadvantages of its operation.
Installation
When installing the product on a gate, you need to remember that the operating radius declared by the manufacturer implies a space free of obstacles. If the conditions for the call to operate are not ideal (there are obstacles), the operating range of the call is significantly narrowed. For this reason, it is necessary to select installation points for both parts of the apparatus so that there are a minimum of concrete walls and metal sheets between them.
If there are solid metal barriers, it is not recommended to use radio calls. The operating radius of a wireless call is also significantly reduced when GSM network equipment is located nearby. The following range reductions must be taken into account before installation:
- Minus 10–20% for walls made of plaster and wood;
- Minus 25–40% for brick barriers;
- Minus 40–85% for walls made of reinforced concrete.
Modern models are often equipped with additional basic receivers.
Name of the design elements of the intercom bell for the gate
- You must select a suitable location for the button. There are many options for mounting points: under the canopy of a support pole, on the front strip of a metal profile body, etc. In each individual case, it is necessary to be guided by issues of convenience and ethics.
- Buttons most often have double-sided tape on the base of the body. You can use this fixation option, that is, simply remove the film from the tape and press it to the installation point.
- In order for the double-sided tape to stick tightly, the surface for installing the button should be degreased with a special solution.
Components of a bell for a gate
Wireless calls for a country house are convenient, affordable and modern. Even a schoolchild can install the device. You can also assign and configure more expensive radio calls yourself. To do this, it is enough to strictly follow the manufacturer’s instructions supplied with them. Anyone can afford to buy a high-quality wireless or wired bell for a gate, gate or front door. This type of call is the best choice for a summer house or private home.
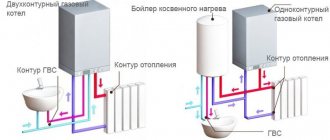
Operating principle, diagram
In the case of a wired call, the situation is clear. After attaching the button on the outside and the bell on the inside, they are connected using a wire. Power is supplied to the speaker, and the circuit is closed through a button.
In a wireless call situation, the same principle is used, but there is no need to complete the electrical circuit.
The operating principle is simple:
- The guest presses a button installed near the apartment, on the gate near a private house (dacha) or in another place.
- The transmitter is activated, sending the signal wirelessly to the receiver (call).
- The electrical circuit is activated.
- Power is supplied to the speakers and the music (that is programmed into the device) plays.
Models with a combined operating principle are available for sale. For example, the button is powered by a battery, and the sound source is connected to a standard power supply.
The speed of signal transmission and its strength depend on a number of factors - the distance between devices and the presence of obstacles (for example, walls or doors). It is important to remember that brick, concrete or metal structures significantly degrade the signal.
The design of wireless calls is simple, which guarantees their reliability, ease of operation and long service life.
There are two boards installed in the button and the device with the bell. A third circuit (signal generator) is also provided, characterized by the absence of failures.
Additional equipment
To make receiving guests even more convenient, you can purchase additional equipment for the call. They can be either included in an expensive set or sold separately. In the second case, it is necessary to find out whether the devices are compatible with each other or not. Most often, additional equipment includes:
- Intercom. Usually this is a solid system that has its own call button. The button also sends a signal to the receiver. Naturally, the kit includes a microphone and speakers. It happens that the camera is still running.
- Camera or video peephole. It can turn on when a person approaches or function continuously. The image from the camera can be sent to various devices - monitor, phone, tablet.
- Motion Sensor. This device helps to know about the approach of a person in advance. If the kit includes a camera, the sensor will activate it.
In addition, there are smaller functions: device lighting, melody selection, setting a separate melody for each button if there are several entrances to the house. Some calls can send SMS to the owner's phone. It is worth remembering that the more functions, the more expensive the device.
Device types
There are two types of wireless calls:
- With separate power supply. The button runs on a battery, and the bell runs on mains power.
- With shared meals. In this case, both nodes operate from a DC source (battery).
Modern models are divided into:
- By functional purpose. Products can be intended for a home or cottage (street and waterproof version), for an apartment door or for an intercom.
- According to the configuration. Buyers have several configuration options at their disposal in terms of the number of buttons and speakers - 1+1, 2+1, 1+2 or 2+2, respectively. When choosing an option, it is important to focus on the number of entrances and the area of the house.
- According to the functional “filling”. Modern models can be supplemented with Wi-Fi, a microphone, a video camera, and work without batteries. Some wireless calls have the option to set your own ringtone (using a flash drive). For better sound quality, a number of devices are equipped with two speakers (as noted in the package). This is convenient when the product is installed in a room with a large area. The device can be used with Smart Home systems (the website has a separate section on this topic).
Thanks to this classification, there are no difficulties in choosing the appropriate button. The main thing is to select a model taking into account the current situation and needs.
Video call
Video call - an independent device that looks like a video panel. It is installed instead of a standard doorbell and is an IP video panel, or IP video call / WI FI video call.
The IP video doorbell has all the functionality of a video intercom panel, the only significant difference is the Ethernet network port / WI FI adapter (optional) and a network video camera (instead of an analogue one).
Yes, the IP panel does not require an intercom – a monitor! Thanks to the connection to the global network, the call is sent to your smartphone or tablet through a pre-installed application. Receive notifications not only when a guest presses a button, but also when a guest moves to your phone to keep track of what's happening at your door.
Nowadays everyone has a smartphone or tablet with them; you must agree that it is very convenient to see who has arrived through the phone, accept the call and let the guest in. Doorbell with intercom? No matter where you are in the world, you are always at home.
It is important to understand that the Internet must be stable and powerful, especially the outgoing speed for sending data!
Technical characteristics - main differences
Despite their apparent simplicity, wireless calls differ in technical characteristics. Basic parameters that are important to pay attention to when choosing include:
- Device operating frequency and range.
- Type of signal being transmitted.
- Number of speakers and buttons included.
- Power and type of electrical power (mains or batteries).
- Backlight (provided or not provided).
- Possibility of installing different melodies or setting your own music (using a flash drive).
- Volume control option.
- Supports application function for intercom or video peephole.
- Option to send SMS messages.
- Night light function and motion sensor.
- Operating temperature range (important when installing the button outdoors).
- Availability of moisture protection (provided for outdoor options).
- Other characteristics.
As a rule, modern wireless calling models operate at frequencies from 433 to 434 MHz. The exception is products operating at a lower frequency - 315 MHz.
When assessing the range, it is important to evaluate not only the information from the passport, but also the presence of interference. Their presence reduces the range of action. For example, a concrete wall or an armored door prevents the signal from entering. Drywall or wood transmits electromagnetic waves better.
How to repair a doorbell yourself
The main sign of a faulty doorbell is the absence of a sound signal when you press the device button. It is also necessary to check the functionality of the device when the melody playback volume is reduced or when the signal sounds intermittently, with some pause.
The cause of malfunction of the device may be natural wear and tear of the device or incorrect installation of the doorbell resulting from an incorrect connection to the electrical network. The noise or button unit may fail, which must be checked for functionality. First of all, you need to figure out how to turn off the bell in the apartment. To do this, a number of manipulations are performed.
Before turning off the doorbell in the apartment, you should turn off the power to safely perform work. Next, you need to make sure there is no voltage. To check the serviceability of the main unit, you need to remove the top cover from it, squeeze the wires from the screw terminals and check the presence of current in them using a multimeter. If the device displays an electrical signal, the speaker should be replaced.
You can repair the doorbell yourself
To check the functionality of the button, the wires are detached from the pressure element. They should be connected to each other. If there is a sound, the button is faulty.
The reason for the malfunction of the button or the main unit may be hidden in the loose contact of the contacts. To do this, the device is disassembled and the reliability of the wire connections is checked. If necessary, they should be cleaned.
Before installing a wireless or wired bell in your apartment, you need to choose the right device, taking into account the location of its installation. You can purchase any model for an apartment. Outdoor devices are subject to special requirements, as discussed above. Connecting a doorbell in an apartment or house is a fairly simple process that requires basic knowledge and skills in electrical engineering. By following the above recommendations, any type of device can be installed in a short period.
Additional components to expand functionality
To increase comfort and convenience, you can complement the wireless call with additional devices. Sometimes they are included with more expensive models.
An alternative option is to purchase the product separately and then connect it to the “base”. In the latter situation, it is important to clarify the possibility of unification.
Additional elements include:
- VIDEO-EYE. It operates on a permanent basis or is activated using a motion sensor (when a person approaches the door). There are cameras connected to the bell button and only activated when it is pressed. The image received from the video eye is transmitted to a special monitor. The signal can be output to a phone, PC or laptop.
- MOTION SENSOR. The presence of such a node allows you to inform the owner about the arrival of a guest before he presses the button. In addition, the triggering of the sensor gives a command for the video eye to operate or starts recording (depending on the setting).
- INTERCOM. Some models of wireless calls are available for intercom. Such a system is more complex and involves the presence of speakers, a microphone, a camera and a monitor that allow you to see and communicate with the visitor.
Advanced models can be equipped with backlighting, a volume control knob, or a mute button.
Some devices can send a signal about a guest's arrival via SMS. It is important to note that the price of the selected model depends on the number of additional functions.
The intercom can have advanced functionality:
- Built-in motion sensor
- Display size: 4″ – 10″ inches
- Built-in memory unit
- Control type: mechanical buttons, touch buttons, via touch display.
- Record videos on an SD memory card for which there is a slot.
- Connecting additional devices: these can be video panels if you have several access points; Connecting CCTV cameras to view the site from a different angle and obtain more information about the guests.
- Built-in quadrator - for the video intercom to work as a video recorder and conduct video surveillance.
- An Ethernet port for connecting an intercom (IP intercom) to the Internet, but then the possibilities of the intercom are endless. For you, this means constant control and monitoring of your home, through alerts and online viewing.
- WIFI adapter
- Possibility of connecting security and household sensors
The video intercom has become an indispensable element of basic security and entered the era of multitasking. Naturally, the more extensive the functional set, the higher the price of a video intercom. Any video intercom always works in tandem with a calling panel.
Video eye for wireless calling
With the help of an additional camera, the owner of an apartment, house or cottage can see a visitor from a distance. As a result, it is easier for him to make a decision about opening the doors.
If there is a peephole with a camera on the apartment door or gate, the calling visitor is reflected on the monitor inside the building. The image from the camera can be transferred to a separate display, PC or laptop (depending on the selected model). The quality of image transmission depends on the camera installed in the video eye.
When choosing a circuit, it is important to consider that the peephole needs additional and more reliable power. The following paths are available here:
- Search for a suitable low-power kit (if continuous video recording is required).
- Scheme with video eye activation only when a button is pressed. Under such circumstances, the camera only records the face of the person calling.
- The video eye is powered separately. In such cases, the use of a wireless call is not entirely clear, but such a scheme is common.
- A circuit with a motion sensor that detects whether a guest is near the bell button. This option is convenient for controlling inappropriate citizens who may make fun of the owner. The convenience is that the video camera records when there is movement near the entrance (pressing the button is not necessary).
When choosing a video eye, it is important to pay attention to the camera resolution. The higher this parameter, the better the image.
On the other hand, with a higher resolution, the volume of video received increases greatly. In addition, high-resolution video eyes have high power requirements.
Intercom => video intercom
An intercom is an intercom: guest – host. Over time, it was transformed into a video intercom, and a monitor was added for viewing and identifying visitors.
Video intercom - is a color monitor with a microphone and speaker for display and remote communication with the visitor, as well as opening the door with one key. Moreover, it can be constructively with a handset or a video intercom without a handset, communication based on the Hands Free / hands-free principle. Presented on the security market with a huge variety of color and shape factor solutions, only the basic functionality remains unchanged.
- Broadcasting live images on the intercom monitor
- Accepting a call to communicate with a guest
- Remote opening of the electric lock.
What is the difference between indoor and outdoor wireless calls?
When buying a wireless bell for your home, it is important to consider its future location. There are two basic options here - indoors (for an apartment) or outdoors (for a home or cottage).
In the first case, it is enough to buy a simple model, without moisture protection and a wide temperature range. If you plan to install a wireless call outdoors, the approach to selection is more serious.
The main requirement is the presence of a moisture-proof coating to prevent moisture from entering the internal elements of the device.
In addition, a wireless bell for outdoor installation must withstand temperature changes and operate in a wide temperature range. This requirement applies not only to the shell, but also to the internal circuits of the product. Moisture protection should also be provided here.
When installing on doors, it is worth providing a small canopy to protect the product from moisture, sun rays, dust, wind and other negative influences.
The main requirement is that the additional element does not interfere with the passage of the signal.
To avoid theft or protect your wireless call from vandals, it is recommended to choose models made of durable metal. The downside is that they will be more expensive.
Installation and operation
When installing an outdoor wireless bell, it is important to consider that all its characteristics, including range, are relevant only for ideal operating conditions. For example, signal range is indicated based on tests in open space . If there are other buildings, tall trees, or other obstacles between the house and the gate, this figure will decrease significantly. In this case, you may need to additionally purchase a signal amplifier.
When choosing a location for installation, you should give preference to the option in which the device will be subject to the least impact between the signal transmitting and receiving parts. If there are solid metal barriers, using a wireless call is impractical. For other materials, the range reduction is:
- up to 20% for wooden surfaces;
- up to 40% for brick;
- up to 80% for walls made of reinforced concrete.
Setting up a wireless call starts with choosing a location. The simplest solution is installation on a support pole, on the front surface of a metal profile in a fence section. Sometimes a special mount or support is made for the bell. The easiest way is to use bells with 2-sided tape as fastening; here it is enough to first degrease the selected installation location and secure the communication module by removing the protective film from it. Sometimes there are additional holes for screws - in this case, the electronic device will be protected from theft.
It is optimal if the mount is removable: this is necessary for replacing batteries, charging the battery or seasonal storage. Wickets made from corrugated sheets are secured with special self-tapping screws and rubber gaskets to prevent corrosion.
The module located in the house is attached to double-sided tape, a nail or a self-tapping screw (if there is a hanging loop). If the receiver has a wired connection to the network, it should be placed close to an outlet.
Features of choice
When purchasing a wireless call, it is important to know the selection rules and follow them when selecting a device. It is important to pay attention to the following details:
- TYPE. The operating principle of wireless calls is almost the same. The differences relate only to design, functionality and equipment.
- APPEARANCE. When choosing, it is important to focus on the design of the house, apartment or cottage, so that the installed equipment fits into the interior. It is important to take into account color, design, shape and other features. Against the backdrop of competition, each manufacturer tries to distinguish its models and make them better than those of competitors.
- NUMBER OF BATTERIES. Depending on the complexity and design of the device, the number and type of power supplies used may vary. This point must be taken into account, because in the future the batteries will have to be changed.
- RADIUS OF ACTION. When purchasing a wireless call for an apartment, this factor does not matter. It’s a different matter when installation is planned in a private house or country house, and the distance between the gate and the house is up to ten meters or more. When studying range, it is important to consider interference in the signal path. range, without obstacles such as walls or doors. That's why it's better to focus on a larger range of action (take it with a reserve).
- CASING. When installing externally, you should pay attention to the material and build quality of the housing. Key factors are resistance to moisture and dust, as well as vandalism. As noted, metal models with high-quality moisture protection are more suitable for outdoor installation.
- MELODY. Most simple models have one or two melodies that you will want to change over time. That's why it's better to get wireless calls with music replacement options. Some devices allow you to insert a flash drive or transfer music from a smartphone.
- SIGNAL POWER. When installing a wireless call button at a distance of 50 meters or more, it is recommended to take equipment with an amplified signal. In addition, before making a purchase, it is worth testing the product at the distance of interest.
- EQUIPMENT. An equally important selection criterion is the composition of the kit. The extended version can add a video eye, an additional button or speakers, a motion sensor or other devices. When purchasing elements separately, it is important to clarify the possibility of their combined use.
- ATTACHMENT METHOD. This is a key point that receives little attention. As a rule, fixation is achieved using simple Velcro. Under the influence of cold or other negative natural factors, it stops holding the button and comes unstuck. The best solution is to secure the wireless call button using self-tapping screws, but such an option must be provided for this.
- PRICE. The seller’s task is to earn as much as possible from the client, so when choosing, you should not follow the seller’s advice 100%. It is important to focus on personal needs and take equipment based on your goals. You shouldn’t overpay for additional features that will never be useful, or for a brand.
- GUARANTEE PERIOD. When choosing a simple model, the likelihood of breakdown is minimal (this is due to the absence of complex elements). It's another matter when the package includes many additional devices. Under such circumstances, you should give preference to products with a warranty of 10 years or more.
Using the above recommendations will allow you to choose a high-quality wireless call with the necessary functionality and at an affordable price.
What to pay attention to
To choose the most suitable device and not make a mistake, you should pay attention to the following parameters:
- Design and appearance. The color and shape of the case can be different, despite the general principle of operation.
- Signal reception radius. If the house or plot is large, you need to choose models with a larger range.
- Quality of material. Low-quality plastic may crumble as a result of unfavorable weather conditions.
- Equipment. When purchasing, it is worth checking what is included in the kit. Are there speakers and a camera?
- Manufacturer of the device. It is not profitable for a popular brand to make bad products.
- Duration and warranty. This is an important factor, since the longer the warranty period, the greater the chance that the call will last a long time.
You can purchase a wireless call to your apartment from both domestic and foreign manufacturers. Italian and German models have the best quality, but they are quite expensive. Good quality from Polish manufacturers. Traditionally, Chinese models are the cheapest. Although their quality is generally average, you can still end up with a bad product.
Popular models
The choice of wireless call models is wide enough to choose the appropriate option.
For an apartment, private house or cottage
Popular models for cottages, private houses or apartments include:
- "Cosmos", KOC_AG512С. The package includes a calling unit and a unit with a speaker. The button is secured using glue screws or double-sided tape. Additional features are noise immunity, 32 melodies, and a range of 150 meters.
- Elektrostandard. The model includes a receiver, button, battery and instructions. The average service life is at least three years when working up to 5 times a day. There are several modes (with light and sound). Features: volume control, light indication, range of 80 m, two batteries.
- "Kosmos Premium", KOC_689. A more modern model with 25 polyphonic melodies, volume control (three positions) and IP protection level. Range of 100 m.
For a summer house with a waterproof button
In this series, the best wireless calls include:
- Rexant "RX-6". The kit includes a power supply, call button and speaker. The latter is powered by 220 V, which must be taken into account when choosing. Features: 36 melodies, waterproof button, range of 80 m. The button is powered by a 23 A battery.
- Proline 2T-298 is a wireless call with a waterproof touch button, night light options and a range of 100 m. The user is offered 48 melodies to choose from. The call key is powered by a 12-volt battery, and the speaker is powered by a 220 V network. The operating volume is from 50 to 80 dB. Signal transmission power - up to 10 mW, frequency - 433 MHz. The kit includes a call button, speaker and battery.
For an apartment with Wi-Fi
One of the most popular models is Cleverdog. This is a standalone wireless Wi-Fi call that provides up to 90 days of operation. After installing it, you can view information from your mobile phone and enlarge the image (up to three times). Camera viewing angle is 85 percent.
Cleverdog Wireless Call Features:
- Receiving messages from visitors. If the owner does not answer within 15 seconds, the system goes into voice notification mode.
- Possibility of visual contact with the visitor.
- Long validity period - up to three months.
- Outputting video to the screen.
- No wires and easy to install. To get started, you need to install the application, connect the device and secure it with screws.
- Degree of protection IP 65.
- Operating temperature from -10 to +60 degrees Celsius.
With two buttons
If there are two inputs (for example, in a country house or in a private house), you can use wireless calls with two buttons. Popular models:
- Proline 2B-289. It has 48 melodies and a range of up to 100 meters. Operating frequency - 433 MHz. The kit includes a pair of buttons and one speaker. The button is powered by a battery, and the sound source is from a 220 V network. The sound volume ranges from 50 to 80 dB. The device can be used in a store, office space, country house or other places. During operation, it is recommended to use alkaline batteries, which have a long service life. It is prohibited to disassemble or repair the equipment yourself.
- QUSUN D035K2 DC. This is a popular wireless call with two buttons and 36 ringtones to choose from. The radius of application is up to 150 meters. The button is powered by a 23-amp power supply, and the speaker is powered by simple AA batteries. Operating frequency - 315 MHz. The scope of application is different - installation in the country, in a store, in an office and other points. The kit includes two call buttons, a speaker and a 23 A battery (two pieces).
- Also supplies wireless calls with two buttons.
Wireless call with two speakers
Buying a wireless doorbell with two speakers is useful for large rooms. In addition, an additional sound source can be installed in the backyard or second floor. Popular models:
- Proline B-288-2 is a wireless call with one call button and two speakers. The button is protected from water. There are 48 melodies to choose from. The working distance is up to 100 meters. The call key is powered by a 23-amp power supply. Features - presence of a night light function, power supply to the speaker from 220 V, presence of an LED indicator on the sound source. Volume - from 65 to 75 dB (four levels of adjustment).
- Proline A-298-2 is a wireless call equipped with two speakers and one waterproof call button. The user is offered 48 polyphonic melodies to choose from. The call key is powered by a 23-amp source, and the speaker is powered by 22 volts. Working distance - up to 100 meters. A night light function is provided. Volume from 50 to 80 dB.
No batteries
Some devices operate without batteries. Popular models with an alternative type of power supply include:
- Wireless call Proline HT-W4U02. The product is powered by a constant voltage of 5 V. Operating frequency is 433 Hz. The operating range is up to 80 m. The user is offered up to 389 melodies with the ability to set one of three volume levels. The special feature of Proline HT-W4U02 is the conversion of kinetic energy. The moment the button is pressed, mechanical pressure is converted into energy. Next, a special module sends the signal to a distance of up to 80 m before the call. The latter is connected to 5V power via a USB port. Immediately after this, the selected melody sounds.
- Proline HT-W4U01 is an equally popular wireless call that works on the same principle. Its range is limited to 80 meters, and the number of melodies is 38 (three volume levels). Operating frequency - 433 MHz.
The absence of a power source on the button eliminates the need for batteries and saves money on their purchase. Moreover, wireless devices without batteries are more reliable. They are unpretentious to different weather conditions and are not afraid of contact oxidation.
How to connect a wired doorbell: preparatory stage
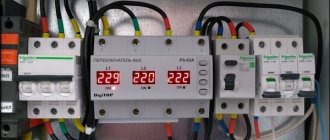
Before connecting a wired call, you need to prepare tools and materials for work. You will definitely need an indicator screwdriver to determine the zero and phase of the electrical network.
There are various modifications of the instrument: the devices differ in design and display options. Despite this, all indicator screwdrivers have the same operating principle. They show the presence of voltage in the network and the relative placement of phase and zero. To do this, apply the metal probe of a screwdriver to the protected end of the electrical cable. If the light on the indicator lights up, this indicates that a phase has been detected. The indication does not work on the zero contact.
To implement a diagram for connecting a 220 V doorbell to an apartment, you need to take a regular screwdriver, pliers with insulated handles, a terminal block or clamping terminals for connecting wires, a stripper for stripping conductors, insulating tape, and plastic clamps.
During the installation process, you will need an indicator screwdriver
An important step is choosing the optimal cable for wiring. Its cross-section should not be more than 1.5 mm². It is not advisable to use a larger diameter cable, since the power consumption of the device is small. The wire must be made of the same material as cable products for electrical wiring in the apartment. Copper wires are most often used, since aluminum cable has a number of disadvantages.
How to install a doorbell: getting started
Before connecting a 220 V bell, you must turn off the power to the house or apartment. To do this, turn off the machine on the distribution panel. If there is an old bell, it is completely dismantled, which consists of removing not only the button and the main unit, but also the cable products.
After the necessary tools and materials for the work have been prepared, at the first stage of implementing the 220 V bell connection scheme, the speaker is installed via a button. The device is usually equipped with holes for mounting and an input socket for electrical wiring. First of all, the element is placed on the wall to make holes for the conductors. The evenness of fixation is checked with a level.
The ends of the prepared sections of connecting wire are stripped. According to the diagram for connecting a bell to an apartment, one end of the cable is passed into the prepared hole and pulled to the location of the button. Both elements must meet in the junction box.
Before installing the bell, you must turn off the electricity at the distribution panel.
It is convenient to place the button at a height of no more than 1.5 m. To do this, make a hole in the wall or door frame. The cable from the bell is threaded into it so that it extends 10-15 cm from the outside. The end of the wire is stripped with a stripper, and no more than 2 cm is exposed.
How to connect a bell in an apartment or house: installation of cable products
When connecting a wired bell to an apartment, it is most convenient to work with color-coded wires. The blue cable points to zero. The yellow or green color of the wire determines the protective ground loop, and red, black, white or brown indicates the phase. If there is no color marking, the location of zero and phase is determined using an indicator screwdriver.
How to connect a bell in an apartment? The diagram will help you understand the details of installing the device. The neutral wire must be connected directly through the terminal to the cable that goes to the bell. The phase wire is connected through a terminal to a cable laid to the button. The second conductor of this cable product is also connected via a terminal with the second wire going to the bell. Both cables connected to the button must be stripped and clamped into its terminals. After this, the button is closed with a cover, which is secured with a screw.
The cable products that come out of the junction box and go towards the bell are clamped into its terminals or connected to the wires coming out of its body. Switching occurs taking into account the location of zero and phase.
Wired doorbell connection diagram
Important! For budget models, the position of zero and phases at the output is not important, however, for doorbells with advanced functionality, the placement of conductors L and N is specifically indicated on the terminals.
If you use a doorbell in a metal case or install a button outdoors, a protective grounding wire must be provided. When connecting cable products, you can not only use terminals, but also twist them. This is permitted if special contact caps are used.
How to install a bell in an apartment or house using a transformer and without it
If a bell is connected to an apartment via a transformer, it is necessary to make technological holes in the panel panel to fix it. The device is securely fastened with screws. A wire that comes from the bell is connected to it outside. It has two ends that can be fixed regardless of where the zero and phase are located, since after the transformer both contacts are equivalent to the phase.
The wires are securely fixed in the terminals. After the transformer, the supply voltage is no more than 20 V, which makes it safe. Cable products should be secured to the brush. If the wires are too short, additional pieces of cable are added to them using blocks or clamps. The ground wire is connected first. Next, the neutral and then the phase cable are connected.
The doorbell can be connected via a transformer or without it
How to connect 2 doorbell wires without using a transformer? The process is carried out on a principle similar to installing the device. However, in this case, one cable from the button goes directly into the machine and is connected to a phase. The second wire is routed to the main bell unit. Another cable comes out from here, which is connected to zero to the machine.
Non-standard doorbell connection diagrams
In practice, there are cases when it is necessary to install two buttons on one call or two main units. The implementation of the first option is carried out by parallel connection of call buttons in apartments. The installation diagram clearly shows this. The phase is supplied to the first button, from where the cable is routed to the second button. From it, from the second free contact, a conductor goes to the same input of the first key, from where it goes to the main bell block.
Important! The cable that will connect the two buttons should be the same color as the wire that comes out of the junction box.
There are situations when it is necessary to connect two doorbells. This option is often implemented for a private home. For example, calls can be on different floors, in different parts of the house: one inside the cottage, and the other outside. The simplest solution in this case is to purchase a wireless bell, the connection diagram of which was described above. The device is equipped with two elements that are tuned to the same frequency.
Wiring diagram for a doorbell with two buttons
When using wired options, parallel connection of the main units is carried out according to a similar scheme that was discussed earlier. The phase wire of the button is connected to the first block, from where it is routed to the second. A neutral cable from the junction box is connected to the free conductors of both calls.
Installation features
Installing a wireless call is not difficult, so you don’t need to call a paid technician to solve the problem. Problems are only possible when connecting additional elements, for example, a camera, motion sensor and others. In other cases, problems are excluded.
When choosing an option, it is important to take into account that it is easier to attach Velcro, but then the key may fall or be stolen. It is better to install using self-tapping screws. When installing outdoors, it is important to ensure there is a canopy to protect from water and sun.
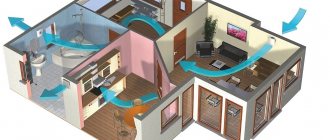
There are also no problems with installing the product inside the house. If you have a large room, second floor or workshop, it is worth installing an additional sound source. In this case, you can exclude the possibility that the call was not heard.
The installation takes place in several stages:
- Study of the configuration. At this step it is necessary to inspect the composition of the product. Advanced models may have additional devices, for example, video cameras, motion sensors and others. It is important that all items are in the box (taking into account the existing list).
- Selecting a location for installation. When searching for an installation point, one of three options is available. A common way is to mount it on the door (directly into a metal or wooden panel). Alternatively, you can install a wireless key near the entrance (near the trim). This will require the use of screws. For private houses or cottages, installation near the gate is suitable. When searching for a location, it is important to ensure protection from moisture and dust.
- Installation. After selecting a suitable mounting point, you can proceed directly to installation. When fastening near the door, we make holes using a hammer drill, having previously marked the place of fixation. To avoid mistakes, the drill diameter must be selected in advance. Next, install the button using self-tapping screws. If there was a wired product in the same place, it must be removed after first removing the voltage from the connected wires. If the old holes are not suitable for installing a new product, they should be covered with putty.
- Installation of blocks indoors. Internal elements do not have to be mounted on the wall. An alternative option is to install the product on a bedside table near the door or near the place of use. To mount it to the wall you will need the hammer drill mentioned above. If the bell needs power, we supply it taking into account the recommendations in the instructions.
At the final stage, it remains to check the functionality of the device. After pressing the key, music should sound (provided that it is installed correctly). From this moment you can use the device.
How to choose?
If you don’t know how to choose a wireless call, then analyze models at different prices from the same manufacturer, then compare them with other brands according to different parameters - the signal power of each sensor, range, operating conditions (temperature and range), external design and the country of origin.
The main differences between street and apartment devices
There are no design differences between the models, since the operating principle is the same. Some points worth noting:
- For apartment options, the strength of the hull may be reduced, since the operating conditions on the train are more favorable - there is no rain, snow or frost.
- Anti-vandal protection and additional canopies are not required, since the entrances have a security system.
- It is irrelevant to install a sensor that transmits video, since there is a peephole on the front door.
- The range of an apartment sensor can be minimal, unlike a street sensor.
Which is better, wired or wireless calls?
| Wired calls | Wireless devices | |
| Advantages | Endurance at low and high temperatures. Reliability and accuracy of the transmitted signal. | No wires, easy installation. Possibility to supplement the system with different sensors. Ease of use. |
| Flaws | Complexity and cumbersome installation. Lack of settings for the siren action. | Limited temperature range during operation. High cost of the system. The need for anti-vandal protection. Requires battery replacement. |
DIY installation features
A quick read of the instructions is enough to understand how to set up a wireless call.
- Choose a location for installing the button on the gate, gate, fence, under the canopy, on the door frames.
- For fastening, use double-sided tape and press tightly to a grease-free, warm installation location.
- Sometimes self-tapping screws are used for the recess in the button body. If the gate is made of corrugated sheets, then holes are drilled according to the markings and treated with an anti-corrosion compound.
- Inside the room, access to the device is left for turning it off and changing melodies. If you need to install a monitor for observation, then make a special stand. An advantageous option for placing the gadget would be a place on the wall next to the door.
- There is a recess on the body of the device, so the mechanism is hung on a driven nail.
Connection
Before commissioning, batteries are inserted into the push-button mechanism and the necessary settings are made on the receiving device - selecting a melody, setting and testing the operating range, checking the connection.
Fastening
The bell is installed outdoors using a particularly strong fastening – self-tapping screws made of galvanized steel. After fastening with metal fasteners, the joints of the gate leaf and screws are treated with sealant.
Principle of operation
The operation of a regular doorbell is that the button located outside is connected by a wire to the speaker, which is located inside the apartment, as well as to the electrical network. If a person outside presses the button, the signal goes through the wire and the bell rings.
Wireless devices work on a similar principle, but with some differences. The signal here does not travel through a cable, but through radio waves. This is much more convenient, since you don’t need to bother with wires. Another difference is in the power supply of the device: a wireless device requires a small battery, similar to a battery. This allows you to avoid running the electrical network to the bell.
There are also combined devices: the external part is powered by a battery, and the speaker located in the house is powered by the mains. The speaker is also equipped with a receiver that responds to radio waves.
The range of the device directly depends on the materials used in construction. Thick concrete and brick walls can partially jam the signal.
Modern models on the market have advanced functionality. For example, you can choose a ringtone not only from the basic assortment, but also install any one you like using a flash drive or mobile phone.
Some models have several speakers in the basic kit. This allows you to place them in different parts of the house where the sound from the main device is difficult to hear. You can also purchase several outdoor devices - a good option for those who have a large area with several entrances.