When designing a roof, it is recommended to pay special attention to the distance between the edge of the eaves light and the wall of the building. If this gap is up to 40 cm, then it is worth considering that water flowing from the roof during precipitation will directly fall on the wall and blind area, while strong gusts of wind will blow into the space under the roof. The filly in the rafter system is used quite often; with its help it is possible to arrange an overhang of the required size.
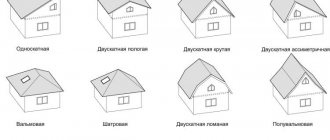
What is a filly on the roof
The filly is an element that is present on the roofing frame. The purpose of this element is to lengthen the rafter leg, which rests on the mauerlat of the structure, made of brick or blocks, and is located on the top frame of the structure made of logs or beams.
To put it simply, a filly in a rafter system is a piece of board used as a continuation of the rafter system, resulting in an overhang on the roof. As a rule, this element is suitable for the rafter system in cases where the rafter leg does not have the required size, which prevents the formation of an overhang.
To install fillets on the rafter system, it is recommended to choose boards whose cross-section is much smaller than that of the boards suitable for the rafter system. In addition, thanks to this approach it is possible to significantly facilitate installation work.
The use of this material in the rafter system can significantly facilitate installation work on the construction and further repair of the roof frame. In addition, it is possible to significantly reduce the level of load on load-bearing walls and foundations.
This is due to the following:
- since the length of the rafter leg will be much shorter, it is not necessary to provide for an overhang of 40-100 cm beyond the plane of the walls for further arrangement of the overhang, as a result the structure is quite light, short and not so expensive in cost;
- installation work is carried out on boards that are thinner compared to the building material suitable for arranging the rafter system, as a result the weight of the structure becomes much less;
- if necessary, it is possible to quite easily align the line at the overhang, and if an error is made in the construction, then it will be enough to replace this element;
- If during operation the support of the eaves overhang begins to rot, then it will be enough to replace the damaged element rather than carry out repair work.
In addition, it is worth considering that fillies in the rafter system can be used during the construction process as a decorative element. If necessary, this product used in the rafter system can be given any shape, making it as decorative as possible.
Attention! For a better understanding, it is recommended to look at what the fillies on the roof look like in the photo.
Why increase the length of the rafters
As a rule, the rafters in their lower part rest on the top of the walls. In houses made of bricks and blocks, the above-mentioned Mauerlat is used for convenience. There is no need for it in wooden buildings. The rafters are fastened directly to the walls.
Let's say that the rafters will not be extended, and the roof will be laid, only slightly extending beyond the plane of the vertical structures of the house or outbuilding. In this case, moisture will drain from the roof directly onto the walls, which will lead to the following negative consequences:
- the wall material will get wet, allowing moisture to pass into the premises, which will certainly lead to the formation of fungus and mold, the activity of which is not beneficial for humans;
- Overmoistening contributes to the rapid destruction of wall material.
- Repeated cycles of freezing and thawing have a similar effect on the frame of a house.
All of the above led to the need to extend the edge of the roof beyond the walls by 45-60 cm in accordance with the existing GOST. Thanks to this, these negative aspects will be eliminated.
Installation of fillies on the roof
The eaves overhang, which has a width of 90 to 100 cm, is quite easy to install. To do this, you will need to secure the fillies to the roof using rafters for these purposes. The rafters in this case should be installed along the Mauerlat or on the top trim. The fillies are a continuation of the rafter system, as a result of which, during installation work, sheathing, waterproofing material and roofing must be installed on them. Before installing the decking, it is recommended to install a cornice board along the edge of the roof, on which the drip line will later be located.
After the roof is completely installed, it is necessary to sew up the overhang on the eaves. For these purposes, you can choose soffits or jointed boards. The location must be perpendicular, with a small gap remaining so that ventilation is not impaired. Thanks to air circulation, moisture will be removed, as a result of which the process of rotting of wooden elements can be prevented.
If you plan to install an overhang, the length of which will be more than 1 m, then in this case the filly on the roof will experience a fairly large load. In order to prevent roof collapse, it is recommended to support the elements of the rafter system on consoles, which are beams located in a vertical position.
As a rule, the consoles can be separate; they do not necessarily have to be connected using a horizontal connection along the perimeter of the entire slope. In this case, the fillies can rely on the Mauerlat. As practice shows, the choice of design depends entirely on the width of the cornice extension. It is recommended to use consoles if the material for the filly exceeds 1.5 m.
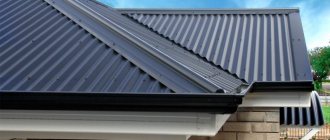
Roof eaves functions
The eave is the lower part of the roof slope that is outside the plane of the wall. The frame of the eaves is the rafters or their extension (fillies); from below, the space between the edge of the roof and the wall can be covered with boards, ordinary siding or special soffits for the sake of aesthetics and in order to protect the space under the roof from the penetration of birds.
Be sure to read: Attaching rafters to floor beams: basic methods
The list of functions of the cornice includes
:
- Protection of wall structures and their finishing from moisture during rains, snowfalls, and thaws. The appearance of the walls retains its attractive appearance longer; structural elements made of wood do not become damp or deteriorate.
- Protection of the blind area from water flowing from the roof. This prevents moisture from penetrating the foundation and extends the service life of the blind area.
- Preventing the penetration of moisture into the roof frame - the eaves sheathing protects the rafter system from splashes of water during oblique rains with gusty winds.
- Protect windows from direct sunlight. This allows you to maintain comfortable living conditions in the premises on hot summer days.
- Aesthetic completion of the roof structure. Hemming the cornice hides the “wrong side” of the rafter system and adds attractiveness to the house.
Lining roof eaves with soffits
In the climatic conditions of central Russia, the recommended minimum width of the eaves overhang is 40–50 cm, unless provision is made for a roof drainage system - in this case, the structure will protect the blind area from precipitation and melt water flowing down the roof slopes.
The fillies are made from boards with a cross-section of 30×100 or 30×150 mm. The wood must be dried, free from damage, rot, and knots. Before installation, elements cut to size are treated with fire and bioprotection agents. The length of the filly is calculated as follows: 50 cm is added to the designed width of the roof overhang for attaching the element to the rafter leg.
Roof frame dimensions
If during the construction work it was decided to use fillets for the rafter system, it is recommended to correctly make calculations and calculate the length of the filly in the rafter system. As practice shows, it is best to carry out installation after the roof has been installed. When calculating the required length of the parts, it is important to understand that a margin of about 30-50 cm must be made, since the fastening will be carried out overlapping.
Only after this can you begin to select materials for further work. In this case, it is allowed to use boards with a cross-section of 50*150 mm, while 120*40 mm or 100*30 mm are perfect for making fillies. Many experts recommend giving preference to materials made from coniferous trees. In this case, it is necessary to ensure that the humidity level varies from 8 to 10%. There should be no rotten fragments or knots on the elements.
Advice! After all the parts have been prepared and adjusted to size, it is recommended that all elements be thoroughly treated with an antiseptic composition, which will prevent the appearance of rot and fungus during operation.
How is a cornice formed?
A wide roof eaves are the key to safe operation and more convenient maintenance of the building. It is formed by increasing the length of the roof slope by 40-50 cm. There are 2 technologies for installing the cornice:
- Due to the use of longer rafters. The easiest way to create a wide eaves overhang is to use rafter legs for mounting the rafter frame, the length of which is 40-50 cm longer than the length of the slope. However, this option has one drawback - the frame turns out to be quite massive and expensive. In addition, if the roof slope is more than 6 meters long, then it becomes quite problematic to find lumber, the dimensions of which allow the formation of a more or less decent cornice.
- Due to the installation of fillies. To form an overhang of the required length, it is fashionable to use fillies. The roof filler is needed to increase the length of the rafters without unnecessarily weighing down the frame. They are attached to the end of the rafter leg to increase the length of the slope. The fillies can extend the cornice to any length, and this technology is cheaper, since boards of a smaller section are used, which are inexpensive.
What are fillies for rafter legs?
Important! Professional roofing craftsmen recommend using fillets to form the cornice, as it is often cheaper. In addition, it is more convenient in terms of installation, since it is not necessary to lift and move rafters of great weight and length along the roof.
How to make fillies for rafters
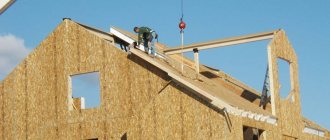
It is recommended to carry out roof construction work, where it is planned to install fillets on extended rafters, using standard technology. After the rafters are installed, it is necessary to proceed to the preparation of other elements, the number of which should be equal to the legs used.
The size of the elements depends entirely on the width of the overhang, to which it is worth adding about 30-50 cm for fastening. It is important to remember one rule - the longer the fillies used, the more reserve you will need to leave for fastenings. This is the only way to achieve the required level of rigidity and completely eliminate subsidence of the erected structure. It is recommended to use boards of the required section or trim from beams.
The step-by-step installation algorithm is as follows:
- The first step is to prepare a template according to which the elements used during construction will be cut out. After this, each trim must be treated with a fire-retardant composition. Installation must be carried out with an overlap on the rafter system - about 30-50 cm, after which the upper ends of all elements are leveled. Rough or regular nails can be used as fastening. To ensure high-quality adhesion, each node should require up to 4 nails, which are driven in 2 on each side. To ensure that the fasteners do not loosen during operation, the ends of the nails must be bent.
- Initially, the outer fillies located on the slope must be secured, and the size of the overlap must be measured as carefully as possible. You will need to tighten the cord between these elements, and then carry out further installation. This method is excellent for short-length slopes, since the cord used should not sag.
- If during the construction process the overhang requires the presence of consoles, then the fillies should be fastened flush from the side of the horizontal beam. To strengthen the structure, it is recommended to additionally install reinforced or continuous sheathing, which will allow achieving the desired level of rigidity.
- After the construction work has come to an end, the cornice will need to be hemmed.
It is allowed to use soffit, siding or boards as a backing - this method will prevent moisture from getting inside the rafter system.
Why don't they use longer rafters?
The first method that comes to mind to solve the problem of short slopes is to lengthen the rafters by the required 65-85 cm in accordance with calculations using the Pythagorean theorem. If we take into account that, depending on the angle of the roof, the length of the frame ribs can reach 8-10 meters, then an increase by seemingly small amounts will lead to an increase in the load on the house frame, which is already quite large.
In addition, the extension of the rafters beyond the walls will require the manufacture of a complex groove system for fastening to the Mauerlat. When installed at the bottom end, the connection process is much simpler. Lengthening the rafters also leads to an increase in the mass of the parts, which complicates their lifting to the top. The work of aligning the lower ends of long parts to bring them into a common plane is also complicated.
Using a filly can slightly reduce the severity of these problems. This is done by reducing the thickness and width of the parts used to lengthen the rafters. Considering that the load on the lower parts of the frame ribs is not large, this solution is considered optimal.
Tips and tricks
When carrying out construction work, it is important to take into account that the fillies on the rafters must be cut off at the same level as the wall of the building. The length of the board used for arranging the overhang depends entirely on the desired size.
The length of the cornice filly must necessarily be increased by 30-50 cm, since the work will be carried out overlapping. In addition, this approach ensures high-quality fastening.
The elements used must be made from the following tree species:
- larch;
- pine;
- cedar.
It is important to consider that the service life directly depends on the quality of the materials used during roof construction and the technologies used.
Attention! It is not recommended to use a croaker.
Calculation of rafter system parameters
The rafter system is formed not only by the rafter legs. The design includes a Mauerlat, racks, struts and other elements, the dimensions of which are strictly standardized. The fact is that the components of the rafter system are supposed to withstand and distribute certain loads.
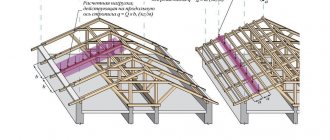
The elements of the rafter system of a simple gable roof are rafters, purlin (ridge board), racks, beds, mauerlat and rafter legs (struts)
Mauerlat
Mauerlat is a structure of four beams that connects the brick, concrete or metal walls of a house with a wooden load-bearing roof structure.
The Mauerlat beam should occupy 1/3 of the space at the top of the wall. The optimal cross-section of this lumber is 10x15 cm. But there are other suitable options, for example, 10x10 or 15x15 cm.
The main thing is not to take beams less than 10 cm wide to create a mauerlat, as they will seriously let you down in terms of strength. But lumber with a width of more than 25 cm will not raise doubts about its reliability, but it will put pressure on the house so that it will soon begin to collapse.
The Mauerlat must be narrower than the walls, otherwise it will put excessive pressure on the walls
The ideal length of the beam for the base under the rafter system is equal to the length of the wall. It is not always possible to meet this condition, so the Mauerlat can also be constructed from segments that are completely or at least approximately equal in length.
The bed acts as an element of the rafter system, which is in a lying position and serves as the basis for the rack (headstock) of the supporting roof structure.
A beam of the same cross-section as the Mauerlat is usually used as a beam. That is, the optimal size of a horizontal element on an internal load-bearing wall is 10x10 or 15x15 cm.
The size of the bench is no different from the Mauerlat
Ridge beam
Due to the size of the ridge beam, into which the rafters rest at the upper end, the weight of the roof should not exceed acceptable limits. This means that for the ridge it is necessary to take a beam that is quite strong, but not heavy, so that other elements of the supporting structure of the roof do not bend under its pressure.
The most suitable pine lumber for the roof ridge is a beam with a section of 10x10 cm or 20x20 cm, like the racks of the structure.
The ridge purlin should not be thicker than the rack of the rafter system
filly
A fillet is a board that extends the rafter if it is unacceptably short.
When using fillies, the rafter legs are cut flush with the outer wall. And the boards that extend them are selected in such a way that they form the necessary overhang of the roof and are no thicker than the rafters themselves.
An extra 30–50 cm must be added to the length of the filly, which will be used to combine the rafters with the additional board and make the connection between the frame and the roof overhang as strong as possible.
The thickness of the filly is inferior to the rafter leg
The post is the same as the center support. The height of the vertical beam in the rafter system is usually found using the formula h = b1 xtgα – 0.05. h is the height of the rack, b1 is half the width of the house, tgα is the tangent of the angle between the rafters and the mauerlat, and 0.05 is the approximate height of the ridge beam in meters.
It is recommended to create racks from beams with a section of 10x10 cm.
The main requirement for racks is stability, so they choose beams as thick as a bench
A strut is an element of the rafter system, which is mounted at an angle of at least 45° (relative to the horizontal cut of the walls) with one end on the rafter, and the other on a tie laid in the direction from one wall of the house to the other, close to the vertical post.
The length of the strut is determined by the cosine theorem, that is, by the formula a² = b² + c² - 2 x b x c x cosα for a flat triangle. a denotes the length of the brace, b is part of the length of the rafter, c is half the length of the house, and α is the angle opposite to side a.
The length of the strut depends on the length of the rafters and the house
The width and thickness of the struts should be identical to the same dimensions of the rafter leg. This will greatly facilitate the task of securing the element to the roof frame.
The tie is installed at the base of the rafter system and plays the role of a floor beam. The length of this element is determined by the length of the building, and its cross-section does not differ from the parameter of the rafter legs.
The tightening can be called a ceiling joist in another way.
Sliding support for rafters
A sliding support or element of the rafter system, allowing it to adapt to changes in configuration, must be characterized by the following parameters:
- length - from 10 to 48 cm;
- height - 9 cm;
- width - 3–4 cm.
The size of the sliding support should allow the rafters to be well fixed to the roof base
The size of the boards that will become the rafters of the roof with symmetrical slopes is not difficult to determine. The formula from the Pythagorean theorem will help with this: c² = a²+ b², where c acts as the required length of the rafter leg, a denotes the height from the base of the roof to the ridge beam, and b is ½ part of the width of the building.
The parameters of rafters that differ in asymmetry are also recognized using the Pythagorean formula. However, the indicator b in this case will no longer be half the width of the house. This value will have to be measured separately for each slope.
Using the Pythagorean formula, you can calculate both the length of the rafters and the height of the rack
Rafters are usually boards with a thickness of 4 to 6 cm. The minimum parameter is ideal for buildings for utility purposes, for example, garages. And the rafter system of ordinary private houses is created from boards 5 or 6 cm thick. The average width of the main elements of the supporting roof structure is 10–15 cm.
With a large pitch and a significant length, the cross-section of the rafters will certainly be increased. Let’s say that when the distance between the legs of the supporting roof structure reaches 2 m, a section of 10 × 10 cm is chosen for the rafters.
The length of the rafters is influenced by the degree of roof slope and the length of the space between the walls located opposite each other. As the roof slope increases, the length of the rafter leg increases, as does its cross-section.
The size of the rafters is determined by the size of the gap between them
Table: correspondence of the length of the rafter leg to its thickness and pitch
Rafter angle
The value of the rafter angle is determined by the formula α = H / L, where α is the angle of inclination of the roof, H is the height of the ridge beam, and L is half the span between the opposite walls of the house. The resulting value is converted into percentages according to the table.
How the rafters will be inclined depends on two indicators - the height of the ridge and the width of the house
Table: determining the rafter angle as a percentage
Video: calculating the size of rafter legs
For each element of the rafter system, there are averaged size data. You can use them as a guide, but it is better to calculate the parameters of the racks, struts and other components of the supporting structure of the roof in special programs on a computer or using complex geometric formulas.
Subscribe to our channel in Yandex.Zen
- Ksenia Zubkova
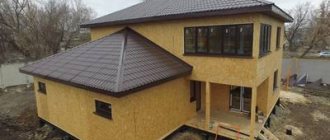
We complete the installation of the cornice
If decorative fillies were chosen for construction, or even in ordinary ones, with the help of impregnations, it was possible to reveal a beautiful wood structure, then in this case the work on organizing the consoles can be completed. In other cases, they resort to installing a cornice box. The main thing to remember is that the entire roof must “breathe”. That is, there must be circulation of air coming from the eaves, passing through all layers of the roof and exiting outside. This process is natural ventilation, keeping each roof element dry and extending the life of the structure as a whole.
To install a cornice box, another element is attached horizontally to each filly - a hemming board. The design is necessary to obtain a closed contour: fillet - hemming board - section of wall. Next, the cornice is hemmed. When choosing materials and installing a box, you should remember not only that the quality of its execution will affect the aesthetic perception of the house as a whole, but also the need to create a “breathable” roof. Therefore, the cornice, like other roofing elements, cannot be mounted hermetically; the use of polyurethane foam or silicone is not recommended.
The cornice is an important element of the roof. It is necessary to take into account all the details and take a responsible approach to both its design and design. Neglect of the advice given in the article will inevitably lead to disruption of the roof microclimate, accelerated rotting of wooden structures and premature failure of the roof as a whole.