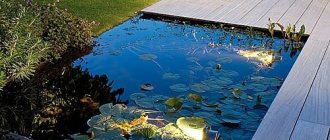
A real body of water on a site is its decoration and pride. Such a structure will decorate the landscape of the local area, provide coolness, which is so often lacking in hot regions, and become a place for relaxation and walks. However, it is not enough just to dig a pit and fill it with water, because the construction of a pond is a complex topic that we will understand. How to dig a pond and put it into operation - instructions for use!
Country fish pond - multi-level structure
Planting aquatic plants for the pond
Aquatic plants saturate the pond with oxygen and decorate the entire water area.
Many representatives of the flora can be planted in your own pond: urut, elodea, water lily nymph, water hyacinth. Even the houseplant cyperus in the summer amazes with its rapid growth, being immersed together with the pot in a pond. If your pond has tiered terraces, then the plants are selected according to their residence in the natural tiers. It is unacceptable to overload the reservoir due to possible disruption of the entire system. For 1 square meter there are approximately 3 large plants near the shore (iris, loosestrife) or 4 small ones (marsh forget-me-not). At shallow depths there are 2-3 types of plants: cattail, calla lilies, etc. For a deep level, choose a capsule or water lily.
Plants need to limit their growth, otherwise a beautiful pond will turn into an unimaginable swamp in the shortest possible time. To do this, they are planted in pots. Planting is carried out in water that has been heated and settled for at least a week. 2 parts of clay and one part of peat are placed in a pot or basket, where the plant is immersed, around which pebbles are poured.
Aquatic plants for a pond in the country:
Arrangement and filling of the pond
In order to breed fish, you need to create all the conditions for its comfortable life:
- cover the plastic covering at the bottom of the pond with clay and sand;
- make a wintering pit for fish;
- install artificial burrows and places for laying;
- lay logs and stones on the bottom, plant algae in the pond, that is, create conditions close to natural.
The logs need to be weighed down with weights so that they do not float when the pond is filled with water. The place for luggage is a wooden canopy with several artificial holes made of plastic pipes or bottles.
The canopy can be raised above the surface of the water and a ladder attached to it. Then you can swim in the pond.
At this stage, you can fill the pond two-thirds with water and add a few fish there. As a rule, 20% of the maximum number of individuals is first populated. A pond designed for 250 fish can accommodate 50 small fish. It is desirable that these be three different types.
How to dig a pit
Before digging a pit, outline the contours
Before digging a pit, its contours are marked on the site. If it has a rectangular shape, place pegs in the corners and tie them with a cord. If the configuration is complex, you will have to lay a rope along the entire intended contour and secure its position with pegs or stones. You can also use a can of spray paint and simply paint the outline on the ground.
First, the pit is deepened to the depth of the coastal zone. Then they outline the area where the bottom should be deeper and dig a hole in this area. If there is a third deepest zone, the operation is repeated, resulting in a multi-level bottom.
Digging methods
If the pit is large and deep, construction equipment is involved
You can dig a pit manually or using machinery.
- An excavator is a faster way. The excavator develops more power. If the bottom of the reservoir is flat, a pit can be dug in 1 day. In practice, this takes more time, since it is necessary to mark the depth levels according to the plan, and this can only be done after a hole has been dug at a certain level. The main disadvantage of this solution is the price. But there is also a limitation on the minimum volume of soil to be removed. The technique is usually used to dig a large swimming pool.
- By hand with a shovel. Workers are hired to dig the trench. It takes much longer, so in the end it is not much cheaper than using technology or even at the same price. However, you can manually dig a pond of any configuration and with a complex relief bottom.
A mandatory element of the work is compaction. Regardless of the type of base, the top layer of soil should be compacted. For this it is better to use a vibrating plate.
How to choose waterproofing
It is cheaper and faster to install a membrane as waterproofing
It is important not only to dig a pond, but also to choose the right foundation. The soil allows water to pass through
In order for the liquid to be retained for a long time, it is necessary to waterproof the bottom and walls. They use different methods for this.
- A clay castle is the simplest option, quite accessible to do it yourself. The clay used is oily, almost without sand. Soot is first poured into the bottom of the trench to repel worms. Then lay out the clay in 3 layers so that the total thickness of the castle is 15 cm. Each subsequent layer is applied after the first one has completely dried. The technology is labor-intensive and time-consuming. But the cost is minimal.
- Another simple solution is high-density polyethylene film. The material is durable, wear-resistant, completely waterproof. For the pool, take a film with a thickness of at least 3 mm. It is advisable to lay 1 large piece, which would be enough to cover the entire bottom. If this is not possible, obtain the largest possible fragments. The sheets are joined together by soldering or glue. Glue with overlap. The edges of the film should extend beyond the edges of the pool. You need to spread the film over a compacted sand cushion.
- Concreting requires more material costs, but is also the most reliable solution. Concrete itself also allows water to pass through, so a waterproofing film is first laid on the bottom and walls of the pit. But concrete gives the pool mechanical strength and durability. The concrete layer must be reinforced with reinforcement. Concrete waterproofing, unlike film waterproofing, does not need to be updated over time.
- Plastic - this option is only suitable for small ponds where fish are bred for decorative purposes. The pool is a ready-made plastic form buried in the ground. Making such a pond is the easiest way: just dig a trench, compact the bottom, place a mold in the recess and connect the pipes. Plastic models are durable: they last 20–30 years.
Requirements for slopes
The requirements for the walls of the reservoir are the same as for the bottom. The main factor is preventing collapse. However, it is more difficult to compact this part of the reservoir. In addition, you cannot place a crushed stone cushion here. Tamping is carried out simultaneously with compaction of the bottom with a vibrating plate.
The slope angle is at least 60 degrees.
Drain the water into gravel or a drainage area.
Alternative methods of waterproofing
In addition to the popular options of films, bowls and concreting, there are other ways to retain water in the tank. Let's name just a few.
Liquid rubber over a layer of geotextile. In this case, the pit is prepared as usual, but it is covered not with film, but with special geotextiles. Liquid rubber is applied on top of it in several layers. This option is especially good for small reservoirs with difficult terrain.
Tamper with a clay castle device. The method is quite complex, requiring the use of heavy equipment for compaction and therefore used mainly for large ponds for economic purposes. You can just build a clay castle with your own hands, but even in this case you will have to work hard.
Gabions and gabion structures. Metal mesh filled with stone - gabions - can be successfully used to fence the banks of a pond. Waterproofing will be required in any case, but the rapid formation of aesthetically attractive banks is guaranteed. Another convenience is that you don’t have to dig a pit, but make the reservoir above ground level.
Types of reservoirs
Before digging a pond on a site, it is necessary to accurately determine its purpose. This is not an exaggeration, since the requirements for water and the functioning of the facility are completely different.
Decorative pond - can have the smallest dimensions, any shape and, as a rule, natural circulation of water. It serves for decoration, so maximum attention is paid to the stone on the bottom and for lining the sides.
An indispensable part of such a reservoir is decorative emergent plants. Fishes are not required, and if you live periodically and not permanently at the dacha, they are also undesirable. Breeding requires constant attention and participation. The photo shows a decorative pond with a fountain.
- Swimming pool - with small volumes, requires the organization of proper water circulation and periodic disinfection. Water must meet hygiene standards, and with small sizes this is not so easy. Actually, it is not a pond - it is correct to call it a pool in which microorganisms are purposefully destroyed.
- A reservoir for raising fish with your own hands - if it is intended to be populated only by decorative species, the structure should also be classified as decorative and care should be taken to ensure its beautiful appearance. If they want to eat fish, the issue must be approached differently. This will require time, effort, and extensive knowledge of fish farming.
Another classification of reservoirs is related to their shape and method of arrangement.
- You can dig a pond with a geometric shape. This is the easiest way, especially if you are going to use an excavator.
- A raised pond with a small size looks very elegant. In addition, sufficiently high sides eliminate possible danger for small children. It’s easier to care for a pond, and you don’t need to dig a pit. However, such a pool warms up very easily, which can damage the plants, and in winter it risks freezing to the bottom - the earth does not protect it.
- Natural - in this case, the features of the relief are used under the reservoir. An undoubted advantage is the naturalness of the form and, again, there is no need to dig a pit. The downside is that the shape of the reservoir can be quite complex, making maintenance difficult.
Good advice on arranging a pond
When building a pond, it is difficult to avoid some mistakes, especially in the compositional plan. For this reason, you need to be aware of common mistakes that gardeners make.
| Plant growing zones | Plants |
| Coastal zone | Conifers, elderberries, ferns, meadowsweet, lilies of the valley, bergenia, etc. |
| Coastline | Lipstick, fluffy, marigold, speedwell, snake knotweed, forget-me-not, etc. |
| Plants for decorating shallow waters (up to a depth of 5-20 cm) | Calamus, reed, parasol, cattail, arrowhead, etc. |
| Deep-sea plants 30-150 cm | Water lily, water lily |
| Plants to decorate the surface of the water (floating on the surface of the water) | Duckweed, water paint, telores |
Pond filter
- First of all, this is container gardening. Yes, this is the option described here because it is the most common, but the fact is that using plastic containers hinders the development of plants. Gardeners are afraid to fill the pond with soil, most likely due to the prospect of dirty water. But there is nothing to be afraid of, because the soil for aquatic plants contains a large amount of clay, which strengthens the roots and is not washed away by water. But if you still don’t like this option, then do as stated above.
- Also, the banks are often decorated with stones of the same diameter. It’s better not to do this, because such a body of water looks very boring. It is recommended to combine small stones with larger ones, but not to “go too far”, that is, not to litter the banks with them.
- Ponds that are too deep resemble, so to speak, bags of stone. According to recent studies, it is more profitable for excavation companies to dig deep reservoirs, because their services are paid per cubic meter of excavated soil. But if breeding fish is not part of your plans, then a deep reservoir is completely useless.
Finally, when planning to build a pond yourself, first practice - make, for example, a miniature pond, and only then move on to larger compositions. This will significantly increase the chances of success.
Instantaneous water heater for a pond A living pond will not only delight your eyes on warm summer evenings, but will also bring some benefits in the fight against insects. The most attractive corner of the garden. Pond in the country.
Good luck with your work!
Choosing the right place for a pond in a summer cottage
The location for the water area is chosen according to several parameters: relief, illumination during the day, the presence of tall trees nearby. It is ideal when the pond occupies no more than 3-5% of the entire site: it is much more difficult to care for a large pond.
Terrain plays an important role if you want to save money on waterproofing. In this case, the site should have a lowland or depression between the hills on the ground. Water usually accumulates in lowlands and does not go into the soil for a long time. But if there are no problems with waterproofing, then the topography of the site does not play any role.
Lighting affects the purity of water: under direct sunlight, microorganisms actively multiply. Ideally, the creek is in the shade for several hours a day.
Nearby trees can damage the bottom and waterproofing with growing roots. Leaves that fall into the water serve as food for aquatic microorganisms, which can so easily turn clean water into a swamp. Therefore, if there are trees nearby, then there will always be leaves in the water, which must be removed daily.
The placement of a country pond should be in harmony with the entire appearance of the site
Requirements for slopes
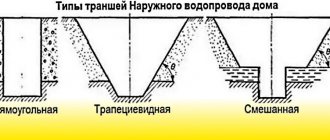
There are certain requirements for pit slopes. Deviation from the norms may lead to the collapse of the walls of the recess.
The determining parameters are the depth of the hole and the density of the earth:
The length of the recess is a minor factor. Large straight sections can also collapse, which is rare for short distances.
Step-by-step instructions for digging a pond at your dacha
Let's look at step-by-step instructions that will allow you to quickly and easily create a pond.
The boundaries of the future reservoir are marked and a pit is dug. This can be done with the help of technology, or independently. The pit depth is usually 30 cm.
The main bowl is dug in the required place. The desired angle of inclination of the walls is 45%, and the depth is at least 70 cm.
After the form is ready, you should clear the pit of stones, branches and other debris that could damage the coating. If you buy a ready-made form, then only large stones can be removed. If the covering is made of film, then it is advisable to make the area as clean as possible.
In addition, it is very important to level the bottom
Now you need to pour a small layer of sand (about 5 cm) over the entire bottom. This will prevent possible damage.
We lay an artificial bottom (covering). If this is a finished structure, then it is simply laid in the finished foundation pit. If the coating is film, then it should be carefully laid along the entire bottom, and the edges at the top should be pressed firmly with bricks or other heavy objects.
Fill the pond with water. It is best to place the hose on the bottom and wait until the required water level reaches.
If film is used as a base, then you should not immediately cut off its edges. After filling, it will begin to take the required shape, which can take up to a day. After this time, you can cut off the excess film (but still leave 20-25 cm on the shore).
Pond blind area. It can be made of brick, stone, tiles or other materials at the request of the owner. The basis of the blind area is always cement mortar, and the width should be at least 50 cm. In this case, less debris will fall into the pond, and the earth will not crumble into the reservoir.
The main mistakes of amateur designers
Plants can be brought from a natural reservoir.
An artificial pond for breeding carp or crayfish is a rather complex structure to install and operate. Errors that occur when choosing a place, introducing fish, even decorating a pond result in the loss of livestock and water blooms.
- The main mistake is installing too powerful filters. In an attempt to purify the water as much as possible, hobbyists often install carbon and polymer filters. However, the latter destroy all biological forms, while in the pond the latter constitute the lower part of the food pyramid. It is better to use biological treatment and remove excess algae manually.
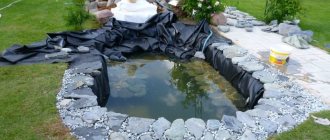
- Stones are often used to line the bottom of the pool. It is allowed to use only flat, round gravel, and not recycled crushed stone, for example, or broken brick. The corners of the latter easily cut the film.
- When decorating the banks, it is also allowed to use only round stones. They are laid out in rows so that the lower ones serve as a support for the upper ones.
- Plants in a pond are chosen not for their beauty, but for their compatibility with the fish living here.
- Low plants that do not produce abundant flowering are planted around the pond.
It is necessary to control the acidity level of the water. When the indicator drops to 5, it is necessary to dissolve a portion of limestone or soda in the pool.
Work on creating a hole for a lake or pond
The first thing you start with when constructing an artificial reservoir is planning. It is better to draw a sketch on graph paper.
Planning
The planning procedure proceeds as follows:
- Using a compass, the south and north sides are determined and markings are made on the plan.
- Objects that cast shadows (buildings, large trees, fences) are marked. This should be done in sunny weather during the day every 2 hours, reflecting on paper places of partial (blessed for 4-6 hours) and full shade. Partially sunny locations are ideal for placing ponds. Under such conditions, flowering can be avoided without harming the vegetation and inhabitants of the reservoir.
- The optimal location on the site for the pit for the pond is selected. There should be no underground communications or large objects laid nearby.
- The type of pond is determined by its purpose.
- The dimensions of the pit, its depth, shape and profile are being worked out. Data to scale is plotted on the plan.
- The pit zones are being worked out, taking into account their purposes and design.
Land works
After developing the plan, you can begin preparing the territory and excavating the soil. These works are carried out sequentially in several stages:
- Preparing the site for the pond.
- The area is marked according to the sketch. You can use twine and pegs for this.
- Excavation of soil with an excavator or shovel.
If the work is carried out using an excavator, then it must be a tracked one with a rotating tower and a 1-2 cubic meter bucket. It is better to start digging from the edge, gradually moving towards the center, going deeper in the right places. During work, you need to check the uniformity of heights using a level. The banks should be at the same height relative to each other. You can adjust the height using the soil left over from digging the pit.
Posting rules
- The dimensions of the reservoir should be commensurate with the area of the hacienda, not only for aesthetic reasons. No matter how attractive the photos of large ponds look, they should not be built on a standard dacha of 5 acres.
- To prevent excess moisture from harming buildings, plants and people, an artificial lake should not occupy more than 10% of the land plot.
- The pond should be placed away from trees, the roots of which can damage the walls of the pit. In addition, foliage can become a source of water clogging and rotting.
- If there are no special requirements for breeding rare species of fish or plants, the pond should be placed in an unshaded area, with access to sunlight for 7-8 hours a day.
- The smaller the pond area, the more often it needs to be cleaned, scooping out debris with a net and changing part of the water.
Types of ponds
Types depending on the method of water supply
- If there is a natural spring on the site, then this is simply a gift from nature. Place the pit below the spring, and the water will naturally replenish it with crystal spring water. Even noble fish can be grown in clean water: trout, whitefish.
- Another present is a stream flowing through the site or nearby. It can be blocked by building a small dam or dam. Typically, the water in such ponds is warm, and they are suitable for raising heat-loving fish. But there is also a pitfall: according to the Water Code of the Russian Federation, such a pond is “associated with water bodies.” For its construction it is necessary to obtain the appropriate permit. And also, an approved project for a hydraulic structure, which is a dam or dam.
- Excavated reservoirs filled with groundwater, rainwater, and flood water. It is possible to grow river fish in them: carp, crucian carp.
Device methods and materials
- Constructed with concrete base and walls. The most labor-intensive option, but also the longest-lasting structure.
- Plastic. It is not complicated in execution, but is limited in size and therefore suitable for growing ornamental fish.
- A pond where PVC and butyl rubber film are used as waterproofing. It can be made in any size and shape. But the period of use will depend on the service life of the film.
- An unlined pond can be built in an area with high groundwater levels. Clay is placed on the bottom and walls. On the edges are cut layers of turf.
Stage #4 – starting the water
Now you can start the water. I threw a hose into the pit and pumped water from the well. The water took several hours to collect. As the film was filled, the folds became confused and had to be straightened. But in the end the tension turned out to be quite uniform.
Latest posts How to keep carrots fresh and juicy until summer on your own. Garden plants that summer residents have been rushing to get rid of lately. How to protect your favorite garden from misfortunes if there is very little snow in winter
A pond filled with water must settle for some time to establish a biobalance
And one more important detail that is worth mentioning. Along with clean water from the well, I poured a bucket of water from a natural reservoir into the pond. This is necessary to accelerate the formation of biobalance. In other words, water from a reservoir with an existing biosphere will help to quickly install the same one in a new pond. There will be no balance, the water will become cloudy and green in a matter of days. And soon it will resemble not a pond, but a swamp with greenish slurry. Activation of the biosystem will also be facilitated by plants planted in water on the bottom.
I immersed the pump to a depth of 0.5 m; it supplies water to the upper cascade of the waterfall and to a small garden fountain. The water division is adjusted directly on the pump.
Water circulation in the pond occurs due to a fountain and a waterfall
Under the well
Not any time of year is suitable for excavating a well. It is better to do this in the summer, when the aquifer is at a low level. This will help avoid erroneous determination of the groundwater level.
Planning
As when digging pits for a pond or lake, you need to start by drawing up a sketch, which will take into account the following nuances:
- Choosing a location. The pit for the well must be located at least 5 m from large buildings, otherwise there is a risk of soil being washed out from under the foundation. Also, at a distance of 50 meters from the well there should be no places where manure and other impurities are located. This may affect water quality.
- Planning a method for strengthening the walls of the well. The walls can be strengthened using materials such as:
- A wooden frame is inexpensive, but short-lived.
- Monolithic concrete is expensive, but reliable.
- Brick takes a long time to install, but, like concrete, it is reliable.
Land works
A pit for a well can be dug either manually or mechanized using an excavator. Let's look at the features of these methods separately:
When digging with an excavator: Temporary placement of the excavated earth should not be close to the pit, so as not to collapse its walls. It is necessary to monitor the depth of the pit and the condition of the walls, and pay attention to any delamination. If the delamination turns into a series of collapses, stop work, fill up above the collapse level and contact professionals. If the influx of groundwater is insignificant, the walls must be strengthened and work continued manually.
When digging manually: It is ideal if the work is carried out by three people: the first is in the pit and removes soil, the second is at the top scraping soil from the edge of the pit, and the third monitors the condition of the pit system and the worker inside
If they change roles every half hour, the work will go quickly and without stopping. The pit should be round, with a diameter 20-30 cm larger than the outer diameter of the rings. Round walls are more stable. If the pit is deeper than 2.5 meters, then its walls need to be strengthened: when this depth is reached, 2 rings are lowered into the pit - they become natural protection for the person working in the pit. Then the soil under the lower ring is gradually dug in a circle, and it lowers under its own weight. If the expected depth to be dug is greater than the height of one ring, then you need to fasten the rings together with plates using anchor bolts. Otherwise, the upper ring may be pinched by the ground and will stop settling along with the lower one.
Third stage. Choosing a place
Let's start with the fact that we place the reservoir in the most favorable place, so that you can admire your creation from anywhere on the site. That is why we take into account several important factors when choosing.
- Land area. Not only the size of the pond, but also its shape directly depends on it.
- Illumination. It is preferable to place an artificial pond in a shaded place where exposure to direct sunlight does not exceed five to six hours a day, otherwise some of the water may simply evaporate. Moreover, in sunlight, biological activity may develop, which is unlikely to beautify the pond. Therefore, having chosen a specific place on the site, we observe the solar regime for several days.
- Relief. The shape of the pond depends on it, and it also simplifies the installation of additional elements (for example, fountains).
- Groundwater level, soil composition. These indicators affect not only the depth of the reservoir, but also the complexity of the work and the need for additional consumables.
- Possibility of expansion. Don't forget about perspective, so we leave some free space on one side.
- Visibility. It is advisable to position the pond so that it can be seen from home and recreation areas.
- Electricity supply. If a fountain or lighting is additionally equipped, we will think about electrification in advance. It is better to lay the wires during development, underground and in a reliable protective corrugation. There should be small access hatches at the connections.
- Reflection. The pond will look more attractive if the surface reflects the sky or beautiful buildings, rather than some kind of utility structure.
- Landscaping. Vegetation near the pond is, of course, beautiful, but the leaves will pollute it and form silt. Moreover, tree root systems can damage the waterproofing layer.
- Compatible with general design and other objects.
We begin work in the spring - this way we will have enough time for the reservoir to “take root” on the site.
An example of a well-designed country pond
Digging pond from the perspective of water legislation
To properly understand the issue, it is necessary to define the terminology.
According to clause 4 of Art. 1 of the Water Code of the Russian Federation (hereinafter referred to as the Water Code of the Russian Federation), a water body is a natural or artificial reservoir, watercourse or other object, the permanent or temporary concentration of water in which has characteristic forms and characteristics of the water regime.
Clause 3, Part 2, Art. 5 of the Water Code of the Russian Federation provides a closed list of reservoirs - lakes, ponds, flooded quarries, reservoirs.
The terms pond and reservoir are given in GOST 19179-73 “Hydrology of land. Terms and definitions" (hereinafter referred to as GOST 19179-73), which establishes the terms and definitions of basic concepts in the field of land hydrology used in science, technology and production. GOST 19179-73 gives the following terms:
– A reservoir is a body of water in a depression of land, characterized by slow movement of water or its complete absence. There are natural reservoirs, which are natural accumulations of water in depressions, and artificial reservoirs, which are specially created accumulations of water in artificial or natural depressions of the earth's surface;
– Reservoir – an artificial reservoir formed by a water-retaining structure on a watercourse for the purpose of storing water and regulating flow;
– Pond – a shallow water reservoir with an area of no more than 1 sq. km.
Based on the terms given in GOST 19179-73, a pond is a shallow artificial reservoir formed by a water-retaining structure on a watercourse for the purpose of storing water and regulating flow with an area of no more than 1 square. km.
GOST 19179-73 also gives the concept of “Pond-dig” - a small artificial reservoir in a specially dug depression on the surface of the earth, intended for the accumulation and storage of water for various economic purposes.
In practice, there are different classifications of ponds.
By origin it is customary to distinguish:
- dug reservoirs (digging ponds)
- created by blocking a permanent or temporary watercourse with a dam (river ponds).
Depending on the purpose, there are cooling ponds, settling ponds, storage ponds, evaporation ponds, etc.
Thus:
POND is a shallow artificial reservoir formed by a water-retaining structure on a watercourse or in a specially dug depression on the surface of the earth, intended for the accumulation and storage of water for various economic purposes with an area of no more than 1 square. km.
How to care for a pond?
An important issue is proper pond care. In addition to introducing water, removing excess plants and maintaining the condition of structures (fountains, filters, aerators), you also need to consider that the pond requires periodic cleaning. Therefore, it is worth purchasing in advance nets for collecting fallen leaves from trees and all kinds of accessories (buckets, shovels). There are also special vacuum cleaners for ponds, thanks to which you can conveniently get rid of sediments lying at the bottom.
In winter, you should take care of the well-being of the fish, protecting them from problems associated with lack of oxygen. Various floats with a fountain filter or insulation under the surface of the water work well. Finally, you can also place a bundle of straw in shallow water, which will maintain a small amount of air flow. The water inside will freeze, leaving microcracks on the blades.
Calculation of water volume
Due to incorrect calculation of the volume of water, the construction of a ringing stream may fail. It should be taken into account that the pump pumps water over a fairly large distance, which is equal to the duration of the stream. On the way back, the movement of water slows down due to the fact that it goes around stones and plant stems. In addition, water evaporates as it moves. According to some estimates, water in an artificial stream travels only 2 m in 1 minute. For example, when operating a stream 10 m long, 200 to 300 liters of water should be in motion.
Diagram of a stream filled with water
If you decide to calculate the volume of water yourself, then take into account the area of the base of the stream, the height of the water column in the stream and its volume in the hose laid under the stream and supplying water to the highest point of the source and plus the volume of the lower pond.
How to determine the size of a reservoir
The size of the future pond depends, first of all, on its purpose. It’s one thing if you want to plunge into it after a bath, another thing if you need a reservoir for breeding carp and crucian carp. For admiring, an old bathtub dug into the ground and planted with plants may be enough. Most recommendations state that the area of the reservoir should be no more than 3% of the total area of the site.
Often the dimensions directly depend on the size of the budget of the “pond project” - when, during the calculations, the cost of film ceases to fit within the boundaries of reason, or when you realize that the pit will have to be dug manually, a decision is made to make its size smaller.
Andrey 64FORUMHOUSE member
Before starting construction, assess your financial capabilities. In 2010, he began constructing a 10 cubic meter reservoir. Then I calculated the budget - more than 100,000 rubles. Work, materials (stone, film), filter, pump, skimmer...
The depth also depends on whether fish will spend the winter there. As an option, you can dig a large barrel into the bottom, in which the crucian carp can sit out until spring. But
The lowest point of the pond is located below the freezing level of the soil.
AshvudParticipant FORUMHOUSE, Moscow.
Ask anglers about the ice thickness in your area and multiply by 1.5, since a small body of water freezes more strongly.
Video: features of fish breeding in an artificial reservoir
The video shows fish farming in ponds:
One of the most common country fish is carp. Read about carp breeding in a pond in this material.
To ensure that your pond is reliable and durable, serving for your benefit and enjoyment for many years, most experts recommend making the concreting solution with the addition of a special waterproofing additive. This small detail allows you to increase the service life of the bottom and wall surfaces for a significant period. Here you can read more about setting up a fish pond.
Species classification of artificial reservoirs
The shape and size are up to you. Decide on the type of pond:
- mini. An excellent element of landscape design;
- decorative pond. It is decorated with decorative elements and plants;
- water. Designed for fish breeding;
- pool. Used for swimming.
Pay attention to the choice of the shape of the reservoir, especially the mini version. To create it, old bathtubs, deep basins and other containers made of strong, durable materials are used.
The choice of base will determine the shape, size and depth. For a bathtub pond and basin, select 3-7 plant species.
The rectangular shape of the reservoir is combined with flower beds of a similar shape. This is the best solution for landscaping the interior of the yard. The use of irregular shapes, curved lines and exotic plants is an option for fans of creative solutions and modern design.
DIY fish pond without film
The simplest fish pond that you can build with your own hands is a structure with a dirt bottom and walls. The pit must be carefully compacted, but still this structure is considered not strong enough and comfortable for fish, so it is better to use film as the main covering.
Figure 6. Bottom drains: a – regular (1 – grate, 2 – riser, 3 – flaps, 4 – dam, 5 – sun lounger), b – simplified (1 – head, 2 – sun lounger, 3 – valve gate, 4 – winch, 5 – fish catcher), c – drainage without riser (1 – hole, 2 – shield, 3 – rod for lifting the shield, 4 – grooves for the movement of the shield, 5 – concrete head, 6 – dam slope)
In fact, the technology for constructing a pond for breeding fish from film and without it is practically no different at the initial stage. Differences appear only at the end, when the bottom and walls of the pit are covered with polyethylene.
Peculiarities
The most important feature of creating and arranging a pond is the correct choice of location. It is desirable that the soil be clayey, since such soil retains water well (Figure 
Figure 7. Types of fish traps
In addition, it is better to build a reservoir on the southwest side so that the water is warmed by the sun for at least 4 hours a day. It is not advisable to locate the pond under the shade of deciduous trees, as falling leaves will pollute the pond.
It is important to correctly calculate the depth of the reservoir. The optimal depth is considered to be one and a half meters, but it is better to increase this figure to two meters, and if you are going to grow carp, then up to 2.5 meters
This feature must be fulfilled so that the fish can be in the pond not only in summer, but also in winter.
Construction technology
To make a pond on a fish breeding site, you need to follow a clear sequence of actions.
Step-by-step instructions for building a pond include the following steps:
- Mark the territory of the future reservoir by scattering sand over its intended territory. Uneven terrain must be leveled so that the water in the pond is approximately at the same level.
- Dig a pit, and its depth should be slightly greater than planned. This is necessary so that in the future you can arrange the bottom of the reservoir. All large boulders and plant roots are removed from the bottom, and the coastal, shallow and deep zones are marked for further development.
- We create artificial differences in water level using soil from the bottom of the pit. It is at this stage that the amount of film required is calculated. Cords are placed along the perimeter of the pond, their total length is calculated and 50 cm are added on each side. If you are not planning to make a pond out of film, you can skip this step.
- We equip and strengthen the bank by filling it with crushed stone or strengthening it with pipes and boards. This will prevent the banks from collapsing in the future. It is also advisable to make a small fence to prevent rainwater from washing the soil into the pond and polluting it.
Figure 8. Stages of constructing a pond without liner
At the final stage, landscaping of the pond is carried out. A special substrate is placed at its bottom, in which aquatic plants are planted. You can also decorate the bottom with stones or broken pots if you plan to grow not only fish, but also crayfish. After this, you can begin installing the pump, filling the pond with water and stocking the fish.
How to calculate film size
To calculate the film, we need to take measurements in order to know exactly: the length of the reservoir, the width of the reservoir and its greatest depth.
The size of the film is calculated using the formula: length/width of the film = length/width of the reservoir + 2 depths + 1 m.
That is, to determine the length of the film, we take the length of the pit, add to it two of its depths and another meter (half a meter for reserve on each side).
We also determine the width of the film.
DreiW
It seems to me that you should first look at what standard sizes of canvases there are in width, and then fit a pond under them so as not to cut/glue. It will be cheaper.
So, for a pond 9 meters long, 5 meters wide and 1.5 meters deep, according to our calculations, a piece of film 3x9 meters will be required.
Variants of pond shapes in plan
Planning is an important step in creating an artificial reservoir in the country. The plan reflects the shape and dimensions of the future water area. If you want to fit a piece of water into the garden as harmoniously as possible, then you should give preference to proven forms. Ponds that are round in shape or resemble natural backwaters look best.
On this plan we outlined the shape of the future reservoir and you can immediately see how it will fit into the landscape of the site:
Pond plan
After we have decided on the contour of the future reservoir, we think about its internal structure: the presence of terraces or simply sloping slopes. Practice shows that terracing makes the reservoir much more solid.
Sectional plan of the pond
Sectional plan of a pond with plants
You can purchase a ready-made form for an oasis with a smooth, streamlined contour. It is convenient to work with such containers, but they often look unnatural.
Serious projects: brick and concrete
If you want to have a large pond in your country house, and you want to build it yourself, you will have to study the topic of building swimming pools. Firstly, the construction of the bowls repeats all the stages one by one. Even the forms are sometimes made stepped. True, the banks are not decorated with plants, and they are not planted in the pool itself... But the construction process itself, with reinforcement, plaster, and waterproofing is the same. Moreover, the water supply and water treatment system is also similar. Except that chemical cleaning methods are not used in ponds, but filters, screamers and ultraviolet light can be used.
In general, a large pond is not a cheap pleasure. Moreover, it requires expenses not only for construction, but also for maintaining a large reservoir in good condition: filters need to be regularly cleaned and cartridges or backfill replaced. But of course the pleasure is great...
Not the largest pond, but it required 10 bags of cement, 30 bags of sand (20 coarse and 10 fine), a hydrophobic additive - 5 bags to make the concrete water-repellent. Plastered on a mesh fixed in the ground
After drying, the plaster was painted with acrylic paint for swimming pools (5 liters were used)
To check, they filled it with water and left it for a week. There are no leaks anywhere. Drained, finished finishing and stocked with fish
And this is a winter pond. In our area it only becomes covered with ice in the coldest weather, but does not freeze to the bottom. Fish spend the winter there
And these are our fish
Read about the organization and construction of a waterfall on the site here.
Plastic fish pond
Have you already bought a plastic frame? With it you will make a pond very easily and quickly!
To do this you need:
To begin with, it is important to understand what dimensions your plastic base has. You will need its height, as well as its diameter, therefore, if it has a rectangular shape, it is important to understand what its length and width are. Boundaries should be drawn on the ground according to the dimensions of the bottom of the purchased container. A hole is dug for the frame, and an allowance of 5 cm is made for each side. Holes are dug for the tubes. The frame is placed in the hole, then the tubes themselves are inserted. The distances between the plastic container and the soil should be covered with earth.
To make a pond, equipping it with film, no such instructions are required. It is enough to dig a hole, arrange holes for the tubes, stretch the film, strengthening it on top with sharp pegs/bricks, and insert the tubes through which water will be collected/drained.
Stage 2. Deciding on the material
There are quite a lot of materials that can serve as the basis for a decorative pond, but the most popular of them are the options below.
- A ready-made plastic mold, for which you only need to dig a hole of appropriate depth. A simple and fast method that does not require large financial costs. Its only drawback is that it is not always possible to give the reservoir the desired shape.
- A durable (often polyvinyl chloride) film 0.5 mm thick is ideal for a small pond. For larger structures, it is advisable to use denser material. What is typical is that when using film, the pond can be given almost any shape.
Due to the fact that the construction of a decorative pond from a mold is unlikely to cause any difficulties, we will consider in more detail the second construction option.
Tench breeding
Tench is a sedentary fish and is quite capable of existing in bodies of water with a very low oxygen content. For successful cultivation and breeding, a pond one meter deep and 3*10 m in size will be sufficient. In the case of tench, the second parameter can be considered more important. The larger the area of the reservoir, the faster the young animals will gain weight. This fish grows quite quickly. Already by the second year of life, it gains a marketable weight of 150-180 g. However, this is only if all necessary breeding conditions are met. Those who want to grow tench in the country should know that this fish loves warm water. It grows much faster in well-warmed reservoirs.
Breeding fish in ponds, including tench, begins with the selection of producers. Launch into the reservoir is carried out in the spring. For a small pond, 1 female and 2-3 males will be enough. Tench begin to spawn in late May - early June.
The fry that appear in the pond will need to be fed. You can use grain waste and weed seeds for this. In addition, tench are fed a mixture of vegetables minced through a meat grinder. Beets, potatoes and carrots are just perfect for this purpose. You can also use mixed feed. These types of food are always given in a strictly defined place, in shallow water. Otherwise, the fish pond will quickly become polluted and silted. To catch tench, the water from the reservoir will need to be drained. This fish loves to bury itself in mud, especially in the fall, on cold days. Therefore, catching must be done as carefully as possible.
Lighting installation and safety
Metal poles 2.5 m high are installed along the entire perimeter of the pond at a distance of 2.5 m - 3 m from each other. Then they are covered with chain-link mesh. Inside the fence it is necessary to install an electrical panel with a socket for the aerator and a switch.
Two LED lamps are installed on one of the posts. One of them should be directed towards the pond, and the second - in the opposite direction. You can install a light sensor on the lamps so that they turn on automatically in the evening or in cloudy weather.
The aerator and lamps will receive power from a common electrical network with the residential building. To avoid electric shock, a separate high-sensitivity RCD is installed in the house. If the wire breaks, the pump or aerator breaks, the protective device will stop the supply of electricity.
