The screed is most often a leveling, load-distributing layer, but depending on the type and purpose, it can also serve as additional sound insulation and thermal insulation, as one of the elements of the heated floor system. In some situations it is also a topcoat, for example in a garage or utility room. For a long time, the traditional screed remained the most popular - pouring with liquid concrete mortar followed by hardening with humidity control. Today, dry screed in several versions is becoming increasingly widespread, and FORUMHOUSE users, based on classical technologies, come up with their own and share the results of successful experiments with everyone interested.
Advantages of concreting
Like all materials, concrete floors have their drawbacks. The main problem is abrasion of the top layer under the mechanical influence of the car’s wheels or the feet of its owner. The result is an unpleasant gray dust that settles well on the surface of the car body, tools and surfaces present in the garage. Concrete tends to absorb various liquids well, and if the composition has an unpleasant odor, this also becomes a problem. And we can also note the labor intensity of the concreting process. But this coating has 3 advantages, because of which concrete will always be the best option for a garage:
- durability,
- strength;
- cheapness.
It is possible to combat the shortcomings of a concrete floor, and there are effective means for this, which will be discussed below.
Implementation methods
As practice shows, only a concrete floor can withstand such loads. It can be created in two ways:
- Lay the reinforced concrete floor slab.
- Pour a thick concrete screed (up to 10 cm) over the ground.
Let's just say that the first option is faster, but more expensive. The floor slab is not cheap; its installation can only be done with the help of a crane, for which you will have to pay for its services. But even a beginner can do concreting on the ground with his own hands. The main thing is to know the technology and nuances of the process.
Basic entry requirements
The convenience of entering the garage largely depends on the angle at which it is located, the length of the span, as well as its width. If we are talking about a private house, then the restrictions depend on the available area in front of the building. In the available conditions, you can build what will be the most suitable option for a particular owner. Often the entrance to a garage near a private house goes directly into the roadway. If the ramp is too narrow, then turning it at a right angle will be quite problematic. That is why it is worthwhile to provide a slight expansion at the base. Often it is 4x3 meters. This applies to ordinary passenger cars.
If we are talking about a rear-wheel drive vehicle or a pickup truck, then the width and length of the entrance can be increased to 5 meters. In this case, the width of the gate should not exceed 3 meters. The slope of the ramp should not be too great. If you do not adhere to this rule, then visibility when entering or exiting will be limited, which will create certain problems when entering and exiting. One of them will be limited visibility, and the second will be poor handling in the presence of ice.
That is why a maximum of 18° is taken as a basis; the minimum slope can be 6°. A minimum slope is required to properly implement a drainage system for a specific structure. If the length of the ramp is 5 meters, then the height difference with a minimum slope will be approximately 25 cm. This will not pose any particular problems for the driver, but the ease of use of the garage will increase. If we are talking about a room that is located in the basement of a building, then the difference can exceed one meter. If a larger drop is required, the ramp will need to be lengthened. In some cases, when the difference exceeds two meters, a ride length will be required, which will be at least 10 meters. How to do this in a limited area was discussed above. In the case where the angle of rotation cannot be smooth, you will need to make a small platform where it will be convenient to make the turn.
Note! In some cases, the slope of the garage entrance may be variable. This applies to situations where other buildings are close to the garage door
In this case, the rise begins with a gentler slope and ends with a steeper one. This approach somewhat reduces the comfort when driving, but it makes it possible to go around the obstacle without much difficulty.
What can the entrance be built from?
The choice of material for the construction of the entrance area in front of the gate should be based on the parameters of a particular site
It is recommended to pay special attention to:
- height difference, which can reach a couple of tens of centimeters;
- vehicle parameters so as not to touch the bottom of the entrance;
- natural phenomena: constant moisture or soft subsiding soil.
Depending on the results of the analysis, it is recommended to select the material for the ramp. This could be: wood, metal, rubber or laying with concrete.
Wood
A simple way to create a decent entrance is to build a ramp from wood. For the structure you will only need boards and bars of different thicknesses (to create a slope). It is permissible to combine materials into a single system yourself. However, the tree is very sensitive to moisture and will become damp in the autumn-winter season. Regardless of the strength of the chosen rock, dampness will lead to decomposition of the material; it is only a matter of time.
To extend its service life, such a structure must be regularly lubricated with special impregnations, be sure to be tinted or put away in a dry, safe place each time after use.
However, this option is well suited for a country garage, which is used only during certain seasons. With constant use, a wooden porch loses to other structures.
Metal
The metal structure made of profile pipe and metal mesh is stronger. This blind area is also susceptible to the influence of accumulated moisture: traces of corrosion will certainly appear on the metal.
To avoid such complications, the ramp requires additional care:
- regular coating with anti-corrosion paint;
- If possible, it is worth keeping the ramp in a dry place.
Also, metal buildings are not suitable if there is soft soil in the entrance area. With each use, the structure will sink deeper into the ground, and subsequently it will be more and more difficult to pull it out.
Asphalt crumbs
One of the best options for building an entrance to a garage is asphalt chips or, more simply, an asphalt driveway. This installation has many undoubted advantages:
- immunity to temperature changes;
- moisture resistance;
- good tire grip;
- not affected by salts and reagents.
You can lay the crumbs yourself, but professionals recommend turning to asphalt pavers for help for compaction. In general, the entry procedure is not complicated. It is recommended to cover everything with crushed stone and cover the top layer with asphalt. If all the subtleties of the technology are followed, the material does not sag.
Paving slabs
Covering the entrance with paving slabs eliminates the influence of external conditions on the condition of the site. However, the cost of preparing and laying the entrance is very high. To comply with the technology you will need:
- remove top layers of soil;
- cover the area with crushed stone 15 centimeters (depending on the situation);
- cover the surface with sand and let it compact;
- then apply a layer of geotextile;
- then tiles are laid on the cement mixture, filling the cracks with the same cement mortar.
If the threshold is not very high, it is permissible to buy a ready-made rubber ramp. To do this, you will need to measure the lift level, select the appropriate one and install it at the entrance. Among the advantages of this design are:
- availability (sold in any large auto store);
- moisture resistance;
- ease of installation (some models are portable, they don’t even need to be secured).
However, depending on operating conditions, the rubber ramp will have to be replaced, on average, once every two years. After all, rubber is susceptible to the influence of chemicals and absorbents that are used when treating roads in winter.
Concrete screed is the best option when creating an entrance to a garage. Laying concrete does not require large financial and labor costs. The material is also resistant to external influences, durable, and even in the event of icing, the consequences are easily eliminated. Creating a concrete entrance provides:
- smooth level changes allow you to create the required slope;
- hassle-free car parking;
- removal of precipitation and pollution from the internal space.
When pouring the screed, it is important to maintain the proportions of the solution and also pay attention to natural conditions. It is not recommended to work with the material at high humidity: the concrete will take a long time to dry, and subsequently subsidence is possible
Finishing layer
To clad your garage at minimal cost, a thin 0.5 - 1 mm layer of self-leveling flooring based on epoxy resin or polymer binder can be used as a floor covering. There are other practical solutions of several types:
- seamless rubber coating or tiles made of the same material;
Rubber covering for garage.
- paving slabs;
Less commonly used is a floor with leveling joists, which is laid on multi-layer plywood and is more expensive than other options.
Self-leveling floor
Before pouring the self-leveling mixture, it is necessary to remove dust and prime the floor twice. The structure is not floating, but rigidly connected to the base, but along the perimeter it must be cut off from the walls with a damper tape. The main nuances of the technology are:
- no slope towards the gate - self-leveling mixtures spread in a single horizontal level under the influence of gravity, so the slope is created at the screed manufacturing stage;
- removing air - after evenly distributing the self-leveling floor over the surface of the base, the master puts on paint shoes and rolls all areas with a needle roller.
Self-leveling floor technology.
Important! The use of epoxy self-leveling flooring is allowed in non-residential premises. In terms of aesthetics, it is not inferior to polyurethane and polymethyl methacrylate mixtures, but is much cheaper.
Read more in the article: Do-it-yourself self-leveling garage floor.
Leveling floor
The main advantage of leveling floors is the installation of joists on studs passing through them. Each block is leveled horizontally by tightening the thread of the pin. After which, the studs sticking out above the joists are cut off with an angle grinder, and the surface is covered with multilayer plywood and decorated with a tongue-and-groove floorboard. This floor has low performance characteristics and a short service life; it is not recommended for a garage.
Leveling floor using joists.
Concrete entrance: step-by-step detailed instructions for pouring
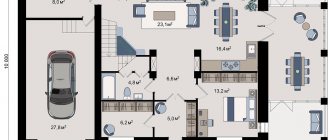
Before pouring concrete into the entrance, let's calculate the size of the garage. To do this, the most convenient and practical way is to draw a scale diagram. It will allow you to calculate the consumption of materials and the timing of the work.
There should be a gap of 2–3 cm between the entrance and the gate so that the gate does not jam due to heaving of the soil.
Required:
- cement M400 30 kg – approximately 3 pcs.,
- sand and gravel (medium or fine fraction),
- lumber (for formwork),
- plasticizer,
- reinforcement 5–9 mm,
- concrete mixer or trough,
- a couple of buckets,
- shovels and bayonet shovels.
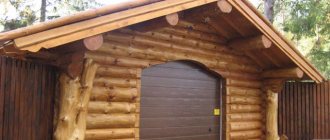
| On the site in front of the gate, we remove the soil to a depth of 35–40 cm. The width should exceed the width of the gate, as can be seen in the photo. | |
| Pour sand in a layer of about 7 cm. | |
| Compact with a hand tamper. | |
| Sprinkle with water to thicken. And we make a second similar layer. | |
| Then we fill it with crushed stone/gravel. | |
| We level and tamp. | |
| It was decided to expand the landscaped area in front of the garage using crushed stone. First remove the plant layer and spread geotextiles so that the crushed stone does not mix with the ground over time. | |
| They pour crushed stone. | |
| Formwork is installed on three sides (not on the foundation side). Lay a layer of waterproofing. In this case, linochrome is used. The insulation is extruded polystyrene foam of 5 cm thickness. | |
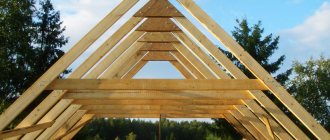
| The reinforcement frame is tied together. | |
| Now let's prepare a solution to concrete the entrance. The ratio of cement, sand and crushed stone is 1:3:5, respectively. Add a plasticizer (ordinary Fairy can act as it; pour it on the eye; when foam begins to form during mixing, that’s enough). When pouring, use a vibration compactor. | |
| The main layer is filled. Its thickness is approximately 15 cm. | |
| Now lay a 50x50 cm mesh. | |
| Fill in the finishing screed; do not add crushed stone when mixing the mortar. The ratio of cement and sand is 1:4. | |
| Level the screed with a rule or a flat board. | |
| When the screed has settled a little, dry concrete is sprinkled on top. This will increase its waterproofing properties. | |
| Iron tie. | |
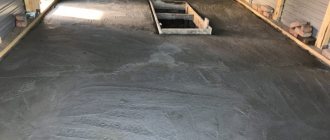
| Ready screed. |
Preparation of the solution
M250 concrete is used for the garage floor. It is suitable in terms of strength and frost resistance, even for an unheated room. For a garage of 24 sq.m. (4x6 m) you will need approximately 2.5 cubic meters of ready-made concrete. Filling must be done in one day. Taking into account the slope and various losses, all 3 cubes of concrete are needed. This is a large quantity that can be provided by two mixers and a team of assistants. Or you can order a mixer to the pouring site. When pouring with a mixer, you will need a receiving tray that will direct the flow of solution to the center of the garage.
Concreting the entrance to the garage: screed
A convenient way to enter the garage is a ramp. The convenience of the design depends on how shallow the ramp is. Ramps are divided into types, which vary depending on how the access roads are located. The ramp can be up or down.
The ascent ramp is equipped with curbs that prevent the car from sliding down; the descent ramp is limited by walls.
When making a ramp, it is important not to forget about the slope of the surface and its arrangement with a drainage system. A groove must be installed in front of the structure to facilitate water drainage
To make the entrance smoother, a counter ramp is installed.
How to make a concrete screed:
- Dig the soil. The depth should be equal to the future screed.
- Lay the first sand layer. It needs to be compacted and watered.
- Lay the second sand layer. It also needs compacting and watering.
- Lay fine-grained crushed stone so that it reaches the top of the pit.
- The screed and foundation are separated by a strip of linochrome.
- Formwork is made from boards.
- Equip the pit with a cushion of crushed stone.
- Using reinforcement, make a frame.
- Pour the concrete layer using a vibratory compactor.
After the main concrete layer is poured, it must be covered with reinforcing mesh. After this, you need to prepare a solution of plasticizer, cement and sand. It is this solution that will be needed to fill the final screed. The finishing screed is leveled using a board, after which iron ties are installed. While the screed is drying, care must be taken to ensure that it is not damaged by birds or other animals.
Additional Tips
To ensure a truly high-quality entry, it is important to take into account the requirements for each of the components of the solution. Optimal grades of cement - M400 and M500
Its consistency should be dry and free-flowing
The optimal grades of cement are M400 and M500. Its consistency should be dry and free-flowing.
It is best to use river sand with a fraction of 1.5 to 5 millimeters.
It is recommended to use crushed stone or gravel as a filler, the size of which varies from 8 to 35 millimeters. Sea pebbles, due to their polished surface, are not able to provide reliable adhesion to the solution.
When preparing the solution, it is necessary to use clean water, free of acids and alkalis. Therefore, river and lake water are not suitable.
Adding auxiliary components to the solution will help improve the quality and performance properties of a concrete structure. These include:
- Plasticizers for adjusting fluidity and viscosity;
- Slaked lime, which facilitates the installation process;
- Reinforcing agents to increase strength (for example, polyvinyl chloride or polypropylene fiber).
It is best to carry out work on creating a concrete entrance at temperatures from +3 to +25⁰С. If the process occurs in winter, it is necessary to heat the solution, organize uniform heating of the structure, and also use special additives with antifreeze properties.
Share this article with your friends on social media. networks!
Concreting the structure
Filling the entrance is carried out in several stages:
- The main layer is poured, the thickness of which is approximately 15 centimeters;
- A reinforcement mesh of 50×50 centimeters is laid;
- The finishing screed is poured. In this case, a solution is prepared without crushed stone. The proportions of cement and sand should be 1:4;
- The screed is leveled using a flat board or rule.
When the screed has been standing for some time, a little dry cement is poured on top of it - this will improve the waterproofing properties.
After pouring, the driveway cannot be used for at least a day, even if it seems strong enough after a few hours. This is necessary for complete polymerization and drying of the solution. The formwork can only be dismantled after the concrete has completely hardened.
The final stage of entry is trimming the protruding areas using a grinding machine and improving the overall appearance.
To ensure a truly high-quality entry, it is important to take into account the requirements for each of the components of the solution. Optimal grades of cement - M400 and M500
Its consistency should be dry and free-flowing
The optimal grades of cement are M400 and M500. Its consistency should be dry and free-flowing.
It is best to use river sand with a fraction of 1.5 to 5 millimeters.
When preparing the solution, it is necessary to use clean water, free of acids and alkalis. Therefore, river and lake water are not suitable.
I recommend watching this interesting video:
Adding auxiliary components to the solution will help improve the quality and performance properties of a concrete structure. These include:
- Plasticizers for adjusting fluidity and viscosity;
- Slaked lime, which facilitates the installation process;
- Reinforcing agents to increase strength (for example, polyvinyl chloride or polypropylene fiber).
It is best to carry out work on creating a concrete entrance at temperatures from +3 to +25⁰С. If the process occurs, it is necessary to heat the solution, organize uniform heating of the structure, and also use special additives with antifreeze properties.
For any car owner, it is important to have not only a garage, but also to properly equip the entrance to it. The safe entry of the car depends on how accurately and conveniently it is performed.
A carelessly made entrance entrance can lead to the fact that it will be inconvenient to enter the garage territory, and precipitation in the form of rain and snow will also enter it. We will tell you below how to make a garage entrance correctly and with the least cost and effort.
lack of access to the garage
Weather troubles in the form of mud, ice, and puddles can create problems for any garage. Icy ledges, on which the car’s wheels slip, not only increase the weight load on the car’s suspension, but also cause emergency situations.
Dark time can also cause malfunctions due to the constant risk of the bumper hitting any obstacle. In addition, the accumulating water at the entrance to the garage is actively trying to get inside the room. All these points emphasize the importance of properly organizing the entrance to the garage.
wooden ramp
Concreting the structure
You will need a concrete mixer to mix the solution.
A concrete garage entrance is considered the most optimal. Its construction is labor-intensive. The design requires money.
The following materials are required:
- cement grade not lower than M400;
- medium gravel;
- sand;
- lumber for installing formwork;
- various additives to concrete to increase the level of resistance to frost and moisture;
- reinforcement with a cross-sectional index of 6-8mm;
- concrete mixer;
- shovel and bayonet shovel;
- buckets.
To prepare the solution, cement and sand are taken. The components are mixed in a ratio of 1:3. Gravel or crushed stone is used as filler.
The entrance to the garage with a lift is installed in the following sequence:
- Clearing the site for the structure from debris and stones.
- Elimination of the presence of underground communications.
- Drawing up a drawing indicating the required dimensions. The optimal ramp slope is 15%.
- Formation of the required ground slope. A hydraulic level is used to complete the task.
- Compacting the top layer of soil using a vibrating saw.
- Soil shrinkage and re-compaction of the layer.
- Installation of formwork.
- Installation of the reinforcing frame. The rods are welded or tied in the form of a mesh with cells of 25-30 cm.
Concrete is poured in layers. Each batch is leveled. When carrying out work in warm weather, the layers are covered with polyethylene. In hot weather, watering the site with water is recommended.
Installation of formwork
The next step is installation of formwork. On the side of the garage door it should correspond to the level of the threshold, and on the reverse side - to the ground level.
The construction of formwork occurs in the following sequence:
- Wooden pegs are driven into all four corners of the prepared area;
- Boards are nailed to the pegs;
- On each side (besides the foundation side), install one more peg in the middle of the boards for additional reinforcement.
When the formwork is ready, a waterproofing and insulating layer is laid sequentially. Linocrom, armored roof and other options that are often used in roofing are suitable as waterproofing materials.
And as insulation - extruded polystyrene foam with a thickness of 5 centimeters. Then a reinforcement frame is installed - a stainless steel mesh with a diameter of 2.5 mm.
Concrete screed
If the soil of your site is quite calm and not subject to swelling, then a concrete platform for a car in the country may be a good option. This material is quite durable, but the work is performed in the following order:
- Before pouring concrete into the area under the car at the dacha, we make a depression along the entire width of the proposed parking lot. Its size depends on the weight of the car. If your car is small and fairly light, the thickness of the concrete layer can be 10 cm. For a heavy brand, the layer should be no thinner than 15-20 cm.
- Along the entire perimeter of the territory we arrange formwork from boards secured with pegs. Its height should correspond to the thickness of the coating.
- The next step is backfilling and compacting the sand cushion.
- Concrete solution should be poured onto the prepared base to a depth of 5-6 cm. If you plan to use a ready-made mixture, you will have to worry about ordering a special machine. If it is impossible for a large vehicle to drive up to your dacha, you will have to mix the concrete mixture yourself using a concrete mixer.
To obtain the working material, you will have to buy cement, the required amount of sand and a sand-gravel mixture. Using a shovel, the mixed concrete is spread in an even layer on top of the sand cushion.
- Without waiting for setting, reinforcement or reinforcing mesh should be laid on top of the freshly poured concrete.
- A second layer of concrete is poured on top of it.
- Using a trowel, we level the surface. For ease of operation, you will need to set beacons. A slight slope should be provided from the center to the edges to allow water to drain from the parking area.
- After a day, the beacons are removed. The remaining recesses from them are sealed with cement mortar.
- We carry out the final treatment of the surface - using a damp broom we sweep away all the unevenness from the concrete that has not yet hardened, fill it with a thin layer of cement and evenly distribute it with the same broom over the entire surface.
- The formwork can be removed after 3 days.
- Concrete will finally gain its strength after 3 or 4 weeks. Then it will be able to support the weight of the car. It is not advisable to enter the parking lot before the stated time.
Preparatory work
First, the area to be filled with concrete is marked.
The area in front of the garage needs marking. It is performed using wooden or metal pegs, which are connected along the contour using a rope. It is marked with flags.
The next step is digging a pit. To ensure long-term operation of the ramp, it is necessary to pour concrete to a greater depth than the level of soil freezing in the area. The bottom is covered with crushed stone. The layer thickness should be 10 cm. The material is leveled and compacted. The crushed stone is covered with a layer of sand, which is watered abundantly and also compacted.
The basis of the formwork is a wooden board or slate. The latter material is preferable because it forms a monolith with concrete and protects it from destruction. Slate can also be used for a small border. After the formwork is erected, the ramp is filled with concrete
After the concrete mixture has hardened, trenches for the curb are prepared. It can be installed on a foundation or on a bed of sand and crushed stone. The arrival must be allowed to dry for 28 days.
Entering the box in reverse step-by-step instructions
While studying at a driving school, you will visit a racing track. There, an instructor will help you park in reverse correctly. The technique here is almost the same as when driving into a garage in reverse.
Below we provide you with a video on how to do this maneuver correctly. But first, let's describe it to you verbally. Imagine that the garage entrance is to the right of the car (otherwise, do the opposite). The car is parked perpendicular to the gate:
- drive three meters away from them and stop. The distance between the gate and the machine should be approximately one and a half widths of the model;
- Engage reverse gear. Turn the steering wheel to the right so that the car is heading straight towards the gate leaf. At the same time, turn your entire torso and head to the right. You should drive little by little, releasing the clutch pedal and lightly pressing the gas;
- when the rear bumper is on the goal line, stop driving. Leave a little space between the side gate leaves. Don't play it safe and don't be afraid. If there is at least 10 centimeters between the fender and the wall, you will have a great ride without scratching anything. Also, if you leave a long distance, you can scratch the left side of the car;
— turn the steering wheel to the right to the extreme point. It will turn out that the drive wheels will turn in the direction of the gate, and the remaining two tires will turn in an arc;
— start driving lightly until the car is parallel to the side wall of the box;
— straighten the front wheels and drive into the garage. Start looking at the back wall of the box to brake in time.
Of course, if your car has parking sensors, maneuvering becomes much easier. But it’s best to learn how to reverse into a garage without it. After all, technology is technology, and it can fail at the most crucial moment.
In general, this is all you need to know about how to properly reverse into a garage. The main thing is to clearly imagine the end result, and practical skills will be acquired very quickly.
A neat, clean and convenient garage entrance is not a luxury, but a necessity.
A skillfully arranged area in front of the garage structure not only makes it easier to move the car to its place, but also protects the structure from the penetration of dirt, snow and other phenomena.
Making your own entry is within the power of every car owner. The main thing is to choose the right materials and follow the technology as accurately as possible. Such devices are made from different materials - concrete, metal, wood and paving slabs.
The metal version is strong and reliable, but negative air temperatures make it slippery. The entryway made of wood is simple to make, but is the most short-lived and requires replacement after 2-3 years.
The area in front of the garage, carefully laid out with paving slabs, looks beautiful and, under favorable conditions, lasts a long time. But it also has disadvantages - a tendency to icing and instability to salt. Therefore, the optimal entry option is concrete - an inexpensive and durable material with excellent performance properties.
Construction of a garage is impossible without a well-equipped entrance.
This device, simple to use, simultaneously performs the following functions:
- Smoothes out the difference in the plane in front of the garage door;
- Reduces the load on the vehicle's chassis and ensures easy, hassle-free parking;
- Protects the interior space from precipitation and dirt.
There are three options for arranging the entrance to the garage - a ramp, a screed and a blind area.
Depending on the location of the entrance, the ramp can be straight or rotary, and if it leads to an underground garage, it can be made with a descent.
Arranging this type of check-in requires compliance with the following rules:
- The optimal length is 5-6 meters;
- The width depends on the dimensions of the garage; on each side the device must protrude at least 30 centimeters;
- The optimal angle of inclination is 25⁰ (if this value is exceeded, the length of the ramp should also be increased).
The blind area is a strip with a slope from the building to drain water. It is made of concrete or asphalt.
A screed made of concrete or cement-sand mixture is made to give greater rigidity to the soil layer. This level area provides comfortable parking for the car and prevents dirt from penetrating into the garage.
Possible problems
After some time of operation, cracks may appear in the concrete floor.
During the period of operation of the concrete floor, surface defects such as cracks and cavities may form. They are eliminated by filling with cement-sand mortar. Pre-embroider, removing all loose particles, remove dust and apply 1-2 layers of primer.
One of the troubles when using concrete surfaces is the formation of specific fine dust. It can be removed by priming, ironing or finishing with facing materials.
The hygroscopicity of concrete is reduced using special means - water repellents. One of them is Penetron. The solution is prepared in accordance with the manufacturer's instructions and applied to the floor surface with a paint brush or roller. For these purposes, you can use other compositions:
- "AQUATRON";
- "HYDROHIT";
- "KALMATRON";
- "HYDROTEX";
- "WASCON"
They all work on the same principle: they fill the smallest pores of concrete, crystallize and form a moisture-proof layer.