Recently, laminated coatings have been used not only as floor finishing, but also as wall cladding. At the same time, its main advantages are preserved: aesthetics, practicality, durability. Let's look at all the ways in which laminate flooring is installed on a wall, as well as some of the nuances of choosing it.
What is the best way to glue laminate to the wall?
The modern construction market offers a lot of different adhesive compositions with which you can quite reliably fix them. Even ordinary sanitary silicone can firmly fix the laminate to the wall. In addition to silicone, a number of other materials can be used.
There are a lot of materials with which you can glue laminate to the wall.
Laminate on the wall with foam
Although some craftsmen claim that laminate flooring can be glued using polyurethane foam, this is not entirely true. Even if it is possible to secure one of the elements for some time, there are no guarantees that it will hang for a long time. And even more so if the entire surface is mounted. Laminate itself is a rather heavy coating, so the fastening must be reliable. Foam tends to expand, so you will need to take this moment into account during application and gluing.
Adhesive foam for laminate on the wall
Adhesive foam is a composition that is used for gluing thermal insulation boards such as polystyrene foam and penoplex. The adhesive not only provides reliable fastening, but is also completely sealed, which improves the performance of the thermal insulation coating. This mounting adhesive foam can be used for gluing laminate flooring to the wall. This type of installation is more reliable than the previous one.
Laminate on the wall, for liquid nails
Although liquid nails are a widely used material in construction, they are not entirely suitable for laminate flooring. Because they are not very elastic. With their help, you can glue the covering to the wall, but if after gluing it becomes necessary to move the lamella a little to the side, this will disrupt the original connection, which will worsen the reliability of the fastening.
Liquid nails are not ideal for gluing laminate flooring to a wall.
The work can be greatly simplified if you connect part or all of the laminate elements on the floor, and only then glue the entire structure to the wall.
Related article:
Polyurethane adhesive for laminate wall
This glue is the optimal solution. The connection is so reliable that if necessary, you will have to use a hammer drill to dismantle the laminate. Therefore, you should not apply a lot of this material. For example, instead of the usual squeezed out snake, a targeted application is sufficient.
Instructions for use
The vertical surface on which the panels will be glued must be well cleaned of dust, dirt, loose plaster, etc. The cleaned surface does not need to be leveled until smooth - for better adhesion it should be porous or rough.
However, if the surface of the wall is loose, then it is better to strengthen it with the help of an appropriate impregnation, for example a latex primer.
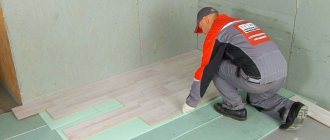
The adhesive can be applied to one or both surfaces. Spot application is acceptable - it is the most economical, but less durable. The method of finishing the wall with a snake or mesh increases the consumption of glue, but increases the strength of the installation. It is best to use a special gun to apply glue.
In order to glue the cladding using liquid nails, after applying the composition it is necessary to apply the panel to be glued to the surface and press with the maximum possible force. In this position, the panel must be fixed for 2-5 minutes.
Then the pressure can be released and the panel fixed using available means. It takes 10 to 40 minutes for the glue to set. However, the final completion of installation is the time for the adhesive to completely dry, which can take up to 72 hours.
Compared to installation using fasteners, installation with glue is faster, but additional time is required for the adhesive to cure.
During installation it may be necessary to remove the adhesive. For freshly applied acrylic composition, the solvent is water. For neoprene liquid nails, mineral solvents for synthetic rubbers should be used.
You can try to remove the dried layer of glue using contrasting temperatures - for example, alternating exposure to an industrial hair dryer and ice. By heating the old glue and then cooling it with ice, you can quite easily pick up the hardened compound with a spatula and separate it from the surface.
Some useful tips before gluing:
- Liquid nails should be stored in a dry, cool place, avoiding damage to the packaging.
- The layer of applied glue should not be too thick - this reduces the strength of the connection.
- Do not glue wet surfaces - water interferes with normal adhesion.
- To minimize the contact of glue on surrounding surfaces, they should be covered with masking tape.
Wall finishing with laminate: where the material can be used
A special feature of laminate is its layered structure.
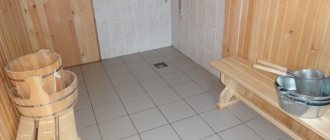
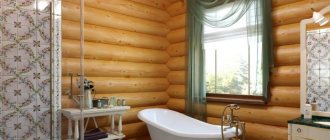
High-quality material has a dense coating that is resistant to external influences, usually moisture- or water-resistant (depending on the class of the laminate), however, the use of lamellas in very humid or too warm/cold rooms is not rational. It is even more risky to install it in the kitchen, bathroom, on the balcony/loggia - where fluctuations in temperature and humidity are large and sharp.
Laminate on the wall in the interior is considered acceptable:
- bedrooms;
- children's;
- living room;
- office;
- libraries;
- office;
- hallway
At the same time, it is undesirable to install the material as a continuous surface; it is better to use it for finishing certain areas.
It is most justified to install laminate on a wall that is often exposed to friction, accidental impacts, and frequent touches - for example, the wall above the head of the bed, adjacent to the stairs.
Surface Requirements
Attaching laminate to the wall requires compliance with certain conditions:
- absence of irregularities, bulges, depressions, cracks and other defects on the surface. The permissible amount of unevenness is up to 1...2 mm, the same applies to level differences along the entire wall - 1...3 mm per 1 m;
- sufficient hardness and uniformity of the surface, especially in the case of adhesive installation. For this installation method, it is necessary to carefully level the wall and prime it.
Before installation, the wall is checked for verticality and absence of shape deviations. The first parameter is checked by a level or plumb line in several places. If the position of the wall does not coincide with the vertical, it is necessary to mark the most protruding point of the surface and measure the deviation. Irregularities are detected using a rule - a long straight rod or bar, which is passed several times across the entire surface horizontally, vertically and obliquely. Detected depressions and protrusions are marked.
Surface preparation
To properly level the surface for installing laminate on the wall, you should use the beacon plaster method. It is not necessary to apply a thick layer of plaster; it is enough to simply compensate for all irregularities and deviations in shape.
A simpler and faster way of leveling is to cover the walls with laminate on the sheathing. In this case, you can arrange the sheathing directly on the wall, compensating for its unevenness by lining the planks or by cramping them together. The convenience of this method lies, among other things, in the possibility of sound and heat insulation of the wall using insulating materials placed in the cells of the sheathing.
A modified version of laying laminate on the wall with your own hands is installation on sheets of plywood fixed to the wall. Sheet material can be attached to the sheathing, on top of the insulation, or directly to the wall using an adhesive method. With sufficient thickness, plywood partially “smoothes out” the unevenness of the surface being coated, muffles sounds, and reduces heat loss.
Which adhesive is best for laminate flooring?
All of the above brands of adhesive compositions based on polyurethane and epoxy resin are considered the best materials for installing classic laminate flooring. For quartz vinyl and vinyl slats, polyester, vinyl chloride and epoxy two-component mixtures are used. They provide a high-strength elastic seam, but are more expensive, and also have restrictions on environmental friendliness.
For joints you can use Kleo
A simple middle-class laminate can be laid on a wooden floor made of OSB and even fiberboard using PVA-M. The glue is inexpensive and at the same time strong enough to ensure reliable fixation of cellulose-based laminate. In this case, it makes no sense to use high-strength Italian and German materials.
Where and how to decorate
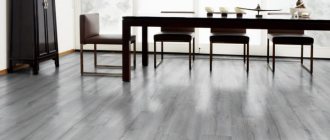
Where is it appropriate to apply such a design technique? If you choose the right material and do not overdo it with quantity, this design can become an element of every room in your abode. And if you place the main emphasis in the interior on wood-look cladding, you will get the design of all rooms in the same style. This method creates additional space. So, let's start with the “showroom” room - the living room.
Wall laminate in the living room
If finishing is planned when using laminate, remember that the color of the board must be selected according to the shades of the overall composition. It can be mounted horizontally, vertically, combining these two positions, or diagonally. It all depends on the designer’s idea. It is also worth considering the area. If the ceiling is high, horizontal lines will be an excellent option for decorating the living room with wood panels. This will visually make the space seem wider. Vertical lines are the best option for a small room (a typical high-rise building). They visually “raise” the ceiling higher.
If the laminate installation method is to use lathing, you can place a plasma TV or an artificial fireplace in the free space. Since the devices are quite flat, they will appear mounted. You can complement the interior with lighting, shelves or shaped mirrors.
On the hallway wall
The hallway is the first thing guests see
That is why special attention should be paid to the design of the room. A narrow and long hallway can be laid out with horizontal laminate lines
This will expand it. It is better to make the covering on the floor and walls the same or in the same tone. It is advisable to lay the stripes in the same direction - let the wall strips become a “continuation” of the floor.
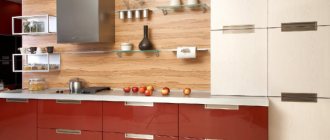
In the kitchen
Using laminate you can replace a kitchen apron, which is usually tiled. Despite the fact that this option is practical, the finish looks very stylish. The wooden, laconic style adds extra coziness to the kitchen. This design will be relevant for several decades, and it is easier to “remove” such a backsplash than a tiled one. This type of design will cost less, all due to the relatively low cost of the material and laminate installation services. Caring for such a surface is also simple, but a wooden apron looks more elegant. Is it worth saying that this particular design solution is a good way to expand the area? Panels “like” wood create a coherent texture, their seams are not visible. The tile forms a cell - also a kind of pattern that can “steal” space. Choose the color of the laminate to match the kitchen furniture.
In the bedroom
The bedroom can also become stylish if you add it to the design using laminate flooring. The best place to apply this is in the area behind the head of the bed. It is advisable to choose a board for decoration so that it best matches the color and texture of the furniture. Then you will get the effect of a single set without taking up space. This will become the main accent in the bedroom - a place where all design decisions should be discreet. The ceiling can be finished with planks along with the wall - as if it visually envelops the space around the bed, thereby further emphasizing it.
Installing a plasterboard wall on laminate
Andreyko If you are confident in the strength of the base under the laminate, then you don’t have to disassemble it. But if there is a possibility that the base will sag or sag, then it is better to install a partition without a laminate. To disassemble this is perhaps radical; I would make markings on the laminate, along the width of the partition, and cut them out with a hand-held circular saw.
The depth of immersion of the circle is adjustable, install a disk with a fine tooth and cut. Seryoga D-k It depends on WHAT laminate. And how they laid it, in the sense of where the beginning of the laminate was. There are types that are impossible to remove without damaging the locks. Besides, how is the partition attached?
If the profile is mounted in addition to the floor in the ceiling and walls, then what is the point of cutting out and disassembling the laminate? Two degrees of protection are enough (ceiling and wall) and your partition will not go anywhere. Don’t touch the laminate, it’s unnecessary.curt You shouldn’t attach the starting profile with dowels to the base through the laminate, the laminate will be rigidly attached to the fill and sooner or later it will come together like an accordion. I would advise you to attach the profile, draw 2 cm from it to the sides (the gap between the laminate and the profile is at least 1 cm + the thickness of the drywall) and cut out a strip of laminate with a chisel. The starting guide is attached to the floor, the gap to the laminate is 1 cm. According to the technology, the laminate should lie freely, without resting against obstacles. Neformal75 No, I prefer to disassemble it. If you cut in the middle, the question is whether the wall being installed will pass at the junction of the laminate boards, then on both sides you will still have to attach the laminate to the wall or floor. If the wall is attached to the laminate, over time it will deform and pull the rest of the floor structure or the locks will break. Yes, there can be a lot of jambs. With skillful hands, you can really disassemble it in about 15 minutes.
It will take half an hour to collect, taking into account the new cut. Question from a forum thread: You need to make a partition on top of the laminate. We decided that it would be made of plasterboard. Simpler, lighter, faster.
Do I need to remove the laminate before installation, or just put it on top and that’s it? If you can do without dismantling, then how? Traditionally, laminate is used to decorate walls in the hallway to the height of the panel. This coating is used to decorate part of the wall above the head of the bed in the bedroom, decorative panels are made from the laminate behind the TV in the living room, and niches are trimmed. The difference in shades of material in the same color scheme on the floor and on the wall creates an interesting effect.
Let's start with rooms where laminate flooring should not be laid on the walls. This is a kitchen, a bathroom, an uninsulated balcony, a basement in a country house. Changes in humidity and temperature will negatively affect the material, and it will quickly lose its appearance. Laying the panels can be done in various ways: herringbone, horizontal, vertical, and this is another big plus in favor of using lamellas for wall decoration. Despite numerous arguments in favor of this material, there are also disadvantages - quite serious problems may arise in the process of surface cladding, which we will discuss below.
Laminate has high strength characteristics, which many analogues cannot match. For example, if we compare laminate and PVC panels, the latter can quickly break from an accidental blow to them, but laminate will withstand even a very strong blow. In addition, the material has a more attractive appearance and ease of installation. To cover a vertical surface with a newfangled finish, it is not at all necessary to invite an expensive company or construction team. You can save a lot on labor costs, since attaching laminate to the wall with your own hands is quite accessible even to a novice master.
Just watch a video on this topic, get acquainted with the technologies, choose your option, buy everything you need and stock up on tools. To work you will need the following tools: There can be many options. But they depend not so much on the installation methods as on the colors, technical characteristics, and texture of the material. The slats can be positioned horizontally, vertically, with the boards offset, or in a checkerboard pattern. Laminated products are used in one color and of the same quality, or they try to attach boards using various combinations and transitions.
That is, the fantasies of designers and customers are unlimited.
Exclusive interior design
Of course, exclusive is not quite the right word. Today, this type of material is increasingly used not only as a floor covering, but also for finishing other surfaces. And this is not surprising. A laminate wall will give a real head start to other design solutions.
Laminate on the wall: exclusive interior design
Considering the variety of colors, it's beautiful. Pressed boards are strong and durable. They don't fade and keep their shape. This means that you can forget about repairs for a decade. This design solution will protect the apartment from unnecessary noise. It will level the surface, add zest to any room, and help zone a separate area, for example, when combining a kitchen with a room.
And this despite the fact that you don’t have to choose very expensive models. To decorate vertical spaces, finishing sheets of low class, 21-31, are suitable. This is explained simply: the higher the class, the greater the strength. Children are jumping on the floor, there is heavy furniture on it. Vertical areas are free of this load. This means you don’t have to overpay for this feature.
Another plus: this coating is easy to maintain. I wiped it with a rag and there was no dirt or dust. At the same time, it is afraid of moisture and temperature changes.
Wall laminate is easy to clean
In addition, in an ordinary room - living room, corridor or bedroom - you need to take into account the acclimatization of the finishing material. In particular, you should not carry out leveling walls or ceilings or other work characterized by high humidity in a room where a package of sheathing sheets is already stored. They can become deformed from moisture. Some craftsmen advise leaving the boards at the installation site for a couple of days. This way they will get used to the microclimate and will not transform during the installation process.
The boards themselves are not light
Therefore, it is important to follow basic installation recommendations when choosing methods of attaching them.
Preparing the surface for work
Laying logs on insulation and leveling the floor using chipboards
First you need to remove the old covering: linoleum, carpet. There is no need to remove tiles. You just need to repair the fallen parts. It is also necessary to remove the rotten parts and treat the base with a primer.
The screed is sanded to eliminate irregularities. To ensure a good fit of the slats and prevent squeaking of the floor covering, you need to collect all debris and dust from the surface of the base. Before installing the laminate, a backing is laid on the concrete to act as a sound and thermal insulator. It is mounted end-to-end. The backing must be secured with double-sided tape.
Old flooring can be leveled using plywood or chipboard sheets. Since the lamellas are based on natural wood raw materials, the use of a waterproofing film is mandatory.
Is it possible to install laminate flooring on the ceiling in an apartment or house?
In addition, if it is intended to fasten laminated panels using the frame method, then the material from which the frame will be assembled will be required. If you plan to simply glue the boards, then you need a high-quality adhesive composition designed for fastening heavy varieties of decor. Experts will in any case advise choosing the option with a wooden sheathing, because in this case you will not be afraid of the planks falling. Before attaching the panels to a plasterboard base it is necessary to completely clean it of contaminants and prime it with special compounds, which will allow the finishing material to better adhere to the glue. If a standard tongue-and-groove laminate is chosen for installation, then fastening to the joists can be done with gluers or small nails diagonally into the groove of the tongue.
In this case, the nails will have to be driven in before installing each subsequent plank. The asymmetry on the ceiling surface is clearly visible, so it is recommended to cut the first and last boards to half the size each. In the process of trimming, it is necessary to take into account technological indents of 1-1.5 cm around the perimeter of the room.
If the first method was chosen, then nothing will be required except a high-quality special adhesive composition and a jigsaw, which will need to be cut into the boards. But doing something like this on your own will be extremely difficult and time-consuming, because the installation will need to be done on a perfectly flat surface, and the panels will also need to be carefully adjusted, which takes a lot of time and effort. You need to buy special glue for laminate flooring. Besides glue, all you need is a hacksaw to straighten the edges of the boards. Before applying glue, you need to clean the surface and coat it with varnish or primer. Help!
Using a frame is suitable if it is not possible to level the ceiling, or there is a risk of material falling due to the use of plaster. This method will also hide the wires.
- to construct the sheathing, you need wooden slats, 1 and 2 cm thick. As for the length of the slats, it depends on the area and type of room in which the work will be carried out;
- roulette;
- pencil;
- building level;
- electric drill, maybe a hammer drill;
- if you use the adhesive method of installing laminate flooring on the ceiling, you will need a special adhesive composition intended for laminated panels;
- dowels with nails;
- hammer;
- hacksaw;
- jigsaw for trimming elements, if necessary;
- ladder.
A ceiling covering that imitates wood will be a good solution for creating a cozy, warm home atmosphere. In addition to beauty and comfort, laminated panels have remarkable heat-insulating properties, which prevent heat loss from the living space. When choosing laminate flooring for the ceiling in an apartment, it is worth taking into account the area of the premises. In small rooms decorated in modern minimalist styles, surfaces decorated with aged wood look beautiful. In this case, the finish should be combined with urban oblong-shaped lamps.
Compact rooms that need additional light sources are best decorated with a white glossy variation.
- wooden slats 20x30 mm, beams with a cross section of 50 mm;
- bits, drills;
- jigsaw;
- building level;
- tape measure, pencil, knife;
- screwdriver, drill, hammer;
- goats;
- construction pistol.
When covering a plasterboard wall, remember that the plasterboard must be firmly fixed, otherwise it may simply fall along with the laminate.
- Hammer
- Level
- Square
- Tape measure, ruler, pencil
- Hacksaw or jigsaw
- Block for tamping laminated boards
- Spacer wedges
- Wooden or metal slats
Additional information on the topic:
- Connecting drywall profiles to each other without self-tapping screws
- Which plasterboard is best to use for the ceiling in the kitchen?
- Which ceiling is better to make in an apartment, suspended or from plasterboard? reviews
- Which insulation is better for the walls of a wooden house inside under plasterboard
- What screws to use to attach drywall to the partition profile
Required Tools
Tools for laying laminate flooring
Before laying laminate flooring, you need to prepare the necessary tools. To work you will need:
- pencil for marking;
- corner, tape measure, building level;
- jigsaw or hacksaw with fine teeth for cutting elements;
- a wooden hammer and a beam for fixing the lamellas.
In addition to the finishing material, you need baseboards, waterproofing film, substrate, and thresholds.
Methods for laying laminate
Before you go to the store for the coating in question, you need to carefully figure out how to calculate the laminate for a room of a specific size in pieces. Nobody needs extra material, and if there is a shortage of it, it is not always possible to purchase even a couple of planks exactly the same as those taken earlier. And here the method of laying out the slats on the floor plays an important role.
Laminate planks are laid in two ways:
- straight (deck);
- diagonal.
The first one is easier to install and requires less material. In the second case, much more scraps are obtained due to the need to cut the planks at an angle near the walls. But the lamellas laid diagonally in the assembly look more impressive. In both options, the boards are laid with an offset of 10–35 cm to the adjacent row.
Laminate assembly
The connection of laminate planks is made with or without glue. The use of the adhesive method is recommended when it is necessary to increase the moisture resistance of the entire coating. Water then cannot penetrate into the joints between the lamellas and does not harm the substrate and the bottom layer of the laminate.
In this case, the second option is often more preferable. After laying the laminated finish without glue, it can be disassembled if necessary to replace one or more lamellas. It is impossible to separate glued boards without damage.
The laminate is connected using end locks:
- “Lock” (groove-ridge).
- "Click" (simple latch).
- "UniClick" (complex latch).
The first of the locks is the weakest to break, and the third is the most durable and reliable. However, if the laying of the laminate is done professionally, then all of them guarantee a strong connection of the lamellas into a single laminated coating.
The principle of laying laminate
Step-by-step instructions for laying laminate flooring yourself
Installation of laminate can be done by anyone, even a novice craftsman. It is important to follow the sequence of work and installation technology.
The order of laying layers - warm floor, underlay, laminate
Step-by-step instructions:
- The first rule of laying linoleum on a concrete base is its waterproofing. For work, use polyethylene film. They lay it overlapping and seal the joints with construction tape.
- Installation of wedges to form a deformation gap. The elements must be the same. They are dismantled after laying the coating.
- Laying the substrate. This step involves the use of natural or artificial materials that hide minor irregularities and also act as a sound insulator. They are laid perpendicular to the laminate slabs.
- Installation of the first row of flooring. Here you need to strictly follow the step-by-step instructions. Laying should begin from the left corner of the room. The panels are connected to each other using a tongue-and-groove system. To secure them tightly, they are beaten with a rubber hammer. The last element will have to be filed.
- Installation of the second row. It should be collected separately. When it is ready, it is attached to the first row. The tenons are inserted into the longitudinal grooves at an angle of 40 degrees. If the rows are long, the master will need assistants.
- Laying the last row. Here the slats will have to be adjusted not only in length, but also in width. In addition, you need to design a doorway and threshold.
Lastly, the baseboards and thresholds are fixed.
Methods for attaching laminate flooring to the ceiling
When deciding how to install laminate flooring on the ceiling, it is worth considering that experts offer 2 installation methods – framed and frameless. The first option is simple to implement, but requires an absolutely flat base, the second is based on lathing and implies the ability to finish even the most difficult areas from an engineering point of view.
It is important that before starting work, the material spends more than 48 hours in the room in which the repair is planned. The raw materials will adapt to the microclimate, which will reduce the risk of subsequent deformations
Frameless installation technology
Tools and materials for preliminary manipulations:
- primer and roller;
- putty knife;
- plaster or putty;
- sealant;
- special glue.
The surface is freed from lighting fixtures, and the remnants of the old coating are carefully removed. In order to lay communications in the future, gating is carried out. Next, a layer of primer is applied. To make the base as even as possible, cover it successively with 2 layers of putty and sand it using a machine. The final layer is primer.
Laying laminate flooring on the ceiling is always accompanied by ventilation, since adhesives are mostly toxic (you will need a respirator). Before arranging the first row, you need to mark centimeter gaps around the entire perimeter.
For each plank, a new layer of glue is formed, the joint areas are also carefully coated (in the future they should be insulated with sealant). Each drying row is fixed with spacer bars lined with soft cloth - this measure prevents scratches.
There is a simplified way to level the base - using plywood or OSB. The sheets and ceiling are prepared for the installation of dowels. When fixing, there should be gaps between the wood panels, which are subsequently filled with elastic putty. A distance of 2 cm from the wall is required. Next, you can begin installing the decorative layer.
Subtleties of laying laminate on a frame
In this case, the installation of laminated panels precedes the formation of metal or wooden sheathing. The guides must be horizontally aligned; here you will need a building level.
Preparing the base:
- cleaning of old materials, removal of flaking areas;
- filling cracks, in the attic space you will need high-quality waterproofing;
- marking routes for laying communications;
- impregnation of wooden frame components with compounds that prevent fire and the development of fungi and mold.
During the installation process you will need:
- wooden slats 20x30 mm, beams with a cross section of 50 mm;
- bits, drills;
- jigsaw;
- building level;
- tape measure, pencil, knife;
- screwdriver, drill, hammer;
- goats;
- construction pistol.
The ceiling is marked in accordance with the future arrangement of the timber, the latter is drilled out in increments of 30 cm. The sheathing is secured with dowels; for reliability, it is recommended to install crossbars. The distance between the frame elements is determined in accordance with the dimensions of the laminate planks. The joints must be placed directly on the beam; a void cannot be left here. During installation work, if necessary, you can lay additional beams or crossbars. Heat and sound insulating materials should be laid between the guides.
Wooden frame
When installing the laminate, you need to leave a gap of 1 cm; subsequently it will be masked with a plinth. The outer panels are secured with hidden screws. The joint grooves are filled with sealant; nails or clamps are used to install the rows. The material must be positioned so that the end joints do not coincide.
You can lay laminate flooring yourself, even if you don’t have specialized skills, but you will need an assistant, especially if there is a need for lathing. The technology of work is in many ways similar to covering metal sheathing with sheets of plasterboard. The durability, harmony and aesthetics of the result directly depends on how smooth and high-quality the base is.
https://youtube.com/watch?v=Cc2VFuthiHw
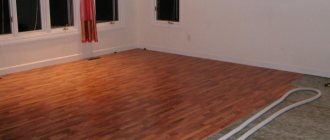
Laying underlay under laminate
First you need to select the wall from which to begin installing the floor. The laminate underlay is rolled out along the wall so that the entire floor is covered - from wall to wall. The joint lines must be aligned tightly. To ensure that the substrate adheres well to the place allocated for it, the sheets do not move relative to each other, the joints can be glued with tape or secured with staples from a construction stapler.
Helpful advice! Do not cover the entire floor with underlay at once - it is better to spread each subsequent layer as needed so as not to walk on the material.
Fixing laminate to the ceiling as a finishing option
Laminate is a finishing material of a very aesthetic appearance. It imitates the appearance of wood or stone and is used to decorate the floor surface, but it also turns out to be relevant for decorating the ceiling surface. A special feature of the use of such a resource is the provision of high-quality heat and sound insulation.
The material that can be mounted on the ceiling is the same laminate that is used for the floor. The exception is the technical characteristics of each variation, which is selected taking into account the characteristics of a particular room. It is worth attaching to the ceiling a material that is wear-resistant, rigid and resistant to changes in humidity and temperature. Resistance to direct sunlight will add advantages to the coating you are going to choose.
Why is it beneficial to use laminate as a decoration on the ceiling?
- There is a wide range of colors and textures available in any construction hypermarket in your city.
- The products do not require special care and have a long service life.
- When exposed to high temperatures, the laminate does not undergo deformation and does not support combustion in the event of a fire.
- The cost of finishing materials is low and affordable for any budget.
- The use of sheathing and locking connections eliminates the need to level the ceiling surface.
If you fix this material on the ceiling plane when decorating the space, it will take on a more laconic and aesthetic appearance. Installation is not difficult, but will require the help of a partner.
Do-it-yourself laminate on the wall: how best to attach it + Photo Ideas in the hallway, living room and bedroom
There are many different materials for finishing the floor, for example, linoleum, parquet boards, carpet, floor boards can also simply be painted or you can still lay laminate on the floor.
Laminate is a floor covering, but inappropriate use of materials has always been an interesting solution in finishing.
In the following text we will talk about how to finish walls with laminate and how to attach this material to the wall.
Installation features
To attach the planks to the floor surface, you can use a regular lathing, which is assembled from simple wooden blocks.
Usually, to fix them, direct hangers are used, used to assemble frames for drywall. When fixing, the lower side of the bars must be positioned in one plane, strictly horizontally. This is necessary so that the surface of the canvas is smooth and without distortions.
Laminate strips are attached to the bars, secured either with small nails or with a construction stapler and staples. You can use special clamps that will speed up the work and make installation easier.
The last stage of work will be the decorative finishing of the resulting ceiling. It consists of installing ceiling skirting boards and additional decorative elements.
The second method that can be used to finish a laminate ceiling is to use glue. This option is suitable only for rooms with very flat ceilings. The panels are simply glued to the base surface, without any additional bars or frames.
Unfortunately, smooth ceilings are rare in our apartments, so, most likely, this option is suitable for use in private homes, where the ceilings are made smooth and straight.
Glue mounting
When attaching with glue, it is important to have a perfectly flat wall. To do this, you can mount a frame and cover it with plywood sheets or plasterboard. This option can be used when finishing an entire wall. You can lay insulation inside or install electrical wiring to make the decorative wall also functional. If a large TV is supposed to be placed on such a wall, then the mounting for the bracket is mounted at the stage of assembling the frame. The following instructions show how to mount the covering, securing the panels with glue. Work begins by fixing the corner into which the first row will be inserted on the floor.
- The lamella of the first row is trimmed. It will be located at the bottom, so its size is adjusted so that the upper slats form a correct, symmetrical layout and do not require trimming from above.
- Glue is applied to the corner into which the panels of the first row will be inserted.
- Glue is also applied to the panel itself.
- The planks of the first row are inserted into the corner and pressed. Check the joints. Fixed with staples through the ridge
- Gently tap so that the lock latches completely.
- The panels of the next row are also greased with glue, pressed and fixed to the brackets through the ridge. The edge of the top strip is masked with a plinth.
Recommendations
You should not use this type of finish in rooms with high humidity. Panels, even covered with special coatings, still cannot withstand the moisture in the air. If you apply this finish in a damp room, the panels will simply swell with water and become deformed.
Installation is easiest if you use clamps, but when you don’t have them at hand, you can also use nails. But it is better to pre-fix the nails in the panel before it is raised up. This will save both time and effort.
It is also better to screw self-tapping screws into pre-drilled holes, slightly smaller in diameter than the self-tapping screw itself. This way they won't be able to split the bar.
Choosing material
The main covering is laminate, classified according to tests for strength and wear resistance. Before solving the problem of how to lay laminate correctly, the class of the laminate and other quality parameters are important to choose.
Class selection
Classes 21 to 34 are recommended for specific rooms and loads - details here. Up to class 31, laminate flooring lasts no more than 4 years. The coating intended for commercial facilities - shops, halls - is considered optimal - reliable and durable. It is not forbidden to lay it in domestic household conditions, where it can remain in its original form for up to 20 years. In addition to classification, pay attention to the following:
- Laminate thickness. The minimum parameter is 8 mm. For home use with high traffic flow, it is optimal to increase the thickness to 12 mm. In this case, the front layer and the supporting base will last longer.
- Lock connection method. There are three of them – click, lock and adhesive.
Despite the cost, the first one is popular - installing the laminate with your own hands is done manually without effort. The second one requires a hammer for tapping. The third involves coating the entire lock system with glue. In the latter case, dismantling without damage is subsequently impossible. - Possibility of use in bathrooms. The packaging containing the laminate must have a corresponding sign.
Choosing the right laminate is not difficult - read more in this article.
Substrate
There are several types of underlay for laying laminate flooring. Each type has pros and cons. The price is accordingly.
- Cork backing.
The ability of a material to recover after significant pressure. It has low thermal conductivity, which will provide a warm floor in a nursery or bedroom. The naturalness of the product indicates environmental friendliness. Minus - the base for the plug must be perfectly flat - differences of more than 2 mm are unacceptable. - Foamed polystyrene.
High heat capacity, leveling out flaws in screed or wooden floor surfaces. Sound insulation and inertness to moisture. However, this material is short-lived and loses its elasticity after 5–6 years of use. Dangerous in case of fire, like many styrenes - it emits toxic gas. - Polyethylene.
The most affordable material, the quality is appropriate. Over time, it crumbles under ultraviolet radiation and loses its shape. One of the advantages is the reflective effect, since one of the sides is foil, resistance to moisture and aggressive environments.
A high-quality and correctly selected substrate is the key to an even laminate coating and overall ease of use.
Calculation of the number of boards
The simplest calculation to obtain the exact number of lamellas per covered area is as follows: S room/S lamellas. But the calculation is very approximate, since the final quantity depends on the following factors:
- Laying method. Deck or diagonal methods vary by up to 40% in total.
- Length of lamellas. The range from 1.3 to 2.66 m affects the number of boards required.
- Mastery. It is difficult for amateurs to do without defects and scraps the first time.
It is also important to take into account that the packaging contains a certain percentage of factory errors, so the final quantity when calculating is safely increased by 15–20%.
Preparing the laminate
When the coating is purchased, it needs to be adapted to room temperature so that the laminate does not become deformed due to a sharp change in the future. To do this, the packages are opened and the slats are laid out on a horizontal surface for up to 3 days. It is recommended to do this when the base is completely prepared.
Advantages of finishing the ceiling with laminate
At first glance, any finishing material is created for a niche purpose, that is, for a very specific place of its application. And if the coating is called “floor”, then it must be observed exclusively under your feet. But only by destroying the long-term finishing pattern can one learn to use the best qualities of the material in a new context.
Laminate prices
laminate
Laminate ceiling finishing
Let's consider the advantages of laminate as a ceiling covering.
- There is a huge variety of colors, textures and combinations, because there are many manufacturers on the market who have been successfully competing with each other for a long time, and new products appear with enviable regularity.
- Simple maintenance consisting of dry cleaning of the surface. Even in the case of unplanned contamination, cleaning can be done using a wet method without the use of special materials for touch-up or surface reconstruction.
- Lightness of design. Of course, it is difficult to compete here with stretch ceilings or classic whitewash, but laminate will give a hundred points ahead to materials such as glass or natural wood.
- Additional sound insulation of the ceiling, achieved due to the sufficient porosity of the laminated panels.
- The aesthetics of the finished form, because with the help of this material you can achieve a perfectly smooth surface with barely noticeable joints between elements.
- Versatility in terms of compatibility with any stylistic solutions. Whether it’s a loft style or an interior striving for classic features, laminate on the ceiling will be an excellent finishing note with the right design of this area.
- The ability to hide all elements of communications or finishing - from electrical wires to air ducts and thermal insulation materials.
- “Clean” installation without noise, dust and debris. With a certain level of skill, the assembly can be done alone.
- Easy to assemble without the need for complex skills, expensive high-tech tools or hard-to-find consumables.
And if you add to all the above advantages the ability to fill the interior of any room with originality and the spirit of modernity in one stroke, then the choice does not seem so difficult and ambiguous.
Do I need to attach laminate flooring to the wall?
This question will undoubtedly arise from a person who learned about this finishing option for the first time.
Laminate has long established itself as an excellent decorative finishing material for floors, durable and practical to use. Laminate can be used to finish floors and walls in almost any room in an apartment or private house.
Laminated panels are increasingly being used for wall finishing, thereby displacing traditional finishing materials such as lining, MDF panels or conventional wall panels.
Advantages of using laminate for wall decoration
- European, as well as domestic, manufacturers put on the market environmentally friendly product that meets all modern safety requirements, so covering walls with laminate is quite possible.
- If you decide to use laminate for walls, then be sure that this material is durable , and if the operating rules are followed, it will last for decades.
- Using laminated panels of low class 21-31, you can save a lot. After all, such panels are inexpensive, but are designed for use as a floor covering, and they will not be demolished on a wall.
- The variety of textures and colors of this material provide a wide field of activity for designers when decorating premises.
- Doing the work of installing laminate flooring on a wall with your own hands is a simple task if you carefully read all the tips given in the article and follow them. Even a beginner can carry out repair work on his own.
Disadvantages of laminate when finishing walls
- The first disadvantage of laminate as a finishing material for walls is its susceptibility to moisture , which can cause the material to swell and lead to cracking of the outer decorative surface of the laminated panels.
- Another disadvantage is sensitivity to temperature fluctuations , especially high temperatures, which can spoil the attractive appearance of laminated panels.
Therefore, you should not install laminate on the wall of the kitchen or bathroom, since these rooms have high humidity and frequent temperature changes. Laminate on the wall of a balcony, basement or loggia is also not the best solution.
The microclimate of these rooms will be harmful to laminated panels and will destroy even the most high-quality and durable laminate. To decorate these premises, it is better to use traditional materials, such as lining or MDF panels.
Fastening laminate panels
We fix the laminate to the ceiling with a margin of 15-20 mm around the entire perimeter (that’s what wide slats along the edges are for). The fact is that no room is guaranteed against dampness, and it almost always comes from the ceiling. The laminate will swell. If it has room to move to the sides, cracks will appear, swelling, warping and the skin can be removed in advance.
If the slabs are immediately laid point-blank, then such a ceiling will “not show any sign” for the time being, and then it may “all of a sudden” collapse with a crash. Which, of course, is undesirable even in a deserted room.
- For tongue-and-groove laminate, use either gluers or small nails diagonally into the groove of the tongue before laying the next panel. To fit the length of the ceiling, it is better to cut the first and last panels, half the size of each: the asymmetry is very clearly visible on the ceiling. Of course, when measuring for trimming, you need to take into account the margins around the perimeter.
- For laminate with a simple edge - use small nails every 15-25 cm, indented by a quarter of the width of the sheathing strip from the edge. The places for the nails are marked in advance on the floor, and the nails are driven in to the thickness of the panel. Doing this work by weight is much more difficult. In place, the carnations are carefully pressed flush with the striker. In a few days, when the nail heads darken, they will no longer be visible.
But in any case, don’t be lazy (and don’t be stingy) before installing the next panel, lubricate the corresponding sections of the sheathing with “liquid nails” - wood mounting adhesive with the addition of sawdust. It will also be possible to coat the seams if imitation beams are not provided. The tone of liquid nails to match the tone of the trim can be selected from a sample spot on the lid of a jar or from a palette of samples from the seller.
Another way to attach laminate flooring to the ceiling is to install supporting wooden beams. But, if you consider that small nails will be invisible, the method described above is more advantageous
Installation begins with preparation
Contrary to claims, the technology for installing interlocking laminate on a wall has long been developed and tested. Many well-known manufacturers such as Pergo, Haro, Egger and others have released step-by-step printed and video instructions, thanks to which you can implement any ideas with your own hands. In particular, buyers are offered three main methods to choose from:
- Adhesive, carried out using elastic silicone or polyurethane sealants, “liquid nails” and structural adhesive compounds.
- Hardware, that is, fixation with self-tapping screws, dowel-nails, “studs” or using specialized clamps, the thickness and shape of which does not prevent the locks from snapping tightly.
- Combined – a combination of two methods.
IMPORTANT! Some craftsmen suggest using polyurethane foam instead of sealants and adhesives, but its use is questionable. The fact is that polyurethane foam greatly increases in volume within 1-2 days after application and can simply “push out” the lamellas. You will need a whole network of spacers to form a more or less flat plane. It is much easier to veneer walls using an adhesive compound or adhesive foam.
Let's answer a question that often arises among buyers - if laminate flooring is laid in a floating manner, can it be glued or nailed to the wall ?! The fact is that the operational loads on the floor are disproportionately higher than on the wall. This is not only constant walking, but also heavy furniture, floor heating systems, frequent cleaning and other factors. Wall claddings are free from this, and besides, the area of the formed coating is, as a rule, small. Therefore, to compensate for temperature and humidity changes, gaps around the perimeter, coupled with elastic adhesive compounds, are sufficient. Regarding hardware: they are used in small quantities or in combination with wood sheathing, which “behaves” almost identically to laminate.
But let's return to the instructions from the manufacturers. Technologists have defined some rules for successful work. First of all, these are the requirements for the base under HDF or vinyl parquet. The wall should be:
- Durable and reliable. Concrete, brick and other monolithic enclosing structures are suitable. Plaster is allowed.
- Dry, without traces of dampness or mold.
- Rovnoy. Allowable differences are no more than 5 mm for every 3 m. All protrusions must be cut off, and cavities and cracks must be filled with repair or plaster mixture.
- Clean. Dust, traces of soot, grease, soot, as well as various wall coverings (wallpaper, ceramic tiles, enamel paint, panels, etc.) must be removed from the surface.
It is not recommended to cover walls with laminate:
- With a negative slope. The enclosing structure must be positioned strictly vertically
- Made from plasterboard, OSB, chipboard and other structural materials, which are fixed to a frame made of wooden slats or aluminum profiles.
- Located in basements, unventilated areas, as well as near bathtubs, washbasins and other sources of moisture (with the exception of waterproof vinyl laminate).
- Raw, not dried after plastering, priming or painting.
- Crumbled, fragile or covered with gypsum, lime putty and other similar materials.
IMPORTANT! Each plank weighs about 2 kg, so the assembled laminated cladding is quite massive and heavy. Therefore, for safety reasons, finishing cannot be used on vertical frame structures.
The second important rule is checking:
- Indoor climate conditions. Recommended temperature – 15-29 ºС, humidity – 35-65%. The heating in the room should be turned off during operation.
- Absence of baseboards, decorative moldings, lighting fixtures, sockets and switches on the wall. They must be removed from the surface in advance.
And the third unconditional rule is compliance with technological clearances. To any enclosing surface, vertical and horizontal, it is necessary to maintain a distance of 5-10 mm. The exact value is usually indicated by the manufacturer and depends on the density of the material and its water absorption coefficient. The lower the last indicator, the more stable the slab.
Before purchasing, calculate the required coverage area minus door and window openings. Add a margin for trimming and correction - 10%. The maximum dimensions of a single piece of laminate on the wall are up to 12 m in length and no more than 3 m in height. The installation direction recommended by well-known brands is horizontally with an offset of 30 cm, 1/3 or ½ of the length of the plank. But vertical and diagonal fastening of the sheathing material is allowed.
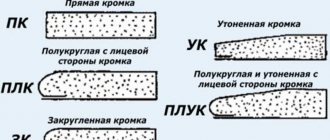
According to the recommendations of all manufacturers without exception, before starting work, it is necessary to give the laminated parquet at least 48 hours to acclimatize in the room. Then the unpacked slats should be checked for defects and damage, laid out on the floor and pre-formed into the optimal pattern in your opinion. Before installation, it is necessary to cut off the side ridges of the outer planks (located along the perimeter of the finished canvas), the lower ones - the tenon ("father"), and the upper ones - the groove part ("mother").
To work you will need the following basic set of tools:
- Hammer and rubber mallet.
- A block and steel bracket for tamping, spacer wedges or a long strip.
- Skeleton-shaped gun with sealant or adhesive composition.
- Construction knife, pencil, marking cord.
- Level and roulette.
- Tool for cutting laminate and making cutouts for sockets, switches: miter saw, jigsaw, hacksaw with wood blades, drill with bits, etc.
- Nail gun and cassette with 1 ½ - 1 ¾ inch finishing pins.
- Hardware: self-tapping screws, dowel-nails.
- Screwdriver or hammer drill.
- Personal protective equipment: glasses, gloves, respirator.
You will also need moldings to decorate the ends of the formed canvas - baseboards, corners (plastic, fiberboard, aluminum), tile profiles (metal or PVC). The latter are useful for refining corner joints.
Which underlay should I buy?
When laying, a special substrate must be used. It is needed to level out minor floor defects and to eliminate the risk of friction of the lamellas on the rough surface. In addition, it also provides additional heat and noise insulation, which is more important for city apartments.
Installation of the laminated coating is carried out on a thin elastic substrate
There are many types of substrate, not only in thickness, but also in material. Cork is the most suitable substrate, but it is expensive. Foamed PET sheets are cheaper, as are thin polystyrene foam sheets. Sometimes the substrate must have a foil layer (for example, when laying an IR film floor).
Important! Don't even think about using old carpet as underlayment! You cannot lay laminate on it!
It is also worth mentioning that laminate does not tolerate high humidity, so it should be protected from the floor. A primer partially copes with this, but in ground-floor apartments and in rooms under which there is a basement, it is recommended to additionally use a vapor barrier. You can use a special vapor barrier membrane, but thick PET film (about 100 microns thick) will also work.
On the ground floors or on floors located above an unheated room, it is better not to neglect the vapor barrier
On a note! If the floor is located above a heated room, then you can do without a vapor barrier.
When using a modern substrate that is already a vapor barrier (for example, “Tuplex”), it is important to ensure the tightness of the joints. Ordinary film should be laid with an overlap of 15 cm and subsequent sizing of the joints with tape. The backing is laid end-to-end, but the seams also need to be taped.
Roll of TUPLEX backing
Laying schemes
In which direction should I lay the laminate with my own hands? There are no strict rules, but there are recommendations. To make the joints along the boards less visible, the direction of the light should go along the board. It turns out beautifully if you lay the coating at an angle. But this method is more complicated and produces more waste. You can also lay it across the light - this is also practiced, and does not threaten anything other than more visible seams.
Laying laminate relative to the window: arrangement of elements
The basic rule that must be observed when laying laminate flooring is the offset of the seams. The minimum transverse seam should be at a distance of 40 cm from the other. This way the strength of the floor covering will be greater: the boards will not come apart under load.
The minimum distance between seams in adjacent rows is 40 cm
The laying scheme of the laminate should be developed taking into account this rule. The easiest one to do on your own is shifting by half the board. Then each odd row begins with a whole, and each even row begins with a half (or vice versa).
If the length of one element exceeds 1.2 m, then the second row can be shifted by 1/3, the third by 2/3 of the length (as in the photo above). It turns out to be a kind of “ladder”. In some types of laminate (expensive), the minimum offset of the rows is much less - maybe 15 cm. This is indicated on the packaging or in the accompanying instructions.
You can lay the laminate with a “ladder”, but you need to observe the minimum permissible seam displacement. On the right is a laying diagram for a long board length and small displacement
You may be interested in reading about the technical features of decorating the inside of a wooden house or about the design of rooms in wooden houses.
Instructions for installing coverings with “Click” locking systems
Step 1. It is recommended to start laying from the far corner. The protruding wide element of the locking connection should “look outwards”. Place the lamella in the corner, use wedges to set the required deformation gap. Alternatively, wedges can be installed after laying the entire first row.
The board is laid in the corner
Step 2. Place the groove of the second into the lock of the first lamella. Install it at the desired angle (this should be indicated by the manufacturer in the instructions).
The groove of the second board is inserted into the end lock of the first board.
Step 3. It is important not to allow any distortions - both in the direction and in the width of the lamella.
Warp in width
Directional skew
Step 4. Also, after snapping, the edges of the slats should match exactly. In our example, an angle of 15 degrees is required for engagement.
In this example, an angle between them of 15° is required to engage the locking parts of the boards
Step 5. Next, simply lower the lamella to the floor so that the mechanism works.
After this, the attached board is simply lowered onto the floor plane
Step 6. If you need to cut the board (as in the example), then it is better to mark for cutting right on the spot.
It turned out that the next board in the row should be shortened
Step 7. Rotate the lamella 180 degrees in both planes. Place the edge that will not be cut against the spacer wedge next to the wall to allow for the required gap.
The board rotates 180 degrees in both the longitudinal and transverse planes
Step 8: Next, draw a straight line along the cutting line using a square.
The cutting line is drawn
Step 9 : Trim. It is better to use a jigsaw, although in a pinch a hacksaw will do (as in the photo).
Cut in progress
Step 10. Turn the cut board over and insert it into the lock of the previous one.
The cropped fragment is inserted
Step 11. Lower it down in the same way as described above. If everything was done correctly, the fragment will fit perfectly into place.
With proper marking, this fragment will fit perfectly into place with the required gap from end to wall
On a note! If the trim is longer than needed, you can use it to start the second row.
If the remaining trim has a length greater than the minimum allowable, then it can well be used as the first board of the second row
Having previously installed the wedge, lay the board close to the finished row so that it touches it along its entire length.
It is laid out from the beginning of the row (with a wedge installed)
To make it clearer, here is a cross-section of the profile of the boards prepared for mutual engagement in the lock
Step 12. Assemble the entire second row according to the principle described above.
The entire strip of the second row is being assembled
Step 13. Raise the entire strip to the required angle so that the tenon fits into the groove (assistants may be required). Then lower the strip while pressing it forward. As a result, the lock should work.
If everything is level, then the lock should work along its entire length.
Step 14. Collect all remaining rows in the same way.
Laminate installation process
Step 15. If you come across heating pipes, proceed as follows. Start with markings. Place the lamella against the wall (with a wedge) and draw a transverse line that corresponds to the axes of the pipes.
There may be heating pipes near one of the walls.
Step 16. Connect this board to the laid strip, move it towards the pipes and mark lines that correspond to their centers.
2 more lines are planned
Step 17. Where the lines intersect, make holes (their diameter should be 2 cm larger than the diameter of the pipes). Use a core drill for the job.
Drilling locations
Step 18. Make a continuous cut along the drawn transverse line. Separate from the lamella a piece with a pair of cut semicircles.
A fragment with two semicircular cutouts is separated from the board
Step 19. Assemble the entire row of covering, starting from the heating pipes.
Next, the entire row of laminate is installed, starting from the pipes
Step 20. Coat the ends of the cut piece with glue.
The ends of the cut fragment are coated with glue
Step 21: Place the piece in place and support it with spacer wedges.
The fragment is installed in place and propped against the board with a wedge from the wall
Step 22. After this, install decorative frames for the passage of pipes (they are sold dismountable).
Installation of collapsible decorative round frames for pipe penetration
Step 23 You should end up with something like this.
This is what this node should look like in the end
Step 24. We should also talk about the installation near the door frame. It is better not to cut the laminate along its contour (it will look unsightly, because the baseboard is not installed here), but to make a groove in the lower part of the box for installing the lamella.
The best way is to cut a groove on the bottom of the box for inserting a laminated board
Step 25: Once you have cut the groove, you may notice that it will not allow the slat to be raised for winding. But this problem can also be solved.
The groove is cut, but it does not allow the board to be lifted in order to move it along with the row being laid
Step 26. First, insert the lamella that will fit into the groove into the lock, then slide it flush against the wall. Then assemble the entire row (without this lamella). As a result, a slight gap is formed.
First, the board, which should fit into the groove of the door frame, is inserted into the lock, and then moved close to the wall
Step 27. On the last lamella of the laid strip from the lock at the end, cut off the protrusion that “looks” vertically with a chisel.
Using a chisel, on the last board of the laid row, the vertically facing protrusion is carefully cut off from the end lock
Step 28 Apply a bead of glue to the edge of the lock.
After this, a strip of glue is applied along the edge of the lock.
Step 29. Slide the outer lamella back so that it meets the coated end. When the glue dries, the connection will be very strong.
And all that remains is to move the outer board back until it joins the glue-coated end of the laid one
Step 30. When laying the last row, you will most likely have to cut the boards to width. Carry out the markings on site.
Sooner or later, the turn of the last row comes
Step 31. Turn the lamella 180 degrees along the longitudinal axis, rest it against the spacer wedges. Draw a cutting line along the edge of the previous row.
A cutting line is drawn exactly along the edge of the working surface of the previous laid row.
Step 32. Install the first board of the last row.
The first board of the row is ready
Step 33. Trim the other boards in the same way and assemble the entire strip.
All other boards in the row are trimmed in the same way.
Step 34: Finally, remove the spacer wedges along the “dead end” wall. Also add wedges around the perimeter (they are no longer required). All that remains is to install the skirting boards without connecting them rigidly to the slats.
At this point, the installation of the laminate flooring can be considered complete.
Video - How to properly lay laminate flooring
Table. Instructions for laying coverings with “Click” locks without an assistant.
| Steps, photo | Description of actions |
| Step 1 | Start laying the first row. There shouldn't be any difficulties here. |
| Step 2 | Move the entire row towards the wall, installing the wedges described above to maintain the deformation gap. |
| Step 3 | Prepare the boards for laying the second strip. |
| Step 4 | Since you don’t have assistants, you will have to assemble the entire row one lamella at a time. Start with the starting board - slide it into the lock at the required angle. |
| Step 5 | After that, lower it to the floor. |
| Step 6 | Lay the next board. Connect it in the end lock, for which you move it as close as possible to the first board. |
| Step 7 | Due to the fact that the lock has not yet been inserted along the length, such a protrusion is visible (see photo). |
| Step 8 | A gap along the longitudinal seam is also visible. |
| Step 9 | Now lift the lamella to the desired angle. |
| Step 10 | Move its right end forward as much as possible so that the gap there disappears. |
| Step 11 | Keeping the right edge pressed, lightly hit the ridge on the end with your left hand. As a result, the lamella should engage. |
| Step 12 | When the gap disappears, lower the board to release the lock. |
| Step 13 | Take the next board. Start with the end connection. |
| Step 14 | Wind the lock by lifting the lamella and press the right edge tightly. |
| Step 15 | Short punch with your left hand. |
| Step 16 | As a result, the lock should work. |
| Step 17 | Here is another photo of the process, but from a different angle. Same end connection. |
| Step 18 | The lamella needs to be raised, pressing the right edge as much as possible. |
| Step 19 | Left hand strike again. |
| Step 20 | At the end, the lamella must be lowered for the lock to finally work. Proceed in the same way until you have laid all the covering. |
On a note! This is an effective, but disparaging method for laminate flooring, which should only be used in a desperate situation.
Tools and auxiliary materials
Depending on the locking method chosen, tools will be required. What you need to install laminate:
- Mallet - a wooden or rubber mallet.
- Square, tape measure.
- Markers. It is important to choose washable ones, especially for light shades of laminate flooring.
- Hacksaw or jigsaw. The latter is preferable, as it accurately cuts contours if you need to go around pipes.
- Wedges for maintaining technological gaps between the wall and the slats. This is required for linear coverage extensions.
- Scotch tape for laying the backing.
The base should be ready by then - a concrete leveling mixture is poured or plywood is laid. See how to level the base here.