Do-it-yourself welding work at the dacha is quite rare, however, it is still required. And here the question arises - should you invite a professional welder, or try to do the welding work yourself? Here you will, of course, say that for this you need to obtain appropriate training and experience, and you will be partly right.
The fact is that to perform simple (household) welding work, deep knowledge and experience are not required, since here electric arc welding simply replaces fasteners - bolts, screws, etc. A novice welder will not be able to qualitatively weld a water or gas pipe, but where the quality of the weld is not paramount, he will succeed.
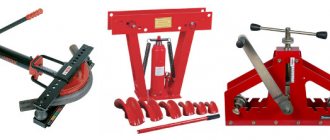
DIY inverter welding
Of course, a beginner does not need to buy any complex and professional equipment; for country needs, it is quite enough to buy an inexpensive welding inverter, with which you can perform the most common type of welding - manual electric arc (MMA). This type is used for welding parts made of carbon structural steel. For do-it-yourself inverter welding, coated piece electrodes are used.
Manufacturers
It is impossible to say unequivocally which devices are the best. There are a large number of manufacturers of a wide variety of welding equipment on the market. However, inverters for welding are in particularly high demand.
Inverters are worth choosing for your dacha, if only because they are light in weight and size. They are convenient to transport, move around the site, and install in the right place.
Suppliers of the best welding inverters that you can choose for your dacha are European concerns. The option is interesting because household devices come with additional functions that eliminate the difficulties of the work process: electrode sticking, overheating and a number of other problems.
The devices cope with increased electrical loads. Unfortunately, high-quality and reliable equipment costs money, although it works quite well for a long time.
You can also choose a domestic welding inverter for your dacha. This is the best option in terms of cost and technical characteristics. Russian and Ukrainian welding inverters have proven themselves well in the domestic market of industrial and household welding equipment.
Among Chinese products, there is a large percentage of low-quality welding inverters, but with some effort, you can choose a decent model for working in the country. In addition, many potential buyers are attracted by the low cost.
Having opted for Chinese household appliances, it is better to deal with official factories.
What is needed to work as a welder?
Welding work is a rather harmful type of production, so it is worth taking care of protecting your eyes and hands first. A mask with light filters is used for the eyes, which protect vision from harmful radiation and at the same time allow you to see the welding site. Light filters have different degrees of shading and are divided by number, depending on the intensity of the arc. We wrote in more detail about the mask in the article “how to choose a welding mask.”
To protect hands, use gaiter - special mittens or gloves that can be bought at any hardware store. In addition, you can also buy a welding suit or apron, as well as shoes that can withstand sparks.
Electrode holder (holder) and mass
The wire of the electrode holder or, in common parlance, the holder must be made of copper with a large cross-section, and the higher the current, the larger the cross-section. Household inverters do not have much power, so they will use wires rated for a current of up to 200 A. In most cases, there is no need to buy wires, since they are included with the inverter.
Simple
The simplest welding machine for the dacha is the FUBAG IQ 200, which costs a little more than 8,000 rubles. Any beginner can figure it out. The “knob” and display allow you to set the welding current from 20 to 220 A with an accuracy of 1 A. The model weighs 3 kg, although the casing is made of metal. The visor above the screen protects against accidental damage and raindrops. The kit includes a holder with a 1.8 m cable and a ground clamp with a 1.2 m cable. The instruction manual is written in accessible language.
Other reasons to buy Fubag IQ 200 include:
- high-tech functions Hot Start, Anti Sticking, Arc Force.
- work at temperatures from -25 to +55 degrees;
- modern IGBT transistors.
But the simplicity and low price of the welding machine affected the productivity. At full power, they can only cook for 4 minutes out of 10, otherwise it will overheat and go into defense. The product warranty is not extended, but standard - 1 year.
What electrodes are needed
There are a great variety of brands and types of electrodes, but for household welding, the OZS, or ANO and MR brands are sufficient. The diameter of the electrode is “two” or “three”, depending on the thickness of the parts being welded; the thicker the parts, the larger the diameter of the electrode and the current for the inverter should be.
Material up to three millimeters thick will be welded by a “two” electrode, from 3 to 5 mm – by a “three”; a four-millimeter rod is unlikely to be useful, since the home electrical network simply cannot withstand such a load, and such tasks, as a rule, are not worth it. Well, in our case it’s not worth talking about the “five”.
Preparing the elements to be welded
Before starting welding, the joints between parts must be cleaned of dirt and rust and moisture removed. If the thickness of the part is more than 3 mm, then it is better to chamfer the edges; this will allow for better welding of the elements, which is important, especially for a beginner. We recommend that you do not skimp on time and prepare the parts to be welded well.
Do-it-yourself welding provisions
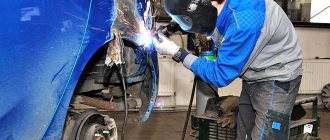
Of course, the most convenient position for manual arc welding is welding “in the lower position,” that is, when the weld seam runs along a horizontal plane. This way the welding process takes place with full control of the weld pool, the melt and filler metal of the electrode lie evenly in the weld seam. This is why experienced welders advise a beginner to start his welding “career” by welding on a table, and not try to immediately weld a structure in place from awkward positions.
Often you have to cook in a vertical position, or horizontally on a vertical surface; this is not very convenient and is generally more difficult than a horizontal position. It is better to carry out the weld from top to bottom with a short arc, while making the weld pool small so that the melt and metal do not drain. Sometimes it becomes necessary to weld from below, that is, ceiling welding, but it is very complicated, so it is better for a beginner not to undertake it.
Home handyman's choice
When deciding which inverter welding machine is best suited for home use, you should pay attention to the main characteristics:
- working cycle duration;
- range of load characteristics;
- voltage range;
- availability of additional functions that facilitate the welding process.
Modern inverter devices offer a large number of settings
You should make a purchase from a manufacturer who offers service for the unit. The optimal choice depends not so much on the cost and promotion of the brand, but on the compliance of the device with the operating conditions and the requirements.
Welding methods: lap, butt, tee and corner
The work of a welder involves several methods of welding parts: overlap, butt, T-joint and corner. The seam is made with an inclined electrode, except for butt welding, when the electrode is held almost straight. When doing fillet welding, it is recommended for a beginner to place the parts to be welded “in a boat” rather than in an L shape; in this case, it is easier to achieve a high-quality seam with well-welded edges.
Setting up a welding inverter
First of all, it is necessary to set the welding current, the strength of which is determined based on the thickness of the electrode. For our purposes, we use “two” and “three”; for the first it is recommended to set the current to 70-80 amperes, for the second type - 100-140 amperes. Experienced welders set the current quite accurately the first time, but a beginner should spend more time, starting with the minimum current and raising it if necessary. The sound of welding will come to the rescue - gurgles or hums - the current strength is set incorrectly, a crackling sound is heard - the current strength is guessed accurately.
The question remains - what polarity to choose for the electrode holder (holder) and ground. Since the inverter uses direct current, both “plus” and “minus” can be applied to the holder and ground, which affects the welding process. For us, it is important to apply “plus” to the holder and “minus” to ground, that is, the connection is reverse polarity. In this case, the electrode heats up more than the surface being welded, which makes it possible to obtain a high-quality seam. Straight polarity (when the electrode is “minus” and the ground is “plus”) is used for welding steel sheets, using electrodes special for this work.
Compact
If you need a compact inverter for your dacha, buy NEON VD-163, the dimensions of which are only 168x129x320 mm. It is almost twice as narrow and lower than the model described above. Due to the reduced dimensions, the weight of the inverter is 4.3 kg. It won't be difficult to move it. A shoulder strap is provided for welding on the roof or in other hard-to-reach places.
The welding machine produces direct current from 25 to 160 A, which is enough to weld metal up to 4 mm thick. The price of the model is 5,500 rubles higher than the Resant SAI-190, but it already has a display that makes smooth adjustment more accurate. The metal case reliably protects the internal components and control panel from damage. Reviews show that the model produces a stable welding current, the arc burns smoothly, and there are no surges.
It is worth buying an inverter due to other advantages:
- 2 year manufacturer's warranty;
- works on the latest generation transistors;
- IP23s water protection level allows you to work outdoors during rain (if you urgently need to weld the joint);
- The arc is easily ignited thanks to the no-load voltage of 70 V.
We begin welding work with our own hands
So, we have prepared everything we need for work, it’s time to start cooking. For the first time, it is best to simplify the task as much as possible: cook on the table in the lower position, the parts are plates (sheet metal) without chamfers with straight edges. The welding seam will be straight in one layer, the parts are placed end-to-end, the electrodes used are “double”. For ease of understanding, we divided welding work into stages:
Stage one. It all starts with igniting the arc, for which we simply strike the electrode over the parts to be welded. This movement is reminiscent of lighting a match, while striking should be done with the electrode tilted towards the horizon at about 30 degrees and in the direction of the welding seam.
Stage two. With an ignited arc, we begin to weld the seam, for which we move it to the beginning of the seam and wait a few seconds until the metal melts. It is easy to determine that the metal has melted; the spot at the welding site becomes yellow-orange in color and becomes covered with ripples. Now all that remains is to form the weld pool, for which we hold the electrode slightly inclined in the direction of the seam.
Stage three. The weld pool is formed by gradually moving the electrode from the beginning of the seam to its end, that is, as mentioned above, we wait for the metal to melt and move it a few millimeters further, and so on until the end of the seam.
What you need to know when forming a weld pool
When forming a weld pool, there are several important details that must be taken into account:
Arc gap, that is, control of the distance between the electrode and the seam. If the gap is large, then we will get an unstable arc and a lack of metal to create a weld; if the electrode “pecks” at the parts, we will get a short circuit and shutdown of the inverter (the device’s protection will work). It is best to select the height of the inclined electrode, at which the electrode coating will touch the parts.
The height of the seam depends on the inclination of the electrode; the more vertical it is held, the lower it will be. Welders, as a rule, try to make the seam level with the parts being welded, but for a beginner it is better to make the seam higher, this will allow better control of its quality. Subsequently, you will be able to lower your height or even reach a professional level, but we do not recommend starting with it.
For a beginner, the movement of the electrode is linear, which will allow the formation of nodules, that is, “scales” that overlap each other. Ideally, you should end up with a seam with small scales, but if this doesn’t work out right away, don’t despair, you’re still a beginner.
Another “trifle” is the speed of movement of the electrode along the seam. This action is determined by eye, and in no other way. It is necessary to carefully monitor the color of the spot under the arc, moving smoothly and without haste. It is important not to over-expose it - it is fraught with burning, and not to over-expose it - you will get an uncooked area. The intensity of movement depends on the thickness of the electrode; the thinner it is, the slower it heats up the metal, and accordingly, the slower it is moved along the seam. In any case, we strongly advise a beginner to stop and inspect the seam; do not try to weld with one arc on the fly (that is, make the seam without stopping).
Finally, the last stage of DIY welding is completing the welding. To do this, you need to make a small circle in place without abruptly removing the electrode. The remaining slag on the seam is beaten with a hammer and cleaned with a wire brush (after cooling, of course). A high-quality weld should not contain slag inclusions, and a beginner should strive for this.
In general, this is all that a novice welder needs to know; the rest will come with experience.
How to choose a 220 V welding machine for home and garden
The quality of welding does not depend on the type and type of inverter unit. Which welding machine is best for home and garden work? Of course, household, unless its owner intends to have additional income from welding in the future.
Inverter classification
Welding devices are divided into three categories:
- for household purposes;
- professional;
- industrial.
All their differences lie in the duration of the operating cycle and the cost of the device itself. If the quality of welding does not depend on the “sophistication” of the device, why spend money on expensive professional equipment?
To perform small household jobs, you do not need a “sophisticated” device
Helpful information! For domestic purposes, a working cycle of 20 minutes is sufficient, after which the device cools down for half an hour.
Types of inverters
Household inverters are designated in documents by the letters MMA. Following the abbreviation are numbers that indicate the amount of operating current - 200 or 250. A professional device has the ability to operate in a wide temperature range, from 150 to plus 150 degrees. A modest home unit has a range from zero to plus thirty, and this is quite enough. Another difference between a household appliance and a professional and industrial one is the duration of the operating cycle. A professional inverter will work for eight hours with breaks of several minutes, an industrial inverter will work for a day with a rest of half an hour. A good household appliance can cook continuously for up to half an hour with a cooling interval of 60 minutes.
Carrying out gate welding work
The voltage range of the home appliance is 220-230 volts. There are devices whose documents indicate a wider range - from 170 volts, but in practice the performance at this voltage is very low.
Expert's point of view
Victor Isakin
Tool selection specialist for the 220 Volt retail chain
Ask a Question
“When purchasing an inverter-type welding device, you should trust a company that has service centers in the city. In this case, there will be no problems with repairs and finding spare parts.”
It is recommended to have the device repaired at service centers.
According to the type of welding mode, inverters are divided into the following types:
- plasma cutting;
- argon welding;
- semi-automatic;
- manual welding.
Additional functions in inverters
Devices from modern manufacturers are equipped with overheating protection. Thermal sensors turn off the power if they detect a high temperature on one of the device components. Similar systems are installed on all devices – expensive and budget. Therefore, when deciding which welding inverters are best to purchase, check for the availability of these additional options. functions should not be paid special attention.
In addition to temperature sensors, the devices are equipped with moisture and dust protection systems. They are also provided on all devices and differ in the degree of protection or the method of replacing and cleaning the filters.
Adjustment potentiometer on the device
The additional function “Anti-stick” is especially in demand among beginning craftsmen. If the electrode is attached to the part, the device resets the voltage and waits for the circuit to open. As soon as the work process is restored, the device begins to supply current again.
For your information! When the device is turned on, in standby mode, the voltage on the electrode automatically decreases to a level that is safe for humans. This mode eliminates accidental electric shock.
Electrodes for the device