To correctly connect lighting devices, sockets and other electrical devices, you need to know where the phase and zero are. To do this, you can use a very useful and functional meter - a multimeter. Despite the apparent simplicity of this device, you need to learn how to use it; in some cases, one wrong action can lead to unpleasant and even disastrous results. We will tell you how to determine phase and zero with a multimeter, and you can safely organize electricity in your home.
Wire colors and designations
In order to find the phase, neutral and ground wires of electrical wiring without instruments, they, in accordance with the rules of the Electrical Installation Code, are covered with insulation of different colors.
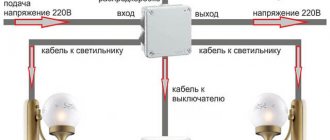
The photo shows the color marking of the electrical cable for single-phase electrical wiring with an alternating current voltage of 220 V.
This photo shows the color coding of an electrical cable for 380V AC three-phase wiring.
According to the presented diagrams, wires began to be marked in Russia in 2011. In the USSR, the color marking was different, which must be taken into account when searching for phase and zero when connecting installation electrical products to old electrical wiring.
Wire color coding table before and after 2011
| Period of validity of the PUE | First phase L1 | Second phase L2 | Third phase L3 | Neutral wire, N | Ground wire, PE |
| Until January 1, 2011 | yellow | green | red | blue | yellow - green (black) |
| After January 1, 2011 | brown | black | grey | light blue | yellow - green |
The table shows the color marking of electrical wiring wires adopted in the USSR and Russia. In some other countries the color markings are different, with the exception of yellow-green
wires. There is no international standard yet.
The designations L1, L2 and L3 do not indicate the same phase wire. The voltage between these wires is 380 V. Between any of the phase and neutral wires, the voltage is 220 V, and it is supplied to the electrical wiring of the house or apartment.
What is the difference between N and PE wires in electrical wiring
yellow-green ground wire must also be supplied to the apartment
.
The neutral N and grounding PE wires are connected to one grounded bus of the panel in the entrance of the house. But they perform different functions. The neutral wire is intended for electrical wiring, and the grounding wire is intended to protect people from electric shock and is connected to the housings of electrical appliances through the third contact of the electrical plug. If an insulation breakdown occurs and a phase gets into the body of an electrical device, then all the current will flow through the grounding wire, the fuse links will burn out or the circuit breaker will trip, and no person will be harmed.
If the electrical wiring is laid indoors with a cable without color marking, it is impossible to determine where the neutral conductor is and where the grounding conductor is, since the resistance between the wires is hundredths of an ohm. The only clue can be the fact that the neutral wire is inserted into the electric meter, and the grounding wire passes by the meter.
Attention! Touching exposed parts of a circuit connected to an electrical outlet may result in electric shock.
Security measures
To ensure safe work and no unpleasant surprises, you should familiarize yourself with the rules of use that stipulate the indicator screwdriver. The instructions stipulate the following precautions.
- It is prohibited to use the device without a screw.
- Only the battery may be removed from the device.
- After replacing the battery, the screw is tightened tightly clockwise.
- Do not use a tool with mechanical damage.
- It is forbidden to use a screwdriver in high humidity environments.
- It is strictly unacceptable to use the device for networks with inappropriate voltage.
This is a series of fairly simple rules, but their strict implementation guarantees the preservation of health and ensures the safety of activities.
Probe indicators for searching for phase and zero
A device designed to find zero and phase is called an indicator. Light indicators for determining the phase on neon light bulbs are widely used. Low price, high reliability, long service life. Recently, LED indicators have also appeared. They are more expensive and require additional batteries.
On a neon light bulb
It is a dielectric case, inside of which there is a resistor and a neon light bulb. Touching the electrical wiring wires one by one with the screwdriver end of the indicator, you find the phase by the glow of the neon light bulb. If the light bulb lights up when touched, it means it is a phase wire. If it doesn't light up, it means it's a neutral wire.
Indicator housings come in different shapes and colors, but the filling is the same for all. To prevent an accidental short circuit, I advise you to put a tube made of insulating material on the screwdriver shaft. The indicator should not be used to unscrew or tighten the screws with great force. The indicator body is made of soft plastic, the screwdriver shaft is pressed in shallowly and the body breaks under heavy load.
LED probe indicator
Indicator-probes for determining the phase on LEDs appeared relatively recently and are gaining increasing popularity, as they allow not only to find the phase, but also to ring circuits, check the serviceability of incandescent light bulbs, heating elements of household appliances, switches, network wires and much more. There are models with which you can determine the location of electrical wires in the walls (so as not to damage them when drilling) and, if necessary, find the place of their damage.
The design of the LED probe indicator is the same as on a neon light bulb. Only instead of it, active elements are used (field-effect transistor or microcircuit), an LED and several small-sized DC batteries. The batteries last for several years.
To find the phase, use the LED indicator-probe and its screwdriver end to touch the conductors sequentially, while you cannot touch the metal pad at the end with your hand.
. This area is used only when checking the integrity of electrical circuits. If, when searching for a phase, you touch this pad, the LED will also light when you touch the neutral wire with the indicator!
A brightly lit LED will indicate the presence of a phase. According to the rules, the phase wire should be on the right side of the socket. How to check contacts and circuits with such a probe indicator is described in detail in the instructions supplied with it.
How to make a probe indicator yourself to find phase and zero on a neon light bulb
If necessary, you can make a probe indicator with your own hands to search and determine the phase.
To do this, you need to solder a 1.5-2 MΩ resistor to one of the terminals of any neon light bulb, even a starter from a fluorescent lamp, and put an insulating tube on it.
A light bulb with a resistor can be placed in the handle of a screwdriver or the body of a ballpoint pen. Then the appearance of a homemade probe indicator will differ little from the industrial design.
Searching or determining the phase is performed in exactly the same way as with an industrial probe indicator. Holding the light bulb by the base, touch the end of the resistor to the conductor.
When selecting a resistor, sometimes difficulties arise in determining its value if colored rings are applied to the resistor body instead of a number. An online calculator will help you cope with this task.
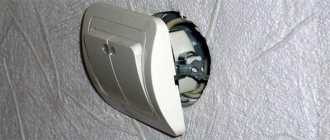
Indicator screwdriver design
The design principle of indicator screwdrivers is quite simple and outwardly resembles its conventional counterpart. The difference between them is the handle.
The indicator screwdriver has a resistor in its body, to which the metal tip of the tool is connected. It acts as a guide.
The resistance element reduces the current to the maximum possible value. This allows you to use the indicator screwdriver safely.
The housing also contains a small LED or neon light bulb. It connects to the outer patch of the contact plate, which is located on the outside of the screwdriver.
The current passing through the probe and resistor decreases, its strength becomes safe for work.
This is the basic principle of operation of such a device as an indicator screwdriver. The rules will tell you how to use the device.
The person must touch the plate on the outer edge of the tool. In this case, the circuit will close and the indicator light will be activated.
Why does the indicator light up when you touch the neutral wire?
I have been asked this question many times. One of the reasons is the incorrect use of the LED indicator. How to properly hold the LED probe indicator when searching for a phase is written in the article above.
The second possible reason for this behavior of the indicator is a break in the neutral wire. For example, a circuit breaker installed after the meter on the neutral wire tripped. In old apartments this is not uncommon and is a gross violation of the electrical wiring. It is imperative to remove the machine from the neutral wire or short-circuit its terminals with a jumper.
When the neutral wire breaks, a phase is supplied to it through devices connected to the electrical network, for example, through a switch backlight indicator, a TV in standby mode, any charger, a computer turned off only by the start button and other electrical appliances. The indicator shows this. In this case, the neutral wire can be dangerous and touching it is unacceptable. It is necessary to find and repair a break in the neutral wire, which may also be located in junction boxes.
Instructions for use
An indicator screwdriver can perform many functions. How to use it correctly? Rules have been developed that regulate this.
To evaluate a wire for a break, you should eliminate the possibility of no voltage in the network. Then, holding the wire with one hand, you should touch the other end with the sting.
If the wire is OK, the LED will light up.
Using this device you can check the condition of the extension cord. To do this, the conductor is disconnected from the network. Two wires are inserted into both holes of the socket. Holding the contact of the plug, you should check the second contact with a tool.
If the light starts to glow, the extension cord is working.
Finding the area where the cable is broken is also quite easy. The probe of the tool is clamped with your fingers, and its handle is guided along the cable. Where the indicator stops lighting, there is a break in that place.
How to find phase and zero using an electrician's test
Electrician checking an incandescent light bulb
To check the presence of supply voltage in the electrical network, electricians previously used a homemade tester, which was a low-power incandescent light bulb screwed into an electric socket. Two conductors of stranded wire about 50 cm long are connected to the cartridge.
In order to check the presence of voltage, you need to touch the electrical wiring wires with the test conductors. If the light comes on, there is voltage.
Electrician's control on LED
An electrician's inspection of a light bulb requires careful handling and takes up a lot of space. It is much more convenient to do an electrician check on the LED according to the diagram below.
The circuit is simple; a current-limiting resistor is connected in series with any LED. LED of any type and color. Use it in the same way as an electrician's control on a light bulb.
The LED and resistor can be placed in a ballpoint pen housing of a suitable size. In the photo there is a control for the motorist. The control scheme is the same. Only depending on the type of LED used, resistor R1 is set to a value of about 1 kOhm.
It’s easy to check the presence of voltage on the wires in the car’s on-board network using such a tester; the right end is connected to ground according to the diagram, and the left end touches any contact. If there is voltage at the contact, the LED will light up. If you touch the positive terminal of the battery with one end of the fuse, and touch the other with the control, then if the LED does not light, it means the fuse is broken. This way you can check both incandescent light bulbs and the presence of contact in the switches.
Phase search in the presence of neutral and ground conductors
If you need to find a phase in an electrical wiring that has phase, neutral and ground wires, then using a tester this is easy to do. It is enough to make three touches with the control wires. You need to assign a conditional number to each wire, for example 1, 2 and 3 and in turn touch the pairs of wires 1 - 2, 2 - 3, 3 - 1.
The following behavior of the light bulb is possible. If when you touch 1 - 2 the light does not light up, it means the wire is 3-phase. If it lights up when you touch 2 - 3 and 3 - 1, it means 3 phase. The meaning is simple: when you touch the neutral and grounding conductors, the light will not shine, since practically these are conductors connected together on the shield.
Instead of testing, you can turn on any AC voltmeter designed to measure a voltage of at least 300 V. If you touch the phase wire with one probe of the voltmeter and the neutral or ground wire with the other, the voltmeter will show the voltage of the supply network.
Search for phase and zero using a control
Attention, touching any exposed conductors while searching for a phase with a tester may result in electric shock.
Everything is done very simply, one end of the control wire is connected to a central heating or water supply pipe stripped to metal, and the other end is touched in turn to the wires or electrical wiring contacts. When you touch the phase wire, the light bulb will light up.
If you cannot reach the metal of the pipe, you can use water flowing from the mixer. To do this, turn on the water and place one control wire under running water as close to the mixer as possible. Touch the other end of the wire to the electrical wiring. The weak light of the light bulb will tell you where the phase is.
It is best to screw in the lowest-power light bulb into the control; I used a 7.5 W refrigerator light bulb. In order to reach the water, you can use a piece of any wire or a standard extension cord.
Checking the device before operation
Before starting the process, it is important to familiarize yourself with the rules on how to check an indicator screwdriver. To do this, a visual inspection is carried out to check the integrity of the structure in order to exclude the presence of mechanical damage.
Having completed this action and not finding any deviations from the norm in the appearance of the instrument, it is tested.
When checking, the probe of the indicator screwdriver is inserted into each hole of the working socket. In this case, the thumb must be kept on the handle plate of the dielectric sensor. If this is not done, the indicator will not work.
Also, when using equipment with a neon indicator on a battery, it is permissible to simply pinch the tip of the screwdriver and its patch with your fingers. If the LED lights up, the tool is working properly.
Finding phase and zero using potatoes
If you don’t have the technical means at hand to find the phase, then you can successfully use the exotic or folk, or you can’t call it anything else, method of determining the phase using potatoes. Don't think this is a joke. For some, this may be the only available method that can be successfully applied in practice.
The end of one conductor must be connected to a water pipe (if it is not plastic) or a heating radiator. If the pipe is painted, then the connection point must be stripped down to metal to ensure electrical contact. Insert its opposite end into the cut of the potato. The other conductor is also stuck with one end at the maximum distance from the previous one into the potato, with the other end, through a resistor rated at least 1 MΩ, they touch the electrical wiring wires in turn. You need to wait for some time. If there is no reaction on the potato cut, it is zero; if there is, it is a phase. I do not recommend using this method if you do not know the safety rules for working with electrical installations.
As you can see in the photo around the wires when connecting the electrical wiring to the phase wire, changes occurred on the cut surface of the potato. When touching the neutral wire there will be no reaction.
Application of incandescent lamp
This is a method of using an incandescent lamp to identify the appropriate colored conductors in a 3-conductor network. This method requires compliance with increased security measures.
To use this method, a regular incandescent lamp is screwed into the socket. Wires that do not have insulation at the ends are screwed onto the cartridge terminals.
If you don't have the parts kit for this method, you can use a standard table lamp. In this case, in order to get the result, you should alternately connect the conductors to the plug by color.
The disadvantage of this method is that by using it, it will be impossible to know for sure which of the two conductors is phase. That is, with this method, we rather check the system for performance.
And the advantage is that with a high degree of probability we will know the following: 1 wire is neutral, the other wire is phase. If the light does not light up during testing, this indicates a lack of phase in the conductors being tested.
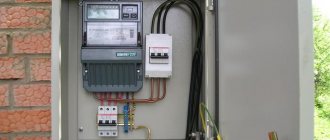
Visual inspection algorithm
First, open the shield. Carefully consider circuit breakers, the number of which depends on the rated load. There are 2 connection options for the machines:
- the wire contains only a phase;
- both phase and zero.
The ground wire is connected directly to the busbar.
Now that you know the meaning of the colors and the location of the cables, all that remains is to check that everything in the panel complies with the standard.
Next, provided that your wire insulation in the panel complies with the rules, you need to open each junction box and visually examine the condition of the twists. There should be no inaccuracies here either.
Very often there are moments that you should not focus on. For example:.
- The distribution box contains a switch connected to the phase.
- The installers used wires with two cores, the insulation of which differed from the standard.
Be sure to adhere to safety regulations and be careful and extremely attentive when solving electrical problems yourself.
How to distinguish by appearance
You can find out which wires run in a particular apartment by their appearance. You need to know how to determine phase and zero without instruments if both of the indicating instruments are missing. You can distinguish wires by the color of their insulation. But this method is applicable only when the electrical wiring is done in compliance with all the rules for its installation.
. The yellow-green color of the insulation indicates that this conductor is grounding. Light blue or dark blue indicates that the wire is neutral, while brown, white or black indicates the phase line.
But even if you are sure of the color of the wiring, it is better to double-check it with an indicator screwdriver or a multimeter, since incorrect connection can result in electrical injury.
General information
In our daily lives, we encounter electricity almost everywhere we go. Whether it’s work or various institutions: cinema, theater, shops, sports complexes - the list could go on for a very long time. Needless to say, we use many electrical appliances every day, and 20 or 30 years ago there were not as many of them as there are now. Moreover, their number is growing with enviable frequency.
But all electrical equipment cannot work forever and sooner or later it begins to break down, which is simply inevitable. No one has yet invented a perpetual motion machine, so you shouldn’t hope for a miracle. Some people want to learn something new, unknown, and electricity is no exception. If only because you can carry out repairs of household appliances yourself. Of course, it is better to invite a specialist, but you can do light work yourself. Only for this it is necessary to study fundamental concepts in order to understand what zero and phase are.