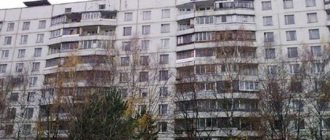
137 series of houses is one of the most popular standard series in St. Petersburg. Houses in this series are rightfully popular among buyers of secondary real estate: buyers are attracted by large kitchens with an area of up to 15 m2, spacious isolated rooms, functional layouts and high ceilings (2.7 m).
The M16-Real Estate agency will introduce you in more detail to the standard series 137. In this review we will talk about houses of this type, apartment layouts, pros and cons.
Type of design project
Standard interior design project
A standard design project contains the drawings necessary for repairs, as well as general visualizations of the future interior, made by hand or in a graphics editor. This is the most common option for submitting a design project and is suitable both for understanding the general appearance of the interior and for transferring it to builders and repairmen. Perhaps such a project will not reflect all the small details of the furnishings, and the accessories will have a schematic appearance and location, but you will get a general idea of their appearance.
Complete interior design project
A complete design project is needed if you want maximum specificity and are meticulous in every detail. The estimate for the project will indicate specific brands of finishing materials and articles of furniture that will be used in the project; three-dimensional visualization and a scan of all four walls will be attached to each room in the house, if necessary. In such a project, every centimeter of space will be carefully worked out and presented to you.
Author's supervision
If you want the designer not only to develop an interior concept, but also to monitor the progress of the work, and also independently or with your participation to select finishing materials, furniture and accessories in stores and showrooms, then, in addition to the design project, you should agree and about author's supervision on his part. Design supervision means that during the renovation the designer will regularly monitor the builders, check the quality of their work and the compliance of the result with the original project. Architectural supervision is negotiated and paid for separately, most often on an hourly basis.
Now let’s move directly to the documents included in the design project and the stages of your communication with the designer.
ADDITIONAL SERVICES
| Name of works | Unit change | Cost, rub. |
| Hanging cabinets, mirrors, shelves | PC. | from 518 rub. |
| Hanging decor. devices | PC. | from 238 rub. |
| Stepladder rental | PC. | from 950 rub. |
| Estimating outside the city | PC. | from 600 rub. |
| Non-tariffed work (standard hour) | hour | from 518 rub. |
| Garbage collection in bags (removal of up to 6 bags) | service | from 3000 rub. |
What is included in a design project?
To be specific, this is a package of documents that includes: drawings, diagrams, sketches, photorealistic images. Here is a list of professional designer documents:
- Measurement drawing. This is a “bare” floor plan to scale (top view), the one that exists before the renovation work.
- Planning decision. This is a plan of the future premises with furniture, appliances and other paraphernalia. There may be several such planning decisions at the beginning. If the designer does a redevelopment, then 2 more plans are added: a plan for installing/dismantling partitions and an explication.
- Layout diagrams for sockets and lighting fixtures (sometimes these can be 2 separate drawings).
- Floor plan. Needed to indicate zones of different types of floor coverings.
- Ceiling plan. A ceiling plan is especially necessary in the case of multi-level structures; the type of material is also indicated.
- Development of walls. Everything is noted on this plan: furniture, lighting, sockets, decor - everything. In essence, it looks like a planning solution, only in profile.
- Technical diagrams (ventilation, heating)
- Estimate (specification of materials and equipment)
- Collage or design board. It might look like this:
- Sketch/visualization in 3D program. By the way, creating 3D visualization is not so difficult if you know which interior design programs to use for a beginner.

As can be seen from the list, compiling such a complete volume of documents is, to put it mildly, difficult for a beginner.
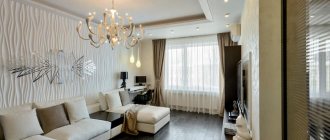
Arrangement of the hallway of a three-room apartment
When creating the interior of a three-room apartment, you need to start with the room that makes the first impression upon entering the house - that is, the hallway. The large space allows you to accommodate a closet - a wall, a dressing table with drawers and a shoe shelf.
Shelving will help set the appearance of the corridor; you can place accessories, paintings, photo frames and books on them. Of course, such a room is poorly lit, sometimes even dark, so the best lighting devices are used for high-quality lighting.
The hallway is a room that is always visible and its overall design should be combined with the interior design of a three-room apartment. The harmony of the corridor emphasizes the good taste of the owner of the house.
Terms of reference for a design project
You need to start developing a design project by identifying the nuances that you may encounter during interior design. The customer himself must write about these nuances. Thus, he will be able to provide us with an image of the interior that he would like to obtain as a result of our work. A technical specification is an opportunity that is given to the client to fantasize about the future interior of his premises.
The terms of reference consist of clear diagrams and questions that need to be answered. If the customer has any special requirements, then you simply mark them on a separate line, but do not forget to include them in the technical specifications.
Why fill out a technical specification?
Namely, with the help of technical specifications, we will be able to understand what kind of interior the client wants to receive. So, for example, if we ask the right question, you can get the right answer, which will significantly help us in developing a design project. There is nothing wrong with a designer being interested in any facts from the customer’s life. It is from such details that you can create the ideal interior for a particular family.
Among other things, it is worth noting that the terms of reference are an official, legal document. The designer must attach it to the main contract, which contains information about ordering the design project. All these documents must be signed by the contractor and the customer.
Communication component of the technical specifications
More often than not, understanding what the customer wants is an incredibly difficult task. Sometimes, customers themselves don’t know what they want to get as a result, and they try to solve all the issues with phrases like: “Well, you’re a designer, come up with something.” But this is a path that will not lead to anything good.
If you really want to get an apartment decorated in your style, if you want to live in it as comfortable and cozy as possible, then listen to the designer - take seriously filling out the technical specifications. If you don’t do this, then the designer can easily create a wonderful interior, but it may not suit you
After all, it is important that the interior is not only stylish, but also comfortable.
So, for example, when creating a design project for a cafe, the executor of your order will develop an interesting project, but without knowing how many people the cafe is designed for, he will not be able to add many details to it - because of this, the project may turn out to be damp and gray. Such a bad result is not a sign that the designer turned out to be bad and unprofessional - this is your fault. Keep in mind - the more information about your tastes and preferences you tell the order executor, the more likely it is that you will like the resulting design project.
Reasons for negative results
After all of the above, it is foolish to deny the fact that working on technical specifications is a very important stage for creating a high-quality design project
But it’s not so simple - it is very important that the technical specifications become part of the production process in its entirety. It is for this reason that it is so difficult to develop it - you need to discuss all the smallest details, clarify absolutely all the points and only after that start working on the project
But if the project fails, then the designer (in the opinion of the customer) or the customer (in the opinion of the designer) is to blame. So, for example, the designer’s problem is that he, as a creative person, does not like to record his every step on paper - it’s easier to call the client at any time of the day or night and quickly bring him up to date. And if further difficulties arise, tell the customer: “Well, I warned you!”
In the case of the customer himself, things are approximately as follows - every day he receives several calls and letters from the designer with various clarifications and amendments, he honestly tries to remember everything and, thinking that his memory is a storehouse with non-vanishing knowledge, I also don’t dare to put everything down on paper. And then, naturally, he forgets some details, which he is not happy with later.
Bathroom in the Czech Republic: characteristic features
The bathroom premises of this series have an undoubted advantage - the considerable size of the bathroom bowl and its placement. The length of the bathtub reaches 170 cm, and the bowl is located against the wall, across the room.
Important! The 137 series bathroom is not tied to any of the currently existing house series, so it can be found anywhere.
So, there is an advantage - a large area that allows you to comfortably place all interior items, as well as additional accessories. Here's what you need to consider when renovating a 137 series bathroom:
- The riser, located in the bathroom, supplies the heating system and taps with hot water. Moreover, the distribution occurs using a water supply fork placed in the toilet room.
Important! Due to this arrangement, the work of installing meters and changing filters is greatly simplified.
- There is a ventilation shaft in the toilet room (behind the wall), so this room is 25-30 cm shorter than the bathroom;
- A bathroom in the Czech Republic is distinguished by perfectly smooth walls, which greatly facilitates the process of covering wall surfaces;
- Wall and floor structures are made of reinforced concrete of extremely high strength (maybe reinforced plaster), therefore installation and replacement of pipes and wiring can cause certain difficulties (the thickness of the floor in some places reaches 7 cm);
- Non-standard doorways are another feature of Czech bathrooms. The width is no more than 57 cm, which brings certain difficulties, but you can widen the opening a little. But it is worth remembering about the reinforcement of the walls of the bathroom, so you will have to make some efforts;
- The bathtub bowl in the rooms of this series fits tightly to the walls, which can create problems when performing tiling work.
Advice! If you first install the bathtub bowl and then start finishing the walls, there will be much less difficulties with the repair.
If everything is clear with the repair work, then another problem arises: combining practicality and comfort. But the good thing about the Czech design is that even during a major renovation, all the equipment can be left where it was (of course, if you don’t install a shower stall). Professional craftsmen and designers were happy to share some tricks to make your bathroom “bigger” and much more comfortable:
- After knocking on the walls of the bathroom, you will realize that the wall behind the bathtub is fake and can be broken. This way, an additional 8-10 cm of volume is acquired, which significantly increases your chances of making an excellent bathroom design in the Czech Republic. The height of the room will increase to 160 cm, and when installing a bathtub 0.7 m wide, the distance from the door to the bowl is approximately 90-95 cm, and this is already an excellent sink (80-90 cm)!
- The heating riser located in the room allows you to install the dryer above the sink. But if you simply swap the places of the washing machine (which is placed a little further) and the sink, you will get a new convenient bathroom design in the Czech Republic! On one side there is a technical area with a washing machine, a dryer and a laundry rack. By the way, above the dryer you can hang a durable and lightweight plastic cabinet for the necessary little things or a “water heater” of any size. Bottom line: the wall above the washbasin is free, which means you can place a mirror, cabinet or shelves, and the dryer above the washing machine does not interfere, especially since it allows you to place a convenient cabinet for accessories or household chemicals a little higher.
Advice! Do not buy ready-made cabinets for installation above the washbasin, they “eat up” space. Find a compact, roomy cabinet and hang it above the dryer. If it is well-protected wood or plastic, the bottom plane of the cabinet will not heat up from the heat and will not deform, regardless of its service life.
- A necessary element that must be included in a well-designed bathroom design of the 137 series is ventilation. No small grates or holes from the toilet to the bathroom, only direct flow into the ventilation duct! To do this, it is important to find a shaft, cut a hole and insert a forced ventilation device. In such rooms, proper ventilation is an urgent need.
Of course, it’s up to you to choose the bathroom design in series 137. Select wallpaper, color and shape of facing material, flooring and other pleasant accessories. There is no problem with this, because manufacturers offer a huge range of products, and the good size of the bathroom allows you to experiment with halftones and shades. But remember: any increase in the width of interior items will lead to a decrease in free space. So, for example, if you choose a washing machine no more than 37-40 cm deep and a sink no more than 44 cm, you will have a lot of room for maneuver. This means that the bathroom will be comfortable and cozy.
No ideas, check out the photo gallery above! A variety of design options will suggest new possibilities and allow you to choose the best examples to bring them to life.
November 2016
The P44 series kitchen is ideal for implementing any ideas. The kitchen is the place where the whole family gathers in the mornings and evenings. It should be comfortable here, despite any nuances of planning and whims of architects. If you have a kitchen in houses p44, p30, 137 series, what design should you choose?
Cost calculation
Several options based on which the cost of the design project may vary.
1. The customer may refuse some of the papers that must be included in the package of documents.
2. Price per 1 sq. m. But! This option does not take into account the features of the object, so the price may initially be too high or too low, which is not always good, since with the latter option the client will have to pay extra for some additional actions on the part of the designer.
3. Individual calculation
The best option of all presented, since it takes into account the characteristic features and degree of complexity of each individual project
You should not avoid design projects due to your own ignorance or fear that you will have to fork out a lot, because professional designers or specialized companies will help in realizing your plans through various alternatives or variations so as not to go beyond the established financial limits.
TILE WORK
| Name of works | Unit change | Cost, rub. |
| Laying porcelain tiles without preparation | sq.m. | from 1100 rub. |
| Cafe laying tiles with adhesive up to 600 rub/m2 (direct laying, 20*30, 30*30)/over 600 rub/m2 | sq.m. | from 770/908 rub. |
| Making corners without using a tiled corner | m. linear | from 478 rub. |
| Surface preparation (cleaning) | sq.m. | from 77 rub. |
| Primer | sq.m. | from 29 rub. |
| Application of concrete contact | sq.m. | from 57 rub. |
| Installing a curb | m. linear | from 179 rub. |
| Knocking down old tiles | sq.m. | from 91 rub. |
| Notching the wall | sq.m. | from 91 rub. |
| Grouting the seam | sq.m. | from 76 rub. |
| Installation of corner profile | m. linear | from 75 rub. |
| Drilling holes for pipes/dowels | PC. | from 126/45 rub. |
| Installation of a screen under a gypsum plasterboard bathtub | PC. | from 1469 rub. |
| Installation of a screen under a PVC bath | PC. | from 633 rub. |
| Mosaic laying | sq.m. | from 1469 rub. |
| Making a shower tray | PC. | from 1469 rub. |
Underfloor heating plan
If the customer wants to install heated floors, the design project includes their plan. Namely, taking into account the location of the furniture and the layout, the exact location is indicated and the binding of the thermostat is given. Its location can be indicated both on this plan and on the switch plan. Typically, heated floors are installed in those rooms where tiles (tiles, porcelain stoneware) are provided, namely the hallway, loggia, bathroom. If the room area is large (especially in cottages), the heated floor can be located in the living room, if the “finish” coating again involves tiles, etc.
ELECTRIC INSTALLATION WORK
| Name of works | Unit change | Cost, rub. |
| Electric meter installation | PC. | from 1170 rub. |
| Grooving a socket for an electric meter (gypsum plaster) | PC. | from 2748 rub. |
| Installation of the machine | PC. | from 236 rub. |
| Installation of socket, switch (without groove) with mechanism and box | PC. | from 236 rub. |
| Grooving a socket for a switch, socket (plaster) | PC. | from 236 rub. |
| Grilling for electrical cables (plaster) | m. linear | from 236 rub. |
| External cable wiring | m. linear | from 54 rub. |
| Installation of the lamp | PC. | from 236 rub. |
| Installation of a transformer (for lighting) | PC. | from 236 rub. |
| Connecting a chandelier | PC. | from 344 rub. |
| Installation of a packet (with dismantling), RCD | PC. | from 344 rub. |
| Electrical panel dismantling/installation | PC. | from 344/696 rub. |
| Fan (installation in hood) | PC. | from 342 rub. |
| Call – repair, installation | PC. | from 342 rub. |
| Junction box repair (open wiring) | PC. | from 241 rub. |
| Junction Box Installation | PC. | from 241 rub. |
| Installing a heated floor sensor | PC. | from 537 rub. |
| Installation of heated floors | sq.m. | from 526 rub. |
| Sealing the grooves | m. linear | from 52 rub. |
| Drilling holes in gypsum boards / in slatted ceilings | PC. | from 57/91 rub. |
Layout of sockets with bindings
In parallel with determining the location of lighting elements, designers begin to distribute all types of sockets
The main milestones that people pay attention to here are the location of appliances, furniture and plumbing. This determines the ergonomics of the space: taking into account such nuances as the location of the mobile phone charger and ending with the number of electrical appliances in the kitchen
The type (type) of sockets, their number, exact position on the wall are indicated, including an indication of what each one belongs to: regular, power, television, telephone, etc. In some cases, an analysis of the kitchen unit plan is required, since this is one of the places in the living space where the number of sockets per square meter is maximum. This is all the subtleties of the work of a professional interior designer.
What a kitchen should look like in a three-room apartment
Regardless of the size of the kitchen, it must be spacious and cozy. Therefore, a light color palette is selected for decoration, furniture is installed to a minimum.
The kitchen set is chosen taking into account the availability of household appliances. With the help of hanging cabinets and shelves, it will be possible to store many kitchen items.
In the dining area, instead of the usual chairs, they use soft corner furniture that can accommodate the whole family. And the niches in such furniture can handle storing various small items.
Description of the house
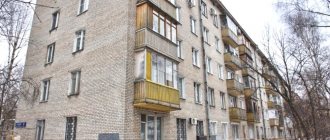
Developed back in 1973, the 137 series immediately received approval among apartment owners. The housing was determined to be prestigious. Excellent layout, isolated rooms, large kitchen, spacious corridors and high ceilings of 2.7 m. This is just a small list of the advantages of quality housing.
Series 137 homes have been built throughout the country for over 40 years. During this time, the original standard design underwent many changes. New options and modifications of houses have appeared:
- 11;
- 12;
- 13;
- 31;
- 161-137.13-1/82;
- 161-137.13-3/82;
- 137-2.11;
- 137-2.12;
- "Europe";
- 137-32/16;
- 137-33/16.
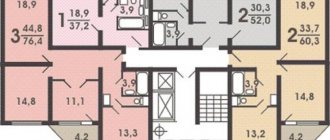
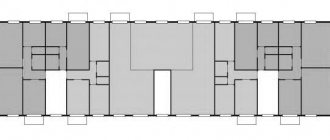
The house of series 137 consists of a set of block apartments and block sections with longitudinal and transverse load-bearing panel walls. The external walls of the building are made of three-layer expanded clay concrete structures. Panels with an interlayer have low thermal conductivity, which has a positive effect on reducing heat loss. The number of floors in buildings 137 ranges from 5 to 24, but high-rise buildings of 9, 12, 16 and 24 levels are more often built. The advantage of this house is the ability to change the layout on a single floor.
In the lobby on the ground floor of building 137 series there is a storage room for bicycles and strollers. Currently, they are successfully used for concierge services. There is a two-story superstructure on the roof. It usually hosts a club of interests to increase the comfort of residents.
Design features of the series and facade finishing
The foundation of the houses consists of reinforced concrete blocks, which were installed with “gaps” filled with sand backfill. This provided him with an additional degree of strength. The buildings in the series have a technical underground, the walls of which are made of durable expanded clay concrete panels (40 cm).
Similar panels were used in the construction of external walls, and the interfloor reinforced concrete slabs of the hollow-core type had a thickness of 22 cm.
Expanded clay concrete was used to fill the vertical external joints. The inter-apartment walls are made of two layers of panels with an air gap between them, which provides good sound insulation. Internal walls could be of different types - brick, panel or block (from 27 to 40 cm). Gypsum-cement-concrete rolled walls were used for the bathrooms.
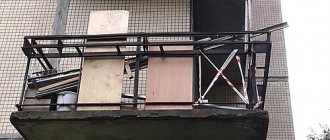
According to the project, the load-bearing walls are made of longitudinal panels, and the transverse rigidity of the structure is achieved through the walls of the staircase, as well as end and intersection walls. The balconies are made of prefabricated reinforced concrete slabs, and their screens are made of aceid.
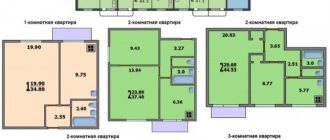
Layout options
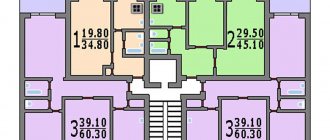
The layout of building 137 is the most successful. This is confirmed by the huge kitchen area of 15 m2. Now you can install a dining table here and receive guests, successfully passing off the kitchen as a living room. It is worth considering that in early-built houses the layout of the apartments is different and the kitchen area is only 8 m2. Examples of such layouts can be seen in St. Petersburg.
In addition, it is worth highlighting the layout of the bathroom. The toilet is isolated. The transverse position of the bath will allow you to place a washing machine. The entrance hall plays a significant role in the overall layout of the 137 series. If in one-room apartments the area of the room is 4.8 m2, then in three-room apartments it reaches 13.6 m2.
A standard set of block sections includes two elevators, one of them for freight, and a staircase separated from the main landing by a passage through a balcony. This layout is typical for the 137 series.
The disadvantage of the building is the electrical wiring. It is made in an open way in special cable channels under the baseboards. This causes some inconvenience. After purchasing a home, its owners, armed with a hammer drill, drill walls and install wires in the usual way.
Studio apartment
Unlike one-room housing in other series, the layout of the 137th series requires virtually no changes. A large kitchen of more than 10 square meters allows you not only to comfortably prepare food, but also to organize a reception for guests here. In the living room you can place both a sleeping bed and a work desk. You can change the layout of a standard one-room apartment by zoning the living space. The door is moved closer to the kitchen, and a workplace is located in the room near the balcony. The opposite part of the room is allocated to the sleeping area.
Two-room
A 2-room apartment in standard buildings meets all the rules of comfortable housing. The rooms are isolated, the kitchen is large, the bathroom is separate, the bath allows the placement of plumbing equipment and household appliances. The owner can change the layout to suit himself. It is taken into account that all changes are coordinated in the relevant structures. As a redevelopment of a two-room apartment in a 137 series building, they usually combine the kitchen with the living room, creating a wonderful place to relax. They connect the toilet, bathroom and pantry to create a spacious and comfortable bathroom.
Three-room apartment
3-room apartment 137 is quite large. The total area is almost 80 square meters. The rooms are isolated. Changing the layout is not relevant here. The kitchen is spacious, but some owners increase its size. The corridor area is added by demolishing the partitions. This creates a large hall with a dining table and a place for cooking. The bedroom is enlarged by combining it with the loggia area.
Four-room apartment
The area of the four-room apartment 137 series is free for design and redevelopment. Owners of huge apartments, remodeling their housing for themselves, will have to change the layout. Subtract in one place and add in another:
- It would be correct to divide the hallway into two zones: entrance and hall.
- It is better to combine the kitchen with the living room, then there will be more space for both preparing food and eating it.
- The living room is often zoned into a dining room and a relaxation area.
- Children's rooms and bedrooms can also be divided into separate sections independent of each other. For example, a sleeping bed and an office.
- The balcony is made into a separate room or combined with an adjacent room.
If you decide to order a design project, contact professionals
To create an interior design, it is necessary to develop a complete package of documents (design project), according to which the construction team will work. Only with technical and artistic knowledge and skills can you create an interior that will not only be beautiful, original and modern, but also convenient for you, practical and cozy.
You definitely need an interior designer if:
1. Comfort and maximum convenience of the layout are very important to you. 2. You don't have extra time. 3. You do not have enough funds for possible alterations. 4. You are not interested in delving into all the details of the upcoming renovation. 5. Your construction team is not very qualified.
You can handle it yourself if:
1. You have a sufficient amount of time to independently develop a design project or part of it. 2. You have your own vision of what your apartment or house will be like. 3. You can afford a certain amount of experimentation and rework, which will entail additional costs. 4. Your workers understand you perfectly. 5. You are convinced that no one but you can make your home truly cozy. 6. You have a clearly defined task for your builders so that they can accurately calculate the cost and timing of repair and finishing work.
WINDOW
| Name of works | Unit change | Cost, rub. |
| Firing window frames | sq.m.approx. | from 2067 rub. |
| Putty on window frames | sq.m.approx. | from 1030 rub. |
| Painting window frames | sq.m.approx. | from 1030 rub. |
| Replacing the bead | m. linear | from 69 rub. |
| Glass replacement | sq.m. | from 317 rub. |
| Installation of window fittings (without insert/with insert) | PC. | from 135/275 rub. |
| Window slopes, internal cladding of gypsum plasterboard/plaster | m. linear | from 238/480 rub. |
| Puttying and painting of window slopes (one window) | m. linear | from 350 rub. |
| Installation of a window sill countertop (on a finished base) | PC. | from 712 rub. |
Documents that must be prepared by a design specialist
Depending on the complexity and volume of work, the number of papers for the development of technical design may vary up or down.
The minimum of what should be included in the filing of materials for the design of premises:
- 1. a dimensional plan of the room or rooms, which is created after measurements;
- 2. drawings with utility networks, as well as window and door openings;
- 3. client questionnaire, which contains information about the interests and preferences of the customer (and his family members);
- 4. a sheet with data on the current position of the object and the client’s wishes for its improvement or change;
- 5. various references, thanks to which the customer can more easily understand and formulate their requirements;
- 6. elaborate 3D renderings (visual models created using computer graphics);
- 7. the following diagrams and drawings: · zoning;
- · spread the floor covering, including heated floors;
- · location of plumbing, electrical (lights, sockets) and other communications.
- · arrangement of furniture and equipment;
- · purchase of selected raw materials and materials;
PLUMBING WORK
| Name of works | Unit change | Cost, rub. |
| Mixer installation | PC. | from 411 rub. |
| Sinks (without faucet) | PC. | from 719 rub. |
| Kitchen sink installation | PC. | from 827 rub. |
| Toilet installation | PC. | from 938 rub. |
| Installation of a cast iron bathtub | PC. | from 1170 rub. |
| Installation of a steel bath | PC. | from 938 rub. |
| Installation installation | PC. | from 3426 rub. |
| Installation of a shower cabin without assembly | PC. | from 1756 rub. |
| Shower cabin assembly | PC. | from 972 rub. |
| Radiator, coil of the same type | PC. | from 1172 rub. |
| Installing a sink siphon | PC. | from 236 rub. |
| Bathtub piping | PC. | from 296/445 rub. |
| Installation of shut-off valve and coarse filter | PC. | from 344 rub. |
| Installation of a water meter | PC. | from 698 rub. |
| Collector installation (assembled) | PC. | from 823 rub. |
| Grilling | m. linear | from 344 rub. |
| Installation of drain pipes | m. linear | from 238 rub. |
| Dismantling of drain and water pipes | m. linear | from 121 rub. |
| Thread cutting | PC. | from 342 rub. |
| Installation of electric water heating devices | PC. | from 1529 rub. |
| Pressure regulator installation | PC. | from 342 rub. |
| Installation of a fine filter | PC. | from 1168 rub. |
| Installation of mixer-thermostat | PC. | from 687 rub. |
| Inserting a mixer into the body of a sink or plastic bathtub | PC. | from 687 rub. |
| Jacuzzi installation | PC. | from 4887 rub. |
| Installation of water heaters | PC. | from 1271 rub. |
| Installation of glass curtains on the bath | PC. | from 2932 rub. |
| Installation of a shower stand with nozzles | PC. | from 1664 rub. |
| Connecting a washing machine, dishwasher | PC. | from 466 rub. |
| Installation of water pipes | m. linear | from 241 rub. |
| Installation of water sockets | PC. | from 146 rub. |
| Replacing the riser | PC. | from 2927 rub. |
| Bathtub dismantling | PC. | from 434 rub. |
| Dismantling a sink with trim | PC. | from 344 rub. |
Ceiling plan
An important part of the project is the ceiling plan. Modern technologies and materials make it possible to use parameters such as color, structure and shape of the ceiling to achieve the desired goals
Plus savings, which, while maintaining the effect, but using different materials, can significantly reduce the budget for installation and materials (paints, coatings).
Also important are the drawings themselves, which indicate the type and boundaries, indicate heights, spotlights and lamps.
Once a decision has been made and the ceiling consists of several levels, separate plans can be developed for the builders with the exact dimensions of the structure.
What is technical design?
These are the plans and ideas of the owner of the premises, which a professional designer processes and visualizes using drawings, drawings and 3D modeling.
To develop the technical design of an apartment, it is necessary to carry out accurate measurements of the premises and, based on this, correctly calculate the required amount of building materials in order to correctly organize the finishing and installation of rooms in the future.
https://youtube.com/watch?v=TeVscXQLQDo
In order to arrange furniture and appliances in the most optimal and convenient way, and also to see how the interior style as a whole will look, in addition to the technical one, a preliminary design is also used.
If it’s still not entirely clear why technical design is needed, then let’s look at its main characteristics.
Creating a ready-made visual image
Thanks to which you can see the final version even before the renovation begins. Understand whether it meets expectations, or whether it is better to make some amendments.
Saving money
A correctly drawn up project will help you plan finances for repairs and the purchase of necessary furniture or equipment in advance.
Efficient and reliable repair
Thanks to the package of technical documentation that specialists must provide, the process of repair and further operation of the premises becomes more productive and safe. In the next paragraph we will look in more detail at what exactly should be included in this set of papers.
List of sources
- vita-designer.ru
- savastudio.ru
- ispolingroup.ru
- skedraft.ru
- planirovkainfo.ru
- 3d-style-dv.com
- www.diy.ru