The key to coziness and comfort of any home or apartment is warmth. If brick walls are not insulated, then they do not retain heat well in the room, but this deficiency can be corrected by sufficiently insulating the walls, and this can be done both outside and inside.
Brick is the most common building material, so most walls are made from it.
Typically, the thickness of a brick wall is 40-65 cm, but its thermal insulation characteristics are not enough to create comfortable living conditions in a house or apartment.
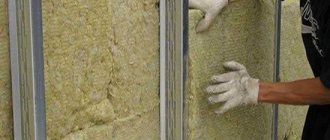
Such walls can be insulated from the outside or from the inside; the best option would be insulation on both sides. To insulate the brick walls of a house from the outside, polystyrene foam, mineral wool or polystyrene foam are usually used.
If you have limited financial resources, then the best option is insulation with polystyrene foam; insulation with mineral wool will cost more.
Regardless of what thermal insulation material you use, if all the installation work is done correctly, then your home will always be warm in winter and cool in summer.
Modern thermal insulation materials are designed in such a way that they allow moisture and steam to pass through only in one direction, that is, they will remove them from the walls and will not absorb them from the street.
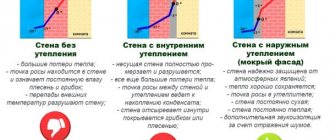
It is correct to insulate walls from the outside or to do it on both sides. If the insulation is laid only inside, the dew point is transferred inside the wall, and it gets wet, which is why mold begins to develop.
Advantages of external wall insulation:
- the wall is heated by air from the room , and the presence of insulation does not allow it to cool quickly and it does not allow cold air from the street to pass through to it;
- moisture from the wall evaporates freely , so fungus and mold will not develop;
- to preserve the structure, you can use thermal panels with imitation masonry;
- the dew point does not move inside the wall , so it will not get wet;
- the service life of the building increases , since frost does not affect the wall (material frost resistance cycles).
- The walls are additionally strengthened
Disadvantages of internal thermal insulation
This method has its drawbacks, which is why it has many opponents.
Problems with internal thermal insulation of walls arise as follows:
- with external thermal insulation, the walls of the building are protected from the cold, which cannot be achieved with insulation from the inside. The base is in contact with the environment and cracks may appear on it;
- the occurrence of condensation. With internal heat conservation, the dew point moves behind the supporting structure and forms between the insulator and the surface. The result may be the development of fungal formations that will be difficult to notice;
- reduction in area. Modern heat insulators have excellent characteristics, but have not yet come up with a material that would take up little space. At the moment, with insulation work, the room will become 10 cm smaller on each side.
Before making a decision on internal insulation, it is worth weighing all the disadvantages and considering the advantages; this is the only way to avoid errors and shortcomings during installation.
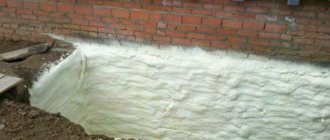
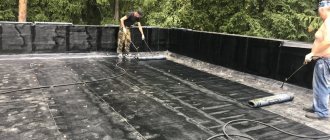
Waterproofing basement walls and external walls from groundwater and overhead water - how to do it correctly
The basement or basement is usually located underground and, accordingly, is most exposed to water. As mentioned above, protecting the outer walls of the basement from water is a necessary undertaking and must be done correctly. It is better and more correct to do waterproofing at the stage of building a house and building a basement.
When it comes to properly waterproofing a basement, the following nuances must be taken into account:
- Cut-off waterproofing is a horizontal cut-off waterproofing of the basement, which will serve as a barrier between the walls being built made of brick, block or concrete (monolithic walls) and the foundation.
- Waterproofing joints between the slab (foundation) and the wall – Cold joints can be sealed using a swelling cord or waterstop (when it comes to pouring monolithic concrete walls).
- Vertical waterproofing is the installation of a protective coating for walls. It is correct to make the vertical protection of the basement so that it connects with the horizontal insulation of the foundation to form a hydraulic lock.
Important: If at the stage of building a house the waterproofing is done incorrectly or not done at all, then its repair or a new installation will cost 3 times more, since for this it will be necessary to dig up the house or basement again, break the blind area, dismantle the insulation, rebuild burying the house, etc... To all this can be added considerable costs for repairing the finishing of the basement or basement that has become unusable.
You can read in detail about how to do waterproofing in a complex in the article - Turnkey complex waterproofing. You can read more about basement waterproofing in the following article - Waterproofing the basement of a house and protecting it from water and groundwater from the outside and inside .
How to properly insulate a corner apartment of an apartment panel building
A corner apartment has a big disadvantage - its walls freeze more strongly and the room is always damp and cold. Condensation collects in the corners, which contributes to the appearance of fungus, so the corner room requires more insulation than other rooms.
It is, of course, better to insulate it from the outside, but this is not always possible.
In such an apartment, 2 walls at once are exposed to atmospheric influences, and especially carefully it is necessary to insulate their junction points.
Before laying the insulator, the walls are treated with antifungal drugs, allowed to soak well, after which the main work begins. The material is chosen with a vapor barrier film so that condensation does not accumulate in the corner.
Covering walls with the heat insulators discussed above or taking additional measures to conserve heat will help reduce heat loss:
- flush the radiators and thereby increase the degree of heating;
- add heating sections to the batteries;
- reinstall the batteries closer to the cold corner.
In the corner room, it is necessary to install heat-retaining windows or stick energy-saving film on them.
Features of insulating a room in a panel house
The main problem areas of city apartments in panel houses are most often interpanel connections. To ensure sufficiently effective insulation, you must first seal the joints of the panels.
To do this, you need to open the gaps as much as possible using a spatula or other suitable tool and, carefully removing the old filler with your hands, fill the joint with polyurethane foam. This option is considered optimal, quick to implement and effective.
Important! When the foam hardens, you need to carefully trim off the parts protruding from the gap to form an even angle. Subsequent work is carried out in accordance with the general insulation technology.
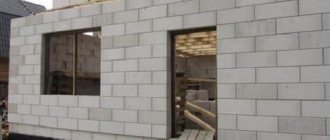
Features of insulating a room in a brick house
Since the brickwork is well tied at the corners and has no external cracks, there is no need to pre-insulate the joints between the walls.
But at the same time, before starting insulation measures, it is imperative to waterproof the brick wall. First, the walls are cleaned of plaster, and then a layer of deep penetration water repellent, intended for indoor work, is applied to the surface with a roller or brush.
When using this material, it is correct to follow the instructions on the packaging. When the treated wall has dried, you can proceed to installing the heat insulator using the usual technology.
Nuances when processing a balcony
The specifics of insulating a balcony look almost identical to the thermal insulation of the walls inside the building. At the same time, on the loggia you also need to protect the ceiling and floor.
If polystyrene foam is chosen as an insulator, it can be attached to the walls using foam adhesive. The next layer is to install a wooden sheathing. It can be secured with dowels.
The optimal insulation thickness is between 50 and 80 mm.
In addition, you can insulate the balcony before painting. To do this, putty, reinforced mesh and another layer of putty must be applied to the foam plastic. After the surface has dried, it must be coated with a primer and painted. In this case, foam plastic with a density of 25 kg / cubic meter is used. m.
Horizontal and vertical waterproofing of external walls
The walls of a building below level zero must be protected using both horizontal and vertical insulation devices.
Horizontal waterproofing - designed to protect the building from water penetration from below, especially when it comes to high groundwater.
Important: Horizontal protection is needed not only when groundwater is high, since the soil around a house or building is in any case saturated with moisture from rain and high water, which in turn negatively affects the foundation of the building and its walls.
Vertical waterproofing - its device is designed to protect the external walls of the basement from water falling on the walls from the side vertically. We are talking about groundwater and rainfall. The soil around the building is saturated with moisture and releases it into the foundation and walls of the basement or basement, thereby negatively affecting them.
Finish coatings
Usually, when installing heat-saving boards with glue, they are plastered using a forming mesh for gypsum composition, and fiberglass for putty. These measures will prevent cracking of the finish coating.
After all the plastering and putty work is completed and the walls have dried, we clean the surface with a fine abrasive mesh and paint it with a water-based emulsion of the desired shade.
Korovin Sergey Dmitrievich
Master of Architecture, graduated from Samara State University of Architecture and Civil Engineering. 11 years of experience in design and construction.
A vapor barrier for the external walls of a wooden house is needed when insulating with mineral wool. This insulation is very susceptible to moisture. Due to its high hygroscopicity, it is able to accumulate water. At the same time, the heat-shielding properties of the material are significantly reduced. To prevent unpleasant consequences, it is necessary to protect the mineral wool from moisture on all sides.
Waterproofing walls materials and methods
Today on the market there are many different methods of waterproofing, including walls. Each method of protecting a home from water comes with a large selection of waterproofing materials. Below are the most popular methods and materials for waterproofing work:
- Coating
- Pasting
- Welded roll
- Mounted roll or membrane
- Injection waterproofing
- Liquid
Coating waterproofing of walls
Read more about coating waterproofing
This type includes various mastics based on bitumen and polyurethane. The most popular coating materials are bitumen mastics from TechnoNIKOL. However, do not forget that waterproofing is not done for 1 day or even 1 year. Accordingly, you should not choose cheap bitumen compounds as the main waterproofing. In addition to cheap bitumen mastics from TechnoNIKOL, there are also a number of professional waterproofing compounds on the market such as FlexLock Pro or PolyFlex from the German manufacturer Hydro.
Pasted waterproofing of walls
More details
Pasting materials include various bitumen-based membranes. Their main difference is that they are glued to the surface using a special adhesive base. Advantages:
- Low price
- Availability on the market
- Easy installation that you can do yourself
Flaws:
- Low quality of protection
- Short service life
- Low resistance to aggressive environments
- Presence of seams
Roll waterproofing of walls
More information about roll insulation
Roll waterproofing is supplied in rolls, which are stitched together on the surface of the walls. This type includes PVC membranes and built-up bitumen-based roll membranes. PVC membranes are sewn together with a special hairdryer and laid on the surface as a kind of carpet. The presence of seams and a complete lack of adhesion to the base of the walls makes these materials very unreliable. Fused membranes are connected to each other using hot fire (burners are used). The main disadvantages of these materials are the presence of seams (which is why these membranes must be applied in at least 2 layers), as well as the lack of 100% adhesion to the base (which creates voids and cavities).
Injection waterproofing of walls
More details
In most cases, injection is used to carry out work from the inside. This is a very effective way to eliminate leaks and repairs, but it is also quite expensive. You can read more about this method in the continuation of this article.
Liquid waterproofing for walls
More details
Liquid waterproofing includes such premium compounds as liquid rubber and polyurea. Liquid rubber is a special material that forms an elastic, seamless membrane with 100% adhesion to the surface. This material is widely used for durable wall protection.
Important: When choosing waterproofing materials, do not forget one well-known proverb: “Good things don’t come cheap” - When buying a product, a person chooses: to take a cheap thing or a high-quality, reliable one that will last well and for a long time.
The best waterproofing of walls
If we are talking about the best waterproofing of walls, then it is best to choose materials with the following qualities:
- No seams – seams are the weakest point in any waterproofing coating.
- Adhesion to the base - good adhesion means that if a crack or hole forms in the protective coating, water will not be able to pass under it, stagnate and walk there.
- Service life - the material should not crumble in your hands after a year.
- Elasticity - the more elastic the material, the longer it will last since dynamics or soil shrinkage will not be able to destroy it (it will not crack or come apart at the seams).
All of the above qualities are met by materials such as Liquid rubber (for example FlexLock) and Polyurethane waterproofing .
Superdiffusion membranes
In areas with high rainfall, superdiffusion membranes are recommended. Thanks to their three-layer structure, they provide high vapor permeability and protect the seal layer itself from bad weather. The price of this coating is slightly higher than conventional windproof substances, but in the future they will definitely pay for themselves, due to the fact that their service life will last much longer than that of their analogues. They have a high level of steam transmission - from 1000 g/m2 and can withstand up to 1000 mm. When choosing the optimal wind protection, consider it: – toxicity – it should not emit any odors or harmful substances, – technical properties – resistance to temperature changes and ultraviolet radiation;
Waterproofing a wall from inside the room
Waterproofing from the inside is done mainly as measures to eliminate leaks in the basement or repair walls when the insulation on the outside is broken or missing, when for some reason there is no access to them from the outside of the house.
When repairing walls from inside premises, the following technologies can be used:
- Bitumen-based coating materials (various mastics), weld-on roll products and PVC membranes. All these materials do not work with negative water pressure (from outside to inside); therefore, when installing them, they need to be pressed with a screed (if we are talking about horizontal insulation) - this method is not recommended when waterproofing from the inside.
- Materials that work against negative water pressure - these compounds work from the inside, when the water pressure goes from outside to inside the room and they do not need to be pressed with anything. One such composition is HydroPaz from the German manufacturer HYDRO.
- Injection materials are polyurethane and helium resins that are injected into or behind the body of the structure. This technology is used mainly when it comes to working from the inside.
Injection waterproofing of walls
Injection waterproofing is one of the most expensive and most reliable waterproofing methods used to protect walls from the inside of a building.
The injection insulation method is suitable for both brick walls and walls made of blocks or concrete (monolithic walls). When performing work using the injection method, holes are drilled in the wall into which packers are inserted (hollow tubes for carrying injection resin), an injection pump is connected to them, which under pressure delivers the composition into the thickness of the wall or beyond it. When injection resin or gel enters the thickness of the wall, it fills all existing voids, microcracks and pores, thereby making the walls waterproof. the method of injection behind the wall is called veil waterproofing and is used in exceptional cases.
Principle of internal insulation
Insulating walls indoors means making your home comfortable and cozy for living. This type of heat saving is non-traditional; insulation is usually used on the outside. But there are situations when there is no other way out.
This option can also be considered in an apartment building, when insulating the internal walls is the only way to thermally insulate the room. This process will help prevent the formation of fungus in the room.
Waterproofing brick and block walls
For waterproofing a wall made of blocks or bricks, essentially the same materials are suitable as for a regular monolithic wall made of concrete. The only caveat is the evenness of the surface on which the waterproofing will be applied. The waterproofing material must lie on a clean and even surface. Brick has many seams and in most cases they are caulked unevenly, which leads to the fact that the surface of the walls where the membrane is to be installed requires leveling with special compounds.
If we are talking about waterproofing a brick wall from the inside, then before injection, the wall is coated with a special non-shrinking compound so that the injection resin goes inside the walls and does not come out through the seams between the bricks.
Thermally insulated pie
According to SNiP 02/23/2003, the thickness of the wall of a cinder concrete block should be 15-20 cm. With this width, a comfortable microclimate for living is maintained.
For the outside
What does a wall pie with insulation look like correctly?:
- Wall.
- Adhesive adhesive composition on which the insulation is attached (if it is suitable for thermal insulation).
- Insulation. Its thickness depends on the characteristics of the selected material. For northern regions, 10 cm is enough, for southern regions 5-7 cm.
- Reinforced mesh.
- Waterproofing. A special waterproof film or membrane is chosen for it.
- Facing material. For external work, choose a weather-resistant material, for example, siding, clinker brick, or cover the house with decorative plaster for painting.
For internal
Internal insulation of cinder block is used simultaneously with external insulation. As a last resort, when it is not possible to install thermal insulation on the outside of the building.
Pie structure:
- Wall.
- Antifungal coating. Prevents the appearance of microorganisms.
- Insulation. As a rule, it is laid in 1 layer 5 cm thick.
- Vapor barrier. Thermal insulation from the inside is most often done for end walls and in the bathroom/steam room. The exhaust air must not condense on the wall. A layer of vapor barrier helps bring it back, keeping the house warm.
- Facing material. Most often they choose dry fastening of plywood or plasterboard, which are then decorated as desired.
Important! If you choose insulation that is attached in layers, you will need to install profiles to hold it in place. The layers themselves are fixed with disc-shaped dowels to secure the connection and maintain the ventilation gap.
Waterproofing walls - how to properly perform the work and prepare the surface
The installation of a high-quality waterproofing coating begins with the correct choice of method and type of waterproofing coating and ends with its correct protection from damage when backfilling or installing subsequent layers (for example, insulation). Here are the main things you should pay attention to when installing a high-quality waterproofing coating:
- The right choice of materials - for each structure (foundation, walls, basement, basement, roof), situation (there is groundwater or not, work is being done from the inside or outside, etc..) there is its own best or at least suitable material. The wrong choice of waterproofing product will lead to a decrease in its service life or to future leaks.
- Surface preparation before waterproofing
- No 90 degree angles for the transition from the horizon to the vertical base (using a fillet or a special plinth).
- Prime the surface with a special primer to improve adhesion.
- Construction and application of waterproofing coating with precise adherence to technology
- Protecting the completed work - It is important not only to produce high-quality work, but also to protect it from further damage.
Installing waterproofing so that later there are no leaks in the room and nothing has to be redone is not an easy task. It is recommended to entrust this task to professionals - a large company whose specialization is waterproofing work.
Preparing the wall surface for waterproofing
Proper surface preparation is 50% of success when applying insulation. If the wall surface is prepared improperly, this will primarily affect the adhesion (adhesion) of the material to the wall, and therefore its reliability.
In order to properly prepare the walls, you need to follow these recommendations:
- Seal all large holes, cracks, seams and cavities with cement mortar or non-shrink sealants;
- Remove all sharp protrusions, ends of reinforcement and other protruding elements;
- Remove all elements extending from the surface;
- Clean the surface from dirt and dust using brushes with metal bristles, rags and pressurized water;
- Apply primer to the surface.
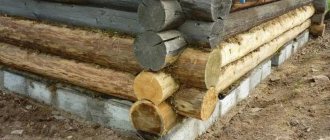
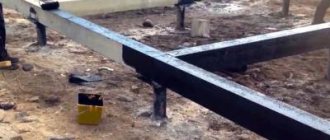
Installation technology
When building a wooden house, vapor barrier is attached from the inside, and wind and waterproofing is attached from the outside. An exception may be in cases where the insulation is fixed on the side of the room. But this option is undesirable for new construction. This is due to the fact that, according to the rules, the thermal insulation material must be fixed on the cold air side. You can deviate from this only if there are compelling reasons.
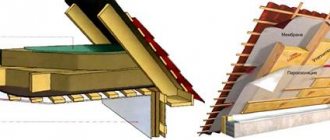
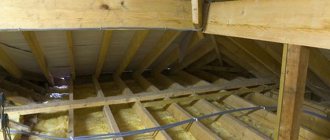
Scheme of layers of a wooden house wall
Before starting work on insulating the walls of a wooden house, it is necessary to clean the outside surface of dirt and dust. To secure the vapor barrier material, you will need to prepare metal staples or nails. All fasteners must be protected from corrosion by a zinc coating.
To glue the joints of the material, you need a special tape. When installing film, construction tape is often used to save money.
Seam taping
When installing films and membranes outside and inside the room, several rules must be followed:
- The canvases are attached to the wall in any direction, with the pattern facing towards themselves;
- the overlap of one canvas on another should be at least 10 cm;
- the width of the tape for gluing joints is at least 10 cm;
- near window openings it is necessary to provide a small margin taking into account deformations (it is a fold);
- next to the cones, the material must be reliably protected from sunlight (polyethylene is especially unstable to it).
The vapor barrier of the walls of the house is secured with staples to the cleaned surface. After that, frame slats are installed on the material for sheathing and installation of insulation. Proper protection of mineral wool from all types of moisture will extend the service life of the entire building.
Films and membranes play an important role in building insulation structures. They regulate the movement of steam, and therefore the moisture content of materials. It is unacceptable to neglect film materials for insulation, especially since their cost in comparison with the costs of thermal insulation or the entire construction is very small.
Let's consider which films are used in various situations, how to choose them correctly and install them together with insulation...
What films and membranes
Two types of film materials are used
- vapor diffusion membrane - on the cold air side, i.e. from the street side;
- vapor barrier - on the warm air side (from the building side).
Wall waterproofing repair
Repair of wall waterproofing is necessary when, during the operation of a private home or commercial building, problems with water leaks and/or increased wall moisture, fungus or mold (due to wet walls) are discovered.
Important: If water leaks are found in your house, basement or basement, this means that the vertical or horizontal waterproofing of the foundation or external walls is missing or has become unusable. Waterproofing repairs are best done on the outside as this will solve the root of your problem.
If you want to solve the problem of leaks once and for all, then the best solution is to create a good barrier on the outside, so that water does not penetrate into the structure of concrete or brick and does not destroy it. If it is impossible to carry out repair work from the outside, you can do it from the inside using the technology described earlier.
Step by step procedure
The work is carried out quickly; one wall can be completed within a day. It is possible to do the installation yourself.
Thermal insulation of cinder block wall outside:
- Preparing the walls. To do this, excess mortar is leveled off and the wall surface is cleaned. If there are chips and cracks, you need to fill them with a solution and wait until dry.
- Applying primer. The surface is degreased to ensure safe attachment of the insulation.
- Installation of the starting profile. It will serve as a support for the insulation. It consists of metal plates that are attached directly to the wall with screws and dowels. Gaps of 2-3 mm are left between the profiles to allow metal movement when the air temperature changes.
- Applying adhesive composition to polystyrene foam. A ready-made mixture is purchased specifically for a specific brand of insulation.
- Installation of insulation.
The boards are pressed tightly against the wall one by one and work starts from the corner. The last elements in a row may have to be trimmed. Installation of insulation layers is carried out in a checkerboard pattern, each new row is shifted by ½ part of the element relative to the previous one. The aim is to ensure that the effect of them is distributed evenly across the wall. - At the corners, the layers should converge according to the principle of gear engagement, overhanging one over the other.
- The seams between the layers are treated with sealant, and excess product is removed.
- Additionally, the insulation is attached to disc-shaped dowels. Their length should be twice as thick as polystyrene foam.
- An adhesive composition is applied, and corners and openings are reinforced separately with metal corner profiles.
- Attaching reinforced mesh with glue.
- Installing film waterproofing on brackets.
- Installation of facing fabric. This could be plastering and painting, installing siding, clinker bricks, etc. Check whether the right side of the waterproofing film will be facing out before installation.
Thermal insulation of a cinder block wall from the inside:
Clear the wall of debris, remove small irregularities. If you need to repair cracks and chips, this is done immediately.- Apply the primer and wait until it dries.
- Place wooden blocks along the height of the wall at a distance of 40-50 cm from each other. Look at the width of the mineral wool; it should be 2-3 cm wider than the opening between the bars so that the material can be easily held inside.
- Lay the insulation and secure it with disc dowels.
- Cover with a mineral vapor barrier film, secure it to the brackets with a construction stapler on the bars.
- Attach thin boards on top of the bars as a base for the finishing material.
- Attach plywood or drywall to the profiles with self-tapping screws.
- Apply finishing finishing (putty, paint, wallpaper or other).
Do-it-yourself waterproofing of walls
If you wish, you can do all the waterproofing work yourself, without resorting to the services of specialists, with the exception of work associated with certain specialized equipment such as injection waterproofing and spraying liquid rubber. However, before you begin work to protect your home from water, it is recommended to carefully study the technology of work and gain relevant experience. You can study the technology of laying basic waterproofing materials from our partners from the TechnoNIKOL company. You can buy the necessary waterproofing and other building materials online from our partners - Construction Trading House “Petrovich” . By purchasing the goods you need in Petrovich, you not only save money but also time, since the company will deliver your online order to your location within 2 hours.
Additional ways to keep your home warm
There are several other options to keep the room warm. Experts recommend doing the following:
- If the apartment is located on the south side, then on a sunny day try to open the curtains as much as possible. Even the seemingly cold winter sun provides a sufficient level of heat through the prism of the glass.
- You can additionally stick a thermal protective film on the windows. It does not reduce visibility. But it retains heat well in the room.
Windows with film
- If you have a fireplace or stove in your home that you are not using, be sure to cap the chimney. 30% of the heat escapes through it.
But do not forget to open the chimney when using the fireplace. Otherwise, carbon monoxide will go into the room.
- If it is possible to install heating in the house in addition to centralized heating, use oil radiators or ceramic panels. They are the safest and provide a large percentage of heat. If possible, abandon central heating in favor of individual heating. This way you can control the temperature in your home yourself.
And of course, just dress warmly in winter. Warm socks, knitted by the hands of a caring grandmother, will give not only warmth, but also spiritual comfort.
Having figured out how to insulate an apartment from the inside with your own hands without repairs, do everything necessary to preserve heat. And in the spring and summer, if possible, do major work on replacing windows, doors and insulating the floor.
Cost of work in the Russian Federation
The cost of work depends on the type of insulation, the volume of work, the complexity of installation and the qualifications of the craftsmen.
| Name of works | Moscow and Moscow Region, rub/m2 | St. Petersburg and Leningrad Region, rub/m2 | Krasnodar region, rub/m2 | Kazan, rub/m2 |
| Insulating a cinder block wall from the outside | 2000 | 2000 | 1900 | 1900 |
| Insulating a cinder block wall from the inside | 1600 | 1600 | 1500 | 1600 |