During the cold season, any house loses heat due to leaks at the joints of building structures, cracks in windows and doors, as well as due to thermal radiation from walls, floors and ceilings into the surrounding space. At the same time, ceilings and roofs account for 15 to 45% of all heat losses. Therefore, the ceiling must be insulated, eliminating heat loss due to the release of heated air and due to heat transfer. Most insulation methods do not require expensive equipment or special qualifications of workers. They are quite capable of doing the work of insulating a house with their own hands.
In addition to the most important task - heat preservation - thermal insulation work also solves one more - maintaining optimal humidity. For this, in addition to insulation materials, vapor barrier and waterproofing membranes are used to prevent condensation from accumulating on ceilings and walls. Semi-permeable membrane films allow water vapor to pass through them in one direction and do not allow moisture to pass through in the opposite direction.
General scheme of ceiling and roof insulation
Ceiling and roof insulation schemes
From the point of view of insulation, all roofs are divided into two types:
- Warm. Under the roofing material there are several layers: vapor barrier, ceiling insulation and waterproofing. They are held in place by battens - spatial structures attached to the rafters. The ceiling of attic rooms is insulated according to exactly this scheme.
- Cold. They have a layer of roofing material and a load-bearing structure and a layer of vapor and waterproofing placed underneath them. The air gap in the attic is an additional barrier to heat loss. The ceiling located under the so-called cold roof must be insulated and waterproofed.
Option No. 2 - installation of mineral wool from the inside
It can be done in two ways. The first of these is similar to gluing and plastering foam. The second option, no less common, is internal installation, carried out under a suspended sheathing, which is installed on concrete or wooden ceilings.
The frame for the sheathing can be made from wooden blocks or from two types - UD and CD profiles. Experts recommend using metal products, since they will not move in the event of a temperature change.
The sequence of actions is as follows:
- First of all, a horizontal line is struck along the perimeter of the room at the level of the future ceiling plane. The easiest way to do this is with a laser level, but if you don’t have one, you can use a hydraulic level, which is a long soft tube with graduated tips that operates using the communicating vessels method.
- Then, according to the applied markings, two UD profiles are fixed on two opposite, longer walls.
- Perpendicular to them, the location of CD profiles is marked on the ceiling, usually observing an installation step of about 50 centimeters.
- In accordance with the markings, the perforated suspensions are secured with dowels at intervals of one meter, their wings are bent downwards.
- Next, they begin to glue the mineral wool slabs to the ceiling. The insulation under the wings of the suspension is cut with a knife.
- To complete the work, CD profiles are inserted into the UD profiles and fastened to each other and to the hangers using self-tapping screws. Now you can begin covering the frame with plasterboard or other finishing material.
Features of ceiling insulation
*
The main feature of insulating a flat ceiling is the inability to arrange condensate drainage, as is done for sloping roofs. Therefore, almost all insulation solutions are aimed at removing water vapor upward, ensuring its unhindered passage through all layers.
Cold overlap
How to properly insulate a ceiling in a cold attic? Air gaps are left above a cold or heat-conducting ceiling (for example, concrete). The first, auxiliary between the vapor barrier film and the insulation, comes into effect when there are large temperature changes and heavy condensation. It must be well ventilated. It is easier to make the main gap between the insulation and the waterproofing layer ventilated - just leave a small gap around the perimeter. It is preferable to insulate a cold ceiling both from above and from below. The insulation used for the ceiling located under a cold attic must be moisture resistant.
Warm ceiling
A floor made of materials with low thermal conductivity, such as wood, is called warm. Such floors, which themselves serve as a heat insulator, need only be insulated from above. Even if condensation forms during extreme temperature changes, it will be absorbed into wooden structures without changing their properties, and will subsequently evaporate. As a rule, this process is invisible to the inhabitants.
The vapor barrier is laid on the ceiling without a gap, then the insulation is laid. The air gap between the thermal insulation layer and the hydrobarrier membrane should also be left and will provide the possibility of its ventilation.
Calculation of the thickness of the thermal insulation layer
The efficiency of thermal insulation depends on the accuracy of determining the thickness of the insulation, which is part of the thermal engineering calculation. In addition, the indicator allows you to calculate the loads placed on the ceiling structure. When calculating, the values of the permissible weight and the required thermal protection are compared.
The thickness of the insulation is determined by the formula
q = R * k,
Where:
- q – thickness of heat-insulating material, m;
- R – thermal resistance, m2°С/W;
- k – thermal conductivity coefficient of insulation, W/(m°C).
The R value is determined from tabular data - the indicator is calculated for each region, taking into account the climate characteristics.
For example, the standardized thermal resistance of floors for Nizhny Novgorod is 4.26 m2°C/W. If you use penoplex to insulate the ceiling, you will need a layer of thermal insulation 12 cm thick
To calculate, it is enough to multiply the indicators 4.26 and 0.038. The last value is the thermal conductivity coefficient of extruded polystyrene foam. The weight of the ceiling is calculated based on the volume of insulation and its density. The first indicator is determined by the product of the area and thickness of the thermal insulation, the second - the table value.
The minimum load on the ceiling is exerted by polyurethane foam and ecowool, their density is in the range of 25-60 kg/cu. m. One of the heaviest insulation materials is expanded clay - 180-330 kg/cu.m. m.
Barriers and membranes
Vapor barriers
Vapor barriers are needed to prevent water vapor from passing through them. For their production, polypropylene films with a thickness of over 55 microns are used.
Polyethylene is unsuitable as a vapor barrier - over time, due to temperature fluctuations, it cracks and begins to let vapor through. However, if you solder a layer of polyethylene and a layer of foil, you get a high-quality vapor barrier.
Folgoizols are also supplied with a layer of fibrous nonwoven material such as padding polyester. This layer collects moisture from the insulation and carries it away through capillaries. If it is present, there is no need to create an additional air gap above the cold ceiling.
Membranes
Multilayer reinforced membrane materials allow vapor to pass in one direction and retain moisture in the opposite direction. The reinforcing mesh layer ensures the strength of the film, prevents it from sagging and guarantees a constant size of the main air gap.
Membranes with a reinforcing layer
Rules for laying vapor barrier
If both sides of the material are the same, then it does not matter how you lay the material. But if the parties are different, you must adhere to the following rules.
Distinguishing the sides of a vapor barrier
Usually an indication of the outer and inner sides of the material is in the instructions. If it is missing, but you need to follow the rule, then the side that is lighter in color is placed next to the insulation.
The roll insulation is wound up by the manufacturer so that it can simply be unrolled and laid without turning it over.
If the surfaces of the vapor barrier are different, the smooth side is considered internal (placed against the insulation), and the rough side is considered external.
Different sides of films
How to attach?
Strengthen the material using a stapler, nails with a large head or a counter lath.
Film mounting options
How to determine membrane leak?
The material will indicate how wide the overlap should be (8-20 cm). The width of the overlap depends on the installation location:
- on the roof horizontally from bottom to top - 15 cm;
- in the ridge - 18 cm;
- in the valley - 25 cm;
- on other elements - 10−5 cm.
The membranes must be inflated during installation
Is there a need for an air gap at the membrane?
It is always necessary to create an air gap (5 cm) near the membrane - it is necessary for ventilation. In the case of diffusion material, the gap is left outside, and the film is laid on the insulation.
Do joints need to be treated?
The places where the pieces of vapor barrier are connected to each other, as well as their connections to window and door openings, must certainly be glued with special tapes on a self-adhesive basis (they can also be used to repair torn insulation). Scotch tape is not suitable for this type of work.
Sealing vapor barrier joints
Insulation materials
What is the best way to insulate a cold ceiling? The main thermal insulation materials used for insulating ceilings can be divided into the following categories:
- Solid. Such materials consist of foamed plastics, are little susceptible to moisture, and are easy to install.
- Fibrous. Mats or rolls are formed from compressed fibers. Inexpensive, have good thermal insulation. Sensitive to moisture, when wet they lose their thermal insulation properties.
- Bulk. Traditional bulk materials - sawdust, expanded clay, etc. The cheapest ones have the weakest thermal insulation. Ecowool stands out separately - an expensive, but extremely effective material.
- Sprayable. Modern coatings made of foamed plastics. They are sprayed locally and do not form joints or seams. The best thermal insulation, very expensive equipment.
How to insulate the ceiling, everyone decides for themselves, based on their needs and capabilities.
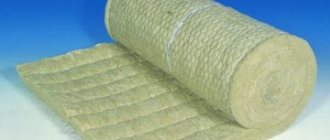
Mineral wool
Rolled mineral wool
*
The most popular type of fibrous materials. Produced from several types of raw materials:
- Basalt wool from volcanic rocks. High strength and density, short hard fibers. High moisture resistance.
- Glass wool from recycled glass. Low strength, light and elastic, long elastic fibers.
- Slag from blast furnace waste. Low thermal insulation properties, low cost. Not applicable for residential buildings.
To insulate with mineral wool, no special equipment is required; the installation process is simple and quite fast. It is produced both in rolls and in slabs with insulation thickness up to 150 mm.
Mineral wool is harmful to health; during installation you must use a respirator, protective gloves and goggles.
Attention! If fibers get on the mucous membranes, respiratory or digestive organs, you should immediately consult a doctor.
After installation during use, mineral wool is completely harmless to those living in the house.
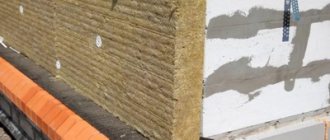
An important feature of mineral wool that must be taken into account when designing and installing is the large number of joints and junctions. They need to be done so that the gap is minimal, the slabs are laid against the guides and opposite each other. Half-centimeter gaps between slabs can reduce the effectiveness of the coating by a third.
Correct and incorrect installation of insulation
The thermal insulation properties of mineral wool are reduced until they are lost when the material gets wet. Therefore, it is necessary to ensure the removal of vapors and condensate.
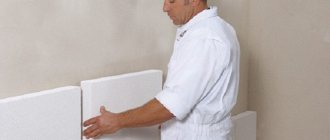
Monolithic
The most suitable and popular material for thermal insulation of ceilings is polystyrene foam. It is produced in the form of 1200*600mm panels equipped with tongue and groove. This allows you to make high-quality joints during installation. In addition, cracks and gaps are sealed with polyurethane foam. The material is resistant to moisture and temperature fluctuations. Works great when insulating ceilings both outside and inside
Its disadvantage is low fire resistance. When burned, it releases substances harmful to health.
Insulation with polyurethane foam
Polystyrene foam, or polyurethane foam, is significantly cheaper than polystyrene foam, but has low strength and is prone to chipping. Suitable for insulating ceilings from the inside.
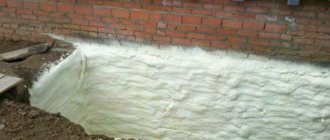
Sprayed and bulk materials
Sprayed materials are very effective, have no joints or seams, and almost do not burn. They can be effectively sprayed into hard-to-reach areas and cavities, providing thermal insulation where other materials can only be placed with partial dismantling of building structures.
The main disadvantage is the extremely high cost of the equipment and the highly qualified operator. This hinders the widespread adoption of this promising method.
Ecowool
Very promising as bulk and sprayed insulation for roofs and ceilings. Occupies an intermediate position between sprayed and bulk materials. It is made from recycled paper and has the same thermal conductivity as mineral wool. Fibers with the addition of glue are fed to the surface or into the cavity under slight pressure and harden there. When wet, it partially loses its properties, but after drying they return.
Additives in ecowool make it low flammable, environmentally safe and unattractive to rodents and mold. The material does not cause allergies and does not contribute to the development of cancer.
Methods for laying ecowool
Applying ecowool does not require special qualifications, and installation is a little more complicated than a vacuum cleaner. One of the few drawbacks is the requirement for application temperature: not lower than +23°C
Expanded clay and foam glass crumbs (foam crumbs)
When filling with expanded clay or foam crumbs, it is necessary to take into account that its thermal insulation properties are low compared to more modern materials. Therefore, a significantly thicker layer will be required.
Expanded clay - traditional bulk insulation
A few advantages of the material are its low cost, moisture resistance and non-flammability.
Expanded clay is used in budget solutions as an outer layer, while internal thermal insulation is performed with mineral wool
Scheme of two-layer insulation with expanded clay and mineral wool
Sawdust and shavings
These materials can be attractive due to their low cost; sawdust and shavings can be obtained completely free of charge at woodworking factories. Wood shavings have a high fire hazard; sawdust burns much worse.
Before laying, it is recommended to dry them well, and during layer-by-layer laying, moisten them with solutions of boric acid and borax.
Application of new technologies
Among modern materials used for thermal insulation of ceilings, the following are most in demand:
- Polyurethane foam
. Refers to new and quite expensive thermal insulation materials. Its characteristics have much in common with extruded polystyrene foam. This insulation is not afraid of moisture, it has a long service life - manufacturers provide a 50-year warranty on it. But polyurethane foam, similar to extruded polystyrene foam, is a waterproofing material, and since it is applied in a continuous layer, it is not suitable for wooden floors. - Penoizol
. It is a widely advertised material. But in reality it is ordinary foam plastic, but in a liquid state. In addition to all the previously described advantages of this insulation, penoizol is applied without gaps, which means that the material is recommended to be used only for thermal insulation of concrete floors. - Ecowool
. It is considered the most suitable choice of insulation for the ceiling. For its production, natural cellulose is used, adding a binder, antiseptics and fire retardants. Ecowool absorbs water, but its level of water absorption is lower than, for example, mineral wool. At the same time, their vapor permeability and thermal conductivity are almost the same.
An important feature of using foam insulation is that their application requires the use of expensive compressor equipment, and with the participation of professionals. An exception is the installation of glass wool, which in a dry state can be poured independently onto the floor of an unheated attic. If it is necessary to carry out insulation from the inside, a compressor will also be required for ecowool.
Ceiling insulation
Let's consider the process of insulating the attic ceiling with mineral wool. The technology varies based on the specific designs and circuits chosen.
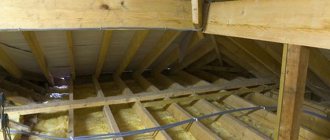
Outside
The simplest and fastest method of thermal insulation is inter-beam. If the ceiling is made of solid boards, a vapor barrier must be placed around the beams or film wraps must be made on them. If the ceiling is made of thin lining or slats, a foil vapor barrier film is attached below the beams, along the ceiling.
Methods for insulating a wooden ceiling from the attic
A complete insulation scheme requires significantly more labor, materials and time, but it is also much more effective. An above-beam double layer of slabs is added to the inter-beam layer of rolls or mats. The layers must be laid overlapping.
How to insulate a cold ceiling from the inside
When choosing a method of thermal insulation of the ceiling from the inside, you need to understand that any of them will reduce the height of the room. Minimal height loss will occur in the case of installing a suspended ceiling or suspended ceiling made of plasterboard. In this case, thermal insulation boards can be placed between the guide metal profiles.
Fastening basalt wool to disc dowels
If a suspended ceiling is not planned, then insulation boards can be attached in various ways:
- Still, make guides from wooden slats or metal profiles.
- Secure the panels with special disc dowels. For one mat measuring 1200 * 600 mm you need at least 4-5 dowels
- Glue to the ceiling with mastic.
A reinforced mesh is glued to the lower part of the insulation, and leveling primer and layers of paint are applied to it.
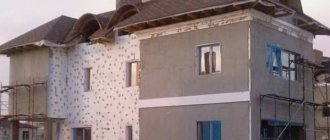
No attic
When insulating buildings without an attic, in addition to solving the problem of heat preservation itself, it is necessary to ensure the removal of excess moisture, both contained in the air in the form of vapor and condensing on cold surfaces.
Scheme for buildings without an attic
A vapor barrier is laid under the light ceiling, and a layer of thermal insulation material is laid on it. It is necessary to provide two ventilated gaps - between thermal insulation and waterproofing and between waterproofing and roofing material. You need to install vents along the ridge or simply lift the ridge cap so that the air can escape freely.
How to protect the attic floor from moisture
Thermal insulation in its structure is a multi-layer cake. One of its layers is a vapor barrier film, which should prevent moisture from penetrating into the structure of the structure.
To protect the insulation from fumes, a vapor barrier film is installed in front of the insulation layer (from the side of the living rooms). The vapor permeability of the film should exceed that of thermal insulation - this will allow you to quickly remove moisture that has entered the insulation through the protection.
Result of water exposure to floor elements
There are 2 reasons for steam deposition on floor structures.
The first is as a result of the release of household fumes and their diffusion through the ceiling. The second is the occurrence of dew due to the difference in temperature inside the room and the unheated attic. A vapor barrier is installed on the ceiling if it is expected that the attic will be unheated. The rest of the space is not subject to insulation, because... it is uninhabited. But the protection of slopes and rafters is necessary, these are:
- waterproofing - to eliminate external influences from the street.
- natural ventilation - from condensation that appears due to the difference in temperature outside and in the house. According to the standards, the total area of all ventilation openings must be at least 1/300 of the floor area or roof projection (horizontally). If ventilation is arranged correctly, in winter the difference in temperature in the attic and outside will be no more than 5-6 degrees.
Special cases
*
Let's look at a few special cases
In an apartment building
Apartments on the top floors of apartment buildings are known to be cold. Especially if the builders performed thermal insulation of the ceiling in violation of the technology. Any independent work in the attic of an apartment building is illegal; it is better to spend time complaining to the construction or operating organization and forcing them to fulfill their obligations to ensure normal temperatures. But the claim process is not a quick process, and the rooms are already cold today.
However, you can quickly and inexpensively insulate the ceiling from the inside and do it yourself. You will have to “please” your neighbors by drilling numerous holes in the ceiling for dowels, but the result is worth it.
Ceiling insulation in an apartment building
Another drawback will be a reduction in the height of the rooms by 4-5 cm, and around the perimeter of the ceiling - up to 40 cm. But heat is more expensive.
A system of guides made of wooden slats or a metal profile 4 cm high is installed on the warm ceiling. Sheets of foam plastic 30 mm thick are laid between them and attached to the ceiling with disc-shaped dowels.
After this, a foil vapor barrier is attached along the lower edges of the guides. Slopes with a radius of 40-40 cm are made along the perimeter, ensuring a smooth connection between the planes of the lines of the false ceiling and walls. At the last stage, sheets of moisture-resistant drywall are attached. Curvilinear slopes are covered with foam chips, starting from the short sides of the room. Ecowool is also suitable for this.
Attic
A residential attic must be insulated. Insulation of a non-residential attic will not hurt either - this will be an additional barrier to the cold on the residential floors. How to reliably insulate the ceiling in a residential attic? The most common scheme is insulation with mineral wool or polyurethane foam slabs laid between the rafters. For vertical walls, you will need to take special cotton wool with a low shrinkage coefficient.
Attic thermal insulation diagram
Particular attention will need to be paid to vapor barrier. In an already built house, the space under the ridge is not always available. In this case, ecowool can help out - it can be blown through temporary technological holes, which are then sealed with polyurethane foam.
Garage and bathhouse
The roof of a garage is often supported by metal I-beams. When installing guides for insulation, drilling holes from bottom to top in a steel beam is inconvenient, so the method shown in the figure is used. Thermal insulation boards are laid in two overlapping layers. Instead of fibrous materials, you can try ecowool. In this case, you can do without foil insulation, and instead lay kraft paper on the false ceiling.
Installation diagrams for bathhouses and garages
For the bathhouse, a standard thermal insulation scheme is used. Increased room humidity requires the use of basalt wool - insulating the ceiling of a building with glass wool is not recommended. Particular attention should be paid to the quality of ventilation of the gaps. Ecowool must be moistened with glue. If a bath ceiling is insulated, working from the attic side, bulk materials such as sawdust and shavings are often used.
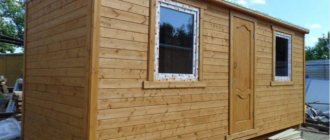
Construction of a frame house with a pitched roof
When choosing a frame house with a pitched roof, you need to add up all the pros and cons so that the choice is informed. In addition to the stylish design, you can get the following advantages:
- simplicity of design;
- low windage;
- saving on building materials (single roof - one-way drainage);
- high speed of roof installation;
- high reliability due to the absence of ridges, valleys and junctions.
The advantages are also followed by the negative aspects of such housing construction, namely:
- limited size of the structure - pitched roofs require a span of no more than 6 meters without additional supports;
- high snow load at low roof angles;
- due to the one-way drainage, there is an increase in the lockability of the foundation on one side of the house;
- impossibility of constructing an attic space.
When assessing the pros and cons, an important factor in the choice is the region of construction with its own characteristic weather conditions: amount of precipitation, strength and wind pattern.
Formation of a pitched roof
When building frame houses with a pitched roof, I follow all the rules for creating a roofing pie. The formation of the entire structure begins with the sheathing, which I install under the rafters laid on the front and rear walls of the building.
The second step is to lay a vapor barrier, which I install on top of the sheathing, bypassing the rafter beams with the vapor barrier.
I fill the entire space between the beams with insulation to the very top. It is better to use insulation based on stone wool.
On top of the insulation I attach a hydrobarrier film, on top of which I punch counter-lattice bars along the rafters. This is necessary to form a ventilation gap between the top sheathing and the hydraulic barrier.
Depending on the material of the finishing coating, I attach the top lathing with or without gaps.
By installing the finishing coating, I complete the formation of the pie roof of a frame house.
So, the roofing pie of a pitched roof looks like this:
- bottom sheathing;
- vapor barrier;
- insulation;
- hydrobarrier;
- counter-lattice;
- top sheathing;
- finishing coating.
Rafter system
Forming a pitched roof in a frame house is possible in two ways: due to the difference in the height of the opposite walls of the house (beam system) or using a triangular truss.
The beam system is limited in its application by the distance between the walls, which cannot be more than 6 m without additional supports. This is due to the load-bearing capacity of the floor beams and the length of the lumber, the measured length of which is exactly 6 meters. This design can be used in the construction of small buildings: garages, outbuildings.
When using such a design on buildings with spans greater than 6 meters, you need to be prepared to install additional supports (walls, columns), and the upper beams will have to be strengthened with jibs and supports. For large spans, it is also necessary to install rectangular trusses along the entire length of the building to ensure the load-bearing capacity of the upper beam.
A more acceptable option and one that I use in the construction of frame houses with a pitched roof is a triangular pitched truss. In this case, the truss can be manufactured at the factory or assembled directly on the site during the construction of the house.
The advantages of such a system are that by changing the angle of inclination of the structure, you can regulate the effect of snow load on the components of the house.
The elements of the truss, which can be assembled at enterprises for assembling wooden structures, are connected to each other by toothed plates.
Such designs are typical for American frames. And the technology of such fastenings was patented in America in the 50s of the last century. I would like to note that trusses connected in this way can provide strength to houses with a span length without supports of up to 12 meters.
Roof slope - how to form and why it is needed
The first task of the roof is to isolate the interior of the house from external factors (rain, snow). To avoid soaking and leaks, it is necessary to ensure guaranteed drainage of water from the roof surface during rain and melting snow. It is for this purpose that the roof surface is sloped
The windage of the entire structure depends on the slope of the roof. An angle that is too steep will ensure complete drainage of water and snow, but will make the roof vulnerable to gusts of wind. In addition, not all roofing materials can be used on steep roofs.
A shallow angle will expand the range of roofing carpet, but will increase the risk that water will stand on the roof after rain or when snow melts.
The angle of inclination of a pitched roof should be optimal. But still, the formation of one or another angle depends on the choice of roofing material and the region of construction with characteristic weather conditions and precipitation levels.
The formation of the angle of inclination with the beam system is carried out due to the walls of the house of different heights.
Using trusses, the angle of inclination of the roof is formed by the angle of installation of the upper chord. At the same time, taking into account that the truss with its elements is calculated by special computer programs, you can be sure that the angle of inclination in this case will be optimal. The weather, snow and wind loads will be taken into account.
Installation of a pitched roof (step-by-step scenario)
A pitched roof in a frame house, the installation of which is planned to be carried out, must be calculated by specialists. Firstly, it eliminates unnecessary waste of building material. Secondly, it allows you to be sure that the roof will withstand all the tests of nature (winds, rains and snowfalls).
So, I start the installation with a detailed calculation. This will give me the exact cross-section of the top beam, which can be 100*50 mm, 150*50 mm, 200*50 mm, 220*50 mm. Indicates points that need to install supports or slopes (with a beam system). It will show weak points in the timber, where it may be necessary to install a rectangular truss.
Option 1 - beam system
I begin the installation of the beam system after installing the walls and forming the ceiling of the upper floor. I make a breakdown along the upper and lower walls indicating the installation locations of the layered rafters (upper roof beam). I make the breakdown in increments of 600 mm.
Near the installation sites of the rafters, I install a perforated corner, through the holes of which I will fasten the rafters. First, I make nests in the lower part of the beams in those places where there will be contact with the upper frame of the wall. I assemble rafters over the entire roof area.
After installing the rafters, I begin installing the bottom sheathing, which I make from boards 25-30 mm thick. The board can be edged or unedged, but I make sure to clean it from any remaining bark. The sheathing can be attached with small gaps, taking into account that the space under the roof will be unusable.
I attach a vapor barrier film on top of the sheathing (on the outside of the roof). Installation is carried out from the bottom up with obligatory overlap and sealing of joints with tape. I secure the vapor barrier by wrapping the rafters on top.
I place insulation boards made of mineral wool or expanded polystyrene into the cavity between the rafters. Polystyrene foam cannot be used, as it is a flammable material.
I cover the insulation with a hydrobarrier. We fasten it with a stapler to the rafters, and then fix it along the top of the beams with a 2-3 cm thick slats. These slats act as a counter-lattice, forming a ventilation gap.
I mount the top batten along the top of the counter-lattice. Depending on the finishing material, I install it with an equal gap (under metal tiles or piece tiles) or with a free distance, so that later I can secure OSB sheets for the installation of flexible tiles or euroroofing felt.
I attach a finishing coating to the formed surface, the choice of which depends on the angle of the roof.
Option 2 – triangular truss system
In this option, installation is faster and more technologically advanced. The use of trusses in the case when a frame one-story house with a pitched roof is being built makes it possible to reduce the cross-section of the upper chord to dimensions of 50 * 40 mm.
Trusses are manufactured centrally at the factory in one size and delivered to the site in finished form.
Installation of such a system is carried out immediately after installation of the walls. A distinctive feature of this option is that the lower chord of the trusses can serve as beams to form the rough ceiling of the house.
I also begin the installation of structures after laying out the opposite walls with the same pitch - 600 mm. The first to install is the gable truss, which I fix directly to the wall using perforated corners installed on the supporting (for trusses) walls.
I install the second truss according to the markings and fasten it to the first, temporary beam along the upper chord.
I install and fasten the remaining structures in the same way.
After installing the roof frame, I cover the façade (high) gable, which allows me to fasten all the structures together.
From the inside of the building, along the lower belt of the trusses, I install a vapor barrier with overlapping strips and sealing the joints.
I pierce the sheathing along the entire plane of the ceiling with an edged board without gaps (solid).
In this option, I insulate the ceiling, and the entire space from the roof to the insulation remains cold, but well ventilated.
I lay insulation between the trusses so that the bottom chord, which is usually 100 mm high, is hidden.
I begin to lay the lathing on the upper belt of the trusses from the bottom up after installing the first strip of the hydraulic barrier. That is, in this option, the hydrobarrier film and the sheathing board are installed almost simultaneously.
Having completed the installation of the sheathing, I attach the finishing roofing covering.
Installation of lathing and counter-lattice
In the case of a pitched roof, the sheathing beats twice. And in both cases it has special functions. To form a full-fledged roofing pie, lower and upper lathing is used.
The lower lathing is mounted on the bottom of the layered rafters or on the lower chord of the trusses. Its main task is to retain the insulation.
With layered rafters, I begin installing the bottom sheathing from the bottom of the building. I fasten it with anodized screws. The entire area is covered with lathing at once. I fasten either completely or with gaps. You can use an unedged board, the sides of which are completely cleared of burrs.
If the roof is formed using trusses, then the lower sheathing is installed from the inside of the building. In this case, I use a trim board to make the fit as tight as possible.
There are times when I install trusses on a finished floor. Then the bottom sheathing is not installed at all.
Counter-lattice is a block with a size of 20*40 mm (30*40 mm), which is installed on the upper edge of the rafters or the upper chord of the trusses. Its purpose is to form a ventilation gap between the roofing and the waterproofing film. I fasten the block with nails 40 mm long.
The top sheathing is the basis of the roof covering. Its installation is carried out from bottom to top with a given step. For metal tiles, boards 100 mm wide and 30 mm thick are used. This size allows the sheet wave to rest securely on the sheathing. And if the step “walks” within 15 - 20 mm, the width of the board will not allow the fasteners to pass by. For piece tiles I use 40*40 mm timber.
If the top covering is rolled bituminous materials or flexible tiles, then a leveling layer of OSB boards is mounted on top of the sheathing of boards.
Selection of roofing material
Depending on the angle of inclination of the roof, the choice of material is made. For small slopes (from 5 to 10 degrees), materials are used that have the least number of open joints. This applies to rolled bitumen materials. The main one is built-up euroroofing felt, which is installed in two layers using the hot method with overlapping joints.
At angles close to steeply sloped roofs (which is about 30 degrees), ordinary slate, ceramic piece tiles, and metal tiles are used.
If the slope angle is in the range of 10 – 30 degrees, corrugated roofing sheets, bitumen shingles, metal tiles, and seam metal roofing can be used.
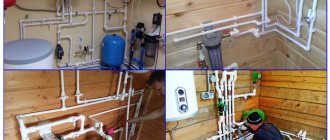
Installation of roofing and thermal insulation
Before completing the installation of the roof, I insulate it. The thermal insulation cake of the roof consists of three main elements:
- vapor barrier;
- insulation material;
- water protection.
A vapor barrier film, which can be dense polyethylene, is installed on the side of the room to prevent moisture from entering the heat insulator. Attaches directly to the mounted bottom sheathing.
Stone wool is used as insulation, but rolled material can also be used. This justifies the fact that the insulation on both sides is covered with lathing and no one will walk on it. Since the attic space cannot be built with a pitched roof, you can use expanded polystyrene sheets as insulation.
It closes the insulating structure - a hydrobarrier, which prevents moisture from entering from the outside, but removes the internal moisture of the insulation to the outside.
After the insulation cake is formed, the roofing covering is installed. Depending on its type, the appropriate sheathing is installed. The sheet material is attached to a plank sheathing with a gap. Rolled and bitumen on a continuous flooring made of OSB, plywood or cement-bonded particle boards.
Having completed the installation of the roofing, I install the junction strips, wind strips, and install the drainage system.
Worker skills and tools
Popular insulation methods do not require expensive equipment or high qualifications. For insulation, a home craftsman will only need general construction skills and ordinary tools:
- knife
- hammer
- screwdriver
- hacksaw
- stepladders
- roulette
When installing the guides, it is best to call an assistant. Help with cutting and laying rolled materials would also be helpful.
Before starting work and purchasing materials, it is necessary to make a sketch drawing. This will help you avoid making mistakes with dimensions and correctly calculate the amount of materials purchased.
Review of the main vapor barrier manufacturers
There are several popular vapor barrier manufacturers on the market:
- surpasses all other companies in quality (according to the Test Purchase program).
- does not lag behind the leader either in quality or in the use of the latest technological developments. This is a domestic company that produces a very high quality product.
- The product is good for both industrial and residential construction, but is not suitable for creating temporary roofing.
Not included in the top three:
- Polish - the company's products are distinguished by the fact that they can withstand very low temperatures.
- "Ondutis" - low prices, excellent connecting tapes, rolled materials.
- Tyvek products provide ideal wind protection.
- German DELTA - steam and wind protection.