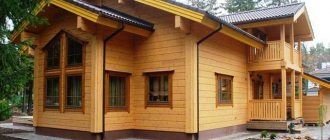
Log house in a bowl
Hello, curious amateur builders!
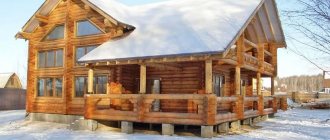
Today there are several types of manual felling of houses and baths. These are “log-house in a bowl” and “log-house in a paw”. The construction of a bathhouse into a bowl is a truly Russian creation. A long time ago, our ancestors built houses and baths this way. Remembering the films of past years and our unforgettable artists, one immediately imagines chopped-up, truly Russian houses. Some architectural examples still stand today, being more than 100 years old. We can say that this construction method has been tested for centuries.
Now quite a few construction companies offer log houses using this technology. I will say right away that it will be difficult for a person who does not have knowledge and practice in this area of carpentry to make a log house into a bowl with their own hands. Almost impossible. But real masters, using their centuries-old secrets, do their work practically without a single nail. Why is this particular cutting method so popular among the population? Let's try to delve into this process.
Russian chopping in the paw
When building a wooden house for a key Russian felling, all logs of the log house must be the same diameter. The thickness of the log dictates the size of the foot, while the ends do not extend beyond the corners. The first crown of the house is exemplary, so it is worth taking high-quality dense wood for it.
This type of house construction is very labor-intensive, as it requires high precision from builders, but at the same time it saves material. After processing the wood and cutting out the paws, the log house is pre-assembled. Russian felling is a fairly economical type of construction, and from the outside this structure looks very neat and harmonious.
But this technology also has its disadvantages. The main disadvantage of felling is the large heat loss from the corners of the building, so edged boards, moss and jute are used to insulate a wooden house. The final caulking of the log house is done only after a year.
Final Tips
Having mastered the craft of a carpenter, you will save significantly on construction. Start learning the basics by making a log gazebo for the garden. Then, build a small bathhouse on your site. The experience gained will allow you to master the construction of a house. A technologically precisely manufactured log house will be warm and will give the building durability and reliability and provide exceptional environmental friendliness, especially if you use cedar lining for internal cladding.
On other pages of our website you can see a lot of interesting things about log houses and log baths.
Russian cutting into a bowl
When doing Russian cutting into a bowl, the logs in the corners are joined together with an overlap. On each side of the log house, the logs stick out into the bowl by about 25-30 cm, so the length of the walls is reduced, and, accordingly, the usable area inside the house is reduced. However, it should be noted that it is the hand-cut openwork logs that are the main highlight of the bowl log, which give it a special charm and charm. A bowl is a special groove at the junction of logs. The width of the bowl depends on the climate; the colder it is, the larger the bowl.
Russian chopping into a bowl is more expensive than chopping into a paw, since there is an overconsumption of material. This felling gained its popularity due to its good stability and protection from wind and precipitation.
The technology itself is quite simple and does not require special skills from carpenters. To stabilize the logs, dowels are tied at the joints. The paw can be located both above and below, but it is better when the paw is located at the bottom, so it is better protected from precipitation.
Types of corner chopped joints
The basis for manual cutting of log houses assembled from round timber is a type of corner joint, which can be made without a protruding part (into the paw) or with a small protrusion. In the latter case, the type of log bundle is called “in the bowl” (or “in the oblo”). Each of these types of log connections can have its own designs, differing in the order and details of manufacturing.
Corner notches with a small outlet can be easily identified by the parts of the crowns protruding from the ends, due to which the useful area of the log house is somewhat reduced.
On the other hand, this design of the corner joint perfectly protects the structure from bad weather and heat leaks, and also has a more aesthetic appearance and high reliability.
Let's consider the features and varieties of this main type of corner notch.
Advantages of Russian log cabins
- Easy to manufacture and install; Good air filtration and maintaining oxygen balance indoors; Favorable microclimate inside the house; The house is protected from the influence of the external environment; Aesthetic appeal; Chopped logs require virtually no finishing, it is enough to cover them with an antiseptic and fire retardants; Strong and durable.
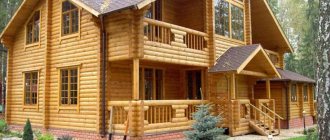
Canadian technologies for building durable and environmentally friendly houses have gained significant popularity in recent years.
This is partly due to the naturalness and energy-saving function of such buildings. Prefabricated structures are also popular due to their cost-effectiveness and simplified assembly techniques. Against this background, North American logging technology is also worthy of attention.
Despite its relevance in our time, the basic principles for the construction of such houses were laid down in the middle of the last century. Another thing is that Canadian log cutting technology has been significantly improved in our time. Among the advantages of this approach to construction are the same natural design, energy-saving advantages and, most importantly, reliability and durability.
This method of forming a house is also called “bowl” felling. Based on the general characteristics of construction, the technology can be classified as a variety of traditional Russian felling. Moreover, its roots come from Russia, but it has not taken root here, but Canadian craftsmen have improved it and have been using it for decades.
Also, modern builders from Russia have taken a different look at the advantages of cutting logs using Canadian technology, and are increasingly using this technique in their work. Among the features of this method of cutting, one can note the complexity of the design. If classic log houses are mainly formed using the technique of simple laying of elements, then the installation configuration according to the Canadian method is highly accurate and thoughtful. Of course, it is painstaking installation that ultimately makes it possible to obtain highly durable houses that are not subject to biological destruction processes. Similar climatic conditions in Scandinavia and Canada also led to many similarities in approaches to construction. Therefore, the two technologies have more similarities than differences.
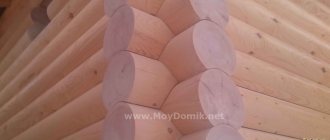
For example, both methods allow you to form a dense, self-wedging frame. Canadian felling, like Norwegian, is carried out without the use of nails, so the responsibility of the architects designing such a house increases. But there are also significant differences. The main one is the use of large logs, the diameter of which can reach 50 cm. In the case of a Norwegian log house, more often a well-prepared carriage is used.
Another distinguishing nuance lies in the technique of forming corners. North American builders use “saddle” cutting, which precisely ensures the tightness of the fit of the logs. Largely due to this feature, Canadian log house cutting is more popular. A photo with an example of fitting logs is presented below.
How to choose wood for a log house?
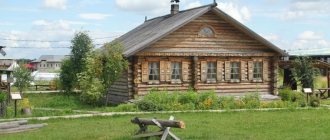
A cedar log house does not require interior or exterior finishing, thanks to the beautiful texture and healing properties of the wood.
Before you order wood for a log house, you need to choose it correctly. When deciding how to cut a log house, you should not forget about this stage. Not only the quality of work, but also the durability of the entire structure will depend on the correct wood. If everything is done correctly, then the thermal conductivity, texture, and build quality will be at their best. It is best to cut a log house from coniferous trees. They are inexpensive, well processed, and have numerous beneficial properties. Pine, which is most often used in construction, is popular in this sense. The log is almost not subject to drying out. This is especially important when building a bathhouse, where the walls of the structure are constantly exposed to sudden temperature changes and humidity fluctuations. In addition, pine is lightweight, durable, and easy to work with.
In addition to pine, larch is also used; it is strong, durable, and does not rot. But it is difficult to process, and this makes the work difficult and time-consuming. The paw does not cut well; it requires some effort. One of the minuses, it should be noted that larch is a type of cold wood, so its diameter must be larger than for other types.
You can also cut a log house from cedar, which is a soft wood, but in terms of strength it resembles larch, and in other properties it is more similar to pine.
This material has a pleasant smell. The appearance of the log house is stylish and beautiful, different from the rest. Cedar wood has numerous useful properties, which is a big plus for any structure, and especially for a bathhouse. The texture is very beautiful, such a log house does not require interior finishing, and façade finishing is not used either. But the cost of this material is higher than that of others, although the quality justifies the price.
Performing markup
During the construction process, you should use a special tool that will increase the accuracy of the formation of the log house. This is a hammer that has two sharp rods, with the help of which the contours of the future bowl are outlined.
Carpenters call this tool a dash, but there are other names as well. The marking itself must be strictly guided by the technical specifications, which will be implemented by the Canadian log house. Projects, in addition to layouts, can take into account different parameters of the bowl.
Of course, for large buildings these dimensions will increase - and vice versa. Marking should begin with determining the parameters of the logs. Next, you need to number each whip, which will eliminate the possibility of errors in further laying.
Material selection
For any log houses, it is recommended to use coniferous wood with natural moisture, felled in winter, preferably from the northern regions. Pine is the cheapest, larch and cedar are more expensive, but stronger and more durable. The trunks must be even along the entire length and of the same size.
Removing bark from all sides of logs is done using a special tool called a scraper. You can also remove the bark with an ordinary shovel with a cut off spout and a sharpened bottom edge. It is unacceptable to remove the bark mechanically, using power tools, chainsaw attachments or grinders, since the upper layers of the main wood will be damaged along with the bark. After which the workpieces are stacked with spacers for ventilation and covered with roofing felt. Drying lasts ≥ 6 months.
The timber must be dry, free from visible cracks, mechanical damage, falling knots, rot and mold or mildew.
Creating a "saddle"
The base of the “bowl” is the “saddle” into which the logs are placed. It should also be noted that each joint must initially have a special tenon. Outwardly, it may seem that the classic tongue-and-groove installation technique is being implemented, but this is not entirely true, since the joint is made by bringing together rounded planes - that is, through “saddles”.
If you do the Canadian felling of log houses with your own hands, then you can make calculations using a simplified scheme. For example, in determining the depth of the “saddle” you should focus on the radius of the log, which will subsequently be laid in this niche. This creates an organic masonry with a tight connection of logs. In this case, it is necessary to retreat from the edge at least 25 cm, and the marking of the “saddle” itself should be done with a sharp nail or a chemical pencil, since ordinary pens and markers can easily be erased.
Log processing
At this stage of the work process, it is important to process the log in such a way as to obtain identical dimensions of the logs at its ends. Process subsequent logs according to the measurements of the first. GOST 30974-02 will come to the rescue, which clearly sets out the established figures for felling in the paw.
For further calculations, we will take a value of 200 mm as the smallest log diameter. Then we proceed according to the scheme:
- determine the central points at the ends using a tape measure;
- markings are made, for which we take a plumb line and draw two vertical lines on the end with small dimensions so that they are symmetrical;
- the distance between the lines must comply with GOST - in this case A = 141 mm;
- then we draw similar lines in the horizontal direction.
After this, begin to lightly trim the irregularities along their circumference, without touching the lines beyond 10-15 mm. Then cut off the humps completely. It is important to know that the horizontal edges of the log must be equal in length to or exceed the maximum diameter of the largest log. Vertical planes should provide optimal plank coverage of the corner and a convenient assembly process. Often their length is equal to the largest diameter of the selected logs. For example, this is 250 mm. The next step: you need to process the block to obtain the required dimensions, which is 141 mm. A prism should come out with a square cross-section. It is subject to a subsequent processing step, which is carried out in two ways.
Carry out calculations to divide the vertical edges of the log into 8 identical parts. Draw horizontal lines through them so that they are parallel. Then you need to trim the block to get 2 planes that pass through different horizontal lines. Maintain the slope along the overall horizontal axis of the entire log.
Take the values from the table for the desired diameter, draw verticals on the planes of the blockhead. Next you need to trim along the lines and repeat the procedure for the other end.
Carry out this operation for all the decks and collect them, placing one on top of the other. You can also make a template using cardboard or plywood feet and apply it to the rest of the logs. If the foot and groove are made using a carpenter's line, the information below will be extremely useful for you.
Log house in paw
Cutting methods
During the chopping process, it is necessary to use a high-quality tool, which can be a sharp cleaver or chainsaw.
Professional companies use special equipment for this task, which also makes it possible to form “bowl” contours that are almost ideal in size. However, even in the homeland of technology, manual Canadian cutting of a log house is more often used. How to make the base of a log house in this way? A thorn should be cut out in the lower crown.
A groove is made in the upper part in the same way. Next, during the assembly process, a heat insulator will be laid in these places. The fitted crowns are disassembled again to make the frame circle. At the final stage, the crowns are assembled so that the “bowls” are oriented downward.
What parameters should I pay attention to?
When choosing a tree, you need to pay attention to the following factors:
Figure 1. Templates for marking “paws”.
- type of wood;
- properties of a particular type of wood, compliance with construction requirements;
- required size, log diameter;
- whether the selected material has beneficial properties.
Among the properties you need to pay attention to are:
- service life, its conditions;
- level of protection of premises from heat loss;
- level of protection from adverse weather conditions;
- protection from rotting, damage by insects, rodents;
- how easy the wood is to work with and how easy it is to process.
In order not to cut down a log house, you can buy a ready-made project, where the wood has already been selected, the cutting has been done and markings have been applied. As a result, the assembly process itself will be as simple and fast as possible. This option is perfect for those who do not have any skills in working with wood.
Tightness as a feature of the Canadian log house
In the process of designing and constructing a Canadian log house, it is important to be prepared for the fact that the technique of its formation itself will not provide a sufficient level of airtightness. In other words, increased tightness eliminates even the slightest ventilation in the walls. In this case, the advantage of the house in the form of high density also turns into a disadvantage.
The only option to correct the situation would be to introduce forced ventilation equipment into the log house. The loose fit of the logs immediately after construction should not be embarrassing - the shrinkage process eliminates the smallest cracks and seals the frame. Canadian logging, like most technologies for constructing wooden houses, requires additional thermal insulation, which also reduces the possibilities for natural ventilation.
Types of logs used
Don’t think that the technology is a one-size-fits-all solution with no possibility of making adjustments. The greatest space for individual choice involves precisely the variety of the main material - logs. Or rather, the methods of preparing the wood. It must be said that Canadian technology requires considerable investment in building materials, so there will be an opportunity to save money.
However, you should start with the optimal solution for those who do not want to skimp on quality. In this case, you should prefer a scraped log. This material preserves the natural shape of the surface, which also increases the aesthetic advantages of the log house. The drawing of crowns in such a design is carried out with minimal tolerances, duplicating the complex shape of the elements. The option of planed logs is no less attractive.
All external flaws and defects of the log are smoothed out, due to which the drawing process is simplified. This is a durable and high-quality processed log, which is inferior to the scraped one only in aesthetic advantages. If you plan to cut log houses in Canada with minimal investment, then it is worth using a planed log, the drawing of which is carried out in one approach. However, the tolerances of “bowls” with grooves in this case increase, which may require caulking.
Recommendations from experts
For beginners in working with log houses, professional carpenters recommend using a notching saw when processing logs, and then removing excess with a chisel.
You should definitely have a ready-made log with a correctly executed “bowl” in your inventory - this will be an example that you can use as a guide in your work. In the absence of a reference log, in some cases tin templates are used, which will reduce the risk of inaccurate processing. But in any case, each crown must be additionally checked with a level.
There are other subtleties in Canadian log cutting that are worth keeping in mind. So, if an excess layer was removed during processing, this does not mean that the log becomes unusable. A layer of insulation that will lie between the logs will allow a few millimeters to be replenished.
Preparatory work
Regardless of the chosen connection method, there are several general rules that should be strictly followed. When choosing a material for construction, you need to keep in mind that the thicker the timber, the warmer the building will end up, since it has fewer connecting grooves.
When installing the lower - frame - crown, the thickest beams are used for it. If, for the construction, a high-quality leveled beam of the same width was purchased, then for the installation of the casing crown it is better to additionally purchase 4 beams with a slightly larger cross-section.
Figure 1. Scheme of cutting into a paw with a tooth.
Before you begin installation, you first need to carry out preparatory work, especially if the material for construction is rounded timber or ordinary logs. In this case, you first need to use a plane or sanding machine to give a flat surface to the side that will be located indoors after assembly.
The side opposite to it is processed to a length of 2-2.5 times the diameter of the timber from the edge of the end. The sides need to be processed to a length of 1-1.5 diameters from the edge of the end. When performing processing, it should be taken into account that the butt of the log will always be thicker than the top.
The trim crown is arranged in the same way for all methods. The first two beams or logs are laid strictly parallel to each other. The next two crowns are placed perpendicularly on top of them. The square formed as a result of laying is leveled strictly according to the level. Further cutting of the log house depends on the chosen connection method, but in any case, the total depth of the groove for planting the upper crown should not be more than half the thickness of the log or timber.
Disadvantages of Canadian logging
The construction process cannot be considered easy, so inexperienced craftsmen often encounter problems.
This applies to both marking and the process of laying logs. The construction itself requires significant costs if high-quality wood material is used. If you use cheap raw materials, then the operational advantages that such a log house should have are more likely to be leveled.
The Canadian loghouse provides good protection from the cold, but only due to the tightness of the structure. As already noted, this nuance does not have the best effect on the ventilation of the house. It is impossible to structurally get rid of this shortcoming during the construction process, so they solve the problem through additional supply of ventilation systems.
Norwegian copula
This type of angular joint is very similar to the Canadian ligament. However, unlike it, when forming a notch, in this case a special form is used - the so-called “carriage”.
The latter is made in the form of an oval-shaped log, in which the wood material on both sides is selected in the same way as shown in the photo on the right.
The corner lock, along with the webbing and the fixing tenon, is completely similar to the Canadian version of the tie. Thanks to the special shape of the logs, the walls of buildings with this connection method are perfectly smooth, and the usable area of the premises is slightly increased.
Tools used
This:
Types of log connections.
- axe;chainsaw;carpenter's chisel;dash;hammer.
If it is not possible to purchase a trait, then you can simply make it yourself.
To do this, use a square-shaped block of wood with sides measuring approximately 30 mm and a length of about 20 cm. Its edges should be ground off and sanded with emery cloth. This method is the most practical.
To complete the work, you will need two metal strips, the thickness of which is 3 mm and the width is 20 mm.
Its length will depend on the cross-section of the logs and the size of the bowl - from 20 cm to 30 cm. Using a hacksaw for metal, you need to sharpen one of the ends on each of the strips. Using tape, you need to secure the non-pointed ends to a wooden block, which will serve as a handle for about 1 m.
When bending the strips to the required size, the contours of the bowl and longitudinal grooves are marked. To prevent the strips from bending during work, they are secured with bolts or threaded rods.
In this case, one hole is made on the strips and bolts and nuts are placed in them. The sizes are adjusted using nuts. This is how a homemade trait is made.
Connection with socket
The assembly of the log house begins with the thickest logs, which form the lower (frame) crown, laid directly on the foundation through a layer of roofing material.
The further construction of the log house walls will depend on the correct installation of the frame crown logs.
After assembling the frame crown, they move on to the next row of logs. Since the next row (crown) will be laid on top of a round log, then in the logs from which it will be assembled it is necessary to select a longitudinal semicircular groove along the entire length in order to achieve a tight fit to the round surface of the logs located below.
To do this, you need to lay one log on top of another and, using a carpenter's line on the top log, draw a line parallel to the bottom log. After this, the log lying above is removed, turned over and a longitudinal groove is made in it.
You can see how to choose the right semicircular longitudinal groove in a log in this article.
After the groove is made, the log is again laid on top and, tapping along the entire length, they see if it fits tightly enough to the bottom one. If necessary, remove irregularities and repeat the fitting.
If the groove is made correctly and fits tightly enough to the bottom log, then the junction of the logs is laid with tow, jute or moss, after which they move on to the next log.
The assembled logs of the log house, covered with insulation, are left to dry out and shrink. Only after this the final caulking of the log house and its polishing is done.
When assembling a log house, it is necessary to constantly monitor the verticality of the walls and the correctness of the geometric dimensions of the log house in plan.
***As you can see, chopping a log house into a paw has its own characteristics that you need to know before starting construction.
Despite some labor intensity, cutting into the paw can be mastered after some practice. Moreover, modern chainsaws can greatly facilitate the work of forming paws and longitudinal grooves.
This is the easiest way to connect into a paw. It has two varieties: one-sided and two-sided. With the one-sided method, a groove is made at both ends of the upper beam for half its thickness and the length of its diameter. With the double-sided method, the groove is cut to 1/4 of the thickness, and not only from the top, but also from the bottom of the beam or log, so that in the end the total depth of the groove is equal to half the thickness.
Figure 2. Connection diagram with subsection.
Then the crown is laid on top of the one lying with the selected grooves on two crowns laid perpendicular to it. Two perpendicular crowns are placed on it with grooves, then the upper crown is laid on top of them with grooves, and so, observing the order of tying the crowns, the frame is driven out (Fig. 1). You can also lay it in the reverse way, i.e. Place the upper crown on the selected grooves, but in this case, during precipitation, more water will get into the grooves.
To increase the stability of the building, the crowns in the corners are fastened together with wooden or metal spikes. To do this, when laying the upper crown, a hole with a diameter of 3-4 cm is made in it and the crown lying underneath it. A spike with a diameter slightly larger than the hole itself is driven into this hole so that it can enter it, but with a certain effort. With each crown placed on top, the procedure is repeated, but the hole must be drilled in a checkerboard pattern so as not to fall on an already driven tenon.
This method of connecting into a paw is more reliable, but it is also much more difficult to implement, so without proper experience in making connecting grooves it is definitely not worth taking on. When marking and cutting the paw, a protrusion of 2-2.5 cm with an area of 1/4-1/5 of the total area of the paw is left on its inner surface (Fig. 2).
Figure 3. Dovetail connection diagram.
A hole for the tenon of the same area and depth is hollowed out from the bottom of the upper crown being laid. When using paws with a cut to fasten the crowns, the assembly of the log house turns out to be akin to assembling parts in a children's construction set.
Thanks to the undercut, the adhesion of the logs and the overall stability of the building are significantly increased. However, such forcing requires almost a jeweler's precision in fitting the tenon into the groove, so the time for making joints increases significantly, not only due to their more complex shape and the need to additionally make grooves, but also to a large extent for their adjustment.
If, when cutting a paw directly, a groove is taken out that is larger than required, and the logs do not fit tightly together, then you can hew out and drive a wooden wedge of the required width between them (although this should be the exception, but not the rule of assembly). When cutting a paw with a notch, if the hole is larger than the tenon, the crowns will move, and no amount of wedges can correct this.
Chopping a log house into a bowl
Deformation of a log when cutting with a traditional Russian bowl.
For convenience during work, the logs are first laid crosswise, and for maximum stability it is recommended to fix them with brackets so that they do not rotate during work.
The bowl should be cut down to such a size that its bottom coincides with the upper edge of the underlying log. For ease of work, it is recommended to make a cut in these places, in relation to the axis of the wall in the middle of the bowl to the required depth. Next, the bowl is cut out, respecting the shape of the lower element.
Above the frame crown are debarked and seasoned straight-layer logs. The installation process consists of laying two logs in pre-made bowls.
After which they are leveled and, if necessary, fixed with staples from both ends to the underlying transverse logs. From the end side, you need to visually determine the dimensions of the gutter, with the help of which the upper element is mounted on the underlying log. The required size is indicated on the line.
Visually selecting the middle of the line, they draw along the log along the line of contact, as a result of which two parallel scratches are formed: one on the lower log, and the other on the upper one. In the same way, using a line, markings are made on the inside. Remove the fixing brackets.
Next, the log is turned over so that the markings are on top. Pull out the top logs from the bowl. They are fixed, but so that they can be easily dismantled later.
Deformation of a log when cutting with a Canadian cup.
There are two visually noticeable scratches on top of the log, along which the wood must be hewn out, resulting in a notch. The dimensions of the recess must exactly follow the contours of the underlying element.
When making a recess diagonally and along the entire length, it is recommended to make notches. When hitting, the nose of the ax must be immersed to the bottom of the future groove, but the blade should not touch the scratch. Many people use the heel, the other side of the blade, when cutting out a notch.
In the same way, notches are made on the opposite side, where the scratches are marked. After this process, an area with notches is selected.
When striking, the ax blade must be directed along the grain of the wood.
Corner cut “into the bowl”.
When working, only the tip of the blade is used, thanks to this the blows will be more accurate. At the same time, the following movements are performed: cutting in the ax and picking out the wood.
After cutting down the middle part of the log, the surface of the excavation must be cleaned. Typically the notch is made 10-15 cm wide.
It is necessary to prepare the bowl itself. To do this, recesses are made in it on both sides from the upper edge of the lower log to the completed markings. If necessary, the bowl is cut from the outside and inside.
Marking the log house
Despite the relative simplicity of making grooves, it is possible to properly cut a log house into a paw only if the ends of the logs or timber are correctly marked. When using timber, it is always better to take material of the same thickness, and the thicker the timber, the fewer connecting grooves there will be in the corners, and accordingly, such a house will become warmer. When cutting a log house from logs, you should always take a log with a thinner end as a sample and adjust the rest to it.
Related article: Excellent garage DIY. Cool homemade workbench
For marking, it is much more convenient to make special templates than to work with each end separately. Such templates are made from thick cardboard, and markings are carried out with their help by simply applying them to the ends of the logs.
To cut a log house you will need the following tools:
Cutting the corners of the walls “in the paw” and the order of its marking.
- saw;
- axe;
- bit;
- plane;
- roulette;
- level;
- plumb line;
- hammer;
- mallet.
Using a plane, you need to completely sand the side of the logs or beams that will be laid inside the room. The opposite side is processed only at the ends; the processed length of the sections should be in the range from 2 to 2.5 log diameters. The two remaining sides are equal at the ends by 1-1.5 times the diameter of the log each.