Having your own bathhouse is the dream of any land owner. What could be more pleasant than having a good steam bath and then drinking tea on the veranda, enjoying the beauty of the surrounding nature. A huge selection of bathhouse designs of different sizes makes it possible for anyone to make a place of relaxation on their site. If you have a large family, or you like to spend time with friends, then pay attention to the 6x6 bathhouse project with an attic.
Features of 6x6 attic baths
The exclusivity of attic baths implies the full implementation of a variety of design solutions. Choose a bath house option taking into account its characteristic features. For those who like to design various variations of buildings, a bathhouse with an attic will be an excellent way to realize their own ideas. One of the main superstructure structures of the attic is the staircase. Climbing to the attic in the bathhouse will require its presence.
The counterbalancing points should be carefully analyzed, taking into account the arguments for and against. Only after taking into account the main characteristics of a personal bath structure is it possible to consider design issues. Another structural feature of bathhouses with an attic is the roof structure. It is important to take into account the limitations of the attic. To make this floor useful, a broken gable roof structure is often used.
A pitched roof is undesirable; the type of traditional gable roof also cannot be called the most convenient. Hip roofing structures are often used. The geometric parameters are more or less clear. Choose an option for climbing to the attic, taking into account one or another roofing option. For example, marching type options are considered the most effective, but they are difficult to install in small areas. Main devices adapt especially poorly to the design of 4x4 m bathhouses.
Bolster ladders are equipped with the advantages of marching devices. Such systems cannot be used for frame structures, since they require a strong load-bearing support. Steps are attached to the wall. If the bathhouse is made of other materials, the device is quite acceptable for use.
Screw-type devices are not convenient, but they are effective in terms of saving space. Often they become a lifesaver in a 4x4 or 5x5 m attic bathhouse project.
The best version of the project with a veranda, terrace and attic involves placing the rooms in the following order:
- first floor;
- steam room;
- shower or washroom;
- vestibule;
- small veranda.
The veranda is often used as a dining area, filled with benches, chairs, and tables. This space is usually open, creating an atmosphere of simple natural beauty. However, the veranda is sometimes sacrificed to increase the internal area of the bathhouse. In the attic area it is allowed to arrange a sleeping area, a games room (for example, a billiard room), and a storage room. If the attic is a storage room, it is more expedient to equip a resting place below. For comfort in the attic, a total room height of 2.5 meters should be provided.
Advantages
A bathhouse with an attic has many advantages, among which the following are worth noting.
- The second floor of the bathhouse will not only additionally fill the room with light, but will also serve as a place for a comfortable pastime. The upper part of the room can be used as a relaxation room or as a sleeping area for guests. In addition, in the attic you can equip a gym, a billiard room and even a small library. It all depends on the preferences and hobbies of the owners.
- By building such a structure, you can significantly save the land allocated for construction. After all, everything you need for relaxation fits in a small area. This includes a steam room with shower, a living room, and a bathroom.
- This structure also saves money. After all, it is much easier and cheaper to build one room, rather than several adjacent ones.
- If the bathhouse is frame, then you can save a little money on heating. After all, the heat coming from the first floor will significantly reduce heating costs.
Flaws
Like everything in this world, a bathhouse with an attic also has some disadvantages.
- Since the temperature on the first floor of the bathhouse is very high, the second floor requires special protection. It is necessary to carry out good hydro- and vapor barrier. If this is not done, then there may be a possibility of the room being damaged by fungus or mold.
- The bathhouse requires increased attention due to the high probability of fires. Therefore, it is best to place it as far as possible from the main building. In addition, it is necessary to treat all surfaces with fire retardants, which will significantly reduce the possibility of a fire.
- Building a bathhouse with an attic will take a little more time and effort than building a one-story building.
Purpose of the attic
To determine the optimal size of a bathhouse with an attic, the following dimensions are taken into account:
- plot;
- buildings on it;
- territory used for planting.
A 6x6 building is an object in which the necessary premises can be placed.
The advantage of the project is its practicality. A 36m2 building will not take up much space on the site, and the attic will allow:
- in the future, build a second tier, saving a significant amount of money;
- expand the useful space of the bathhouse, set up a relaxation room in the warm season, a billiard room, hookah room, karaoke room, or just a utility room for equipment and bath accessories;
- separate a guest room or make a summer bedroom.
Construction requirements
Before you start planning and developing drawings, it is important to read the regulatory documentation of the current legislation, which regulates the construction of baths.
This list includes:
- SanPiN 1.2. 3150-13 “Sanitary and epidemiological requirements for the placement, design, equipment, maintenance and operating hours of baths and saunas.”
- SP 22.13330.2011.
- SP 64.13330.2011 - updated version of SNiP II-25-80.
- TKP 45-5.05-146-2009, TKP EN 1995-1-1-2009. Requirements for the design of wooden baths.
SNiP II-L.13-62 contains many useful recommendations for the construction of baths. Although this document has not been relevant for a long time, many standards have been developed on its basis.
In addition, it is worth considering the following:
- It is better to build a bathhouse on a hill.
- A free-standing structure should be clearly visible from the windows of a residential building.
- When choosing a location on a site, the wind rose is always taken into account so that the smoke does not disturb the neighbors. This applies to buildings that are heated by wood stoves.
A classic Russian bathhouse with a standard set of rooms (steam room, font or sink, dressing room) is considered an outbuilding, so you do not need to obtain permission for construction. But, if communications (gas, electricity, water supply, sewerage) are centralized to the bathhouse or a second floor is being built, its registration is required.
What to consider when developing a project and planning a bathhouse
By project we mean a smaller version of the future building, transferred to paper. It contains a general drawing of the structure, diagrams of individual elements from different angles. The type of foundation and materials for building a bathhouse are indicated. Calculations were made of the amount of building materials and money spent taking into account the size of the structure. The method of supplying communications and the placement of the furnace is clearly shown. The approximate construction period is indicated. The project is always accompanied by construction permits from local services. It is unlikely that you will be able to cope with such a volume of work yourself, so it is easier to order the design procedure from experienced architects.
The layout of a bathhouse means the proper arrangement of the interior spaces, taking into account the requirements of the owners. The calculation of the size of each room depends on the expected number of vacationers.
It is important to pay attention to where the doors will be installed and which side they will open from.
Among other planning nuances:
- In bathhouses made from fresh logs, it is better to place the wood-burning stove near the wall adjacent to the rest room, and place the firebox in the dressing room.
- It is worth setting up a small vestibule at the entrance to the bathhouse premises. It will reduce heat loss in winter.
- It is convenient to place a bathing bowl or pool in the room, opposite the doors to the steam room.
- The steam room should be larger in size than the washing room.
- There is no need to overload the space with furniture. Its quantity should be minimal.
With a compact arrangement of a standard set of rooms, there is enough space for a separate bathroom, and a dressing room with access to the terrace will allow you to relax in the fresh air in the summer. Attic floor - the possibility of arranging an additional lounge for guests.
What are walls made of?
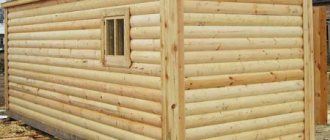
When designing walls, it is important to make the right choice of material. They are made from rounded or chopped logs, bricks, and blocks. The most popular option for this design is timber. It can be glued, profiled, or simple. It is easy to work with and environmentally friendly.
Construction algorithm:
- Lay a layer of waterproofing (roofing felt or waterproofing) on the foundation;
- Lay out the first row of beams, fastening them together with a dovetail or using the tongue-and-groove method;
- Check if the diagonals on each rectangle are equal;
- When choosing a floor structure in a steam room, beams (steps of at least 500 mm) and subfloors are created from wood;
- When constructing a tiled or heated floor, it is necessary to pour sand and gravel and lay temporary flooring;
- The timber is laid in rows, their connection is ensured by wooden dowels. There is no need to use metal options for a number of reasons. When rust appears on the nails, obstacles will be created for the shrinkage of the log house, and gaps will appear between the rows. It is worth considering the possible transfer of the building to another site, which in this case is difficult to implement;
- Check the horizontality of the top row on which the rafter system is supported.
Construction materials
On the modern market there are many types of building materials that can be used for any bathhouse. For example, they are built from:
- timber;
- logs;
- foam blocks;
- wood and wooden blocks;
- aerated concrete;
- rounded logs;
- frame blocks;
- glued timber;
- finished log house;
- bricks
If the project contains brick, foam concrete and aerated concrete, the walls require cladding, both inside and outside. This feature is interconnected with the technical qualities of the materials. For example, a brick bath without insulation will be cold. The qualities of aerated concrete and foam concrete are almost similar. The structural pores of these materials can collapse under the influence of high humidity and temperature changes. In this case, it is important to perform the cladding of the foundations with the construction of the structure.
The most suitable material for building a bathhouse is wood. Wood is environmentally friendly, reliable and durable, practical and durable. Frame technologies are also used in such construction. In this case, both wooden and metal frames are allowed. The cladding is installed on top of the frame. Be sure to choose high-quality insulation for such a structure, which will serve as insulation for the entire structure.
The finishing of a frame building can be made of:
- wood;
- block panels;
- linings.
The interior decoration can be made of plastic. The most economical and profitable technology for constructing baths is frame. The frame does not require a massive foundation. In this case, building materials are not the most expensive. And the weight of the building will not have any additional effect on the soil.
Determining the material for building a bathhouse is an important step. In construction stores you can find standard construction kits made from ready-made elements. An assembly kit is purchased based on standard developments. You can make the parts of the construction set yourself. Wooden materials (for example, timber, logs, rounded wood) are often used for the construction of bathhouses; block panels are often considered. Having dealt with the raw materials of construction, they move on to design.
Wood (log, timber)
A timber bathhouse will be inexpensive, but it will turn out beautiful and neat. You need to buy well-dried, sanded and antiseptic-treated material. The assembled frame is sheathed on the outside with timber. It is recommended to heat and waterproof the walls inside. The insulation should be chosen that will be resistant to moisture (mineral wool). Expanded polystyrene and its types are not suitable.
Bathhouses built from timber and foam concrete or brick look great.
Unlike logs, timber exhibits minimal shrinkage, which increases the service life of the structure.
A log bathhouse is considered a Russian classic. It does not need interior finishing. The interior is decorated in a rustic, country style. It is much more difficult to build such a structure due to the large weight of the logs.
The round timber must be sanded and impregnated with a moisture-resistant compound. Delivery is made in cubes, so you need to calculate in advance how much raw material you will need for the job.
When using high-quality and well-dried wood, the sauna will last for decades.
A strong foundation will have to be poured under the log building. In areas with low groundwater levels, it is recommended to make a strip foundation.
Brick
Brick baths are not built very often due to the large expenditure of time and money on materials. But as a result, it will serve all year round and become a cozy guest house.
Construction requires pouring a monolithic or strip foundation. The walls are waterproofed and insulated from the inside. External finishing of the facade is carried out at the discretion of the owners.
The roof is made of a simple single-pitched or multi-pitched roof. The masonry process is labor-intensive. Therefore, it is better to invite an experienced builder to help. It will take more than one hour to heat such a bathhouse, unlike a wooden one. But the heat in the room will last longer.
Blocks (foam, gas, expanded clay concrete)
Foam block, gas block are a real budget alternative to brick. The material is light in weight and larger in size. This significantly simplifies and speeds up the laying process. A sauna made of aerated concrete heats up quickly, but also cools down quickly.
One significant disadvantage of the blocks is their instability to moisture due to their porous structure. To extend the service life and protection, the building needs exterior finishing.
Log house
One of the most popular materials for building baths is wood, in particular a log house made of round logs. And this is not an accident, because it has a large number of advantages.
- First of all, it is an environmentally friendly and safe material.
- The log house differs from other materials in its high thermal insulation, as well as good sound insulation.
- A log bathhouse almost never shrinks and is quickly installed. If necessary, it can be moved to another place.
- Thanks to the light weight of the structure, owners can save on the foundation.
- This structure looks very beautiful not only inside, but also outside.
- When the sauna heats up, the wood begins to smell pleasant.
Among the disadvantages it is worth noting the following:
- there is a risk of fire;
- Over time, the log house releases moisture;
- since fumes are poorly evaporated from wood, fungus or mold may appear over time;
- Additional work will be required to seal the gaps between the logs.
Foundation
The foundation is of the following types:
- Pile;
- Columnar-ribbon;
- Tape;
- Columnar.
Tape and columnar-tape options are considered the easiest to finish and the most durable. Although they are expensive, they are used often. Let's consider a strip foundation; as a rule, for its construction it is necessary:
- Dig a trench according to the diagram that is in the project. The depth should be slightly greater than the depth of soil freezing in a particular area;
- Create a sand cushion at the bottom so that the thickness is up to 15 cm. To do this, pour sand, pour in water, compact it;
- Install wooden formwork. For this purpose, ready-made boards or boards with a thickness of 25 mm are used;
- Place a reinforcement cage inside the formwork. This will help the foundation avoid cracking during temperature fluctuations;
- Mark the foundation horizon (upper plane) using the water level;
- Pour in concrete mortar. You can prepare it yourself or order it from an organization. The upper plane of the foundation is located horizontally. Filling must be done in one stage, otherwise the foundation will not be very strong.
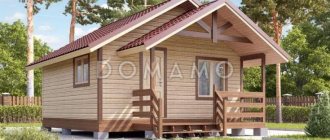
Projects
Bathhouse designs with an attic vary in size and layout. The most popular of them include structures 6x6, 6 by 4 m. Despite the fact that the buildings are compact and usually simple, they provide complete relaxation. This option is suitable for a small number of people, as well as for those who do not have extra space on the site.
The 6x4 m project plan involves the placement of:
- steam rooms;
- shower;
- vestibule;
- verandas.
Some small projects do not include a veranda. Sometimes the entrance area turns into a rest room. In this case, a guest room is placed on the attic floor. Sometimes the attic involves placing a storage room.
The staircase is placed so as not to clutter the bathhouse. Structures of 6x6 or 4x6 m will also not occupy the territory of the site. An equipped attic will make the building area more useful. At the same time, the internal dimensions of the bathhouse rooms can vary at the request of the owner during construction.
The design of a bathhouse with a 6x8 m attic usually accommodates everything necessary for a large group of people to relax. This building layout even includes a bathroom. More often there is a large terrace and a relaxation room of 20 sq. m. The room can accommodate standard furniture and even a large table. A group of several people can fit at the table, while leaving space for free use.
The building includes a classic shower room and a relaxation room. There will be a spare bedroom on the attic floor. This could be a billiard room, tennis room or gym. The building material will be profiled timber.
A good compromise is the layout of bathhouses 5x5, 5x6, 5 by 9 m. To make visiting a small bathhouse enjoyable, you need to carefully calculate everything. The layout of the premises is important to take into account a well-thought-out plan. For example, in a small bathhouse 5x5 m there will be an entrance hall, a washroom, a steam room, a relaxation room or a storage room on the attic floor.
Choosing a suitable log house project is always a search for a compromise. The bathhouse must accommodate all dimensions. When choosing a 6x9 or 7 by 8 m bathhouse, it is important to take the marking of the area seriously. Think carefully about the placement of the bathhouse (especially if the land is only 6 acres).
Another important parameter is the cost of construction. Logging of large dimensions will require a larger area on the site. For example, a log house with parameters of 4x6 m will cost 10,000-15,000 rubles more than a 4x5 m bathhouse. A larger bathhouse will require more time and fuel for heating. The temperature in the steam room should be sufficient for the heat.
An important parameter for choosing the size of the bathhouse is the number of people who will visit it. If the number of steam lovers does not exceed two people, it is enough to build a small and low structure. For a large family and regular guests you need a large building. To correctly indicate the layout, draw drawings.
If you wish, you can play with the location of the walls separating the rooms on the ground floor from each other.
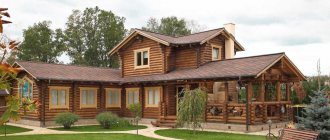
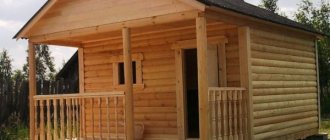
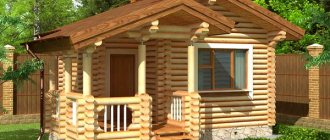
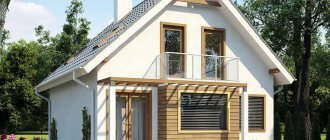
Frame bathhouse with attic: the best projects in the photo
Photo of a 6x6 bathhouse with an attic
Roofing options
When developing a house project, it is thought through what roof shape will best suit it. But not every option will be ideal for the implementation of an attic floor. A pitched roof, for example, involves the construction of walls with different heights. It is thanks to them that a slope is formed that allows water to drain from the roof. But this solution is not always convenient for the attic. The thing is that part of the room can be high enough for a person to fit there, but the second part is only suitable for a bed or sofa. A gable roof will be more interesting in this regard, but it also has its drawbacks. The length of the entire attic space will definitely be suitable for freely moving around it. But it will be less comfortable under the slopes. Some of the most convenient options for the attic floor are half-hip, hip, and broken versions of rafter systems. They allow you to freely plan and delimit the space of the attic floor. In the photo below you can see all the options where it was possible to implement the attic floor.
Construction stages
There are several stages in building a bathhouse with an attic.
Preparing the site
This includes not only marking the site, but also removing stones, dry grass, and various unnecessary debris.
Foundation
First of all, it is worth deciding on the foundation. You can make a strip one or mount a pile one. As for the first of them, it is quite durable, however, it will be expensive. In addition, shrinkage will take from three to six months, which not every owner will like. It is also worth noting that strip foundations cannot be made on every soil. It should not be used in places where there is too much moisture.
Most often, a pile foundation is used for baths. Its construction is quite fast, it is very durable and practically not inferior to its tape counterpart. Despite this, a pile foundation will require too expensive equipment, as well as precise calculations.
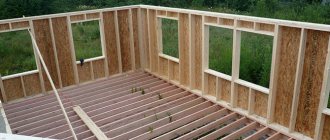
Frame
As for the construction of the frame, it can be made from almost any material. However, the internal lining must be made of wood. When installing the frame, it is necessary to take into account not only the height of the steam room, but also other rooms. In addition, it is worth knowing how much space will be allocated for furniture.
Roof
When the frame is completely done, you can begin building the roof. If you need to slightly increase the volume of the attic itself, then you should opt for a gable roof. However, in this case it will be necessary to increase the height of the load-bearing walls from 1 to 1.5 meters. Anyone who is not particularly concerned about the usable space of the attic can opt for a sloping roof. It can be installed immediately or during the process of refurbishment of the premises.
Interior finishing
All finishing work must begin with the installation of the stove. You can make both an iron and a stone firebox - it all depends on preferences, as well as budget.
After this, you can begin finishing the entire room.
As for the steam room, its walls must be covered with boards; the best option is a hardwood board. In addition, during finishing work it is necessary to mount the frame and cover it with foil insulation.
In the recreation room, instead of insulation, you should use a vapor barrier. As for the walls, they do not have to be covered with wood - it is enough to use any finishing option. As for the finishing work in the attic, it is carried out similarly to all work in the bathhouse. It is imperative to make them waterproof and able to retain heat well indoors.
You also need to take care of the stairs. It is best to make it flat, with wide and comfortable steps. This is necessary so that after the steam room a person can calmly walk on it without slipping. In addition, the stairs must be fenced with railings, which will serve as insurance against falling from a height.
Furniture placement
Inside the bathhouse you can place various interior items, but there are those that are extremely necessary:
- Canopy in the steam room.
- Wardrobe, rack or clothes hanger.
- Shower stall or tray.
- Chairs and benches.
- Kamenka.
- Table.
- Shelves for equipment.
Additional products for which it is advisable to leave space in the building when creating a layout are:
- flower pots, preferably of a floor type, which will give the room greater aesthetics;
- acoustic system;
- laundry basket;
- sideboard with dishes;
- mini fridge.
It is undesirable to clutter the space with many decorative elements, especially those that are not fire resistant, which may be unsafe for use. Shelves and benches for the steam room are chosen only those that are treated with special compounds that prevent fire when in contact with an open flame.
Bathhouse 6*6m is the best option for a building in which everyone can equip main and additional rooms that can meet their preferences in terms of comfort, utility and convenience. The main thing is to correctly formulate the design of the project, the canvases used during installation, without violating norms and standards.
Communications
The rules imply the preparation of a building project simultaneously with the installation of all necessary communications. You will definitely need water, electricity (sometimes gas). The laying of water pipes takes place during the construction of the structure. You should not lose sight of installing a high-quality ventilation system in all rooms (including rest rooms), otherwise the humidity will increase. Humid air will cause fungus to appear on the walls. Some types of building material will begin to deteriorate quickly.
To maintain optimal heat in winter, it is important to provide a heating structure. Only with additional heating can you achieve optimal temperature conditions in cold weather. In addition to ventilation in the bathhouse, it is important to provide high-quality waterproofing and thermal insulation. Installation of communication systems in a two-story building is easier than in a one-story building with extensions.
Frame baths with attic
Frame baths with attics, their designs, assume a standard placement of all rooms inside the building. Namely:
- The 1st floor is a steam room with a washing room, a dressing room, and a toilet;
- The 2nd floor is an attic. There may be one or two rooms for temporary or permanent residence.
An example of the layout of the first floor and attic in a frame bath
The first floor is connected to the second by an internal staircase, usually located in the dressing room.
Advantages of a frame bath with an attic
A distinctive feature of these structures is the structure frame, made of wooden beams, as well as the presence of a second attic floor - an attic. Frame baths, compared to baths built from logs or bricks, have their undoubted advantages. These advantages include:
- Speed of construction of a bathhouse.
- Simplicity of design.
- No shrinkage after construction.
- Economical construction.
- You can build a bathhouse at any time of the year, even in winter.
Design and layout of a small bathhouse
Almost everyone can afford a frame bathhouse with an attic on their own site. The price of such a structure is not so high. In addition, having once built such a bathhouse at home according to a standard design, you can later expand it by adding more than one room to it.
Stages of constructing a frame bath with your own hands
The construction of a frame bath is carried out according to the usual scheme for such types of work: base, both corner and wall posts, trim, ceiling, roof. All work can be divided into several stages:
- Preparing a site for building a bathhouse. This includes removing debris, grass, and stones.
- Marking the site, pouring the foundation.
- Laying the first bundle of logs on the finished foundation. Immediately before laying the log on the foundation, you need to put roofing material on it in two layers. This method is used to waterproof the foundation.
- Laying floor joists. It is made by cutting the ends of the logs into the lower log. Before laying floorboards on them, all debris must be removed. The finished floor is insulated with expanded clay.
- Installation of racks. The racks are fixed both on the lower frame of the logs and on the top. All this is done while maintaining the same distance between them.
The process of installing frame racks - Ceiling installation. First, ceiling beams are cut into the upper logs, then boards are laid on them. Roofing felt is used to waterproof the ceiling. It is laid on the boards with an overlap, in two layers. A double sheathing is laid on top of this. Then everything is covered with metal tiles.
- Sheathing of the frame, both from the inside and from the outside. From the outside, the bathhouse can be additionally sheathed with boards or siding.
- Installation of windows and doors. For this, a special building level is used.
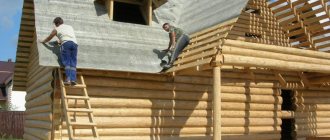
Construction of an attic and roof of a bathhouse
After carrying out the main work on the construction of the bathhouse frame and all internal partitions, you can begin building the attic and erecting the roof. Installation of the attic begins with laying the floor beams and securing the U-shaped frames. The result is like a broken roof. This type of roof allows you to make the attic more spacious. From the outside she looks very beautiful and unusual. In addition, this allows you to significantly reduce the load on the walls of the frame.
Scheme of the structure of the roof frame and attic of the bathhouse
Design drawing of a roof frame for a bathhouse.
They make a flooring of boards on the beams and immediately begin installing rafters and ridges.
All rafters must be the same. To achieve this, you must first assemble one rafter, and then assemble the rest along it. In this case, to eliminate differences in size and possible displacement of parts, all roof components are modified on site.
As for the roof of the bathhouse, to speed up and facilitate the procedure, a block installation method is used. In this case, the beams are laid transversely relative to each other. In this case, an element such as a pusher is additionally used.
An example of the design and layout of an attic frame bath
It is fixed above the center of gravity, and also firmly connected to the racks with a screw - a capercaillie. It has a bolt that acts as an axle. To prevent the frame from moving along the placed boards, a wire clamp is additionally used. Using these devices, you can easily lift all the roof frames up yourself, without resorting to special equipment, and secure them in place. The roof can be covered with different types of roofing materials.
Drawing with dimensions for building a frame bath with an attic
For example, such as slate, metal tiles, soft or sheet ondulin. But before using these materials, roofing felt is laid on the sheathing in two layers. The roofing materials are covered with a ridge on top. No attic is complete without windows. They can be of completely different sizes and shapes. Modern windows can be installed anywhere, even in the plane of the roof itself.
The process of assembling and covering attic rafters
Final stages of construction
Particular attention should be paid to such points as the outer cladding of the building, insulation of the bathhouse, thermal insulation of the attic and masonry of the heater. On the outside, the bath frame can be sheathed with OSB or DSP sheets. These materials are characterized by increased water resistance and non-flammability, and they are also reliable and practical.
Insulation of bath walls
The key to the efficiency of any bathhouse is its insulation. After all, the longer the heat remains inside the room, the better.
For insulation, modern thermal insulation materials are used: polystyrene foam, mineral wool. They allow air to pass through very well, which allows the walls to breathe. This property can extend the life of the bathhouse by several decades. To properly insulate the walls of a bathhouse, adhere to the following installation technology:
Detailed diagram for insulating walls in a bathhouse
An example of insulation of frame walls of a building
- Upholstery of the frame on the inside with a special film. It is secured with slats.
- Laying polystyrene foam or mineral wool.
- The insulation on top is covered with film and foil. All seams must be taped.
- Wall upholstery with wooden clapboard.
Thermal insulation of the attic
Don't forget about the attic. It must be properly insulated. For insulation, materials such as glass wool, mineral wool, and foam are usually used.
Thermal insulation diagram of the attic in the bathhouse
These materials are laid on the ceiling of the bathhouse, leaving small gaps for air circulation. The inside of the attic roof is waterproofed using a vapor-proof film. This helps prevent moisture from getting into the bath itself.
Thermal insulation design of a frame bathhouse roof
All thermal insulation materials are fire resistant. Therefore, they are recommended for use specifically in a bathhouse, since there is a source of open fire, namely a stove-stove.
Furnace laying
A stove-heater is one of the main attributes of any bathhouse. Not everyone can lay it out correctly. It is best to entrust the laying of the stove to a professional stove maker.
The only thing you can do yourself is to determine its location and make a high-quality and reliable foundation for it.
Option for installing a stove in a bathhouse
An example of a folded brick stove for a bathhouse A stove for a bathhouse must meet the following parameters: compactness, reliability, safety, ease of use, and the ability to heat the air in the steam room of the bathhouse to a temperature of 100 degrees. You can also use a modern electric stove-stove instead of the usual stove. Recently, such stoves have become increasingly popular among the population.
The process of laying a sauna stove made of bricks
As can be seen from all of the above, building a frame bathhouse with an attic on your own site is not such a difficult process. Having such a bath has a lot of advantages. The first place is, of course, the bathhouse itself. It can only bring joy and health benefits to a person.
It is worth remembering that a frame bathhouse with an attic, compared to a conventional frame bathhouse, requires a person to invest additional money in it. This mainly involves the purchase of thermal insulation, waterproofing, and finishing materials for the attic. Therefore, the choice in favor of one or another type of bath remains entirely with the owner of the site and entirely depends on his capabilities and needs.
Calculation of the rafter system
The rafters of a do-it-yourself attic must withstand the following loads throughout its entire service life:
- own weight;
- weight of roofing and insulation;
- maximum gusts of wind for a given area;
- snow cover pressure.
Reference. When the roof slope is more than 45°, snow practically does not stay on it, and at 60° it is not taken into account at all in the calculations. But wind pressure increases due to the height of the structure and its position, which is close to vertical.
The result of the calculations should be 2 parameters - the cross-section of the rafters with beams (otherwise known as tie rods) and the pitch of their installation. It is a mistake to think that the size of the wooden beams of the roof grows along with the loads on it. Maximum structural rigidity is achieved through the use of trusses made of logs with a diameter of 120-200 mm or lumber with a thickness of 40 to 200 mm, installed in increments of 50-120 cm. If you are not a civil engineer, you will not be able to determine these values more precisely, since the methodology quite complicated.
Online calculators posted on the Internet do not solve the issue, because their calculations still need to be checked. The solution is this: use ready-made data that has been calculated a long time ago. To do this, you will need table No. 1, which shows the cross-sections of rafter legs at different lengths and loads:
We will explain the calculation method with an example. Let’s assume that the snow load on a flat surface (projection of a pitched roof) in your area is 100 kg/m², the slope is 60°, the span length is 4.5 m (before the strut), the pitch of the rafters is 120 cm. The roofing is slate. We count:
- Real weight of snow cover: 100 x 0.32 = 32 kg/m². The slope coefficient of 0.32 is taken from Table 2 below.
- The specific gravity of a slate covering with a regular profile is 25 kg/m².
- Total specific gravity – 32 + 25 = 60 kg/m².
- We calculate the specific gravity per 1 linear meter of rafters, multiplying 60 kg/m² by an installation step of 1.2 m. We get 72 kg.
- We return to table No. 1 and select the cross-section of the beam according to the span length. We accept a load of 100 kg per 1 line of rafters (with a margin). A log with a diameter of 140 mm, a board 40 x 200 mm and other materials whose dimensions are in the same horizontal line are suitable.
Reference. When installing a sloping mansard roof, 2 types of rafters are used - layered and hanging. On a gable roof, only hanging roofs are used; the difference between them is shown in the diagram.
The last table No. 3 will help you correctly determine the installation interval of roof trusses:
The proposed method is suitable for small rectangular houses measuring 6 x 6 m. To build a mansard roof on a large cottage, it is strongly recommended to contact specialist designers for calculations.
Adviсe
Work related to planning is a critical stage in the construction of a bathhouse. It must be approached with full responsibility.
Once the planning issue has been resolved, determine the following important organizational steps:
- Take into account popular sizes: 6x4, 6x6, 6x8 m.
- Consider the materials from which the bathhouse will be constructed.
- You can download the program on your PC “3D modeling”. This will simplify the planning stage.
The standard arrangement of rooms is usually as follows:
- entrance from the terrace into a small hallway;
- further on there is a rest room or dressing room;
- Behind it there are two exits: to the bathroom and the steam room.
Sometimes a shower room and a steam room are provided with an additional entrance. All this is located on the first floor. The second floor is often used for entertainment, recreation or household needs. Sometimes a solarium is installed on the second floor. This adds comfort to the rest of a large company.
Buy a ready-made standard construction set. Create a standard bathhouse from an assembly kit. Coming up with your own options for arrangement details is more difficult. If the soil properties on the site are unstable, use frame constructors for the construction of the attic complex. Columnar and screw foundation structures will help strengthen the foundation of the bathhouse.
In any case, weak soil will require powerful piles or special reinforcement tape. In a building close in shape to a cube (with roof rooms), there is less heat loss. Warming up such a bath will require less wood and time. A one-story building with the same parameters and auxiliary rooms below will require more firewood and time for heating.
In addition to the properties of the soil, it is important to take into account the aesthetics of the location of the bathhouse on the site. A project with an attic and a terrace implies the presence of visible landscapes. They will become a significant component of your vacation. Don't forget to protect the under-roof room from temperature changes. This is difficult, since heat and humidity will penetrate the floor from below, and the summer sun will heat up the roof. In winter, the attic floor will be especially cold.
Pay attention to waterproofing in the interfloor ceiling and under-roof space. Modern building materials make it possible to combine a Russian steam bath with a stove with a house under a common roof and an attic floor. Such a bath house project is not without advantages, but it also has disadvantages. The main difference between such projects and ordinary houses and bathhouses is the shape of the roof, which cannot but affect the load-bearing structures. Consider the thickness of the walls and the depth of the foundation. Think carefully about the functional features of your home.
How to choose the right construction company
You need to choose a construction company even more carefully than the project, because the quality of the building and its service life depend on the reliability of the builders. An initial assessment can be made at least from photographs of already implemented 6 by 6 bathhouse projects with an attic. If there are none, then this is one of the signals that it is better not to contact such builders.
It also doesn’t hurt to call personally and ask about the technologies used, the availability of appropriate equipment, permits and certificates. The level of employee readiness to answer such questions quite clearly shows their qualifications and the company’s attitude towards clients.
Frame making
The simplified method presented below involves the installation of an attic sloping roof in 2 stages: assembly of roof trusses on the ground and subsequent installation on the finished walls of a timber or log house. The structural material is boards with a section of 15 x 5 and 10 x 5 cm with a standard length of 6 m.
Start of assembly - formation of the upper chord of the rafter system
The technology looks like this step by step:
- Prepare the beams of the lower chord of the truss, taking into account roof overhangs of 25-27 cm on each side. If the length of the beam is not enough, it needs to be increased using an overlay of the same section, nailed.
- Lay the beam on the ground and attach vertical posts to it with corners, forming the walls of the attic room. Install the ceiling beam and the ridge support (headstock), then attach two hanging rafter boards to it and the corners of the frame for marking, as done in the photo.
- Cut the elements into place and secure them. From the remaining parts of the boards, make layered (lower) rafter legs in the same way and nail them to the frame. The farm is ready.
- Make the remaining trusses using the same method.
Advice. As a rule, windows or doors to the balcony are provided on the front gables. It is also convenient to make racks and belts for their installation on the ground, as well as to cover the openings with clapboard.
The finished frames are lifted onto the walls and fixed in place one by one, starting from the first gable. To prevent it from falling, install spacers and nail them to the walls of the log house. The second and subsequent trusses are placed in the design position and connected to each other with boards.
After placing the rafters, they must be secured to the walls in the following ways:
- staples to the second top crown of logs or beams;
- on steel corners and galvanized screws, as shown in the photo.
Note. Installation on brick and other solid walls is carried out using a mauerlat - a wooden beam laid on load-bearing structures along the entire perimeter of the building. In turn, the Mauerlat is mounted on studs or anchor bolts, and a waterproofing layer of roofing felt is placed between it and the stone wall. The mounting assembly looks like this:
The roofing covering is laid on top of the sheathing - slate, metal tiles, and so on. The technology of installation and fastening depends on the selected material.
Beautiful examples
Consider beautiful examples of a bathhouse with an attic. Some examples of projects involve combining a steam room with a relaxation room on the ground floor. Then the rest room is set up in the attic. A successful project places a steam room, shower room, locker room, bathroom, and rest room. The second floor (attic) can be used for bedrooms, a hall, not forgetting the balcony.
Spacious attic baths are especially popular today: it is impractical to equip the attic floor in a tiny building. Modest log houses 3x4 or 4x4 m are expanded by increasing the volume of the first floor. There may be a full-fledged gaming room or cinema here. An attic bathhouse is often supplemented with a veranda. It is more convenient to sit with a group at a large table on a fresh holiday.
- Sources used in the article:
https://stroy-podskazka.ru/mansarda/proekty-ban/ - https://o-vannoy.ru/banya/proekty/s-mansardoj-6h6/
- https://BlogoBane.ru/bani-mansardoy-tualetom/
- https://strbani.ru/banya-6-na-6/
- https://tvoya-banya.ru/karkas/planirovka-bani-6h6-s-mansardoy-i-tualetom.html
- https://Proekt-sam.ru/banya-bassein/karkasnye-bani-s-mansardoj.html
- https://m-strana.ru/articles/proekt-bani-6-na-6-s-mansardoy/