Our portal is replete with examples of the construction and operation of small, or, as they are now commonly called, mini-houses, but usually these are either frame-modular or frame structures. As it turns out, logs are also a suitable wall material, especially when the construction concept is environmentally friendly and natural. One of our craftsmen, with the nickname mike099, shared his experience with everyone interested. His topic collected all the stars, which indicates its relevance, so it makes sense to expand the reach of the audience by considering the construction process in stages:
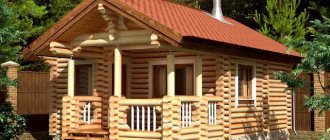
- Eco-hut.
- Preparation.
- Foundation.
- Box.
- Roof.
- Interior work.
Log house in a bowl
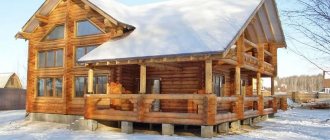
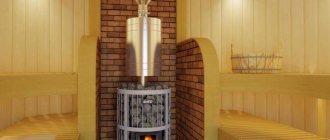
One of the common ways to make a log house with your own hands from a log is the method of assembling it into a bowl. It is most often used in the construction of a bathhouse, since due to its design features it retains heat well. In this assembly method, special semicircular recesses are made along the edges of the log, into which the upper elements of the structure are laid.
There is a 25-30 cm protrusion outside the corner, and the cutout is made to fit the size of the log that will be placed in it. This is necessary to increase the density of the connection, which will prevent the building from falling apart, and will also reduce the likelihood of heat loss due to drafts in the cracks. Thermal insulating material is placed between the parts.
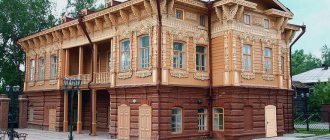
Log house in winter Source skstroyider.ru
Preparatory work
To build a log house yourself, you will need to buy beams, rafters, joists, roofing material, a tape measure, a level, buckets, boards, screws, and a screwdriver. Then the site for the future building is prepared. Wood should be stored under cover. Since the building being erected is light in weight, it will require a shallow foundation. For these purposes, experts advise pouring a pile-strip base, slab, pile or buried strip structure.
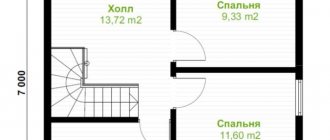
Foundation diagram for a log house.
To arrange a pile-strip foundation, you will need to mark the area. Then the top layer of soil is removed. A recess with a depth of 30 cm is made across the width of the structure. Wells are installed along the perimeter of the building, the diameter of which is 180 mm and the depth is 150 cm. A layer of crushed stone and sand is poured into each well. A frame is prepared from the reinforcement, which is lowered into the well. The next stage involves filling the hole with concrete. A vibrator is used for compaction.
Boards are used to construct the formwork. The structure is mounted above the ground level so that it protrudes 50-60 cm. For a strip base, you will need to weld a frame that is connected to the reinforcement sticking out of the wells. The next stage involves pouring the base. If the foundation has hardened, then it is waterproofed. To do this, you will need to lay roofing material on the surface (3-4 layers), additionally coating the material with mastic.
Technology selection
There are 2 main ways to cut a log into a bowl:
- “V oblo” (Russian cutting) is a method in which a cut is made in the lower crown. It can be smooth or with a spike (fat tail), which prevents the structure from moving.
- “In the okhlop” (Siberian felling) - in this method, a bowl is made at the bottom of the log, which is placed on top of the bottom.
The first method is used in most buildings that were made in the old days. For those who do not know how to build a bathhouse from a log with their own hands, it is recommended to use the “hollow” method, since during long-term construction moisture does not form in the bowl due to precipitation. It is also considered simpler than Russian cutting.
Types of log house in a bowl Source samdizajner.ru
Caring for a log house
In order for the house to maintain its original appearance for a long time, you should take care of it on a regular basis, in particular:
- promptly coat the log walls of the house with antiseptics. The frequency of application is determined by the product manufacturer's recommendation;
- cover log walls with fire retardants;
- apply stain or lighten walls. Under the influence of ultraviolet radiation, walls darken, and not always evenly. The use of various protective compounds can slow down the process, but the process cannot be stopped. Therefore, after time, it will be necessary to cover the walls with a darker composition;
- paint the walls with glazing translucent paints, which, on the one hand, allow you to see the structure of the wood, and on the other, create additional protection;
- as a last resort, cover the outside of the house with siding or clapboard. But, this is only if it is not possible to restore the wood.
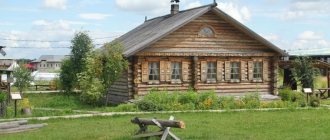
Thanks to proper installation and maintenance, a house made of rounded logs will function fully for a long period and stand out among other buildings.
Advantages and disadvantages of a log house in a bowl
The main advantages of the log house:
- High strength of the joints of the structure, which ensures its stability.
- Increased thermal insulation of the room, which is created due to the low thermal conductivity of wood and protection from blowing through the corners of the structure.
- Environmentally friendly material.
- Possibility of constructing a building of several floors.
- Decorative appearance.
Multi-storey log house Source pokter.ru
The disadvantages of a log house in a bowl include:
- The difficulty of manufacturing structural elements and assembling a building without experience. If a log house is made by a person without skill, then such a structure may have cracks, begin to rot, and also crack or fall apart.
- Due to the protruding corners of the structure, it is difficult to carry out external finishing.
- Wood for log houses must be treated with insect repellents, as well as antiseptics (prevent the formation of fungus) and fire retardants (reduce the flammability of the material).
- Protruding parts of the log reduce the useful length of the crown, which increases wood costs. Because of this feature, this type of log house does not require additional insulation of the corners. Therefore, the difference in price when assembling a log house into a bowl or into a claw will be unnoticeable.
The finished building has a smaller usable area due to the thickness of the walls and protruding corners. This should be taken into account when calculating the size of the foundation and the length of the logs.
Why is it difficult to process the external part? Source royalwoods.ru
Project of a house made of rounded logs
Any construction must begin with the development of a project, and the design of a residential building made of rounded logs needs approval from various authorities.
What is needed to design a log house:
- order the development of an individual project, develop the project yourself using computer programs, download a standard project and modify it taking into account the characteristics of the location and operating conditions (you will need to conduct geodetic research);
- calculate the parameters of the future house: total square footage, usable area, number of living rooms, their purpose, take into account the special requirements of residents (for example, pensioners or people with disabilities), take into account all wishes, because the house is being built for the whole family and will be used by several generations ;
- think over the rafter system and choose roofing material. It must be heavy enough to create pressure on the walls and prevent gaps from appearing between the logs;
- will take care of protecting the south side of the house. As you know, it is this material that is most susceptible to rapid shrinkage due to direct sunlight. Therefore, most designs contain a veranda or covered terrace along the south side of the log house;
- make a log sheet - a document that will allow you to order a house kit from rounded logs for self-assembly or will simplify the adjustment of logs when using moldings.
Materials and tools
To know how to cut a log frame into a bowl with your own hands, you need to choose the right cutting tools. To mark the logs, a tape measure, a level, a chemical pencil and a carpenter's line are used. This is a tool with two rigid plates with sharpened edges and a handle with which the distance between the ends is changed. This tool is designed to draw 2 parallel lines. Also, to cut out the bowl you will need:
- Carpenter's axe.
- Wood chisel.
- Chain saw (electric or gasoline).
- Hand saw.
- Hammer.
To blacken the recess when fitting logs, you will need coal. The cutout requires chemicals to treat fungus and insects, as well as insulation.
Tools for log house Source izba.spb.ru
A little about labor organization
As a rule, to make a log house, professional carpenters process the logs directly “on site”, sitting astride a log if necessary. For beginners, this method is fraught with injuries and poor quality, and the installation of scaffolding takes time commensurate with the construction of the log house itself.
5 log crowns
The solution may be to work in two or three steps. The lower part is assembled to a convenient height, and then the crowns are assembled on linings nearby. The finished top is disassembled, marking the logs and transferred to a permanent place. In this case, you can do without forests.
Finally, caulking is done - tamping down the previously laid strands of sealant, etc.
How to caulk a log house
To know how to assemble a log bathhouse from logs with your own hands, you need to understand what kind of heat-insulating material is required to fill the space between the structural elements. It will help prevent moisture from penetrating into the bowl, as well as enhance protection from wind and cold. In order to caulk cracks and cavities, the following is used:
- Moss . An environmentally friendly material that can retain heat, withstand temperature changes, and also remove excess moisture, which prevents the appearance of fungus. It is believed to have antimicrobial and healing properties, which manifest themselves when the structure is heated.
- Tow . As the log dries, it becomes damp and begins to rot. Therefore, after the structure dries, it is cleaned and re-laid.
Stage 4. Waterproofing the base
Waterproofing strip foundation
Waterproofing a strip foundation with roofing felt
Treat the surface of the foundation with molten bitumen and lay a layer of roofing felt on top. After the bitumen has completely dried, repeat the procedure. As a result, you will have reliable two-layer waterproofing.
Waterproofing with mastic
Additional insulation with roofing felt
Video description
In this video you will see how to caulk a log house with tow:
- Jute . An environmentally friendly type of insulation that retains heat well, but has a short service life (3 years) due to the fact that it strongly absorbs moisture.
Old jute is difficult to get out of the cracks, so it is rarely used. There are also differences between types of jute. For example, tow is too hard and has low density. Because of this, it is necessary to caulk the log house in several stages to achieve the desired density.
Flax-jute contains 50% flax fibers, so it requires additional treatment to prevent insects and rot. Jute felt consists of 10% flax fibers, but has high flexibility and good density. It also requires additional insect repellent treatment.
- Lnovatin . Due to heavy treatment with insect repellent chemicals, it is not environmentally friendly. It has a service life of 3 years and is attached to the structure using a construction stapler.
Felt made of jute Source drevtorg.rf
See also: Catalog of house projects made from hand-cut logs and timber
- Synthetic compounds . They cost more than other materials, but are easier to use.
Such substances are used in combination with natural material (cord). To do this, the thread is placed in the gap and filled with sealant, which is leveled with a small spatula.
The disadvantage of this method of sealing log cracks is that when exposed to sunlight, the sealant will dry out and begin to crumble. To do this, the place of putty must be covered with planks.
Also, synthetic compounds harden and can expand and contract with temperature changes, which can lead to cracks in the wood. To avoid this, it is necessary to use elastic compounds.
The right combination of sealing materials helps avoid the formation of damage and fungus, and also increases the thermal insulation of walls. This is necessary when constructing buildings in cold regions or when assembling a bathhouse, since in such rooms rapid cooling of the air can be critical.
Synthetic sealant for log houses Source td-artemov.ru
Shrinkage of a house made of rounded logs
How to control the shrinkage of a log frame:
- wait a year for primary shrinkage to occur;
- use jacks to adjust vertical elements;
- arrange gaps over non-shrinkable elements of the house: door and window openings;
- remember that walls can not only shrink, but also gain moisture and, therefore, swell;
- take into account that internal walls (piers) shrink faster than external ones, because they are more protected from external influences;
- warm up the house slowly, because in case of rapid heating, the internal walls will shrink quickly, and the external ones will lag behind in this process;
- remember that southern walls dry out faster, which means they shrink faster;
- control the process of shrinkage of the log house and caulk the cracks in time.
Main types of wood for felling and their processing
To know how to cut down a bathhouse, you need to select the appropriate types of wood for production. Most often, coniferous types of wood (pine, spruce, larch) are used for the manufacture of such structures. It is best to choose material from cold regions (for example, Siberia), since in winter the flow of sap along the trunk is least. This reduces the risk of cracks forming when drying the material.
Also, trees that are felled in winter have a higher resin content, which increases its resistance to rot. The diameter of the logs must be at least 21 cm (but not more than 35 cm), and the length of all elements must be approximately the same to simplify processing and assembly. All wood must be smooth and free of knots. The area from the root to the beginning of the crown of a pine tree is best suited for this.
Wood for a log house Source sm-news.ru
See also: Catalog of companies that specialize in log baths and sauna vats
When laying structural elements, it is recommended to make the first 2-3 crowns from larch, as it has high resistance to moisture. When choosing a material, it is not recommended to use crooked trunks or wood with cracks and rot. The bark should be removed with a scraper, as it hardly touches the working surface underneath. After this, you need to let the material dry for 3-4 days. Also, before cutting, the wood is treated with an antiseptic and impregnated with a fire retardant.
Processed wood for a log house Source im0-tub-ua.yandex.net
Dowel for logs
To give rigidity to the wall, the logs are fastened together using dowels - wooden fasteners. Often dowels are cut from the remains of a log, but it is more correct to use special fasteners for this that meet the following parameters:
- made of hardwood (for example, birch). This type of dowel is more durable compared to coniferous ones;
- the diameter of the dowel (usually 25 mm) exceeds the diameter of the hole by 2-3 mm;
- has a square shape (ensures uniform shrinkage);
- humidity corresponds to the moisture content of the log.
Note. Metal dowels or dowels made of corrugated fittings are not suitable for installation. Iron dowels tend to rust, and on corrugated reinforcement the log will hang during the shrinkage process and there will be cracks.
Layout of dowels in a log wall
How to install dowels correctly:
- Once the log is in place, it is temporarily fixed with nails. In this way, the displacement of the log during the drilling of a hole for the dowel is prevented;
- drill a hole for the dowel. Moreover, the diameter of the drill is 3-5 mm less than the diameter of the dowel;
- a hole is drilled through 2-3 logs;
- the dowel is driven into the hole using a mallet. It must enter with force. To simplify the installation of the dowel, it can be sharpened from below;
- The first dowel is installed at a distance of at least 200 mm. from the edge of the log;
- all dowels are recessed into the wood to a depth of 2-3 mm. Protruding fasteners will cause logs to hang; Material for the site www.moydomik.net
- The step for installing dowels in a log is 1-1.5 m.p. In piers, the installation step varies and depends on its length. There should be at least two dowels per log;
- installation is performed in a staggered manner. To avoid confusion and install fasteners correctly, craftsmen advise marking the installation locations of the dowels with a pencil on the inside of the wall;
- installation displacement occurs on every fourth log;
- after fixing the log with a dowel, the safety nails are removed;
- After some of the logs are fastened with dowels, they are pushed down with a mallet so that they accurately occupy the seats. This helps reduce the amount of shrinkage.
How to drill holes for dowels in a log
Hole for dowel in log
Birch dowel for logs
Metal dowel for logs
Material calculation
How to make a log house and calculate the amount of money spent, if the dimensions of the proposed structure are known - this is an important point in the manufacture or ordering of a finished building. For example, for a bathhouse with dimensions of 3x4 m and a height of 2.4 m with a frame in a bowl.
Due to the fact that the corners of such a structure will protrude 25 cm on each side, when calculating the length and width of the building, 50 cm is added.
If the diameter of the log is known (for example, 24 cm), then the volume of wood can be calculated using the formula 3.5 x 4.5 x 2.4 x 0.24 = 9.072 m³. During assembly, a groove is made in each log, which differs in width from 0.5D to 0.67D. This reduces the final volume of wood, so this formula requires further refinement.
Wide logs for a log house Source promdrevo.ru
Vertical column supports
Installation of vertical elements (pillars, columns, racks) in a wooden house is carried out using special devices (shrinkage compensators) - screw jacks.
- the log is cut to length minus 80-100 mm. By this amount, a house made of rounded logs will shrink, and the jack can be lowered;
- a bowl is cut out at the bottom of the support;
- a jack is installed on top, which will compensate for the shrinkage of the house;
- Vertical installation is checked;
- the remaining vertical elements are installed along the same line;
- The jack is height adjustable.
Marking and cutting logs
To know how to cut down a log house, you need to understand the method of marking logs. To do this, they need to be laid perpendicular to the lower crowns. It is recommended to use staples to secure the structure. This will prevent the log from turning around its axis. Next, using a line, you need to draw the contours of the bowl and longitudinal grooves using several rules:
- One leg of the feature should rest on only 1 log.
- The distance between its points should be half the diameter of the log, depending on the log house used: “to the edge” - the upper one, and “to the edge” - the lower one.
- It is recommended to start drawing with a bowl and end with a longitudinal groove.
- The prepared logs are placed in bowls, and after that it is necessary to process the joint: if there is a large gap, insert wedges, if it is small, remove the excess layer.
Insulation of a house made of rounded logs
Thermal insulation can be divided into three stages:
1 – interventional insulation
How to lay inter-crown insulation for a log. Laying rolled thermal insulation material between the crowns of a log wall. The insulation sheet is laid in one layer and secured with a stapler for reliability. The width of the blade is 10-20 less than the width of the longitudinal groove. The amount of overlap is 50-70 mm. A meter before the end of the log (corner or opening), the insulation is laid in two layers. This is due to the fact that the log dries more intensively in the opening. The insulation in the bowls is also laid in two layers;
2 – first caulk
Performed one year after the construction of the house. During this time, the most intense shrinkage occurs;
3 – subsequent caulking
Performed as necessary during the operation of the building.
When performing caulking, you should remember:
- Only the outer walls are caulked;
- the bowls will definitely be caulked;
- a large amount of insulation can cause the crown to rise, causing the need to raise the crowns of other walls.
Assembling a log house
Before assembling the log house, it is necessary to make a strip-type foundation, since the wooden structure has a large mass, and put waterproofing on its upper part.
Next, it is recommended to lay 2-3 larch crowns and level the horizontal surface of the log house using a level. During assembly, insulation is placed in the longitudinal groove, and to compact the log, the log is tapped with a wooden mallet or log. Also, after laying each crown, it is necessary to check the horizontal and vertical position of the structure.
After assembly is completed, all cracks and joints are caulked, and excess insulation is removed. After six months, it is recommended to repeat this operation, since the insulation can become saturated with moisture from the drying logs. All wooden structural elements must be treated with an antiseptic 2 times.
Log house Source metasold.com
Laying the crowns of a house made of rounded logs
The crown is one row (belt) of logs laid along the perimeter of the building. The assembled and fastened crowns form the walls of the house.
When building a house from rounded logs, different types of crowns are used:
- the frame crown is the first row of logs that are laid on the foundation (also called the lower, first, mortgage);
- bottom trim - the second (lag) crown, which allows you to form a subfloor in a house from rounded logs, as well as an interfloor ceiling;
- ordinary crowns - the remaining rows (wall);
- window - are shortened logs (short logs) from which window openings are made;
- window sills - logs laid from the bottom crown to the window;
- over-window - logs laid on top of window crowns. The first crown above the window is the closing crown.
- the top trim is the basis for constructing the roof truss system.
Regardless of the type of crown, each log must be coated with an antiseptic before laying. This will protect it from all sides, incl. at the junction. The treated log will be protected primarily from biological activity and will prevent rotting.
The first crown of the house (flat or bottom)
To lay the first row, denser logs are used, usually from larch. Hardwoods are more difficult to process, so they are less common on sale. But, aspen and oak are perfect. Before you begin laying, you need to make a longitudinal cut on the log. Unlike the grooves that are on every log, the cut is needed to ensure that the log rests on the foundation with the maximum area. This will distribute the load evenly and make the log house more stable.
Advice. Some users recommend making a backing crown from laminated veneer lumber, as the material that is most resistant to deformation, or a backing board.
The logs of the embedded crown are treated with antiseptics in 2-3 layers.
After laying the first crown, the diagonal of the laying is checked; the discrepancy should not exceed 5 mm.
Beams and halves of logs (cut in half) for the frame crown and wood processing
Laying timber under a frame crown made of rounded logs
The first (flat) crown made of rounded logs
Note. The foundation log is not attached to the foundation.
The second crown (lag) is the lower trim
The floor in the house is made of rounded logs and is formed directly during the process of laying the crowns. Logs can be installed in the first crown, but insertion reduces their strength. Therefore, according to new technologies, logs are installed in the second crown on support beams.
Bottom frame of a house made of rounded logs
Laying the second crown of a house made of rounded logs (bottom trim device)
How to embed floor beams (joists) in a log house:
- the beam is fixed with a pin made of reinforcement, which is inserted into a pre-drilled hole or using a metal support for beams (joist holder);
- the beam is impregnated with antiseptic and fire retardants;
- places for installing beams are outlined;
- a groove is cut inside the log (using a chainsaw). The depth of the groove is selected so that the support beam fits firmly into the log;
- installed in a prepared place;
- After the erection of the ordinary walls, logs will be laid on the beam in increments of 600-700 mm.
Technology of inserting floor beams into logs
How to cut a groove in a log for a beam with a chainsaw
Shallow cutting of floor joists into logs
Deep cutting of floor beams into a log
Method of installing floor joists on a support beam
Floor joists rest on a beam attached to the foundation
Installation of floor beams in a log house
Fastening unit for floor beams in a log house
Installing a floor along logs in a log house
Fitting chipboard floor joists for subsequent insulation
Ordinary Viennese
Ordinary crowns are laid in the same way as the first, with mandatory checking of horizontal, vertical and diagonal lines. Rolled insulation, usually jute fabric, is placed between the crowns.
Note. The vertical check is carried out from the inside of the wall.
The figure shows how to lay a rounded log correctly.
Laying ordinary crowns of a house made of rounded logs
Construction of house walls from rounded logs
Construction of internal walls of a log house
Installation of shortened logs (short logs)
Briefly about the main thing
The log house is most often made from pine or other coniferous wood.
The main advantage of a wooden log house is thermal insulation and environmental friendliness.
When choosing a log manufacturing technology, it is recommended to take into account the level of knowledge and skill. If it is not high enough, then it is better to contact specialists.
It is necessary to use high-quality thermal insulation and means to combat fungus and insects. This will extend the life of the building.
All logs for a log house must be treated with a fire retardant to avoid fire in the structure.
Ratings 0
Stage 8. Caulking logs
Types of tools and caulking methods
After shrinkage is completed, the log house is caulked. To do this, prepare the following equipment:
- hammer;
- caulk (made of wood or metal).
Attention! If you sealed the inter-crown space with tow or moss, you can skip this step, since you most likely will not need caulking. But if you find even the slightest cracks, then it is still better to carry out the procedure.
Proceed to work only after the insulation has completely dried. First, twist the material (tow or moss) into a rope, then hammer it between the crowns with a hammer and caulk.
Caulk
You can use tape jute - in this case, the material is simply fixed with nails or a mounting stapler.
Primary and secondary caulking of a log house