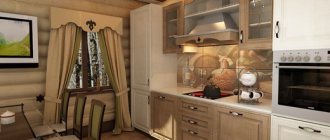
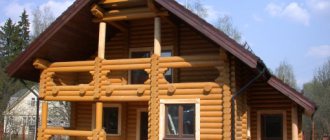
The construction of bathhouses from logs is an ancient tradition of our country, which has not lost its relevance in our time. Moreover, with the development of woodworking technologies, building a wooden bathhouse has become easier and faster, and the possibilities for realizing various architectural fantasies have seriously increased.
The group offers bathhouses made of rounded logs - modern lumber, which gives the structure a neat, beautiful appearance, improves the performance properties and service life of the bathhouse. Affordable prices, high quality materials from our own production and professional construction teams are what sets us apart from our competitors.
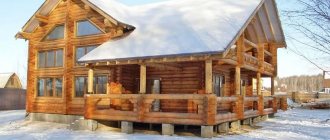
Log house in a bowl
One of the common ways to make a log house with your own hands from a log is the method of assembling it into a bowl. It is most often used in the construction of a bathhouse, since due to its design features it retains heat well. In this assembly method, special semicircular recesses are made along the edges of the log, into which the upper elements of the structure are laid.
There is a 25-30 cm protrusion outside the corner, and the cutout is made to fit the size of the log that will be placed in it. This is necessary to increase the density of the connection, which will prevent the building from falling apart, and will also reduce the likelihood of heat loss due to drafts in the cracks. Thermal insulating material is placed between the parts.
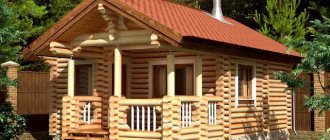
Log house in winter Source skstroyider.ru
We install a log bathhouse with our own hands
How to make a log house for a bathhouse from round wood? Of course, it all starts with the choice of location and construction project. If you do not want to use widely available ones or pay for copyrighted developments, then you should at least prepare your own sketches with general plans and key transcripts.
Order building materials based on theoretical calculations. You will have to work with completely natural raw materials, so some of it will be discarded due to excessive curvature or defects in the structure of the trunks. You need to remember this in order to purchase round timber and slightly increase the volume of its purchase.
In parallel with the organizational processes, and while you are waiting for the main building materials to be delivered to the site, you can start preparing the site and making a foundation for a log bathhouse. Choose its design based on the characteristics of the local topography, geology and hydrogeology of the soil. Read more about this in the article “How to make a foundation for a bathhouse with your own hands.”
When everything is ready for installation - the foundation is in place, the material has been delivered, the issues of supplying communications have been thought out, proceed to the stage-by-stage assembly.
Basic assembly points
- Sort the wood taking into account its location in parts of the building, as well as the conicity of the trunks, grouping the thick and thin ends.
- Clean logs using hand tools (axes, planes). We remember that machine processing loosens the wood structure.
- Make locking joints and grooves, guided by the design, using templates and a carpenter’s device “devil”. To remove the bulk of the timber from the cuts, take a chain saw or electric saw, and then trim the remains with an ax. The final adjustment of the mating surfaces is carried out element by element already at the installation sites. You should achieve standard clearance values: for longitudinal grooves - 15 mm, for corner locks - 5 mm.
- Do not forget to seal the log for the log house along the bowls or legs, as well as seam joints, using tow, moss, and jute cloth.
Let's take a closer look at the most important aspects of installation.
We pay special attention to the crown molding
The framed crown of a bath house (starting assembly tier) operates under conditions of complex exposure to unfavorable factors. Its location is characterized by an abundance of dampness, because moisture is concentrated in the lower parts of the interior, can penetrate through defects in the waterproofing of the foundation, and enter with splashes of rain and evaporation emanating from a nearby ground surface. In addition, the flashing is installed in the area of maximum pressure caused by the weight of the building. It is logical that the log-bench of the starting tier is selected with special characteristics, and special attention is paid to its safety:
- firstly, for cutting a log house, the starting round timber is taken with a diameter larger than the diameters of the elements of the remaining ordinary crowns;
- secondly, they use wood species that are resistant to rotting. For example, oak or larch only gain strength in a humid environment;
- thirdly, they take enhanced measures against moistening the lower crowns, as well as minimizing the consequences of these moistenings, by applying combined fire-protective drugs, such as Senezh, Remmers, Neomid, Prosept.
Moisture protection of wood
It is important to understand that the protective treatment of wood with biocides only partially solves the problem of its biological destruction. The effectiveness of antiseptics is manifested only in the upper layers of round timber, and in order for the preservative to completely penetrate into the solid mass of the workpiece, it must be impregnated under industrial conditions. Additional factory preparation will significantly reduce the profitability of building a small bathhouse, and the positive environmental characteristics of the natural material will be completely eliminated. Therefore, when building a log house with your own hands, you should take all possible methods to protect it from moisture, as well as quickly remove it. Similar measures apply to both the flashing crowns and all other logs of the building. Such events include:
- high-quality waterproofing of the upper section of the foundation, as well as the organization of a ventilated underground space;
- the use of a backing board under the frame crown, which over time is quite easily replaced with a new one;
- installation of developed roof overhangs that prevent direct precipitation from falling onto the walls of a round timber bathhouse;
- arrangement of canopies over framed logs;
- proper insulation, heating and ventilation of premises.
Assembling the box
The assembly of the crowns from the frame to the very top is carried out according to the same scheme, with the selected type of corner fixation:
- When installing the elements of the bed, we lay pieces of inter-crown sealant under it and in its corner locks.
- We roll out a jute roller over the assembled frame, overlapping the corners of the lower logs of the frame. We fold the canvas in half along its longitudinal axis into the room, and also carefully bend it in the corners.
- We lower the prepared crown log of the next tier with the corners cut out from above, trimming the seal so that the fold of jute protrudes slightly evenly onto the street.
If for some reason the strips of inter-crown material were spread in half without bending, for example, the task was to deliver the box in a short time, then you can do it a little differently. Then, after assembling the log house for the bathhouse, the edges of the strips sticking out are folded down and driven into the seam. There is no need to achieve significant compaction; this is not caulk yet. The main goal is to form a roller along which precipitation will flow, minimally lingering and being absorbed into the cushioning fabric.
- The tightness of the logs is achieved by their draft. To do this, they are tapped on top with a wooden block, a special mallet, or another massive object.
- As you gain level by level, do not forget to check the drawings or sketches of the log bathhouse project, and also control the verticality of its walls with a plumb line.
Roof
From a technical point of view, it is better to choose a heavy roof, which will well load the crowns of the building, which is especially important for the upper tiers. The result of compression of the wood elements will be their merging into a single durable structure.
You should also be guided by aesthetic criteria. For example, a log house covered with galvanized corrugated sheets will not look very nice, but a covering made of ceramic tiles will suit the exterior very well.
Technology selection
There are 2 main ways to cut a log into a bowl:
- “V oblo” (Russian cutting) is a method in which a cut is made in the lower crown. It can be smooth or with a spike (fat tail), which prevents the structure from moving.
- “In the okhlop” (Siberian felling) - in this method, a bowl is made at the bottom of the log, which is placed on top of the bottom.
The first method is used in most buildings that were made in the old days. For those who do not know how to build a bathhouse from a log with their own hands, it is recommended to use the “hollow” method, since during long-term construction moisture does not form in the bowl due to precipitation. It is also considered simpler than Russian cutting.
Types of log house in a bowl Source samdizajner.ru
Construction of the roof structure
The next stage - the construction of the roof - can begin after the frame has completely settled to prevent its deformation.
The work is performed in the following order:
- Beams are mounted on top of the wooden structure, which are the basis for fixing the rafters. The distance between the legs of the rafter system is no more than 100 cm.
- Boards are tightly installed on the rafter elements to create a continuous flooring, and a vapor barrier is fixed between them.
- The selected roofing material is mounted on the sheathing - slate, metal tiles, ondulin, etc.
- The gables are lined with clapboard or other available material.
Advantages and disadvantages of a log house in a bowl
The main advantages of the log house:
- High strength of the joints of the structure, which ensures its stability.
- Increased thermal insulation of the room, which is created due to the low thermal conductivity of wood and protection from blowing through the corners of the structure.
- Environmentally friendly material.
- Possibility of constructing a building of several floors.
- Decorative appearance.
Multi-storey log house Source pokter.ru
The disadvantages of a log house in a bowl include:
- The difficulty of manufacturing structural elements and assembling a building without experience. If a log house is made by a person without skill, then such a structure may have cracks, begin to rot, and also crack or fall apart.
- Due to the protruding corners of the structure, it is difficult to carry out external finishing.
- Wood for log houses must be treated with insect repellents, as well as antiseptics (prevent the formation of fungus) and fire retardants (reduce the flammability of the material).
- Protruding parts of the log reduce the useful length of the crown, which increases wood costs. Because of this feature, this type of log house does not require additional insulation of the corners. Therefore, the difference in price when assembling a log house into a bowl or into a claw will be unnoticeable.
The finished building has a smaller usable area due to the thickness of the walls and protruding corners. This should be taken into account when calculating the size of the foundation and the length of the logs.
Why is it difficult to process the external part? Source royalwoods.ru
What are they collecting for?
Logs or beams are not just stacked on top of one another, they are fastened together. It is impossible without fasteners. During the drying process, both the logs and beams “twist”. The installed fasteners hold them in place, preventing them from turning too much. If there is no fastener, the crowns fall out or in, depending on the direction of the prevailing forces. Most often this is observed on gables, in walls where there are windows and doors.
Loose crowns fall out
Fasteners can be metal or wood. It’s easier, of course, with metal ones - you don’t need to prepare them and it’s more familiar to work with them. But the metal does not change in size, and the wood dries out. As a result, the log house does not shrink during drying, but “hangs” on the studs. This leads to the formation of large gaps between the crowns. So metal pins are only permissible when assembling a log house from laminated veneer lumber: it does not dry out. Nails should not be used at all. They are not for the log house.
It is also not recommended to use pieces of reinforcement, spring units and, in general, any metal. Wood conducts steam, and it will condense on the metal with all the ensuing consequences (rapid oxidation and destruction of the metal, and wood “hangs” very well on rusty metal, another disease is the proliferation of fungi in a humid environment). So if you decide to assemble a wooden frame, it is assembled using wooden fasteners.
Nageli
Dowels and dowels are made from wood. Pins are long thin bars of round, triangular or square cross-section. More often they use round ones; holes of a slightly smaller diameter are drilled for them (1-2 mm less than the diameter of the dowel), into which the bars are hammered. For triangular or square ones, you need to select a larger drill diameter, and drilling with them will be very difficult.
Nageli
The length of the dowel is calculated depending on the cross-section of the beam: the height of the three crowns is multiplied by 0.8. If you have a beam 200*200 mm, then three rows is 600 mm, after multiplication we get 600 mm * 0.8 = 480 mm. The dowels should be of this length.
The most popular diameter/section of dowels is 25 mm or 30 mm. They are made from hard wood - birch or oak. Spruce resists torsional forces very well, so spruce can also be used. If you follow the SNiP standards, then the dowels must have a moisture content of no higher than 12%, they must not have knots or other defects, and they must be treated with antiseptics/fire retardants before use.
Drilling must be strictly vertical
Place the dowel at a distance of 200-600 mm from the edge of the log/beam, and then every 1.5-2 meters in a checkerboard pattern. They are placed strictly vertically, in the middle of the log/timber. To prevent the crowns from hanging on the fasteners when the wood dries, the holes for them are drilled 2-3 cm deeper. To make it easier to track the depth of the hole, wrap a strip of masking tape or bright electrical tape around the drill. They are used to navigate. Then, even with a significant reduction in size, the log house will sit evenly.
Assembling a log house on a dowel - installation diagram
When driving in dowels, it is important to control the effort and hit strictly from above so as not to crack the wood. To make it easier for them to “fit” into the holes, they are dipped in oil (you can use it for mining).
When assembling a log house from timber or logs, the work technology is as follows:
- The first two or three rows are fastened with dowels, spacing them at the required distance.
- Next, two more crowns are laid and fastened to the top row of the previous package. Only now you move the dowels so that they don’t end up on top of each other, but move in a checkerboard pattern.
- Next, two crowns are placed again and connected to the top beam of the previous package (also shifted).
Now a little about the prices of dowels. They are usually sold individually. The price depends on the size and type of wood, but we can definitely say that they are expensive. To save money, people buy rake handles (they have the right diameter), cut them into pieces of the required length and use them. Just note that knots and other wood defects must be cut out.
Square dowel
It’s even cheaper to buy a board of suitable wood (dry, “elite” grade, without knots or defects) and cut it into bars of the required size. For example, you can buy a 50*25 mm board, make 25*25 mm bars from it, cut it into pieces of the required length, and slightly sharpen the edges. Apart from the time investment, this approach is the least expensive.
Dowels
Assembling a log house using dowels is less popular because it takes more time. They only hold two crowns together, so there's more work involved.
Assembling the log house with dowels
You need to cut holes for each dowel in the top and bottom logs. Install the prepared fastening bars, then carefully “put on” the upper crown. The work is precise, long and hard.
What does a dowel look like when cut?
Materials and tools
To know how to cut a log frame into a bowl with your own hands, you need to choose the right cutting tools. To mark the logs, a tape measure, a level, a chemical pencil and a carpenter's line are used. This is a tool with two rigid plates with sharpened edges and a handle with which the distance between the ends is changed. This tool is designed to draw 2 parallel lines. Also, to cut out the bowl you will need:
- Carpenter's axe.
- Wood chisel.
- Chain saw (electric or gasoline).
- Hand saw.
- Hammer.
To blacken the recess when fitting logs, you will need coal. The cutout requires chemicals to treat fungus and insects, as well as insulation.
Tools for log house Source izba.spb.ru
Carrying out work on pouring the foundation
If you decide to build a bathhouse from a rounded log, you should take care of a reliable foundation that can withstand such a load (more details: “Building a bathhouse from a rounded log - a step-by-step guide”).
There are several types of foundation:
- Slab . The most expensive and reliable type of foundation. It is used in northern latitudes with extreme frosts and on unstable soils.
- Tape . The most common type of base. It consists of a reinforcing mesh filled with a layer of concrete along the entire perimeter of the building.
- Columnar . Used for small, relatively light buildings. It consists of a number of free-standing columns supporting the load-bearing elements of the building.
- Unrecessed . It is made in the same way as a strip foundation, but is installed on top of the ground on a special pad.
- Recessed . Its sole is lowered into the ground for some distance.
You need to decide what the foundation will be like on your site based on what type of soil is on your site. In areas where the soil is predominantly gravel or rock, a columnar or shallow foundation is suitable. But on sandy, forest or fertile soils with nearby groundwater, it is better to choose a strip foundation.
It is worth remembering that if a columnar type of foundation is chosen, additional supports must be laid under the furnace.
Let's look at the most affordable types of foundations.
To work you will need the following tools:
- shovel;
- tape measure or cord for marking;
- hook for tying wire;
- grinder with a set of discs;
- concrete mixer or other container for mixing the solution;
- wheelbarrow for transportation
The required list of materials includes:
- unedged board for formwork;
- timber pegs;
- fishing line;
- wire for tying;
- fittings;
- gravel;
- sand;
- cement.
The first step before pouring a strip foundation is to clear the building site of debris and plants, level the surface and remove the top layer of soil.
Next, along the outer perimeter of the building, 4 pegs are driven in at the corners, stretching a fishing line between them. The markings can be checked by measuring the diagonals. From the outer edge you need to set aside the width of the foundation and another 10 cm and drive in 4 more columns. A fishing line is also pulled between them, marking the inner edge.
The fishing line must be placed at the height of the future foundation, taking into account its deepening into the ground by 50-70 cm for large buildings or 40-50 cm for smaller buildings, as well as the thickness of the bedding of 15 cm and its elevation above the ground.
Now you need to dig a trench for the foundation. Soil can be dumped into the center to fill the base. The bottom of the trench is covered with sand, watered and compacted.
The boards are used to make formwork panels, placing them on both sides along the perimeter of the site. The height of the formwork is equal to or slightly greater than the foundation.
Next, using knitting wire and reinforcement 12 mm in diameter, make the sheathing. Take 4 rods on each side, connecting them at intervals of 40 cm.
The sheathing is laid in the prepared ditch and connected at the corners with rods. There should be a distance of 5 cm on each side from the reinforcement to the formwork walls so that they are completely hidden in the concrete. Sometimes bricks are placed at the bottom.
At the next stage, pipes for ventilation from sewer pipes are installed.
To fill, you need to prepare a solution of cement, crushed stone and sand in a ratio of 1:3:3. It is advisable to pour as quickly as possible so that the concrete is uniform over the entire surface.
Then, over the course of several weeks, while the concrete is setting, it is periodically watered with water so that drying occurs gradually. At the same time, it can be covered with a film to retain moisture.
If the soil on the site is stable, then you can use a columnar foundation to build a bathhouse from rounded logs with your own hands. It will require the same tools, and instead of formwork material - asbestos pipes 20 cm in diameter.
The sequence of actions looks like this:
- The territory is being prepared and marked.
- Mark the corners of the building, as well as the locations of supporting structures.
- From the corners, control points are applied every 1-1.5 m.
- Recesses are selected in the ground for the pillars at a level below freezing of the soil. The width of such a pit should exceed the size of the support by 5-10 cm.
- The bottom of the pit is filled with a layer of sand 15-20 cm high, which must be compacted and spilled with water.
- A round hole does not need to be strengthened, but a rectangular hole needs additional formwork to prevent the soil from crumbling.
- The pipes are cut to length, taking into account their penetration into the pit and a protrusion of 40 cm above the surface.
- Prepare the solution in the ratio indicated above.
- Asbestos pipes are insulated with rolled bitumen or other material and lowered into a pit.
- Fine crushed stone is poured around the pipe to about ½ the height and compacted.
- Cement mortar is poured into the pipe to half its height and slightly raised so that the mortar falls to the bottom.
- The gaps around the pipes are filled to the top with crushed stone and compacted.
- Reinforcing rods are placed into the pipe and the filling of the solution is completed.
- The solution in the pipe is compacted with a rod or vibrator for uniform distribution.
If you want to install a closed base in a bathhouse with a columnar foundation, you will need to perform a number of other manipulations.
To do this, between the installed posts you need to dig a ditch 30 cm deep, 10 cm wider than the supports. It is filled halfway with crushed stone and compacted.
Next, the solution is poured into the ditch and sheets of flat slate are placed in it. They are screwed to the supports with self-tapping screws in pre-drilled holes.
You need to make a gap in the sheet material to install the ventilation pipe and insert it. Along the perimeter from the inside and at the top from the outside, the structure is reinforced with a metal corner.
The internal space behind the base must be covered with film and filled with expanded clay.
How to caulk a log house
To know how to assemble a log bathhouse from logs with your own hands, you need to understand what kind of heat-insulating material is required to fill the space between the structural elements. It will help prevent moisture from penetrating into the bowl, as well as enhance protection from wind and cold. In order to caulk cracks and cavities, the following is used:
- Moss . An environmentally friendly material that can retain heat, withstand temperature changes, and also remove excess moisture, which prevents the appearance of fungus. It is believed to have antimicrobial and healing properties, which manifest themselves when the structure is heated.
- Tow . As the log dries, it becomes damp and begins to rot. Therefore, after the structure dries, it is cleaned and re-laid.
Why do they continue to choose solid wood to build a bathhouse?
Despite the fact that today woodworking enterprises offer developers products with ideal geometric shapes (rounded logs, profiled and laminated timber, carriages), buildings made from solid ashlar continue to be popular. Why does this happen, since it is noticeably easier to work with dried calibrated material? In fact, wild log cabins for bathhouses occupy a special position due to a number of advantages that are absent from structures made from prepared factory products.
Strength
Shrinkage of a bathhouse made of wood with natural moisture, as a result of drying of the wall material, occurs with the entire structural mass simultaneously. The elements of the building are additionally fused together due to the redistribution of stresses, and by the end of shrinkage they form a rigid spatial frame. On the contrary, nodal elements made from pre-dried wood are not able to gain strength over time. They are too demanding on the build quality, and are often used in conjunction with reinforcement parts: dowels, brackets, ties.
Durability
A log bathhouse is much more resistant to biological damage or pests. Under the same conditions, a building made of ordinary round timber without artificial bioprotection will last many times longer than one made of rounded logs or profiled timber. The reason lies in the structure of the wood. Thus, hewing leads to compaction of its surface layer, closure, and collapse of the capillaries. On the contrary, when planing, and especially sawing, a material, a massive opening of its micropores occurs. Obviously, a loose structure will be more susceptible to dampness, pests and biological damage.
In addition, machine mechanical calibration, as opposed to manual fitting of log logs, destroys the outer part of the round timber, which naturally protects the trunk from environmental influences.
Thermal efficiency
One of the key characteristics of a bathhouse is the thermal comfort of the premises, including maintaining a high temperature inside the steam room. Of course, this largely depends on the intensity of heating, but if the walls are “cold”, then heating will be useless. Therefore, it is not uncommon for log structures to be additionally sheathed with insulation. However, having massive thick walls, you can avoid such costs. For example, if you build a wild log bathhouse from a whole forest with a trunk diameter of 40-50 cm, which can provide sufficient heat protection. At the same time, if you decide to use expensive rounded products, then their maximum diameter is only 32 cm, which, given the heat loss at the seams, is not always enough for paired rooms.
Video description
In this video you will see how to caulk a log house with tow:
- Jute . An environmentally friendly type of insulation that retains heat well, but has a short service life (3 years) due to the fact that it strongly absorbs moisture.
Old jute is difficult to get out of the cracks, so it is rarely used. There are also differences between types of jute. For example, tow is too hard and has low density. Because of this, it is necessary to caulk the log house in several stages to achieve the desired density.
Flax-jute contains 50% flax fibers, so it requires additional treatment to prevent insects and rot. Jute felt consists of 10% flax fibers, but has high flexibility and good density. It also requires additional insect repellent treatment.
- Lnovatin . Due to heavy treatment with insect repellent chemicals, it is not environmentally friendly. It has a service life of 3 years and is attached to the structure using a construction stapler.
Felt made of jute Source drevtorg.rf
See also: Catalog of house projects made from hand-cut logs and timber
- Synthetic compounds . They cost more than other materials, but are easier to use.
Such substances are used in combination with natural material (cord). To do this, the thread is placed in the gap and filled with sealant, which is leveled with a small spatula.
The disadvantage of this method of sealing log cracks is that when exposed to sunlight, the sealant will dry out and begin to crumble. To do this, the place of putty must be covered with planks.
Also, synthetic compounds harden and can expand and contract with temperature changes, which can lead to cracks in the wood. To avoid this, it is necessary to use elastic compounds.
The right combination of sealing materials helps avoid the formation of damage and fungus, and also increases the thermal insulation of walls. This is necessary when constructing buildings in cold regions or when assembling a bathhouse, since in such rooms rapid cooling of the air can be critical.
Synthetic sealant for log houses Source td-artemov.ru
Preparing a working design for a wooden bath
The construction of a log bathhouse is a labor-intensive and responsible process that is carried out in stages. The initial stage is preparing the bathhouse project.
A typical project includes:
- choosing a suitable location for development;
- layout of the number of floors and interior spaces of the bathhouse;
- layout of the location of window and door openings;
- selection of heating, ventilation equipment and lighting devices;
- selection of construction and finishing materials;
- development of premises design;
- calculation of construction costs.
Finished projects are presented in the public domain, but to receive an individual sketch, you should contact the design office.
Main types of wood for felling and their processing
To know how to cut down a bathhouse, you need to select the appropriate types of wood for production. Most often, coniferous types of wood (pine, spruce, larch) are used for the manufacture of such structures. It is best to choose material from cold regions (for example, Siberia), since in winter the flow of sap along the trunk is least. This reduces the risk of cracks forming when drying the material.
Also, trees that are felled in winter have a higher resin content, which increases its resistance to rot. The diameter of the logs must be at least 21 cm (but not more than 35 cm), and the length of all elements must be approximately the same to simplify processing and assembly. All wood must be smooth and free of knots. The area from the root to the beginning of the crown of a pine tree is best suited for this.
Wood for a log house Source sm-news.ru
See also: Catalog of companies that specialize in log baths and sauna vats
When laying structural elements, it is recommended to make the first 2-3 crowns from larch, as it has high resistance to moisture. When choosing a material, it is not recommended to use crooked trunks or wood with cracks and rot. The bark should be removed with a scraper, as it hardly touches the working surface underneath. After this, you need to let the material dry for 3-4 days. Also, before cutting, the wood is treated with an antiseptic and impregnated with a fire retardant.
Processed wood for a log house Source im0-tub-ua.yandex.net
Floor in a chopped bath
A wide selection of modern materials allows you to make the floor not from wood, but from more durable and moisture-resistant materials. A wooden floor quickly gets wet and dries slowly, as a result of which the process of rotting begins, unpleasant odors and microbes are released, which is harmful to health.
The best option for a bathhouse is a concrete floor covered with tiles.
Please note that the floor is made only after the installation of the sewer system.
Material calculation
How to make a log house and calculate the amount of money spent, if the dimensions of the proposed structure are known - this is an important point in the manufacture or ordering of a finished building. For example, for a bathhouse with dimensions of 3x4 m and a height of 2.4 m with a frame in a bowl.
Due to the fact that the corners of such a structure will protrude 25 cm on each side, when calculating the length and width of the building, 50 cm is added.
If the diameter of the log is known (for example, 24 cm), then the volume of wood can be calculated using the formula 3.5 x 4.5 x 2.4 x 0.24 = 9.072 m³. During assembly, a groove is made in each log, which differs in width from 0.5D to 0.67D. This reduces the final volume of wood, so this formula requires further refinement.
Wide logs for a log house Source promdrevo.ru
Layout of a chopped bath
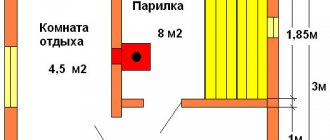
At the design stage, it is necessary to designate which rooms will be in the bathhouse and how to rationally distribute the total area between them.
As a rule, a bathhouse includes several rooms:
— vestibule, with an optimal area of 1 m2: the main function of the vestibule is to prevent humid or frosty street air from getting inside, otherwise condensation will freeze on the front door and it will be impossible to open it;
- locker room or rest room: according to the recommendations, the standard locker room area is determined at the rate of 2-4 m2 per person; if a small bathhouse for 4-6 people is being built, it is enough to allocate 8-10 m2 for this room;
— washing room: according to the standards, 2.7 m2 per person is allocated for this room, some owners combine a washing room and a steam room;
— steam room: according to the standards, 2-3 m2 are allocated per person to make it comfortable to steam, the area can be calculated with some margin.
We offer you several options for planning a bathhouse.
In the presented material, we outlined the basics of constructing a chopped bathhouse. If you have patience and, with a little work, understand the intricacies of the construction business, then soon you may have your own bathhouse - a source of health and good mood. Read more about the specific aspects of bathhouse planning here.
Marking and cutting logs
To know how to cut down a log house, you need to understand the method of marking logs. To do this, they need to be laid perpendicular to the lower crowns. It is recommended to use staples to secure the structure. This will prevent the log from turning around its axis. Next, using a line, you need to draw the contours of the bowl and longitudinal grooves using several rules:
- One leg of the feature should rest on only 1 log.
- The distance between its points should be half the diameter of the log, depending on the log house used: “to the edge” - the upper one, and “to the edge” - the lower one.
- It is recommended to start drawing with a bowl and end with a longitudinal groove.
- The prepared logs are placed in bowls, and after that it is necessary to process the joint: if there is a large gap, insert wedges, if it is small, remove the excess layer.
Features of the arrangement of openings
No building is without openings, doors or windows, even a bathhouse. So I had to think about how to make them while still chopping. The fact is that each beam will shrink differently during the drying process and the openings may squint.
It was possible, of course, to install the entire frame of the bathhouse without windows and doors, and after drying it for a year, cut out the openings where necessary with a chainsaw. But in this case, there would be a lot of wood waste, and in my case, every piece of timber counted. The construction of openings during the construction of the log house would provide significant savings.
In order to “feed both the wolves and save the sheep,” I decided to leave a through beam in the openings every 3-4 rows, cutting out the rest. In this case, the shrinkage of the log house will be uniform.
Assembling a log house
Before assembling the log house, it is necessary to make a strip-type foundation, since the wooden structure has a large mass, and put waterproofing on its upper part.
Next, it is recommended to lay 2-3 larch crowns and level the horizontal surface of the log house using a level. During assembly, insulation is placed in the longitudinal groove, and to compact the log, the log is tapped with a wooden mallet or log. Also, after laying each crown, it is necessary to check the horizontal and vertical position of the structure.
After assembly is completed, all cracks and joints are caulked, and excess insulation is removed. After six months, it is recommended to repeat this operation, since the insulation can become saturated with moisture from the drying logs. All wooden structural elements must be treated with an antiseptic 2 times.
Log house Source metasold.com
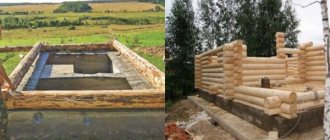
Construction of a reliable foundation for a bathhouse
Log baths have an impressive weight, so it is necessary to build a strip or column-type foundation for them.
The strip foundation is suitable for moving soils with different levels of freezing, can withstand the maximum load of the structure, and also allows the construction of underground buildings - basements, cellars and garages.
The columnar base is more economical, practical, accessible for installation, and has high strength indicators. It is suitable for construction on soils with a high content of clay, sand, and those prone to rapid freezing. The disadvantages of the foundation include the impossibility of arranging cellars and basements, as well as the need for additional insulation of the floor base.
The construction of a strip foundation is carried out as follows:
- At the selected site for construction, a trench is dug: depth - up to 100 cm, width - up to 45 cm.
- The bottom is covered with a sand cushion, moistened and compacted. The height of the sand layer is 18 cm.
- Formwork is assembled from boards and reinforced with metal rods, the upper part of which is cut off according to the height of the foundation.
- The formwork is filled with ready-mixed concrete around the perimeter of the trench to construct a monolithic base.
- After the concrete has completely dried, a waterproofing layer is laid to prevent the base from being washed away. To do this, concrete is treated with hot bitumen and then covered with rolled roofing felt.
Briefly about the main thing
The log house is most often made from pine or other coniferous wood.
The main advantage of a wooden log house is thermal insulation and environmental friendliness.
When choosing a log manufacturing technology, it is recommended to take into account the level of knowledge and skill. If it is not high enough, then it is better to contact specialists.
It is necessary to use high-quality thermal insulation and means to combat fungus and insects. This will extend the life of the building.
All logs for a log house must be treated with a fire retardant to avoid fire in the structure.
Ratings 0
Construction of the roof and ceiling
You need to decide on the type of ceiling before installing the roof.
There are three options for the ceiling structure:
- Invoice . The simplest, but rather fragile design, which involves laying 5 cm thick boards directly on the top crown. The boards are tightly joined and nailed together. A vapor barrier and a layer of insulation are placed on top of the ceiling. The width of such an overlap should not exceed 2.5 m, and the niche under the roof cannot be used.
- Hemming . It is mounted on floor beams laid on the walls using the “bowl” method. The board will be hemmed to the beams from below. A foil vapor barrier is placed on the flooring in the space between the beams, a layer of clay is poured on top, and then mineral wool is placed for insulation. If you sew up this “sandwich” with another layer of boards, you will get a floor for the attic.
- Panel . It consists of wooden blocks that are purchased ready-made and installed on site.
After arranging the ceiling, you can start working on the roof.
As a rule, the roof on a log bathhouse is made of two types:
- Single-pitched - if the bathhouse is adjacent to a residential building. It is important to correctly calculate the angle of inclination so that the entire structure appears unified.
- Gable . In this case, the upper crown will serve as a Mauerlat. At the bottom, rafter structures are assembled from two legs, a crossbar and a base. Grooves are cut into the beams for installing triangles. Assembly begins from the edges, gradually moving towards the center. Temporary bridges are used to hold the structure. At the end, the roofing sheathing is attached to the rafters. The base can also be used as a ceiling beam. For rafters that are too long and extend beyond the building by more than 1 m, additional supports are installed.
You need to choose roofing material based on the climatic conditions of the region, as well as the characteristics of the project. The choice can be soft tiles, corrugated sheets, metal tiles or other materials.
Design
The project is the very first and very important stage of construction, which will help you not only calculate materials and costs, but also make your work easier. If you are building a simple village bathhouse with a dressing room, you can complete the project yourself. If the bathhouse has several rooms and connections to communications, it is better to entrust this matter to professionals. Companies involved in the sale of log cabins sell standard bathhouse designs, and you will certainly find the right one at a reasonable price.
Bathhouse project
The project must take into account the dimensions of all rooms, the location of windows, doors, and communications connection points. After this, make a calculation of the required material. When calculating the height, take into account the shrinkage of the logs; for debarked raw logs it is about 5%.
Flaws
- Fire hazard. To reduce the influence of this property, all wooden structural elements should be treated with special means that help increase their resistance to fire.
- Shrinkage. Finishing work can only be done after six months.
- Care. In order for wood to preserve its original appearance and properties, it requires special care. Alternatively, you can cover the logs with veneer material to protect them from the environment.
Bathhouse 6x4 with veranda under construction
Drawings and diagrams of a bathhouse with a terrace
Photo: diagram of a two-story wooden bathhouse 6x6 meters.
Following the step-by-step instructions, the first step is to draw up a drawing of the future structure. As a basis, you can take existing buildings with completed calculations, a ready-made estimate, or develop a project yourself.
A visual image of the building simplifies and speeds up installation work, and allows you to document and eliminate possible shortcomings.
For a small family of 2-3 people, a one-story bathhouse with a closed terrace is quite enough. If the number of residents reaches 5–8 people, then it is better to consider the design of a medium-sized bathhouse with an attic.
Downstairs, according to the standard, there is a steam room, a shower room, a dressing room, a relaxation room and a kitchen (if the area allows). The second floor is equipped for comfortable leisure of the whole family. A billiard table is installed here, a games room or home cinema is set up.
The diagram above is an example of a one-story bathhouse with a terrace and a swimming pool inside.
Photo. Bathhouse 2.3x6 meters made of profiled timber 100x150x6000 mm with an open terrace 2.3x1 m under a common roof.
This drawing is suitable for a country holiday with a small family. An open extension is made under one roof.
Scheme of a one-story bathhouse 6x6 meters
This is an example of a one-story bathhouse with an open terrace and a large relaxation room.
Bathhouse layout with a garage for 2 cars, a veranda and a utility room.
An interesting design option, where the bathhouse is combined with a garage on one side, and on the other side there is a terrace, and there is also a utility room.