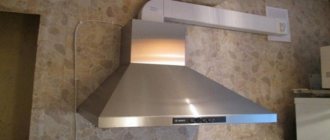
When natural exhaust does not cope with its task of removing smoke, it is necessary to install a smoke exhauster to create forced draft. Such devices are used for fireplace or stove pipes, used on boilers, and are excellent for use in a private home.
Without the use of forced exhaust, serious problems may occur if the natural draft in the chimney is disrupted. The smallest problem in this case will be the gradual clogging of the ventilation system (smoke exhaust), the most serious will be a threat to the health of people living in the building.
What is a fireplace exhauster and why is it needed?
This device is a duct fan with an electric motor, which is mounted at the outlet of the chimney. The principle of operation of the device is simple - during operation of the fan, the draft in the chimney increases.
Simply put, this device is a forced exhaust system, but they are not designed for full exhaust. They are used only to improve (occasionally) the natural draft in the pipe, or during its repair.
Chimney hoods
For example, a fireplace smoke exhauster is started as needed - for a time when the natural draft drops to a certain value.
The rest of the time, while the traction is normal, its activation is impractical, so it simply “stands idle”.
When should it be used?
There are several indications for the use of a fireplace smoke exhauster, which are in one way or another related to draft disturbances in the chimney pipe.
Indications for use:
- When there is no draft at all in the chimney pipe (for example, due to errors in the construction of the chimney pipe, or because of its weakness in terms of exhaust). This often happens when the chimney height is selected incorrectly.
- In cases where the chimney is incorrectly positioned relative to the roof ridge.
- If a taller building was built nearby and, accordingly, the draft fell because of this (due to an obstruction to wind flows).
- In cases where the chimney needs repair work (gaps, cracks, or any protruding elements have appeared).
- In cases where the diameter of the chimney chosen is not large enough, or, on the contrary, too large.
Pros and cons of use
Any device of this type has both a number of undeniable advantages and a number of disadvantages. This is also true for smoke exhausters.
Among the advantages of such a device it is worth noting:
- you don’t have to repair the chimney “right now” - the smoke exhauster allows you to postpone repair work indefinitely;
- the ability to create the necessary traction by increasing it, in any weather;
- you can significantly reduce the harm from the formation of condensation due to the fact that the draft will be increased, and as a result, less condensate will form;
- the ability to turn off the fan at any time when there is sufficient natural exhaust from the chimney.
List of disadvantages of using such a device:
- It is not always possible to install a smoke exhauster;
- additional consumption of electrical energy (however, to be fair, such fans consume relatively little electricity ).
Rules for installing a smoke exhauster (video)
For which chimneys is it suitable?
The smoke exhauster can be used on chimney pipes for stoves, fireplaces, and various boilers (gas and solid fuel). But there is one important condition - such a product can only be installed on chimneys in which the temperature does not exceed +600 degrees.
What models are there and how much do they cost?
The cost of a smoke exhauster depends on which model you are going to order and with what parameters (standard, heat-resistant). For clarity, you can demonstrate the cost of several popular models.
- model BAHCIVAN BRCF-M 315 (power 550 W, consumes 1800 m 3 of air per hour) – cost 14,000 rubles;
- model Sputnik-555 (power up to 105 kW, productivity about 550 m 3 per hour) - cost 12,000 rubles;
- Elicent Tirafumo model (productivity about 850 m 3 per hour) - cost 30,000 rubles;
- model Vents KAM KFK 150 (productivity about 520 m 3 per hour) - cost 19,000 rubles;
- model Vents KAM 140 (productivity about 480 m 3 per hour) - cost 11,500 rubles.
Simple Ways to Increase Traction
As a last resort, completely replace the chimney. It's worth starting with simpler methods.
First, the old chimney needs to be cleaned of soot and dirt. Special metal brushes are used for this.
If the channels and pipes were not insulated at the construction stage, it is worth doing so. Warm gases are removed more efficiently than cooled ones. In addition, it is necessary to exclude convective flows inside the chimney, when air flows down along the cold wall, interfering with the upward flows.
Another effective way to increase draft is to reduce the number of bends in the smoke removal system. Partial reconstruction of the chimney is cheaper than a complete replacement of the system.
A popular way to increase draft in a chimney is to install a deflector. The wind becomes a helper rather than creating gusts of reverse thrust
A rotary turbine can also be used. When there is wind, the turbine spins the impeller, which provides additional vacuum at the chimney outlet.
An equally effective way to increase draft is to increase the height of the chimney. The speed of movement of gases and, accordingly, the performance of the system as a whole depends on the height of the chimney.
We looked at passive ways to increase traction. But there is another effective method, which is discussed below.
How to install?
Installing a fan on a fireplace is quite simple and does not require any special theoretical knowledge. The first step is to calculate the direction of air flow. This information is available on the packaging with the device or in the instructions for it.
Installation is carried out from above at the mouth of the chimney pipe. Please note that it is easier to install the device on brick chimneys than on stainless steel chimneys. You should also think about the power supply system to the smoke exhauster and correctly position the wire with the switch and speed mode switch.
Preventing the condition of the chimney
To avoid the need to use means of forced exhaust of a chimney made of heat-resistant material, it is necessary to use preventive means to maintain it in working condition.
Since the main reason for reducing the intensity of flue gas extraction is the reduction in the passage of the pipe by soot accumulated on the walls, we will consider means of combating this phenomenon.
These methods could be:
- Burning about half a tablespoon of naphthalene in the furnace firebox. Naphthalene vapor decomposes soot into loose components, large ones fall inside the firebox and are subsequently removed with the ash, and small ones fly out through the pipe along with the furnace gases. This product cannot be used for smoke removal from a fireplace and for pipes of open hearths - it leaves a characteristic suffocating smell in the rooms.
- From time to time, burn potato peelings in the firebox. They are pre-dried. Starch vapors loosen the soot deposit and it will fall into the firebox. Pure starch acts similarly, which is fed into a well-lit firebox in the amount of one tablespoon.
- A good way to remove soot from pipes is walnut shells. It burns at a high temperature, burning off soot deposits on the inner walls. A single dose of shells should be no more than three liters. Frequency of application - as accumulation occurs.
- Aspen firewood has a similar effect on soot. One or two logs are burned at the end of the last stack of firewood. They burn at high temperatures.
The frequency of use of high-temperature products should be regular, at least twice a week, so that soot does not have time to accumulate.
Otherwise, you can cause a serious fire, since the soot burns and releases a very large amount of heat. In addition to those listed, there are many anti-soot agents on the market for both chemical and thermal decomposition of soot. The use of preventive measures can eliminate the need for forced measures to improve the exhaust hood on the chimney.
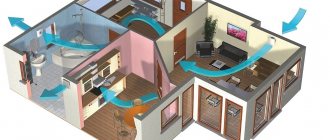
Use of ventilation pipes in everyday life
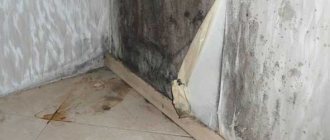
Residential buildings must have ventilation. In the process of breathing, a person emits carbon dioxide and moisture, cooking - moisture, soot, fat, carbon dioxide, sanitary appliances - a lot of moisture. Moisture settles on walls and furniture, which leads to the formation of mold. Carbon dioxide and combustion products, odors from cooking lead to rapid fatigue, irritation of the respiratory tract, deterioration of well-being, and decreased performance. Some of the substances formed during frying are carcinogens.
In old Soviet-built houses with small apartments and loose doors, ventilation in the kitchen and bathroom simultaneously removed some of the air from the living rooms. Ventilation ducts were built into the building structure. In private houses, ventilation was not provided at all - the situation with carbon dioxide was saved by a stove with a chimney: the air for firing the stove was taken from the house and removed, along with the products of fuel combustion, outside the living space. Fresh air entered houses and apartments through leaks in wooden windows and doors. The smoke and soot simply settled on the walls and ceiling - they had to be whitewashed every year.
In apartments there are ventilation ducts in kitchen hoods, additional ventilation in bathrooms and toilets.
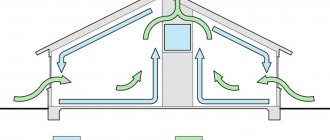
In modern houses, in addition to the hood, additional ventilation systems are often installed - exhaust and supply and exhaust. In passive and energy-efficient houses, supply and exhaust ventilation with heat recovery is a mandatory component of the house design.
Technical features of channel laying
It is recommended to lay the chimney parallel to the ventilation ducts.
The construction of the ducts is carried out in accordance with the rules of SNiP:
- The construction of air ducts of any type without an approved design is strictly prohibited.
- Brickwork of smoke and ventilation ducts at the same time is prohibited. They are arranged separately.
- It is recommended to install the ventilation duct parallel to the chimney. Combustion products heat the air in the ventilation duct, which improves draft.
- The masonry depends on the thickness of the wall. With a thickness of 380 mm, the masonry is single-row, with a thickness of 640 mm - double-row.
The dimensions and nature of the masonry depend on the power of the heating system, the area of the room, and the purpose of the building. This is important when building a brick channel: after all, its parameters depend on the parameters of the brick.
Differences between a kitchen exhaust system and ventilation
A kitchen hood is a local exhaust ventilation system with artificial impulse and is fundamentally no different from ventilation. There are differences from general indoor ventilation: general ventilation in apartment buildings is designed with natural impulse and operates without the participation of fans. In addition, general ventilation serves to ensure air exchange throughout the entire apartment, and the hood removes polluted air in a specific place and only when necessary.
Useful tips
If, after reading the information described above, you decide to organize an air exchange system yourself, then you probably want to receive useful instructions.
We understand this and present to your attention some important recommendations.
An example of a shaft laying (a – for a one-and-a-half row, b – for a double row)
- The laying of brick ventilation ducts should be made from solid samples. At the same time, we must not forget about the dressing rules. It is best to design this element in advance.
- As a rule, the dimensions of brickwork ventilation ducts are 14x14 cm, while chimneys should be slightly larger - 27x14 cm. In this case, the thickness of the walls between them should be at least half a brick.
- If you want to achieve the correct shape and prevent clogging of the shafts, insert special inventory buoys into them. Essentially it is a hollow box made of plywood.
- To create channels, you can use a regular solution of cement and sand. Before application, it is recommended to moisten the brick with water to improve its adhesion.
- It is recommended to make the channels smooth, that is, without any roughness. It is also not advisable to have protrusions or depressions, as they interfere with normal air circulation.
Take care to cut the brick to create the holes. As a rule, this operation causes difficulties for many people.
If there is a need to create a branch, then its length should be no more than 100 cm, and the angle of inclination should be at least 60 degrees relative to the horizon.
In this case, the cross-section in both parts of the channel must be equal, otherwise a decrease in traction efficiency will be observed. To lay sloping areas, you need to use hewn bricks at the desired angle.
In places in close proximity to wooden structures, it is necessary to create a cutting made of non-combustible materials. Asbestos is perfect for this.
It is also necessary to increase the thickness of the channel walls: up to 40 cm if the structure is not protected, and up to 25 cm otherwise.
For masonry, it is best to use double silicate brick m 150, as it has the required coefficient of frost resistance and thermal conductivity. However, other samples can also be used.
The importance of kitchen ductwork
The existing general ventilation does not remove combustion products and evaporation specifically from the stove; it serves to replace air throughout the entire volume of the room.
Modern housewives are not happy with this situation. We want high-quality and durable repairs in the kitchen; a working woman does not have time to regularly wash the walls, ceiling and furniture. Demand creates supply - local ventilation units have appeared above kitchen stoves - hoods. But polluted air must be removed outside the room, and air ducts perform this function.
Advantages and disadvantages
There is only one advantage of the air duct: it is impossible to remove carbon dioxide, water and soot without it.
- They take up space.
- They spoil the kitchen interior.
- Poor installation results in increased fan noise.
- They require regular washing on the outside and periodic cleaning on the inside.
Is it always possible to install a hood?
There may be situations when installing a hood is prohibited by the operating rules for gas appliances.
If there is a gas water heater (boiler) or a gas heating boiler with an open combustion chamber in the same room as the hood, a hood with air removal (circulation) cannot be installed. Removal of combustion products from the boiler occurs without force; when the exhaust fan is turned on, the draft may overturn and toxic combustion products may be thrown into the room.
It is allowed to install a flow-through exhaust device only if a boiler with a closed firebox is installed (with a coaxial chimney and combustion air intake from the street).
You can install circulation-type devices with filters that clean the air from grease and soot.
Is it possible to do without an air duct?
Hoods are produced as flow-through and circulating:
- Flow-through systems remove exhaust air from the room.
- Circulating filters purify the air without removing it from the room.
Circulating hoods are installed above the stove; the air passes through a housing with a carbon filter and is cleaned of grease. These devices do not require air ducts; they are compact and easy to install. But they have other disadvantages - the need to frequently change filters, insufficient air purification, and lack of removal of moisture and carbon dioxide.
Forced exhaust by additional means
The need to install additional means of forced exhaust may arise for natural reasons, for example, trees have grown on the site, which has changed the direction or intensity of wind flows.
Watch the video
We increase chimney draft artificially
You can, of course, rebuild the house or redo the chimneys, but this path is very expensive and labor-intensive. It is easier and cheaper to use forced ventilation devices. To improve the hood, the following additional devices are used.
Types: materials and characteristics
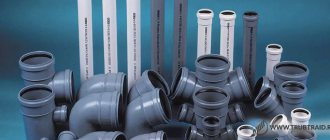
For the installation of small home ventilation systems, the industry produces a wide range of pipes and components.
Air ducts for domestic ventilation are divided into:
- By material - plastic, aluminum or galvanized steel.
- Shape: square, rectangular, round.
- According to the degree of flexibility - flexible or rigid. Flexible boxes are made of corrugated aluminum or galvanized steel. Rigid air ducts made of metal are not used due to the complex installation and complexity of manufacturing galvanized pipes of small sizes (from 100 to 150 mm in diameter or section side length). Aluminum pipes of suitable sizes are expensive, there are no special advantages in their installation, so they are also not used for kitchen hoods.
Plastic
Plastic air ducts are round, square and rectangular with a smooth surface. They come in white and painted in different colors - it’s easy to choose a shade that matches your furniture set or wallpaper.
Plastic boxes are very smooth - they are easy to clean, and less grease and soot accumulate inside. Smooth walls provide the least air resistance - therefore, such pipes vibrate and make less noise. Plastic boxes are the quietest compared to corrugated boxes.
The service life is at least 10 years.
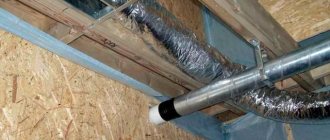
Made from flexible corrugated aluminum pipe
A very practical option for an air duct is a corrugated aluminum pipe of round cross-section. The flexible pipe is easy to install; it does not require rotating elements - it can simply be bent. An aluminum pipe is durable, but it is very difficult to clean it from grease and soot deposited on the walls. The corrugated inner surface creates great resistance to air flow; the pipes make more noise when the hood is operating.
Metal
The corrugated pipe can be made of galvanized steel. This pipe is a little stiffer and stronger, but otherwise its installation is as simple as for aluminum corrugation.
Places with a damaged zinc layer rust, the rigidity of the pipe complicates its installation, so steel corrugation is rarely used for internal household ventilation systems.
By degree of flexibility
Aluminum corrugation is more ductile than steel, it is easier to bend, stretch and compress.
Plastic air ducts are used only for rigid ones; corrugated plastic pipes are not suitable for transporting hot air.
Unloading the roof
If you have to break critical elements of the rafter system, which can happen if the rafter installation step is less than the thickness of the well, it is necessary to unload the roof. At 40–50 cm from the upper and lower boundaries of the passage, you need to place horizontal beams 5–6 spans long under the rafters. They are supported by vertical posts so that each of them is located strictly above one of the attic floor beams.
Using a plumb line, the attachment points for vertical posts that take part of the load from the rafters are marked. Each of the broken rafters must be supported in two places - above and below the cut area. If there is a brick well, it is better to unload the rafter system onto it, replacing part of the wooden racks with angle steel bevels.
Even if the opening fits between the rafters, they should be tightened with horizontal jumpers of the same width, forming a convenient pocket for laying a thermal insulation belt. Sometimes, for reasons of saving material, it makes sense to install vertical jumpers at the same distance from the pipe or well.
Advantages of plastic and metal air ducts
Advantages of plastic boxes:
- Little air friction and power loss when air passes through pipes.
- Easy to clean; Less grease and soot settle.
- Fits beautifully into the interior.
- There are many varieties of components available that allow you to assemble a system of any configuration.
Advantage of metal corrugation:
- Fewer adapters and angles required; smooth turns reduce the efficiency of the system less.
- The ability to stretch and contract makes installation easier.
- Small price.
Which option is better
Plastic boxes are better - they have less resistance to air flow, they fit better into the interior and are washable.
But in some cases, when laying hidden, flexible corrugated pipes are necessary.
Standardization of ventilation during operation of gas boilers
It should be noted that gas equipment is a source of increased danger. Therefore, the procedure for designing and operating boiler houses is standardized by the state, and compliance with these requirements is strictly controlled by it.
To streamline all requirements, “Building Norms and Rules 2.04.05” have been developed and applied. II-35", and II-35–76. The basic requirements for premises for gas boilers are set out above.
This document also regulates:
- procedure for developing technical documentation;
- sizes and capacities of ventilation systems for different types of buildings;
- their types and order of arrangement.
Tips for choosing
When choosing a pipe type, they are guided primarily by aesthetic considerations. Before making a choice, it is determined whether the box will be mounted openly or covered with furniture, a box, a false wall, or a suspended ceiling.
Corrugated shiny pipes spoil the kitchen interior; more often, when laying air ducts openly, smooth plastic pipes are chosen - they are easy to clean and can be painted in the desired colors - white or colored to match the ceiling or walls. Rectangular and square boxes fit better into the interior; round plastic boxes have minimal resistance to air flow.
When laying hidden, corrugated pipes are chosen - they are easier to install, no adapters or corners are needed, they are easier to bend when avoiding obstacles and for turning. Masking metal pipes will require additional costs. If problems arise, it will be difficult to get to the hidden pipe.
Diameter and shape
The diameter of the round pipe should be equal to the diameter of the outlet pipe of the kitchen hood.
Round boxes provide minimal resistance to air movement.
The ideal shape for an air duct is straight. Sharp corners when installing air ducts are unacceptable.
Dimensions and cross-section
The cross-section of a square or rectangular pipe must be equal in area to the cross-section of the round hood pipe. Narrowing the cross-section will lead to deterioration in system performance, fan overload, increased noise, vibration and loosening of fasteners. It is better to take a pipe with a slightly larger cross-sectional area. A large excess of the cross-section will lead to increased costs and difficulties with masking the pipe.
A slight narrowing of the cross-section is permissible only if the fan power is taken “with a reserve” and the hood is rarely turned on at maximum power.
The optimal length of the air duct is no more than 3 meters. If the duct length is longer, the fan power must be increased.
Diameters of corrugated pipes used in domestic ventilation: 100 mm, 125 mm, 150 mm.
Dimensions of plastic boxes: 80×80 mm, 100×100 mm, 125×125 mm, 55×110 mm, 50×120 mm, 60×204 mm, 90×220 mm.
Diameters of plastic pipes: 100 mm, 125 mm, 150 mm, 200 mm.
Calculation of the minimum required size
Calculation of the cross-section of the hood duct is not necessary. The cross-section should be equal to the cross-section of the hood outlet pipe. If the hood was purchased with a power reserve and it is not planned to turn it on at maximum power, then the cross-section can be narrowed.
The minimum cross section is calculated using the formula:
- Smin is the minimum possible cross section.
- Srab is the nameplate section of the exhaust pipe.
- Qwork is the required volume of air removed.
- Qmax - maximum volume of air removed (according to the hood's passport).
- Qwork is calculated using the formula:
- Qwork = kitchen volume x 12 times x 1.3 per m³.
In accordance with sanitary standards, 12 is the air exchange coefficient (the air in the kitchen should be changed 12 times per hour), 1.3 is the power loss coefficient in the air duct and ventilation shaft.
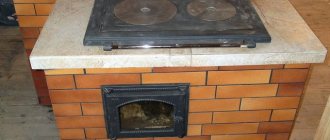
Algorithm for laying smoke and ventilation ducts
Chimney order
Installation of air ducts is carried out according to a previously created project. In order not to make a mistake when laying a channel in the wall, first create a template: a wooden board 250 * 14 * 2.5 cm, on which the diagram of the channels in the wall is marked. Thanks to the workpiece, it is easier to design a straight, even stroke.
Air duct construction diagram:
- The template is used from the 1st row of masonry. The board is laid so that the end is adjacent to the wall from the inside, and the holes for the channels are outlined with chalk. The template is used constantly to prevent shifts.
- The walls of the channel are laid out in 1 brick. If the cross-section is large, you can strengthen the ventilation by laying bricks across the channel.
- The bricks are placed end to end, and excess clay mortar is immediately removed. The treatment is carried out by mopping: the seams are thoroughly rubbed and leveled. A single-row dressing is used near the ventilation duct. It is performed using halves and three-quarters.
- If necessary, make a channel diversion. The angle is at least 60 degrees from the horizon. Lay out the outlet from bricks, hewn at the required angle. At the same time, the dimensions of the main channel and the outlet remain the same.
It is important to maintain cleanliness during construction. The holes are filled with newspapers. After removal, check the cleanliness of the shaft using a ball.
Duct outlet options
There are several options for using and connecting the air duct in the kitchen:
- Connect one or two air intake points to one air duct.
- Take the box outside or into a ventilation shaft.
In any case, general ventilation must operate in the room.
With one entrance
When connecting one air intake point to the ventilation system, the possibility of natural ventilation must be provided. If there are two ventilation shafts in the kitchen, the hood is connected to one of them, and a hole (with a grill) is left in the second shaft for natural ventilation.
If there is only one shaft, then a tee is installed near the entrance of the hood pipe to the ventilation shaft with the ability to switch between the hood and the hole for natural ventilation. There are grilles with holes for natural ventilation and a check valve that does not let air from the shaft back into the room.
With two inputs
If it becomes necessary to connect two air intake points to one system, then check valves must be installed between the tee and the fans, otherwise the fans will interfere with each other’s operation. It is also advisable not to turn on the fans at the same time. A third check valve is installed near the grille.
Outside
If you decide to take the box outside, you need to cover the outlet hole with a grill to prevent birds or animals from getting into the pipe. It is also necessary to install a check valve to prevent cold air from entering the room.
When is it necessary to increase the performance of a chimney?
Poor draft is not always the only reason for chimney work. It may be necessary to increase the rate of carbon monoxide removal if additional equipment is connected to the hood from the stove.
It is allowed to use a chimney to connect a column if the equipment is located on the same floor. And if the chimney has a sufficient smoke removal volume for operating the gas heater.
Another reason to increase the draft in the chimney is to install a more powerful heater. The required parameters of the chimney are indicated in the product data sheet.
It is also worth paying attention to how quickly you can light a fire in the stove. For example, if the draft is weak, damp wood will not burn
If the volumes of gases removed do not match the capabilities of the existing system, then the chimney needs to be modernized.