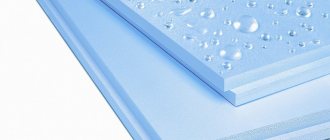
Nowadays, many people independently build and repair their homes. For anyone who has encountered insulation, EPS means only one thing - extruded polystyrene foam. The range of applications of this material is very wide; in particular, it is widely used for insulating foundations. Extruded polystyrene foam is produced by extruding polystyrene foam through an extruder. Extrusion imparts new qualities to polystyrene that are not possessed by material produced by non-press or press methods.
What is extruded polystyrene foam?
Not everyone clearly understands what polystyrene foam actually is. In general, this is nothing more than ordinary and well-known foam plastic, used in everyday practice, mainly for packaging fragile items. This is a durable, lightweight, heat-saving, biodegradable and almost insoluble material obtained by filling styrene granules with gas and then heating them.
When exposed to temperature, the granules “swell” until they occupy the entire volume available to them and sinter together.
Extruded or extruded polystyrene foam is distinguished by a special manufacturing technology. For ordinary polystyrene foam, polystyrene granules are simply heated with water vapor, while to obtain EPS, several processes are used at once: the granules are mixed and heated, a foaming agent is introduced, and then extruded under high pressure, i.e. pushed through the molding hole.
This technology provides greater uniformity and, therefore, greater strength of EPS compared to foam plastic.
A little about the product
Extruded polystyrene foam is an analogue of foam plastic, consisting of small edges. Production involves foaming the material using agents, which can be freon or carbon dioxide. Numerous tests have confirmed the negative impact of the former on the Earth's ozone layer. In this regard, manufacturers are increasingly trying to produce polystyrene foam using CO₂. The granules themselves are obtained by passing the mixture through a special matrix with small cells. As a result, finished sheets and panels are formed. This form was not chosen by chance, since laying extruded polystyrene foam in the form of small slabs is much easier and more convenient.
Pros and cons of EPS
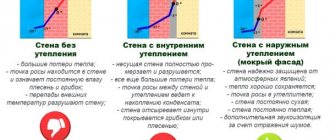
Expanded polystyrene insulation at the lower level of the building confidently competes with the more familiar mineral wool. The latter loses its effectiveness when wet, so it is not advisable to use it underground. Expanded polystyrene will absorb less than 1% of its total volume during a whole month of direct contact with water (for example, with groundwater that becomes active in the spring). In addition, this material does not rot, is not susceptible to chemical influences and can withstand up to a thousand freezes without deforming or losing its properties.
The main positive quality of extruded polystyrene foam, which is extremely important for thermal insulation of foundations - low thermal conductivity - is explained by its unique closed-porous structure. Expanded polystyrene is, in fact, a cluster of closed cells filled with gas. Together they form a kind of air cushion that does not release heat from the inside and does not let in cold from the outside. That is, EPS ideally meets the requirements that high-quality insulation must meet.
The density of expanded polystyrene significantly exceeds the “ceiling” required to insulate the basement and basement (up to 35 kilograms per cubic meter).
Finally, the clear benefits for consumers are:
- light weight of the material;
- ease of cutting;
- ease of installation, ensured by connecting tenons and grooves along the edges of the slabs;
- resulting from the previous point, the ideal joining of the plates, so that the cold will not penetrate between them.
Expanded polystyrene also has its negative sides. The main one is the flammability of the material. Treatment with a protective compound will help solve this problem.
Features of foam
Polystyrene foam or expanded polystyrene is a slab of small balls. This structure allows you to retain a large amount of air inside the material. It is this that has the best insulating properties (except for inert gases). Air is used in all heat insulators, in the manufacture of windows, etc.
The thermal conductivity of polystyrene foam is comparable to that of mineral wool and extruded polystyrene foam. The thickness is assumed to be almost the same.
But when choosing the material in question, it is worth knowing that it is afraid of the simultaneous action of moisture and cold. Manufacturers may be silent about this point, but when the liquid between the balls freezes, the foam crumbles into separate particles. Without proper waterproofing, such insulation will not last long.
The advantages of polystyrene foam include:
- accessibility and affordable cost;
- ease of cutting and installation;
- good thermal insulation performance;
- safety for humans (except in cases of fire, therefore it is applied only outside the building).
Expanded polystyrene is not recommended for use if there is a risk of flooding. The reason is poor resistance to moisture. At the same time, the balls themselves do not absorb liquid and are not afraid of it, as many manufacturers indicate. But the connections between them are easily destroyed by the action of water and sub-zero temperatures.
When and in what order to insulate?
The foundation is insulated with extruded polystyrene foam both during the construction process and when the house is already ready. You don’t need to be a professional to do everything yourself - EPS processing methods do not require any special skills.
Thermal insulation of the basement floor requires strict adherence to a certain procedure:
- foundation preparation;
- installation of waterproofing material;
- laying insulation;
- installation of a protective layer;
- final finishing of the base;
- backfilling the trench;
- installation of a blind area.
Materials and products used during installation
To perform foundation insulation work you will need:
- polystyrene foam sheets. To determine the amount of extruded polystyrene foam, it is necessary to measure the area of the foundation and, according to these indicators, purchase the required amount of foam;
- water-based mastic. Also, many recommend using roofing felt to create reliable waterproofing;
- crushed stone and sand to create a pillow;
- special glue for fixing the insulation;
- dowel - nails for fastening polystyrene foam sheets;
- polyurethane foam for sealing joints and eliminating holes;
- level for creating smooth surfaces;
- spatula with teeth for applying glue;
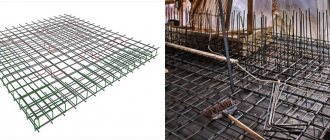
- reinforcing mesh to create durable structures;
- prepared concrete for pouring.
Only after all the necessary materials have been purchased and the tools have been prepared can you begin installation work. Using EPS is simple and accessible to every happy owner of a summer house.
Foundation insulation technology
Insulation of the house
The insulation process consists of the following stages: waterproofing the surface, fastening polystyrene foam, exterior finishing of the foundation. After excavating the earth, you need to wait until the base dries well, and only then begin to insulate the walls.
Step 1. Surface waterproofing
Waterproofing the foundation with liquid rubber
Coating waterproofing with a layer of 4 mm is applied to dry, even foundation walls. Mastic should be used without organic solvents, preferably polymer or water based. The mixture is applied with a roller, trying to fill the pores and small cracks in the concrete well. You can use only roofing felt for waterproofing or combine both materials: apply roofing felt on top of the mastic and glue the joints with the same mixture.
The moisture-proof layer must completely cover the entire surface of the base and base and have no gaps.
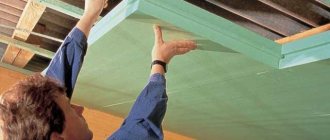
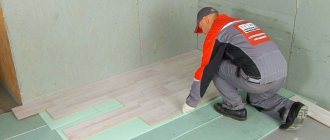
Step 2. Attaching polystyrene foam
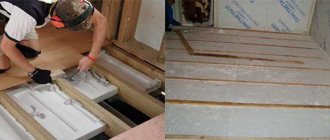
When the mastic has dried, you can proceed to the main stage. Take the first sheet of insulation and apply glue on the back side either in longitudinal stripes or dotted, the main thing is that the glue is in the center of the sheet and along the edges. 1-2 minutes after application, the sheet is applied to the foundation, its position is checked by level and pressed firmly. The slabs are attached to the foundation only with glue, so as not to disturb the integrity of the base, and on the base the slabs are additionally strengthened with mushroom dowels.
Applying glue to polystyrene foam. Spot application of glue. Attaching a dowel-fungus. Attaching a dowel-fungus. Attaching polystyrene foam with dowels.
The next sheet must be attached to the side close to the first so that the joints are as tight as possible. Be sure to check the level of the location of each fragment - this will prevent the formation of distortions. Laying is done from the bottom up, with vertical seams recommended to be shifted half a sheet to the side. When the first layer is completely fixed, proceed to the second. Everything is repeated in exactly the same way, only the joints of the upper layer should not coincide with the joints of the lower layer - the slabs must be laid offset. Finally, carefully inspect the layer of thermal insulation and, if cracks are identified in the seams, fill them with foam.
When insulating the base, the sheets are laid immediately on the glue, and the dowels are used after 2-3 days, when the glue has already dried. Each slab is fixed at the corners and in the center; To save money, fasteners can be placed at the seams.
Step 3. Plastering the foundation
To protect polystyrene foam boards, another layer is needed, for example, plaster. The basement part can be covered with siding or lined with porcelain stoneware. First, fiberglass mesh is secured over the slabs using dowels with large heads. At the joints, it is necessary to lay the reinforcing material with an overlap of 10 cm. It is recommended to stretch the mesh well so that folds do not form, which will lead to cracking of the plaster layer.
Conditions for attaching insulation:
- gluing of slabs begins in the direction from bottom to top, it is necessary to maintain the horizontality of the rows;
- The material is fixed to the waterproofed wall surface with glue or by melting the bitumen layer at several points;
- Mechanical fixation is unacceptable when externally insulating the foundation;
- each subsequent row of slabs is laid end to end with the previous one;
- the slabs must have the same thickness and dimensions;
- the glue used must not contain solvents;
- The adhesive composition is applied exclusively to dry bitumen waterproofing.
- For secure fastening, dowels can be used (with the exception of the recessed part of the building).
Calculation of the optimal thickness and amount of material
If it has been decided to insulate the foundation of a house with polystyrene foam, you first need to find out the optimal thickness of the material and its required quantity.
The first step is to determine the purpose of the work:
- reduction of heat loss in the room;
- basement insulation;
- converting a basement into a living room.
The required thickness also depends on:
- climate;
- operation and purpose of the building;
- measures to protect against moisture condensation;
- energy saving.
The most important characteristic for foundation insulation is its thermal conductivity. The lower this value, the better the heat is retained. Thermal conductivity can be defined as the amount of thermal energy that passes through a material with an area of 1 m² if the surface temperature difference is 1 °C. This value is measured in W/m²*°C. To calculate the required insulation thickness, you need to know one more value - heat transfer resistance. It is measured in m²*°C/W. To calculate it, you can use the following formula: R=d/k, where d is the thickness of the wall, K is the thermal conductivity coefficient, and R is the required thickness of polystyrene foam.
Table. Calculation of thermal insulation thickness.
Thermal insulation thickness, mm Heat transfer resistance, m2*°C/W Thermal conductivity coefficient, W/m2*°C
| 40 | 1 | 0,83 |
| 50 | 1,25 | 0,68 |
| 60 | 1,50 | 0,58 |
| 70 | 1,75 | 0,51 |
| 80 | 2,00 | 0,45 |
| 100 | 2,50 | 0,37 |
| 120 | 3,00 | 0,31 |
| 130 | 3,25 | 0,39 |
| 140 | 3,50 | 0,27 |
Important! Correct calculation of thermal conductivity will help improve the efficiency of the heating system and save a lot of money. There is no need to immediately buy too thick slabs, as their cost is higher. It is more profitable to calculate the optimal option in advance.
Calculation of insulation thickness
The required amount of polystyrene foam can be calculated by multiplying the height by the perimeter of the house and dividing the resulting value by its area. The final result will help you find out how much polystyrene foam you need in sheets. To work, you will also need glue, the consumption of which depends on the manufacturer and is indicated on the packaging.
How much insulation is needed?
Penoplex prices
Penoplex
Description of characteristics
A technical description of the characteristics of the heat insulator is presented in the table below.
| Technological characteristics | Unit measurements | Range | |
| Minimum | Maximum | ||
| Lifetime | year | 30 | 50 |
| Density | kg/m³ | 27 | 35 |
| Heat resistance | °C | -70 | +75 |
| Elasticity | MPa | 15 | 17 |
| Compressive strength | MPa | 0,27 | 0,27 |
| Flexural strength | MPa | 0,4 | 0,4 |
| Water permeability (30 days) | % | 0,5 | 0,5 |
| Coefficient of thermal conductivity | W/(m*C) | 0,031 | 0,032 |
| Vapor permeability coefficient | mg/(m*hour*Pa) | 0,005 | 0,008 |
| Sound absorption | dB | 41 | 41 |
| Moisture absorption coefficient | % | 0,4 | 0,5 |
| Fire resistance category | Group | G4 | G4 |
Based on the technical characteristics, we can say that this type of insulation meets the declared characteristics:
- Durable;
- Highly thermal insulating;
- Frost-resistant;
- Lasting;
- Water- and vapor-tight;
- Soundproof.
The material also has a number of other advantages:
- Biological resistance (not subject to decomposition and exposure to fungal microorganisms);
- Environmental safety (besides the fact that the material is durable, during its entire service life it does not affect the external environment with harmful substances);
- Ease of use (there is no question of how to cover the penoplex on the foundation - it is durable, but easy to cut, shape, fasten, etc.; very light in weight).
It is worth noting that the penoplex foundation has dimensions that are most successfully selected for construction. In addition, a “groove” connection system is used at the junction of the plates. But, joint grooves are present in slabs of at least 30 mm thickness, since the thickness of such a groove is 10 mm. So, the standard characteristics of building materials are:
Dimensions: width – 585 mm; length – 1185 mm; thickness - from 20 to 100 mm (sometimes you can find a thickness of 150 mm).
Packaging: the number of slabs in the package depends on the thickness of the sheet (1200x600x50 mm 8). For example, with a thickness of 20 mm - 20 slabs, and with 100 mm - 4 slabs. The surface of the material is smooth, and is usually orange in color.
Classes: from 31C to 75. The difference in density of penoplex is in its number - the larger it is, the higher the density. In addition, impurities can be added to various classes of insulation, which will one way or another affect its characteristics - improve fire resistance, reduce moisture permeability, reduce thermal conductivity, etc.
Compliance of Penoplex foundation with a characteristic that is much higher than many other thermal insulators gives it a significant advantage. But, among other things, it is worth noting that the material complies with the technological conditions of building materials - TU 5767-006-54349294-2014.
Vertical installation method
Foundation insulation scheme
Foundation insulation options
The vertical option is suitable for both houses that are still under construction and those that are in operation. It is best to use it for a house under construction. This method consists of the following steps.
Step 1. The surface must first be dug up, cleaned of soil, debris, including construction debris, mold, dust and grease stains.
Excavation
Step 2. Then it is leveled with cement mortar and waterproofing is carried out without using solvent-based mastic. This is necessary in order to avoid the foundation getting wet from groundwater.
Prices for bitumen mastic
Bitumen mastic
Preparation for installation of insulation
Foundation waterproofing
Step 3. Contact glue is diluted and, while it is maturing, the lower boundary of the installation is marked on the working surface. The slabs can be buried a little.
Rules for fixing polystyrene foam and polystyrene foam
Step 4. The glue is applied in strips around the perimeter and in the center, after a minute the slab must be pressed to the base and held in this position for several seconds. If necessary, align it and attach the next one, inserting it into the groove. It is better to use a level to prevent distortions. If a second layer is needed, it is positioned so as to overlap the seams of the previous one. This arrangement of the plates contributes to better insulation.
How to insulate a foundation
Rules for bandaging foam at corners
Step 5. The part of the foundation that will remain underground is no longer strengthened in any way - then it will still be pressed down by soil.
Step 6. After the glue has dried, the slabs are attached to the remaining surface using dowel nails. They are driven into the surface by 4 cm.
How to insulate a foundation with polystyrene foam
Insulation of the foundation with penoplex
An example of foundation insulation with two layers of penoplex
Insulation of the blind area together with insulation of the foundation
Video - Procedure for insulating the foundation with polystyrene foam
Protection of slabs from external influences
It is necessary to finish the base not only for its decorative appearance, but also to protect the polystyrene foam from external influences. It is very important to protect the insulation from ultraviolet rays and damage from small animals.
In order to maintain the integrity of the insulation, you need to cover it with reinforcing mesh or panels made of wood shavings. The mesh is also attached using a dowel. Cement plaster is applied on top. Additional waterproofing components can be added to the solution, which will help avoid the material getting wet. When the surface is dry, it can be painted or any cladding material can be attached.
Installation of the reinforcing layer
Prices for facing materials
Siding
Video - Attaching reinforcement mesh to polystyrene foam
If the building is located on wet soil or the groundwater level is very high, drainage is required when insulating the foundation (this can be a perforated pipe laid on a bed of crushed stone). It is made around the perimeter and taken to a specially designated place.
Foundation drainage diagram
Insulating the foundation with polystyrene foam boards eliminates freezing, helps eliminate temperature changes on several sides and prevents the formation of condensation. This reduces the humidity in the basement and basement, improves the microclimate and saves money on heating the room. The positive effect of thermal insulation also helps to increase the service life of the building. Expanded polystyrene can be used not only outside, but also indoors, it is easy to work with, and its long service life allows it to remain the most popular thermal insulation material on the market.
Recommendations for thermal insulation of the foundation with polystyrene foam and polystyrene foam
Horizontal installation method
Slab foundation insulation scheme
Horizontal insulation is used for slab and strip foundations, for which polystyrene foam up to 10 cm thick is used.
Step 1. First, the site is cleared of soil, leveling the bottom, the last few centimeters are removed manually.
Step 2. The base is covered with sand, which needs to be compacted.
Step 3. Temporary formwork is performed, which is filled with a layer of concrete without reinforcement.
Step 4. Then, when it hardens, laying the slabs begins.
Step 5. A thick film is placed on top as waterproofing, which is glued with tape.
Step 6. Formwork is made, then reinforcement is made and the foundation is poured.
Step 7. When the formwork hardens, it is removed and additional thermal insulation of the side walls is performed.
Installed insulation
Video - Monolithic slab foundation. Insulation and waterproofing
Video - Monolithic slab - technology
Installation of blind area
Insulation of the foundation cannot be considered complete without final insulation of the base and arrangement of the blind area. The latter is a narrow path along the perimeter of the building, concreted or covered with asphalt. Its width varies depending on the extension of the roof, the minimum is 600 mm. The sloping surface protects the foundation from rain and melt water flows. In addition, the blind area insulates the soil along the house, which is especially important for regions with cold climates.
Insulation of the blind area
In frosty winters and clayey soil prone to uneven freezing, for additional insulation it is advisable to equip the blind area with extruded polystyrene foam slabs. The strength and elasticity of this material fully corresponds to the functions assigned to the blind area.
Perimeter thermal insulation
With the arrival of heat, cracks or distortions often appear in the walls of the basements of buildings. This is due to the deformation that occurs due to soil heaving during the cold season.
How to avoid soil heaving?
Each type of soil is susceptible to heaving in its own way. Clays and loams suffer especially greatly from this process. At first, the soil actively absorbs water. When winter comes, the moisture freezes and the volume of the soil increases. Swelling appears, sometimes capable of pushing out the foundation. With the onset of spring, the frozen water melts, and the foundation of the house sinks. The walls of the basements become warped and cracks form.
To reduce frost heaving, a sand cushion is made under the foundation. The thickness of the sand is at least 10 cm. Backfill is also based on sand, which is sometimes called non-heaving soil. But these measures do not completely solve the problem. Only the complete elimination of soil freezing helps to get rid of the pushing out of the foundation with subsequent subsidence. To do this, you can insulate with extruded polystyrene foam around the entire perimeter.
Perimeter insulation technique
Work begins with digging a perimeter excavation outside the building, the depth of which is 40–50 cm. A 20 cm thick layer of sand is poured into it. Then it is compacted with a slight slope, starting from the base of the supporting structure. Foam boards are placed on the sand. Since the soils in our country freeze to 1.5–2 meters, products should have the same width.
In corner areas, the width of the insulation is one and a half times greater, because heat is lost more strongly than on flat surfaces. The materials are covered with a 30 cm thick layer of sand on top.
Insulating the foundation with foam plastic solves several problems at once. It prevents the ground from freezing. As a result, heaving soil loses its buoyancy force. The supporting structure remains intact, the basements retain heat.
Insulation of various types of foundations with polystyrene foam
Insulation of a shallow strip foundation
The main elements of a shallow foundation are shown in the figure.
The peculiarity of the design is that the freezing limit is much lower than the foundation laid. Thus, insulation of a strip foundation with polystyrene foam should be carried out over the foundation area outside the building, and over the floor area inside. This is the only way to achieve high-quality insulation and a significant reduction in heat loss.
Foundation depth
To insulate a shallow foundation, you do not need to dig a deep trench. It is enough to “dig out” the foundation. After all, there is no point in digging to the point where the soil freezes. And the width may be smaller, sufficient for installing polystyrene foam boards.
Further work is performed according to the same principle as described above.
2. Insulation of slab foundations with polystyrene foam
Insulation of a slab foundation with polystyrene foam. A slab-type foundation is called floating because a house built on it seems to float on it, like on a raft. It is used where eroded, weak or bulk soils predominate.
The insulation of a slab foundation with polystyrene foam is similar in technology to the insulation of a shallow strip foundation. That is, you need to perform vertical insulation of the slab with polystyrene foam. To do this, install several layers of expanded polystyrene with a total thickness of 100-150 mm. along the perimeter of the slab. It should be noted that the depth of the slab rarely exceeds 200 mm. This is due to the fact that as the thickness of the slab increases, the load on the soil increases, thus the house sags. But the main advantage of this type of foundation is reduced to nothing. Next, horizontal insulation is performed. This is due to the fact that the main direction of heat loss is the horizontal surface of the slab, the place where it meets the ground. Related article: Do-it-yourself wooden tool box
The sequence of layers is shown in the diagram.
Insulation of slab foundations with polystyrene foam
It is worth noting that high-quality insulation of a slab foundation with polystyrene foam is possible only at the stage of its construction. Otherwise, you will have to perform insulation from the inside, and this approach to insulation has several disadvantages, which will be discussed below.
3. Insulation of the pile foundation with polystyrene foam
Insulation of a pile foundation with polystyrene foam. A feature of a pile foundation is the use of piles that are driven into the ground to a depth of more than 1 m. A grillage made of reinforced concrete, wood or metal is placed on the piles. Consequently, insulation of a pile-screw foundation with polystyrene foam is carried out by insulating the grillage. The principle of the device: polystyrene foam is laid starting from the lower level of the grillage to the first row of bricks or timber.
Insulation of a pile foundation with polystyrene foam
4, Columnar
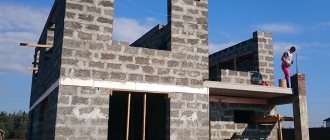
How to insulate the outside of such a house foundation? Let's look at the workflow using the example of using penoplex. By the way, this is the answer to the question of what is the best way to insulate a columnar base from the outside.
First, a trench is built around the entire perimeter of the house, the bottom of which has a slope from the foundation walls to ensure the removal of ground moisture. The surface of the supporting structure is cleared of soil, uneven areas are smoothed out, and chips are repaired with cement mortar. Then the foundation is dried, all its elements are covered with two layers of bitumen mastic to protect the concrete from the negative effects of a damp environment. The insulation is glued to the bitumen layer with a special glue applied to the slabs pointwise. The work is carried out from the lower section, the gap areas should be minimal, they are then filled with polyurethane foam. Many people are interested in whether it is necessary to arrange a second layer of penoplex? Yes, if you want reliable protection from cold air.
Preparatory stage
Expanded polystyrene PSB-S
First you need to calculate how many insulation boards will be needed for the foundation. The dimensions of a standard polystyrene foam board are 600x1200 mm, thickness from 20 to 100 mm. For the foundation of a residential building, slabs 50 mm thick are usually used, laid in two layers. To find out how many slabs will be needed, the total length of the foundation is multiplied by its height and divided by 0.72 - the area of one sheet of polystyrene foam.
For example, if a 2 m high foundation is insulated in a 10x8 m house, the thermal insulation area is equal to 72 square meters. Dividing it by 0.72, we get the number of sheets - 100 pieces. Since the insulation will be carried out in two layers, it is necessary to buy 200 slabs 50 mm thick.
This, however, is a very average calculation, based on the fact that the insulation thickness will be exactly 100 mm. But this value can be greater - it all depends on the climatic conditions of the region, the foundation material, and the type of insulation.
There is a special system for calculating thickness, which requires knowing the R index - this is a constant value of the required heat transfer resistance established by SNiP for each region. You can check it with your local architecture department, or take it from the table below:
| City (region) | R - required heat transfer resistance m2×°K/W |
| Moscow | 3.28 |
| Krasnodar | 2.44 |
| Sochi | 1.79 |
| Rostov-on-Don | 2.75 |
| Saint Petersburg | 3.23 |
| Krasnoyarsk | 4.84 |
| Voronezh | 3.12 |
| Yakutsk | 5.28 |
| Irkutsk | 4.05 |
| Volgograd | 2.91 |
| Astrakhan | 2.76 |
| Ekaterinburg | 3.65 |
| Nizhny Novgorod | 3.36 |
| Vladivostok | 3.25 |
| Magadan | 4.33 |
| Chelyabinsk | 3.64 |
| Tver | 3.31 |
| Novosibirsk | 3.93 |
| Samara | 3.33 |
| Permian | 3.64 |
| Ufa | 3.48 |
| Kazan | 3.45 |
| Omsk | 3.82 |
Calculator for calculating the thickness of foundation insulation
In order not to bother the reader with calculation formulas, below is a special calculator that will allow you to quickly and accurately find the required thermal insulation thickness. The result obtained is rounded up, leading to the standard thickness of the panels of the selected insulation:
In addition to polystyrene foam you will need:
- mastic or roofing felt;
- gravel;
- glue;
- mushroom dowels;
- putty or polyurethane foam;
- level;
- notched spatula;
- cement mortar;
- sand;
- reinforcing mesh;
- roller
When all the materials have been prepared, a trench is dug along the perimeter of the foundation. You need to dig to the freezing level, that is, to a depth of 1.5-2 m. To make it convenient to work in the trench, its width should be 0.8-1 m. Of course, soil excavation is carried out exclusively by hand, since equipment can damage the foundation. The walls of the base must be thoroughly cleaned of soil, unevenness and cracks must be repaired with mortar.
We insulate the strip foundation
The insulation process depends on the type of foundation. First of all, let's look at how the thermal insulation of the most common strip foundation is performed.
I should immediately note that the strip foundation of the house must be insulated from the outside. Only this arrangement of the insulation will allow you to achieve maximum effect. In addition, external insulation allows you to protect the base from various negative environmental influences, including moisture.
The technology for insulating a strip foundation includes several basic steps:
Stages of insulating a strip base with penoplex
Preparation of materials
So, to insulate the foundation, in addition to penoplex, you need to prepare the following materials:
- waterproofing for the foundation;
- drainage pipes;
- geotextiles;
- acrylic adhesive for penoplex.
The thickness of the penoplex for insulating the foundation should be at least 80 - 100 mm. If the slabs are thinner, they should be installed in two layers.
Digging out the foundation
Excavation work
The best time to insulate the foundation is at the stage of building a house. This will avoid doing a lot of unnecessary labor-intensive work.
If you have to insulate a house that has already been in use, you must perform the following excavation work:
- First of all, you need to dig a trench around the perimeter of the house to the full depth of the foundation. The width of the trench should be at least a meter and a half. After digging out the foundation, it must be allowed to dry ;
- While the foundation dries out, drainage should be done around the perimeter of the house. It is especially necessary if groundwater is close or if your region is characterized by heavy floods.
Drainage diagram
Drainage needs to be installed at the level of the foundation sand cushion. To do this, at a distance of about half a meter from the foundation, along the perimeter of the house, you need to dig a trench to a depth of 40 centimeters.
The bottom of the trench should be covered with a layer of sand ten centimeters thick, and then with a layer of crushed stone of the same thickness. After this, the trench needs to be covered with geotextile with a fold over its edges, as shown in the photo below.
Laying drainage pipes
Next, drainage pipes need to be laid in the trench. Keep in mind that it is necessary to ensure a pipe slope of at least 2 cm per meter. After this, the trench must be filled with crushed stone and the edges of the geotextile must be folded so that they wrap around the pipe.
Drainage pipes should be diverted to a storm drain.
It is necessary to insulate the foundation in dry weather. It is best to carry out work in late spring or summer.
This completes the excavation work.
Foundation preparation
Now you need to prepare the foundation walls for insulation.
To do this you need to do the following:
- after the foundation has dried, it must be thoroughly cleaned of soil residues, as well as broken pieces of concrete, etc. To do this, you can use a metal brush;
Cleaning the foundation from dirt
- If there are protruding parts on the foundation walls that could break the insulation, they need to be knocked down. The smoother the surface, the more durable the thermal insulation will be;
- Next you need to waterproof the foundation using bitumen mastic. You can apply mastic using a paint roller.
Applying mastic to the foundation
The coating layer should be 2-4 mm. Try to fill all the depressions, cracks, etc. with mastic so that a continuous waterproofing layer is formed.
This completes the preparation of the foundation. Now, before attaching the insulation, you just need to wait until the mastic has completely dried.
Foundation thermal insulation
So, all the preparatory operations have been completed, now we insulate the foundation with penoplex.
This work is carried out as follows:
- glue should be applied to the back side of the penoplex. It is best to use acrylic foam adhesive. The composition is applied around the perimeter of the slab, as well as in the center;
In the photo - applying glue to penoplex
- then the penoplex needs to be glued to the surface of the foundation. Start working from the corner and glue the sheets in rows from bottom to top. Try to place the sheets as close to each other as possible. Some types of extruded polystyrene foam are connected to each other using a tongue/groove system;
Some nuances
When insulating the base with polystyrene foam or polystyrene foam with your own hands, you should take into account a number of other facts, failure to comply with which can lead to improper operation of the structure or its destruction. The main requirement is that when choosing thermal insulation, it is recommended to consult with specialists and determine the exact thickness of the slabs required for the specific region in which the property is located. For more information about insulating the base and blind area with extruded polystyrene foam, watch this video:
In addition, there are a number of other important details. Below are some of them:
- Insulation slabs located above ground level must be additionally fixed using disc dowels.
- When installing the drainage system, be sure to tilt it towards the storage wells, where moisture will flow through the pipeline.
- When insulating corners of the foundation, it is recommended to apply a double layer of thermal insulation, since these elements are considered the most susceptible to freezing.
- Extruded polystyrene foam and polystyrene foam cannot be glued to a composition containing acetone, ethyl acetate, toluene and white spirit.
- The work process must be carried out at positive ambient temperatures.
- Insulation of a high foundation is carried out with the thermal insulation arranged in a checkerboard pattern. The seams should not be located on top of each other. The use of a double layer is not recommended by professionals, who explain this by the fact that under soil pressure as a result of soil heaving, the layers can come apart and compromise the integrity of the structure. If you do use this option, make sure that the seams do not coincide with each other. This will help avoid the formation of cold bridges.
The main mistake of home owners is the desire to insulate the walls of the building, and not its base. At the same time, not many people are interested in thermal insulation of the foundation. Therefore, this leads to significant heat loss and a reduction in the service life of the base and the entire structure.
Insulation of a pile foundation
Now let's look at how to insulate a foundation on stilts. In essence, this operation consists of arranging a “warm” base.
The insulation technology in this case also includes several stages:
Stages of foundation insulation
Preparation of materials
To insulate a pile or columnar foundation, you will need the following materials:
- boards and beams for assembling the sheathing;
- polyurethane foam;
- antiseptic impregnation for wood;
- material for covering the sheathing - this can be plinth panels, aceid or other suitable covering.
Insulation scheme for a columnar foundation and blind area
Arrangement of the blind area
You can start work by arranging a blind area, which is performed as follows:
- along the perimeter of the house you need to dig a trench about forty centimeters deep and a meter and a half wide;
- then the bottom of the trench must be covered with a layer of sand about 10 centimeters, and it must be compacted thoroughly;
- then fill in the same layer of crushed stone and compact it too;
- a trench should be dug along the outer edge of the blind area and drainage should be made according to the scheme described above;
- after that, lay waterproofing, for example, roofing felt, on the crushed stone. As in the previous case, the joints need to be glued with bitumen mastic;
- then penoplex is laid on top of the waterproofing, and then the screed is poured.
This completes the installation of the base.
An example of attaching a sheathing to a pole
Frame assembly and insulation
First of all, you need to make the crate with your own hands. I must say that there are quite a lot of options for its manufacture.
Most often, the sheathing is done like this:
- Boards or beams are attached to the posts around the perimeter of the house. If the piles are metal, you can weld planks to them and secure the boards with bolts. Also, bars are often attached to the piles using clamps. The boards are attached to these bars using self-tapping screws. In some cases, the sheathing is attached directly to the walls. In any case, the sheathing should be positioned vertically. Keep in mind that all wooden structural elements, including the foundation grillage, must be treated with antiseptic impregnation;
- then the horizontal boards need to be connected to each other by vertical posts;
Penoplex can be fixed to the inside of the frame
- Now you need to secure the penoplex to the frame. For these purposes, you can use ordinary nails, the only thing is that washers should be placed under the heads so that the penoplex is securely attached to the foundation;
- The gaps between the plates must be filled with adhesive foam or even regular foam.
If the house is built on heaving soil, a gap of about 10-15 centimeters must be left between the base (sheathing) and the blind area.
At this point, the insulation of the pile foundation with penoplex is completed.
Aceid sheathing
Base covering
The final stage is covering the frame. To do this, you can use plinth panels. They are attached to the sheathing or walls of the house with screws that are screwed directly through the foam.
The only thing is that a starting strip will first be installed along the perimeter of the sheathing from below, into which the lower edge of the panels is inserted. The foam is on top and the upper edge of the panels is covered with a shimmer.
In the case of finishing the base with aceid, the sheets are attached to the sheathing using nails. Subsequent finishing of the aceid can be done with decorative stone, tiles or other material.
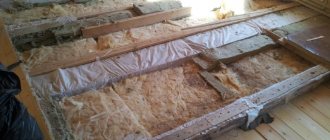
Technology of insulating the foundation with polystyrene foam from the inside
Insulating the foundation from the inside with polystyrene foam is more preferable than insulating with polystyrene foam. This is due to the fact that the sufficient thickness of polystyrene foam to insulate the foundation from the inside is 30 mm. And, therefore, its presence does not take up much useful space.
However, carrying out work inside the basement has a significant drawback: due to the shift in the dew point, the foundation is still exposed to temperature changes, which means that the possibility of its deformation cannot be ruled out.
The procedure for internal insulation of the foundation:
- all defects on the surface are eliminated;
- the cracks widen to a V-shape. Then they are treated with a primer and sealed with sand-cement mortar;
- the entire surface is treated with a primer.
- Installation of polystyrene foam is carried out using an adhesive mixture or adhesive foam. The sheet must be fixed with an “umbrella” (if glued to foam, then umbrellas are also attached while it hardens, after which they are removed, this is done in order to prevent deformation of the polystyrene foam boards during the foam swelling process).
- the sheet is protected with a metal mesh from rodents;
- carry out finishing.
When installing insulation from inside the room, you need to ensure high-quality ventilation to avoid condensation.
Quite simple technology and relatively inexpensive materials will allow you to take the first step towards the implementation of energy-saving technologies.
Insulation with permanent formwork
In accordance with the current SNiP and SP 50, the process of installing permanent formwork begins with preparing the construction site on which it is planned to place block or panel material.
The algorithm of actions is as follows:
- a layer of waterproofing material is laid on the prepared base;
- installation of the structure begins from one of the corner sections. The first block row is strung on reinforcing bars installed vertically in a sand and gravel bed;
- As soon as the initial layer is laid out, the block grooves are filled with reinforcement of the required diameter, located longitudinally along the entire perimeter. They are fixed to vertical rods using knitting wire. At the joint areas, the reinforcement is laid with an overlap. The correct placement of blocks vertically is controlled by a level every three to four rows;
- communication pipes are passed through special holes;
- concrete solution is poured, the level of which should reach the middle of the outer block row;
- the use of insulated formwork for a monolithic foundation allows you to create a kind of “expanded polystyrene - concrete monolith - expanded polystyrene” panel.
Bridge of Cold
A cold thermal bridge is a structural element of a building with low thermal resistance.
Masonry elements and monolithic structures are conductors of cold into the building, as they contain concrete, mortar and metal in their composition. These materials cool much faster than others, and along them, like bridges, heat leaves the building. The more such bridges are in direct contact with the external environment, the lower the thermal protection efficiency of the building.
The lower the energy efficiency of the structure, the greater the energy consumption will be. Heating costs will increase. At the same time, cold bridges contribute to the formation and accumulation of water condensate. This affects the appearance of mold and various fungi. Condensation also gradually leads to corrosion and destruction of building elements.