A house made of foam blocks for a summer residence takes first place in popularity. Blocks are a universal material, which, moreover, can have different sizes and densities.
To build a regular block house, the density most often chosen is 500 or 400.
You can lay denser blocks on the first floor if you plan to build a two-story country house or a building with an attic, and lighter ones on the second floor.
But you should not choose blocks with a density below 400, as they are too loose - they hold heat well, but even self-tapping screws will not hold well in them.
House made of foam blocks: we build it ourselves
So, if you decide to start building a budget house from foam blocks with your own hands, our tips and recommendations will definitely help you.
Where to start building a house from foam blocks?
The construction of cottages made of foam blocks begins with preparatory work. The territory itself is being prepared where the house will stand, the location of the building relative to the cardinal points is being clarified, and markings are being made.
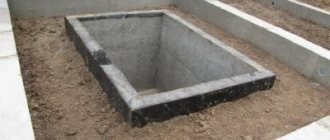
The foundation for a block country house should be more solid than for a frame, so it is better to go with a strip foundation.
It’s not difficult to make a budget strip foundation even on your own, but you will have to spend some time constructing the formwork, which is a device into which cement will be poured.
Typically, formwork is made from boards that are connected by special spacers. The width of the foundation depends on the size of the blocks, and the depth - on the expected weight of the country house made of foam blocks, but below the freezing point.
Do not forget to lay and compact the sand cushion under the strip foundation
So, we dig a trench under the foundation, install the formwork and pour cement.
It is better to order cement with a mixer, since to independently prepare such a volume from a dry mixture you will need a huge container and a long period of time.
And creating a foundation in several stages will lead to a decrease in its strength at the joints.
In general, a block house requires a more solid foundation than a frame house.
Description of material
Foam blocks are artificial stones of regular shape made from foam concrete. This material, also called cellular concrete, is created from standard components - sand, cement and water, but with the addition of foaming agents.
The properties and price of foam concrete largely depend on the type of foaming agent, which can be synthetic or organic.
- Synthetic foaming agents are easy to produce and inexpensive, but they negatively affect the quality, strength and fire resistance of foam blocks.
- Organic (protein) foaming agents are created on the basis of natural raw materials and are an environmentally friendly product with no hazard class at all. Foam blocks made with their use are of high quality and strength due to the formation of a thicker interpore wall.
Protein foaming agent Foam concrete structure
There are two ways to form blocks:
- Pouring the finished mixture into standard size molds;
- Cutting a monolithic cellular slab into bars.
Foam concrete brands
The greater the volume of air in the material, the lower its density, the lighter it is and the better it retains heat. But a decrease in density is also a loss of strength.
Therefore, foam concrete blocks, depending on the density indicator D, are divided into the following grades:
Thermal insulation (D300 - D500) - intended for insulating external walls, floors, and foundations of houses with foam blocks;
Thermal insulation of loggia walls
- Structural and thermal insulation (D600 – D900) – for the installation of internal partitions, construction of utility rooms;
- Structural (D1000 – D1200) – for the construction of external walls and foundations.
Waterproofing the foundation of a house made of foam blocks
After the foundation has hardened and the formwork has been removed, it is time to continue building a house from foam blocks.
Coating with resin will provide an additional guarantee of waterproofing the foundation
It is necessary to waterproof the foundation. This can be done using ordinary roofing felt.
The base on which you will lay sheets of roofing felt should be coated with special resin. It acts as an additional waterproofing agent, and in addition, it prevents the roofing felt from moving during the laying of blocks, securely gluing it to the concrete.
Sometimes the foundation is not coated with resin, but it is still better to do it. The resin doesn't cost much, and you can coat and lay the waterproofing in one day.
Wall thickness
The optimal thickness of the walls of a block house must be agreed with SNiP. The use of gas silicate is strictly regulated:
- We need to calculate the height of the walls.
- Height restrictions are 4-5 floors.
- For three-story houses, the blocks must be grade B-2.5.
For summer living, adhere to the following rules:
- Use blocks with a thickness of at least 200 mm.
- Two or three storey houses are built from blocks 300-400 mm thick.
- The partitions are erected from gas silicate with a thickness of 200-300mm.
For year-round living in central Russia, the thickness of the blocks is 375 mm. brand D400.
All parameters can be calculated using special formulas. Correctly made calculations will ensure a sufficient level of strength and resistance to your home under any loads.
In the Middle Zone, the thickness of a gas silicate wall is:
- Block density 400 kg/cub.m. the wall must be at least 44cm thick.
- At a density of 500 kg/cub.m. wall thickness 37.5 cm.
What will be needed for construction
No matter how even we strive to make the foundation, soil subsidence cannot be uniform.
Therefore, in 99% of cases, the first row requires a lot of concentration for the installer.
You will also need the following tool:
- Great level.
- Small level.
- Long tape measure for measuring walls.
- A short tape measure for measuring load-bearing partitions.
- Shovel for applying cement mortar.
- Rubber hammer.
- Wide brush.
Also for construction you will need masonry mortar, construction adhesive and foam adhesive.
Masonry mortar is used at the first level of blocks, when it is necessary to significantly level the level.
The difference in total can reach several cm, and only masonry will help to lift the blocks.
When choosing it, please note that some types are able to smooth out even 8 cm of inaccuracy.
Laying the first level of blocks under the rope
An adhesive solution will be needed to fill the gaps between the blocks and for small, up to a couple of cm, errors. Foam adhesive is sold in cans and can be used when the blocks lie perfectly flat.
It practically does not create gaps between the blocks, is well distributed in space and tightly glues the building material together. Working with foam is much easier and installation is faster, since there is no need to mix the solution.
First level: special attention to markings
In order for the first layer of blocks to lie flat, you need to work “under the rope”. Since the blocks should overhang the foundation slightly from the outside, the rope is stretched along the outer edge of the house.
It should run exactly along the edge of the block. Use a laser level to determine the height of the rope. This is especially important if the foundation has some skew.
Since the blocks can only be raised to the highest point, we use more masonry mortar where the level is lower.
Laying the second level of foam block with glue
After placing cement mortar on the foundation waterproofing, we install the first block and check it with a short level. If there is a misalignment, use a rubber hammer until the block lies flat.
Once we have achieved perfect evenness, we lay the second block, gluing both blocks with adhesive solution to each other. We again check the evenness with a level along the top surface and along the side wall of the future house.
It’s better not to rush and lay out the first layer perfectly evenly, because the errors will add up, resulting in a general warp of the wall.
Some design tricks
While working on the project, there were a lot of disputes in the family about the location of the rooms inside the house. For example, a corridor: apart from the passage function, there are no useful characteristics. This space can be eliminated by removing partitions, creating a single area . You can also make an arched structure. This creates the illusion of the presence of another room and slightly expands the space (especially if you install a large mirror in one part of the room).
Living room in a cozy, country style
With the help of design and furniture, the site will be divided into visual zones and create the impression of a large, bright space. This trick can be used on the first floor of a two-story building.
Advice The first floor can be made more dynamic by choosing the right wall color or wallpaper pattern. But the second floor will become more “residential”, “sleeping”. It is better to leave pastel colors, floral patterns and light furniture for him.
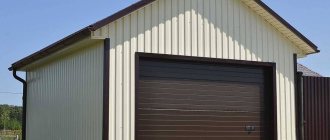
If the project includes a built-in garage, the space above it is ideal for a dressing room. Residential premises are not recommended for safety reasons. Sometimes this space is equipped with space for stairs.
The room on the ground floor should be comfortable for all family members
The premises on the ground floor are for general purposes. It should be comfortable for all family members. It’s better to plan it right away, while amendments can be made. If the family is large, then it is better to allocate the largest room on the first floor as a living room, so that all family members can easily fit at a large table.
We divide and arrange
The kitchen is often combined with the living room. Visual separation occurs due to the installation of a bar counter. The hood with this layout should be powerful. Smells are perhaps the only disadvantage of such zoning.
Large and bright bedroom in a country style
When there are children in the house, the task becomes more complicated. The equipment for the children's area must be integrated into the overall design. It is better to choose furniture taking into account the intensive use by little fidgets. Try to buy wooden tables, chairs, cribs, toys. Environmentally friendly material will keep your child healthy.
Instead of plastic painted in thermonuclear colors and fragile glass objects, it is better to equip the children's area with sports equipment and furniture without sharp corners.
Your sons and daughters don't need mirrors and vases. Everything in the nursery should be aimed at the safety of the child.
Beautiful kitchen in light colors
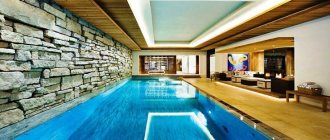
Some customers ask to include a basement in the project. This is an expensive undertaking, but its functionality is not in question. You can dig a hole for a cellar inside the house, or you can find free space in one of the sheds. It is much more convenient to place a basement in the house, because the cellar is not just a place for pickles and tinctures. Shelves are often installed here and communication systems are installed.
Bathroom in a minimalist style
Creating a project is a fascinating process. There are a lot of ideas, and sometimes the grain of truth is difficult to find. Listen to the advice of professionals - their experience can suggest the ideal option for you.
Second block level: residual alignment
For the second layer, masonry mortar can no longer be used. If any errors remain, or the solution has settled too much in some place, use an adhesive solution.
If you are sure that everything is smooth, you can use foam. Sometimes the entire second layer is laid on foam, except for 1-3 blocks that unexpectedly fall into the masonry mortar.
Correct application of the solution: create an air layer inside that retains heat
Foam, as we wrote above, is very easy to work with. Before applying it, the block is moistened with water, for which a wide brush is useful.
The foam is pressed under pressure in two parallel strips onto the bottom block and onto the side wall.
It holds the building material securely and dries very quickly. Try not to get yourself dirty, as it is extremely difficult to remove foam from clothes or hair.
Just remember the rule: each laid block must be checked by level from above and from the side.
Finishing work
Each aerated block wall must be treated with a special type of plaster for aerated blocks; with its help, the building material can become more durable, as well as improve the thermal and waterproofing of the walls.
Finishing of the facade begins only at the very end, when the roofing work is completely completed. For cladding, you can use any material: brick, decorative stone, siding and many others.
Third layer: foam for minimal seams
The third layer is usually easy to install. The blocks are easy to lay on the foam, and you no longer need to level them so carefully.
No, we continue to use the level every time, but as a rule there is no need to correct anything. However, the time has come to use the reinforcement.
We use foam for laying foam blocks
Iron reinforcement 15 mm thick is sufficient to create a rigid coupling between all blocks. You can throw two 20 mm reinforcement in the corners for greater reliability.
Interesting: the total distance between seams on a 10 meter wall will be reduced by 15-20 cm if you use foam instead of adhesive for blocks.
Roof installation
Work order:
- Forming a ceiling from wooden beams or floor slabs. The strapping is done using boards 3 cm thick.
- Installation of the rafter structure. It is recommended to assemble it on the ground and then install it on the walls.
- Cover the rafters with boards.
- Install moisture insulation and insulation.
- Cover the roof with roofing (slate, tiles).
It is better to treat wooden structures with an antiseptic.
How to use fittings
In the top layer of the wall, using a homemade iron corner, a groove is made into which the reinforcement is placed.
It is sealed with adhesive mortar or cement mortar. As a result, all blocks will be connected to each other not only with glue, but also with iron.
Particular attention should be paid to corners and transitions to load-bearing walls.
We use a wall chaser and place reinforcement in the grooves
The reinforcement is laid through at least one level of blocks. If the building is large and heavy, then each layer can be fastened with iron.
If you are building a garden house from small foam blocks, you don’t need to use reinforcement.
Important: determine in advance where the windows will be. You'll have to tinker with them. The windows are reinforced on top either with concrete lintels or metal corners.
Second floor or attic
Economy class foam block houses often have an attic. The ceilings in them are usually made of wood.
You can choose laminated veneer lumber, edged boards or ready-made I-beams.
Wooden floor for a block house
Floor beams are mounted at a distance of no more than a meter from each other, but it is better to take a step length of 60 cm.
The beam can have a cross-section of 150x225 mm and should extend into the aerated concrete wall by at least 15 cm.
The length of freely hanging beams should not be more than 6 meters, otherwise they begin to bend under their own weight. If the distance between the walls is more than six meters, load-bearing walls are erected inside the house.
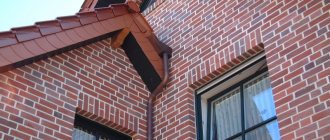
After the ceiling, the gables are erected. Usually, when calculating the number of blocks, door and window openings are not taken into account.
These extra, remaining blocks go to the gables. The gables themselves, especially if the attic floor is made residential, usually also have windows.
Foam block pediment with window: approximate view
By doing the construction yourself, you can build a house from foam blocks for a million or even less.
Houses made from economy class foam blocks meet all the requirements for modern construction projects, and at the same time are affordable for any budget.
Blueprints
The construction of any house begins with a competent design and a detailed drawing indicating all the components of the future building. It is when designing a home that its layout is developed. Let's consider several attractive projects of one-story foam block houses.
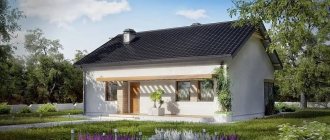
If you want to build a small house in the country, then you will like the project of a neat 7x9 m structure:
- it can be built on a strip-monolithic foundation;
- for external walls it is permissible to use a combination of foam blocks and gas blocks;
- floors are made of reinforced concrete;
- For a simple gable roof, metal tiles are suitable.
Conventionally, such a building can be divided into two halves. On the left side there is space for a small bedroom of 9 square meters. m. Directly in front of it, it is worth placing a more spacious hall, combined with a kitchen located on the right side of the home (this area will occupy 23.7 sq. m.). Behind the kitchen on the right you need to allocate a small space for the boiler room (2.5 sq. m).
The last room on this side will be a combined bathroom of 2.9 square meters. m. The areas near the front door and the door leading to the backyard should be continued with small hallways of 4.1 and 3.1 sq. m. m (for the back door). In such conditions, it is quite possible to equip an attic.
Also today, many people order projects for foam block houses, the dimensions of which are 8x8 m. As a rule, two-story buildings have such parameters, but this does not mean that they cannot be used for one-story houses.
So, in a building measuring 8x8 m there is room for the following rooms:
- most of it should be allocated to a spacious living room combined with a kitchen (28.60 sq. m);
- Opposite the living room and kitchen, allocate space for a hall running from the front door to the back door (15.4 sq. m.) to divide the building into two halves;
- on the right side of the hall there is space for a bedroom or guest room (13 sq. m), a small bathroom (5.8 sq. m), as well as a dressing room (7.20 sq. m), located in the corner of the building.
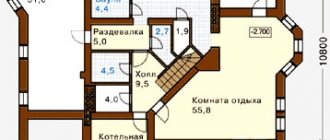
A foam block house measuring 8 by 10 m can be successful.
Let us consider in detail which rooms (and what area) can be located in such conditions:
- at the entrance to the house you can organize a neat terrace;
- the first room next to the terrace will be a vestibule (2.7 sq. m), which turns into a hall (3.42 sq. m);
- on the left side of the vestibule and hall, place a bathroom (6.3 sq. m);
- on the right side, organize a comfortable living room (20.56 sq. m);
- right behind the living room you can arrange a small kitchen (11.2 sq. m);
- Opposite the kitchen (on the opposite side - on the left) allocate an area for a bedroom (10.6 sq. m).
If you are planning to build a small block house measuring 6x8 m, then you should consider the following project.
- such a house can have the simplest possible shape;
- place the hall in the right corner of the home;
- in front of the hall, equip a small bathroom that will conditionally separate the entrance part of the house and the bedroom located in the corner on the right side;
- Opposite these rooms, place a large living room, separated by a partition from the kitchen.
A block house measuring 9x9 m will be more spacious.
Below we will consider how to arrange all the necessary rooms in such a structure:
- divide a small hall between the kitchen on the right (8.9 sq. m) and the bathroom on the left (toilet - 2.8 sq. m, bathroom - 3.6 sq. m);
- allocate the remaining space to a spacious hall and dining area (34.8 sq. m), install a staircase in the corner leading to the attic;
- in the attic, place a study (8 or 11 sq. m), behind the wall from it a bedroom (14 sq. m), and after the bedroom another study (12.1 sq. m), located in the corner;
- place the bathroom on the left side of the second office (8.7 sq. m);
- organize a small balcony with an exit from the first office.
A more spacious house of 9x10 or 10x10 m can be equipped in a similar way; such a structure can be supplemented with a garage, separated by a partition from the boiler room. On the remaining area it will be possible to arrange all the standard rooms.
Convenience of a bay window: more inside than outside
House with a bay window made of foam blocks - creating additional space in the house
A house made of foam blocks with a bay window is a popular construction project primarily because of its convenience.
A bay window expands the space, but also increases the cost of the project itself. The presence of this feature of the house will have to be taken into account from the construction of the foundation.
However, the advantages outweigh all the difficulties:
- Expansion of space when the inside of the house looks more spacious than the outside.
- The original appearance of the building.
- Additional separate area in the room.
- Possibility of creating an extensive view thanks to the installation of windows.
Important steps and sequence of actions
Preparatory stage - selection of foam blocks
The distinctive properties of this material lie in three main features:
- Firstly, it is softer than aerated concrete, therefore, it weighs less;
- Foam concrete is more resistant to moisture and is not afraid of dampness and mold. At the same time, an optimal microclimate is maintained in the house; the air is never too dry;
- Finally, the price of foam blocks is significantly lower than aerated concrete blocks.
The blocks are made from durable foam concrete, with the addition of sand, water and a special foam substance (the instructions for the batch will tell you in more detail about the properties). Among the advantages of the material are the same durability, good thermal insulation properties and sound insulation inherent in brick houses.
If you don't build it yourself
If you don't see yourself as a builder, you can try to buy a ready-made house.
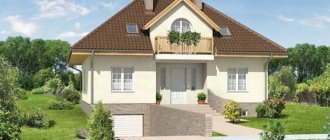
Today, prices for houses made of foam blocks have dropped significantly, and it is quite possible to choose the option of a small budget house for 1 million.
We build an inexpensive budget house from foam blocks ourselves for 1 million rubles!
The big advantage is that buildings made of foam blocks can last for a very long time.
And if you cover it with foam plastic (at least 5 cm), then it will not be afraid of frost, wind, or cold.
Foam concrete does not deteriorate, does not rot, and is not attacked by bugs, like frame houses, and this is a big plus. It is ideal for permanent residence.