Characteristic
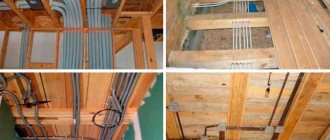
Hand-held drilling equipment has gained considerable popularity. But using it “in its pure form” is very difficult and time-consuming. A stand for a motor drill can significantly simplify many jobs. This structure is made from a pair of metal pipes. A carriage is attached to the fixed part, which moves the drilling element.
To make the carriage move, a chain is attached to it. And this chain, accordingly, is connected to a shaft equipped with a sprocket. When working, rotate the handle up and down. Thus, the gas drill stand allows you to pull up and lower the main drilling part. At the same time, which is important, the reliability and stability of manipulations is ensured, and not just the unloading of the operator’s muscles.
Adjustment of the design is required. After all, the soil can be different, and there simply cannot be a single standard for excavation.
Moving along the surface of the earth will be greatly simplified if you equip the device with wheels.
Stage 3. Frame
Most often, wooden gazebos are built. Therefore, we will talk about the construction of timber and boards from a frame.
The frame is installed starting from the bottom trim. For these purposes, a 15x15 cm beam is suitable. It is connected to each other in half a tree and drilled in the center to connect to the anchors. The harness must be strictly horizontal.
Keep track of this using a building level. Immediately with the strapping, they also lay down the floor joists, on which the floor will then be laid. They are connected in half a tree to each other and to the strapping bars, then the connection is strengthened using metal corners on self-tapping screws.
Next, racks are placed from the same timber, which are secured with temporary jibs. They must stand strictly vertical, so use a level when installing them. After securing the jib it was time for the top strapping.
It is made according to the bottom principle and is attached to the racks with screws and corners. The roof will be attached to it in the future. Often the top frame is reinforced with diagonal bars, thanks to which the roof structure receives another point of support in the center.
Communities › Kulibin Club › Blog › Rack for motorized drill
Tomorrow I’m leaving for my small homeland; there’s work to be done on installing a fence. Accordingly, it will be necessary to drill holes for the pillars. There are a lot of pillars to be erected. Actually, the ADA Ground Drill-5 motor drill was purchased for these purposes. After watching a YouTube video, I came to the conclusion that it was necessary to make a stand similar to this one:
I changed a few things, but the essence is the same. I made a more comfortable handle with a gazul and assembled a gearbox with a ratio of 1:4.5 from small-module gears. The gearbox was assembled on bushings from a car. Timing chain (3 pcs). Sprockets from Moskvich 412 tensioner. I assembled everything locally without drawings.
The most interesting thing is that I didn’t even manage to try it for its intended purpose :). I assume that at the bottom it will be necessary to weld a screen 15-20 centimeters from the ground hitting the lower star.
P.S. I drilled 32 holes to a depth of 60-80 cm for 40x60 pipes with a homemade 70 mm drill. Without a stand it would be very difficult for me to do this, since the main effort comes when removing the drill. The soil is dense, virgin soil, like almost everywhere in the Trans-Urals. I ate only about 1.2 liters of a mixture of 92 gasoline and oil.
Comments 21
Drilled in clay 1 m deep, 200 mm auger. The clay is such that a shovel sticks into a tree. It’s hard for one, he doesn’t suck like a kid. The two of us got the hang of it - we stood on both sides, it’s much easier, you hold it, with tension, but in moderation. We drilled approximately 150 holes in total.
As you work, it will become clear that it is very difficult to twist and hold at the same time. This is not driving a moped. In my opinion, what would make the work much easier is a two-handed stop around the engine, the gas, and simply opens it all the way, so as not to bother with it.
We also drilled together, the second person simply stood on the frame for weight, which helped to drill faster.
Write how it will show in practice. Interesting. It seems like a problematic design to me. There is no particular need for precision. The eye sees.
We drilled 30 holes with a homemade drill of 70 mm for profile pipes 40x60 to a depth of 60 cm. A couple of times, due to inexperience, I drove deeper and had to fight back a centimeter at a time at full throttle :). The drilling rig is not for the sake of accuracy, but for the application of less effort, which it did remarkably well. I drilled a couple of holes with a 200 mm drill under the pillars, to a depth of 80 cm. It goes great up to the clay, but beyond that it’s problematic. When you apply force from above, the motor drill becomes a little weak, you need to dose the force. But the main thing is that we need a different design for the drill head, we need more teeth. Like in the video:
No other design needed. You just need to open the throttle at full speed and don’t make much effort from above, but keep it straight.
This design is the result of several years of human use of a motor drill for almost professional purposes, including drilling horizontal 7-meter punctures under the road: www.forumhouse.ru/threads/284530/
It’s just right for seven-meter horizontal punctures. It may also be suitable for vertical drilling with a diameter of 300 mm and a depth of more than 1.5 m. But for fence applications, 200 mm and up to 1 m will cause more difficulties than it will make the job easier.
Source
Stage 5. Floors
After the main work on the construction of the frame and roof is completed, you can cover the floor in the gazebo. Since there are logs laid at the base, which divide the total floor area into sections, there is a choice - either to lay boards across the entire length, or to lay each section separately. The second option is preferable, because if you need to replace a damaged board, changing a short board will be much easier.
Homemade MGBU
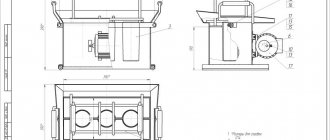
This diagram shows the main working units of the MGBU, which you can manufacture according to our drawings.
Drilling rig drawing
Assembly of the drilling rig begins with the frame. The frame stands for the drilling rig are made from DN40 pipe, wall thickness 4mm. “Wings” for the slider carriage are made of DN50, thickness 4mm. If not with a 4mm wall, take 3.5mm.
You can download drawings for a small-sized drilling rig using the links below:
- Upper frame: chertyozh_1_verhnyaya_rama
- Bottom frame: chertyozh_2_nizhnyaya_rama
- Drilling ram: chertyozh_3_polzun
- Slider sleeve: chertyozh_4_gilza_polzun
- Frame assembly: chertyozh_5_rama_v_sbore
- Engine and slider: chertyozh_6_dvigatel_i_polzun
- Node A MGBU: chertyozh_7_uzel_a
Drilling swivel, rods and locks
At first, we recommend purchasing ready-made drill swivels and drill rods. In the manufacture of these parts, processing accuracy is very important, since the loads on these units are large.
We do not recommend making a swivel from improvised means. One slightest inaccuracy and it will fail.
If you decide to order a swivel, you will need to find a turner with a CNC machine.
For the swivel and locks you will need steel:
- Locks – 45 steel.
- Swivel – 40X.
You can download a drawing of a homemade drill swivel here: DIY swivel for drilling swivel
You can save money by purchasing ready-made units, but it will take a lot of time to find a specialist. But it's worth it - homemade parts are much cheaper than purchased ones. To get started, purchase parts for samples. Turners work better when they have drawings and templates on hand.
If you have factory samples, it will be much easier to check the quality of work. For example, if a turner made drill rods and locks, then you take factory-made and home-made parts and screw them to each other - check the quality of the thread. The match must be 100%!
Do not buy spare parts by delivery. This is necessary so as not to buy a marriage - this, unfortunately, happens. And most importantly, if you order delivery from afar, you can wait more than one month.
DIY drawings of locks at Moscow State Budgetary Institution
We recommend making threads on drill rods in a trapezoid - it is no worse than a conical one. But if you then order it from a turner, it will be more difficult to make a tapered thread. If you make or buy locks for drill rods separately, then take simple suture pipes for the rods if you are drilling no deeper than 30 meters (3.5 mm thick and an internal diameter of at least 40 mm). But a welder must weld the locks to the pipes! In vertical drilling, the loads are high.
To drill deeper than 30 meters, you need to take only thick-walled pipes with a wall of 5-6 mm. Thin rods are not suitable for great depths - they will tear.
- Download bar lock No. 1: chertyozh_zamok_na_shtangu_1
- Bar lock 2: chertyozh_zamok_na_shtangu_2
Drill head
It’s not difficult to make a simple drill yourself. The drill is made from ordinary steel. If you decide to make it from alloy, then keep in mind that it is difficult to weld! Need a welder.
Drill head drawing for download: chertyozh_bur
If there are a lot of stones at the drilling site, then buy drills from companies that are adapted for strong soils. The higher the price, the harder the alloys on the drills and the stronger the drills themselves.
Homemade winch and gear motor
When manufacturing a mini drilling rig, a “RA-1000” winch is used. You can take another one, but preferably one with a carrying capacity of at least 1 ton (or better yet, more). Some drillers install two winches, one electric and the other mechanical. In the case of a drill string wedge, it is very helpful.
To make the work easier, it is better to buy and connect two remote controls: one for reverse and engine speed, the other for the winch. This will save a lot of effort.
A motor-gearbox for drilling wells for a homemade mini drilling rig will require 60-70 revolutions per minute, with a power of 2.2 kW. Weaker will not do.
If you use a more powerful one, you will need a generator, since it will not be possible to connect to a voltage of 220 Volts. If you make a hydraulic drill with your own hands, take a motor-gearbox of the following models: 3MP 31.5/3MP 40/3MP 50.
Useful tips
When trying to make a high-quality hole drill with your own hands, you need to be patient and follow the instructions exactly. With a responsible approach, in a short period of time you can create a good tool with which you can solve a lot of construction and household problems.
It is important to understand that in some models the cutting elements are made removable, and the holes themselves are made using garden drills. And for their further expansion, a folding knife with a special earth receiver is taken. This guarantees quick completion of the task with a significant reduction in labor costs.
Design features of the pit drill
Pit drill device
When making a pit drill, you must remember that in the classic version this unit consists of two parts. The first is the working body, the second is a vertical stand with a handle for easy grip. The basis of the unit is the pin. A strip of metal sheet in the form of a spiral is attached to its side plane. At the end of the pin there is a sharp blade made of durable materials.
When the handle rotates, the tool goes deep into the ground. It cuts small roots and moves soil to the surface using an auger mechanism. To dig a deeper hole, the stand is equipped with additional inserts. It’s good when the end of the pit drill is pointed, like a spear. In this case, he will perform all tasks more accurately and efficiently.
What it is?
An electric drill is a tool that automatically operates on alternating current, which is used to solve such a problem as creating earthen pits of various types and purposes.
The device consists of a rod, handles and a drive. It is equipped with an electric motor, which is its distinctive feature. Special blades on thrust bearings are attached to the rod (the so-called rod part of the frame), which collects and lifts the earth when the unit is buried in the ground during the development of the hole.
Operating principle of the unit
An electric drill is an electric motor and a shaft with a screw-type auger. When using such equipment, the hole in the ground will have smooth edges and a clear auger diameter. The direct drilling process is carried out due to the fact that the auger has a very sharp tip, as well as pointed helical blades. When the equipment starts, the electric motor begins to rotate, transmitting its force to the shaft to which the auger is attached. This is how drilling occurs.
View gallery
Stage 4. Roof
The choice of roof shape, as well as the material of its covering, depends largely on your wishes. The most common shape for a square wooden gazebo is hipped.
To make such a roof, you first need to make an octagon from a 1 m long beam, to which the rafters will be attached, and install it vertically at the junction of the diagonal beams. Next, rafters are attached to it using nails or self-tapping screws, which should protrude beyond the edges of the gazebo by at least 50 cm in order to better protect it from slanting rain.
The lathing is attached to the rafters, the pitch of which depends on the type of coating used. If the roofing material must be laid on a solid base, for example, bitumen shingles, then OSB or plywood sheets are first placed on the sheathing, then a layer of waterproofing and only then the finishing coating. In the case of using solid roofing material, such as plastic corrugated slate or polycarbonate, it is laid directly on the sheathing.
Purpose
A hand drill in the ground is very useful if you need to prepare a hole for a pile or fence support. But no matter how experienced the users are, no matter how hard they try to do everything right, a blow to the hand will still occur. Moreover, if the device for earth drilling goes deep into the formation, along the entire auger, its extraction becomes very difficult. A homemade simple stand effectively solves all these problems. Lifting and lowering is made easier, even if thick lumps of dense clay stick to the auger, all you need to do is add a winch to the stand.
Auger drill
Due to the large number of turns, an auger auger creates significant resistance, that is, it is much more difficult to work with it than with a garden auger. But augers are used mainly in the presence of a mechanized drive - when making a drill for deep wells - for water, for installing underground probes for a heat pump, etc.
This is what an auger drill looks like
To make a homemade auger drill, you will need several metal disks. The number of disks is equal to the number of turns. The disks are cut identically, a hole is cut in them in the center for the rod, as well as an identical sector - so that they can be welded.
A sector is marked in the rings and cut out
The discs are welded on one side, then, slightly stretching the resulting accordion, the seam is welded on the other side. Rings are welded on the outer disks. The welded discs are placed on the rod, the lower edge is welded.
It turns out to be such a big spring
Next you will need a winch. The blank for the auger is secured, the winch hook clings to the ring and is stretched to the required length, after which the auger is boiled.
Almost done
Getting started with a motor drill.
The most dangerous thing when drilling is the kickback that instantly occurs when the drill auger collides with an obstacle in the ground. Always be prepared for a blowback. Always expect backlash. If you are not careful, there is a risk of injury. Be especially careful when drilling into rocky soil and clay.
Start the motor drill engine according to the instructions. Do not try to start drilling immediately after startup. Allow the engine to warm up for some time after starting the engine. To drill, stand firmly on the ground. Use shoes with non-slip soles. If drilling is carried out on a slippery surface, be especially careful. Hold the auger control handles firmly; if you have a weak grip, there is a risk of injury. At the same time, the arms and legs should be relaxed and slightly bent to minimize the risk of injury.
Popular brands
Today, electric drills allow you to perform many jobs. Without these tools, the efficiency of solving many problems would be significantly reduced. Thanks to the fact that suppliers now offer equipment that meets consumer needs, labor productivity has increased significantly and less and less human effort is spent.
Drill manufacturers compete for dominance in the market and try to improve new models of equipment. The brands in greatest demand are:
STIHL is the first domestic company to produce a variety of technical equipment at attractive prices. The models presented by this brand receive a lot of positive reviews. Buyers note the decent quality of the products. As for electric drills, STIHL guarantees a long service life of the unit.
There is a large selection of drill models designed for work of various formats.
Equipment for any, even the most specific taste, is sold by the following brand - EFCO , which specializes primarily in garden equipment. It is not surprising that this Italian brand is so famous on the Russian market: official representative offices sell its products in many countries. The drills from this company are very durable and are used for tasks of various sizes, from making an ice hole for fishing to responsible professional work.
Ice screw from trimmer
A drill for working on ice works on the same principle. It is equipped with a durable drill, which is attached to the mower. But in order for all tasks to be completed efficiently, it is recommended to use more powerful brush cutters.
In this case, it is better to assemble an ice screw from a gas mower, which is considered more productive than, for example, electric models. The operator will be able to drill holes at a long distance near the house and not be afraid that the motor will freeze.
In terms of their design, a do-it-yourself motorcycle and ice auger made from a trimmer are no different from each other. Therefore, they can be collected according to the same scheme.
Stage 1. Drawing of the gazebo
Make a schematic drawing of the gazebo - this will make it easier to see what exactly you want to build. You can use ready-made models and drawings from the Internet (don’t forget to adjust them to your sizes) or show your imagination and create something new and unique.
Once you have a plan for the gazebo and its dimensions, proceed to choosing a location and preparing the area. How to make an iron blank drill? Clear the area of debris and tall grass, mark the required dimensions using a tape measure or measuring tape, and drive pegs in the corners. Be sure to measure the diagonals - they should be the same!
When the diagram is ready and the territory is marked, we move on to the second stage.
Do-it-yourself mechanized hole drill: design options and principles of its calculation
The modern market is saturated with various kinds of construction tools and devices. Take, for example, a hole drill: today you can easily find a device whose cost is quite affordable, and the declared characteristics completely satisfy the buyer. It would seem that there is nothing simpler: buy and use. But you shouldn’t always rush into such an acquisition. The fact is that budget equipment in practice does not always meet the needs of the buyer, or is even not at all capable of performing the functions assigned to it: the drill is in no hurry to enter the ground even with strong pressure, engine speed drops due to heavy load, etc.
Buying a powerful and expensive device for a small amount of construction or gardening work is not always advisable. Renting is also not a cheap pleasure. Therefore, craftsmen strive to use the equipment they already have at their disposal to create compact drilling rigs.
Earth drill from a drill
In most cases, a mechanized hole drill is a power unit (a powerful drill or a gasoline engine), which is connected to a conventional hand drill using a simple mechanical drive. You can make a drill yourself.
You can find a ready-made serial drill for sale.
Many people say that they simply bought such an auger and attached a powerful low-speed electric drill to it.
Engine characteristics
Recommendations regarding the number of revolutions of the power plant and its other characteristics deserve separate consideration. Let's start with the fact that the power plant can be connected to the drill either directly or through an additional gearbox. Everyone determines the need to use a gearbox for themselves. As practice shows, if the rated power of the drill is 2 kW, then there is no need to use a gearbox (especially if the installation does not have a special frame, and you have to hold it with your hands during operation).
At first, a gearbox was planned, but after field tests with the “drill - auger” scheme, it was decided to abandon the gearbox. The moment is such that it does not notice the operator at all (if you drill with your hands).
The power indicator - 2 kW - was not chosen by chance. These are the drills most often used by our forum participants in the manufacture of mechanized hole drills.
In order to make holes of the required depth in the ground, the user had to build a compact drilling rig (with a frame, winch and other accessories).
But now we are talking about the power of the power unit, and from the description presented it is easy to understand what a drill with a rated power of 2 kW (even without a gearbox) is capable of.
A little theory
If we consider the relationship between the power of a drill (or gasoline engine) and the torque on the drill shaft, it is determined by the following relationship:
Theoretically, the torque on the working shaft of such an installation at a speed of 500 rpm should be 38 Nm (64 Nm at 300 rpm). But to calculate torque, it is always necessary to take into account losses, which are determined by the efficiency of the device. The thing is that most power tool manufacturers indicate only the power consumption of their devices, and the output power (on the working shaft) by 1/3. 1/4 less than consumed. Accordingly, the torque is less. A 2 kW drill at 300 rpm will create a torque on the spindle that is not 64 Nm, but approximately 48 Nm.
When choosing a power unit for your pit drill, you can consider devices with a power consumption of less than 2 kW. But then you will have to seriously think about introducing a reduction gear into the design of the drilling rig.
Based on the torque created by a 2 kW drill (without an additional gearbox), you can choose a suitable device for your hole drill. In other words, knowing the power of the drill, the number of revolutions of its spindle and the gear ratio of the gearbox used, you can calculate the value of torque that you will receive at the output of the power plant. But it should be understood that the speed of the drill cannot be greatly reduced.
The optimal speed during drilling is from 60.100 to 200.300 rpm. The mode depends on the type of soil, drilling method, type of drill bits, hole diameter, etc.
The above quote mentions drilling methods. There are two of them: continuous drilling and drilling with constant soil removal. For continuous drilling, the rig must provide high torque.
During drilling with constant soil removal, an auger drilled into the soil to a certain depth rises to the surface. In this case, the loosened soil located on the working blades of the auger is also removed out.
As we have already said, when choosing a power unit for a drilling rig, it is better to focus on a low-speed drill with a power of 2 kW (that is, the torque that it transmits to the working shaft). Judging by the numerous reviews from FORUMHOUSE users, these devices have proven themselves quite well. The power of gasoline engines must also correspond to the specified indicator.
Gearboxes for pit drills and their varieties
The assembly of any homemade mechanism in most cases is characterized by the use of improvised materials, devices and components that have been lying idle for a long time, because there was no worthy use for them. The experience of our users suggests that a mechanical reduction gear can be made from a wide variety of parts: from spare parts for an old moped, from a simple chain or worm gear, from a suitable gearbox of unknown origin, accidentally lying around on an old shelf in the garage, etc.
I had a broken moped lying around, and I took the rear gearbox from it. I sawed off the gearbox with a turbine (the back part of the aluminum housing with the gearbox), then through a gear transmission I attached an electric motor from an old 2 kW electric saw to this gearbox. The engine with gearbox gave a ratio of 13:1 (the output turned out to be approximately 300 rpm).
About the chain drive: having a certain amount of ingenuity, you can, without making much effort, build a completely reliable hole drill with sufficient power. The presented idea is not new, and many people successfully apply it in practice (if necessary).
There is no gearbox, although it was planned to make it from the VAZ 2101 timing chain and its sprockets. The gear ratio is 1:2. Tests have shown that it is not needed. Maybe use it on very hard soils, but we don’t have those.
The use of the above mechanisms requires a non-standard approach to assembling the drilling rig. If you have a small serial gearbox (or the opportunity to purchase it inexpensively), then the task becomes much easier. Here, for example, is a photo of a gearbox posted by user melomandk.
I found such a gearbox. But the gear ratio is large - equal to or even slightly more than 1:40. Dimensions (according to the body) – about 15 x 15 cm.
As it turned out, the device has quite suitable parameters.
My hole drill is based on just such a gearbox. So far I'm very pleased. The engine is an angle grinder (3000 output rpm). The power of the grinder is 2 kW. I didn’t try to drill into clay, but I did take a hole drill into hard compacted earth with inclusions of crushed stone and rotten roots. The diameter of the auger is 160 mm, the knives on it are homemade - made from springs.
Conclusion: there are no specific recommendations regarding the design of the gearbox for a homemade garden hole drill, but there are many working options.
bed
If there is a lot of work, if you need to drill deeply, and it is very difficult to hold the installation in your hands, then the existing equipment can be secured in a special frame.
The design of homemade frames, as well as that of mechanical reduction gears, can be very diverse. But there are design elements that are used in the vast majority of cases.
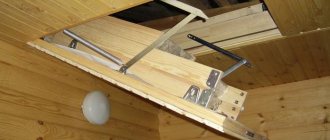
Lifting mechanism
A chain drive installed inside the central pillar can be used as a lifting mechanism. Raising and lowering is carried out either using an additional electric motor or using a handle (as in the photo from user jumper_at_home).
The maximum depth was 1.8 m (auger + extension). There was no need to go deeper. Homemade winch - 2 gears and a chain from a motorcycle.
In order for the plate with the main electric motor to move freely along the vertical pipe, four rollers can be installed on the carriage.
Source
Manufacturing of percussion-rope drilling rig
A tripod with a bailer is a simple design, like everything ingenious. Its dimensions can be estimated “by eye”; particularly precise engineering calculations are not needed here. For example, the height of the tripod on which the bailer will be attached should be about a meter greater than this drill.
If drilling work is carried out in the basement of a house, the size of the structure will be limited by the height of the ceiling.
Impact-rope drilling is performed using a heavy projectile - a bailer. It is thrown down from a height, the soil collapses and fills the cavity inside the bailer, after which the device is removed and cleaned
In an open space, the bailer can be hung higher to increase the impact force. But don't make it too high, it's not effective. The bailer itself should be quite heavy. To effectively loosen the soil, it is better to make notches on its sole or grind off a sharp edge.
The optimal length for drilling is considered to be between 1.8 and 2.2 meters, so that the driller can freely reach the top of the drill to attach or disconnect the cable. However, in manual drilling, the best bailer length is considered to be 1.0 - 1.2 m. This size allows you to reach the bottom of the projectile with your hand if it does not empty when loam sticks, for example.
In cable percussion drilling, a bailer with a length of about 1.2 - 2.0 meters is used. The projectile must be heavy enough to break up the soil and pull it to the surface in large quantities
A bailer is most often made from a piece of metal pipe; the desired metal thickness is 4–6 mm.
To make such a drilling device, the following operations should be performed:
- Prepare a piece of pipe of suitable size.
- Make a valve at the bottom of the projectile.
- Weld a protective mesh on top.
- Boil the handle or “ears” to secure the rope.
- Sharpen the bottom of the projectile or weld several “teeth” from pieces of metal or pieces of thick wire.
- Make a tripod from metal pipes.
- Install a block, winch and engine to lift the projectile from the shaft.
- Tie a rope to the bailer and assemble the structure.
The bailer valve deserves special attention. Small diameter projectiles use a ball valve. A metal ball with a diameter slightly larger than half the diameter of the bailer is suitable for its role.
If a suitable ball is not found, it can be made from scrap materials. For example, for these purposes a mixture of lead shot and epoxy resin is often used; the role of the casting mold is played by some kind of children's ball made of plastic or rubber.
The reed valve of a bailer consists of a round piece of metal that closes the gap at the bottom of the glass, as well as a spring that holds it closed.
A washer with a hole whose diameter is smaller than the size of the ball is welded at the bottom so that it does not fly out. For the same purposes, a stopper is placed at the top, at some distance from the protective grille - a piece of metal that limits the upward movement of the ball. A wire grid prevents large pieces of soil from falling out of the bailer.
The valve ball must not fall below the level of the pointed edge or metal teeth, otherwise it will absorb the force of the impact. On the other hand, the “teeth” should not be made too long, otherwise they will not allow part of the soil to get inside the bailer.
A window is cut out in the upper third of the bailer body. It will be needed when a full bailer needs to be cleared of soil that has accumulated inside.
To make a ball valve for a bailer, you need a metal ball with a diameter of about 60 mm. Such an element can be removed from a large bearing
Another valve option is a petal valve. It is made from a piece of metal. The reed valve looks like a round door attached to a spring at the bottom of the bailer. When the projectile moves downwards, the valve opens under soil pressure, and then the spring closes it and holds the soil inside. Sometimes such a valve is sealed with a piece of rubber, but this is not necessary.
If, when drilling with a homemade bailer, it turns out that it captures too little soil, you may just need to slightly correct the design. Sometimes you need to open up the clearance a little at the bottom of the device. If the projectile turns out to be too light, it should be weighted down.
To do this, the upper part of the bailer is sometimes filled with concrete. But you can simply attach an additional load on top on a movable joint.
A tripod for impact-rope drilling can be made from a metal pipe, but for short-term use, durable wood, for example 150-200 mm timber, is also suitable
On viscous soils, a type of bailer without a valve may be effective. Dense soil is packed inside the projectile and held there naturally. Such a device is cleaned through a narrow vertical hole on the side.
If possible and necessary, you should make two different bailers to use them on different soils. The bailer is also used to clean the finished well from sand and dirt. But in this situation there is no need to make such a large projectile; a device about 0.8 -1.0 meters long will do.
Advantages and disadvantages
Although electric earth drills are available in stores, they are rarely used on sites. Many people refuse to buy a device because they simply do not know about its main advantages:
- Saving physical strength. These devices are powered by electricity, making the job of drilling holes in the ground an easy task.
- Environmental friendliness. Unlike gasoline devices, their electric counterparts do not emit exhaust gases during operation, so there is no harm to plants or the environment.
- Silence. An electric drill does not create noise during work. Thus, its use completely eliminates discomfort for neighbors.
- Minimum weight. Modern models are lightweight, which also gives them an advantage over gasoline devices.
Stage 6. Decor
The most basic and difficult thing is the foundation, the construction of the frame and roof. When these stages have been completed, you can begin the most interesting and easy part - decorating your future vacation spot. Here you can show all your imagination: install railings and hang balcony pots on them, or make full-fledged walls to protect from the wind, or make a sheathing around the perimeter and let grapes run along it. In any case, do not forget to treat the wood with an antiseptic for protection.
Painting in colors is optional.