A workbench is an indispensable tool for a garage or workshop. This is not just a table on which additional elements are placed. When properly manufactured according to pre-thought-out drawings, it can become an excellent assistant, allowing you to speed up the execution of various works with wood. Let's look at how to make a workbench with your own hands at minimal cost, taking into account the features of the workshop and the amount of free space in it.
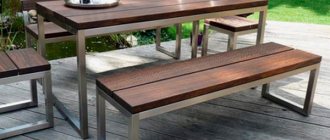
What is a carpentry workbench
A carpenter's workbench or table is a simple, but at the same time convenient design. This is a high, long table designed for heavy objects and complex work on it. As a rule, the tabletop has large holes so that waste from production falls and does not interfere with work. There are also shelves for support and tool boxes.
For simple carpentry work, everyone can make the simplest work table, or you can think through all your needs and create an ideal workplace.
The workbench is used for several types of work:
- Cutting wood and other hard materials.
- Cutting materials.
- Wood processing: planing and sanding.
- Assemblies of various parts and objects.
The most convenient way is to make a universal carpentry table with your own hands. This is absolutely not difficult, and the owner will be able to gain additional experience in carpentry.
By approaching the work with full responsibility and armed with drawings, you will receive a convenient and functional workbench.
A table of your own production will save money, and besides, it can be quickly assembled from scrap materials. If the device is needed only for a while, it will be easy to disassemble after use.
Important! When making a table with your own hands, the craftsman will be able to take into account individual dimensions, requirements and make the necessary shelves, supports and other elements important for work.
Purpose
First of all, a carpentry workbench is intended for direct work with wood. Therefore, its tabletop must have a rigid fastening. If desired, it can be equipped with additional elements and tools that expand functionality, such as a carpenter's vice.
Making it modular will save space in your workshop. So, it can be supplemented with various drawers and cabinets that will house tools, sorted by type and purpose. The back wall will also not be empty - it is perfect for placing small fasteners such as screws, clamps, etc.
When choosing a design for a future DIY workbench, you should consider the following points:
- what will be the nature of the predominant planned work performed on it;
- how much free space is there in the room;
- what additional functions and modules are required, whether it is necessary to supply electricity and place stationary tools and machines on the workbench.
If you think through these issues in advance, you won’t have to make changes to the design later and wonder how best to remake this or that element.
Main types of workbenches
There are several types of workbenches, which differ in their functional purpose. Complex devices combine several types at once. Simpler ones have limited functions.
- Carpenter's table. It is an ordinary high table with a flat, even tabletop. It is designed for processing and sawing small parts. But it is difficult to process large boards on it.
- Long workbench. It is a long structure with a vice for securing boards and logs. Its main purpose is to process these types of parts. However, it is impossible to collect small items here.
- Universal table. It has a flat, wide table top, nearby holes for dumping debris and a long mount with a vice. The most advanced models are reinforced on individual sides with metal sheets or tape, which makes it possible to process metal and stone products on it.
There is also a gradation of workbenches by type of assembly. There may be the following options:
- Mobile workbench. It is small in size and weight. Designed for carrying from place to place and processing small products.
- Stationary table. These structures are heavy and, as a rule, securely attached to the floor. They process heavy logs, boards, and large parts. Typically, such options are used in private homes, where the owner quite often does carpentry or other work. Most often, these workbenches are universal with a large number of accessories.
- Folding table. This is an intermediate option between a mobile device and a large stationary table. Prefabricated workbenches are also quite large in size, but can be removed fairly quickly. They are suitable for garages or small private houses.
According to its design characteristics, a carpentry workbench is a table on which shelves for tools, drawers and additional equipment are located.
Business risks
Many authors of publications on the topic of carpentry workshops emphasize that most business plans are successful. However, in the conditions of the Russian economy, there are still risks for doing business in this area that must be taken into account:
- Seasonal factor.
- High competition and low barriers to the entry of new carpentry workshops into the market.
- Reliability of suppliers and supplied products. The need for their diversification.
- Reputational risk.
- Availability of interchangeable products, for example, PVC doors and windows.
Construction of a carpentry workbench
Despite its simple appearance, the carpenter's table has a very complex structure, since any inconspicuous detail here carries a number of important functions.
Traditionally, woodworkers worked with hand tools, so to work with electric tools, the worktop must be modified to suit your needs.
Main elements of the workbench:
- Base or bed. This element is also called the underbench. This is a support made of thick timber or metal. As a rule, it is a frame that has additional drawers or crossbars. It must support a heavy structure with a tabletop, tools and wood for processing. The drawers and frame elements are connected to each other with wedges and glue.
The construction of a carpentry workbench is simple, but requires careful design, calculation of dimensions and the correct choice of material. - Tabletop. It is also called a workbench board. It is made from thick boards. As a rule, the thickness of the board is 6-7 cm. This is necessary to withstand the weight of tools, workers and heavy blows to them. The table top has the necessary grooves, holes, holes or clamps. Each master places them at his own discretion.
For a home workshop, it is most convenient to make a stationary wooden carpenter's workbench with a base made of metal or wood. - Vices, clamps. The workbench should have at least two clamps on both sides. The clamps are made of wood, since it will not deform the material of the products. The maximum number of clamps is not limited. If you plan to work with parts of different sizes - for example, small items and large boards, then there should definitely be several clamps. At the same time, they should be located on opposite sides of the tabletop so as not to interfere with each other.
All types of work tables known to us originated from the carpenter's workbench. - Shelves for tools and additional stops. They are located under the tabletop. It is important to place shelves for tools so that they can be easily reached with one hand without leaving the table. That is why it is convenient to place them below, and not in the closet nearby.
Selecting a project and drawing up a diagram
When drawing up a project, the main parameters that need to be taken into account are height, configuration and functional equipment.
Height. For comfortable long-term work, the height of the workbench should not be more than 90 cm. When determining this parameter, first of all, you should take into account your height (if the workbench is being made for yourself). Also important is the type of carpentry work that is supposed to be performed most often, and those that require the most convenient conditions for their high-quality performance.
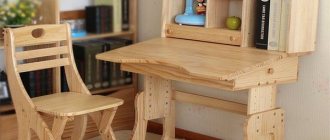
Diagram of a wood carpentry workbench
Configuration. If there are no workspace restrictions, the optimal width is 80 cm, length is 2 m. When configuring a workbench, you need to take into account the presence of shelves, compartments, doors, drawers, their number and sizes.
Functional equipment. To hold workpieces, the carpentry workbench must be equipped with two clamps. The front clamp is located on the left, the rear clamp is on the right end of the workbench. This clamp arrangement is intended for right-handed people. If the master’s main working hand is left, the clamps are positioned in a mirror manner relative to the option described above.
It is necessary to provide places for fixing electric and manual tools, technological holes for stops and limiters. It is better to place lighting fixtures and sockets on nearby walls and objects.
How to make a carpentry table with your own hands
Creating a carpentry table with your own hands, despite all its features, is quite simple. To do this you need:
- Calculate exact dimensions.
- Create a preliminary drawing.
- Select the necessary boards and other materials.
- Refine the drawing.
- Assemble the table itself.
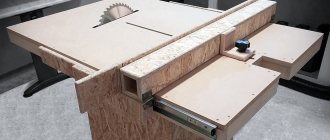
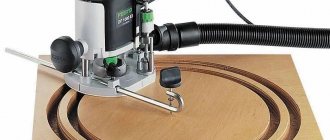
A modern work surface is also additionally equipped, for example, with space for a milling machine.
Size calculation
The basic size requirements are simple: the table must fit in the room so that it is convenient to walk around it with a tool. To do this, a distance of 80-100 cm should remain between it and the wall or other objects.
The size of the table is determined by factors such as the area of the room and your individual characteristics.
The size of the tabletop should be such that it is convenient to place everything you need on it. If you plan to work with small objects, then a length of 100–150 cm and a width of 80 cm will be sufficient. If you plan to process large objects, then it is better to choose a length of 200–250 cm and a width of 80–100 cm.
Ideally, the height should be such that it is comfortable to work behind it while standing or sitting on a chair. To do this, it must be 70 cm. A height of 80 cm will allow you to work only while standing.
Working at a workbench that is not the right height will lead to serious back problems.
Drawing
Once the basic dimensions have been determined, you can begin creating the drawing. You need to pay close attention to this, since the details will then be cut out from it.
Drawings of the future structure, as well as its dimensions, are selected taking into account all conditions.
The drawing is performed in two versions:
- Table top drawing.
Here the width of the boards is calculated and how they will be connected to each other. The necessary clamps and vices are also indicated here. Important! It is worth trying on the location of important elements in real size, trying from which points it is convenient to reach them with your hands and checking whether they interfere with work. - Basic drawing. Here it is important to calculate the load on the legs and how the frames will be strengthened.
Drawings of tables that can be found on the Internet are presented in a huge variety.
After this, it is worth checking the drawing again and its compliance with the materials: whether there are boards of the required width or the required number. Are the necessary support bars available?
Selection of tools and materials
Before assembling the table, you need to prepare all materials and tools.
Necessary materials:
- Wooden boards are 15-30 cm wide and 6-7 cm thick. Their length should be no less than the length of the table top. The cheapest regular pine board is suitable for this.
- Wooden blocks for the frame, legs and drawers. The width of the bars should be 10-15 cm.
- Square metal pipes for making metal supports.
- Metal furniture corners for connecting wooden parts.
- Self-tapping screws and bolts.
- Wood glue.
It’s great if you can find lumber made from beech, ash, maple or hornbeam, but if not, then make a table from a pine board.
Tools needed for assembly:
- Hammer.
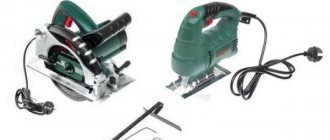
- Jigsaw.
- Hand saw.
- Grinder saw.
- Screwdriver.
- Ruler.
- Roulette.
- Pencil.
For convenience, tools and small parts should be placed on one side, and large boards should be placed on the other.
Other tools may be required, but this will depend on the design of your workbench.
Advice. Small parts and screws should be laid out on a light cloth or paper. This way you can immediately find the item you need.
Table creation process
Assembling a workbench involves several steps:
- Frame assembly. She's going first. The supports are fastened together using drawers and crossbars. For the most reliable fastening, they are connected using wedges or puzzles, which must be prepared in advance. A simpler connection is also possible using metal brackets and furniture corners. The metal base is assembled using welding or screws.
- Creating a tabletop. First, boards of the required size are cut.
- Fastening the table top to the frame. To do this, furniture corners are attached to the boards, then they are installed on the frame and attached to it. If a folding tabletop is intended, then you first need to make its parts and then connect them to the frame using furniture hinges.
- Creation of additional elements: clips, puzzles and others. After the tabletop is installed and secured to it, it is convenient to attach additional elements: clamps, vices. Here you can also cut out the necessary holes with a jigsaw.
The tabletop is treated with a surface planer and a sander to achieve a smooth surface.
Advice. When assembling the table, do not use nails. This will subsequently cause the table to become loose. Self-tapping screws can always be re-tightened. Puzzles and wedges are firmly connected with glue.
After assembly, all that remains is to prepare the table for work and you can begin the creative process.
The base is impregnated with an antiseptic, which will not allow fungus or mold to grow in the wood.
Final stage
Finally, it is necessary to check the strength of all connections and modify those that may become loose.
It is also important to check the comfort of all parts on the countertop. Most likely, something will seem superfluous, and something will be missing. To be more confident, you should try working on a large object on a workbench. In this case, nuances will certainly appear that can be quickly corrected before installing additional equipment and securing the table.
You can make a shelf on the bottom frame, or one or two cabinets. Careful craftsmen make a cabinet and a shelf on which various equipment is stored.
The very last step in creating a woodworking table will be attaching it to the floor. The table is usually screwed to the floor using furniture corners. This ensures its stability and ease of support during operation.
Mobile devices intended for small items do not need to be screwed to the floor. But in this case there will still be a risk of knocking it over.
What tools will you need?
A self-made small wooden carpentry workbench will take its rightful place in a home workshop. You don't need a lot of tools to make it.
You can always put a piece of plywood or hardboard on a steel sheet, and a galvanized sheet on a wooden surface.
You will need a standard set that can be found in every home:
- screwdriver;
- roulette;
- Bulgarian;
- jigsaw or hand saw;
- hammer.
First of all, we determine the ergonomics of the workplace.
Depending on what material will be used for the carpentry workbench, the list of materials and tools may vary. For example, to make a metal work table, you cannot do without a welding machine and electrodes.
The height of the workbench should be such that you don’t have to bend your back and, at the same time, stand on tiptoes.
Installation of additional equipment
After the table is ready, additional equipment is installed on it:
- Board clamps. Usually mounted from two bars. Clamps are installed at both ends of the tabletop. For convenience, it is worth installing several clamps of different thicknesses: 5 cm, 10 cm, 15 cm and 20 cm. The clamps are installed exactly opposite each other.
- Vise for parts. Ideally, there should be several vices: 2 or 3 pieces. They are designed for small and large parts.
- Stops for cutting parts. This is optional equipment. Stops are usually small blocks on the countertop.
- Lower shelves for tools. They will create comfort during work and significantly save time. It is better to place heavy, large tools on the bottom shelf. Place boxes with small items a little higher. It is better to make drawers for small things retractable.
- Additional lighting. Without it, work will be uncomfortable. Typically, a long LED office lamp is mounted on the desk. To prevent shadows from your hands from interfering with your work, you should attach two lamps on different sides.
Don't forget about the lighting. We suggest considering fluorescent lamps or LED strip as an additional lighting source.
Assembling the frame with legs
The base or frame of the table is assembled from a set of transverse and longitudinal wooden beams, which are attached to the bottom of its lid, increasing the rigidity of the entire structure as a whole. For this, four bars with a cross-section of 50x50 mm, placed at a distance of about 7-9 cm from the edge of the table, are sufficient. They are fixed on the bottom of the lid with self-tapping screws of suitable size in increments of approximately 23-25 cm. On its front side, the fastening elements are recessed into the material, completely hiding their hats. The frame can be made stronger by pre-treating the mating surface of the bars with a layer of wood glue, carried out immediately before attaching them. After joining the glue-coated workpieces, the latter are securely fixed with clamps, which are removed immediately after the adhesive has dried. The legs of the structure can be made from bars of the same cross-section as the blanks for the frame (50x50 mm).
The structure of the table must be strong and rigid
The shape of the legs is chosen so that they provide maximum support area for the frame part of the base and have a shape that tapers towards the flooring. On one of these legs, controls for turning the circular saw on and off are subsequently placed, duplicating the buttons located on its body.
You will be able to further increase the rigidity and stability of the entire structure with the help of a set of steel angles mounted in the area of its butt joints. To secure them, it is recommended to use standard bolts with washers, which should preferably be installed with their heads facing outward.
Selecting a place to install the table
The choice of the main location for installing the workbench should be thought out in advance. Usually this is a workshop, a place on the site next to the technical unit or in the garage.
In addition to the placement location, you need to think through a few more technical nuances:
- From which side will the approach to the workbench be? To work with small objects, an approach from one edge is sufficient; such a device can be installed against a wall. For large-scale work, a free approach from all sides is required.
- Which side will the items be placed on the table? It is important to think through this point so as not to touch other furniture with long boards.
- Do not place the workbench next to a door or window. Usually such work takes a lot of time. There are always drafts near a window or door; if you stay here for a long time, you can catch a cold.
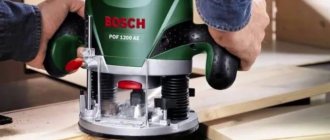
When setting up a workbench, think carefully about where the power tool will be connected.
Working through these points will make work in the future comfortable and safe.
Features of manufacturing a metal frame (bed)
The upper part of the metal base is a welded frame measuring 800x800 mm with legs made of pipes 220 mm long and a cross-section of approximately 17-20 mm welded at the corners.
Two longitudinal profiles are mounted on a frame made of 25 mm angles, used to install the shaft on bearings.
To ensure greater stability of the structure, the lower part of the frame is welded from larger corners (40 mm) and has two jumpers intended for mounting the electric motor with starting equipment circuits. Pipes are also welded at its corners, having the same length as on the upper frame, but slightly larger in diameter (23-25mm).
Closer to the edge of such pipe legs, threaded holes are prepared in which special holders are located (they are also called “lambs”). With the help of these wings it will be possible to fix the position of the pipes of the upper part of the frame, which is moved to regulate the tension of the drive belt.
Operating rules
In order for the carpenter's table to last a long time and to work at it safely, it is important to follow the basic operating rules:
- All table parts must be firmly secured. If they start to wobble, they need to be tightened or secured. Any unsteady position can result in serious injury. It will not be very pleasant if the saw or jigsaw comes off the part at the most inopportune moment.
- All items for work should also be held well on the table. This will make the work more accurate.
- The device must be protected from moisture. Wooden boards will warp and crack with sudden changes in humidity. If there is high humidity, mold may grow here.
- When working with heavy objects, you need to evenly distribute the load on the tabletop.
Making a carpentry workbench yourself is not a quick task, but it is exciting, because you need to take into account not only your needs, but also the ergonomics of the entire workspace.
Proper assembly of this device and its correct operation will bring joy from carpentry work, which will give inspiration for creativity.
Necessary materials
When selecting material for each workbench unit, you need to take into account the functional features and loads to which it will be subjected.
To ensure that the workbench does not turn out to be too massive, light softwood is preferred as the material for making the frame:
- pine;
- spruce;
- alder;
- Linden.
Hardwood, as well as plywood of various thicknesses, is used to make countertops.
The frame for the workbench can be welded from a metal square pipe or an angle of a suitable cross-section, but most carpenters prefer wooden structures.
Preparatory work
Creating a drawing of a workbench is an obligatory part of the preparatory stage
Preparation for assembling a workbench consists of determining the design features, choosing the dimensions and installation location of the structure. In order to ensure that not a single moment escapes attention or is forgotten, it is recommended to create a working drawing of the workbench, made to scale with reference to the size of the garage
Particular attention should be paid to the height of the tabletop - it differs significantly from the height of a regular dining table. The optimal option is the height from the floor to the bend of the elbows of a person standing straight
Considering the difference in height between different people, assembling the optimal workbench for yourself can be a very useful exercise.
In addition, we must remember that the width of the tabletop should not be too large. The size of the garage is relatively small; you often have to work next to a car parked inside.
You will need space for a person to pass through, so the optimal width is considered to be 50 cm. You also need to decide on the size of the shield for the tools that are needed most often.
Ways to minimize the cost of organizing a garage
You can minimize the cost of arranging a garage by making your own racks, shelves, and storage systems. Advice from experienced car owners will help reduce costs:
- Heating and cooling a room can be done using the same device: an air conditioner.
- Proper installation of natural ventilation will help you avoid buying a fan for a forced ventilation device. For this purpose, one pipe built into the wall is placed at a distance of 20-30 cm above the floor, and the second - on the opposite wall at a distance of 30-40 cm from the ceiling.
- The best insulation for walls and ceilings is polystyrene foam. Unlike mineral wool, it does not absorb moisture and does not lose its thermal insulation properties.
- The most inexpensive method of interior finishing is plastering followed by whitewashing with water-based emulsion.
- For wall cladding, you can make your own gypsum tiles with a “brick” or “natural stone” surface.
- Instead of expensive store-bought storage systems with many drawers, you can sew (or order from a studio) fabrics with numerous pockets.