A number of measuring instruments include a laser level. This is a modern device that can quickly and, most importantly, accurately project planes. Now builders and craftsmen do not need to carry rulers and levels to mark a plane on the surface of a wall, ceiling or floor. Just before you pick up a measuring device, you need to figure out how to use a laser level correctly. To learn this, you do not need to undergo additional training in construction, since even a beginner can master the use of the tool.
What is the level for?
If anyone doesn’t know, a level is a synonym for a laser level. The material is specifically about a laser level, since there are also optical devices. The tool itself is designed to implement the following tasks:
- Alignment of walls
- Laying tiles and tiles on walls and floors
- Installation of windows and interior doors
- Hang a picture, shelf or furniture on the wall evenly
- Align wall-mounted outlets and switches
The use of a laser level is quite wide, and it is in demand not only among builders and craftsmen. If you plan to renovate a house or apartment, then without such a tool it will be difficult to cover the walls with plasterboard or plaster them evenly. In scientific terms, a level is a device that detects and records the exact location of different objects in height. The main task is to measure the difference in height between the marks of the future structure.
Many experienced builders do not understand why a laser level is needed until they try the tool in action. After all, an alternative option for leveling surfaces, which is used not only by home craftsmen, but also by experienced specialists, is a water level. However, such a tool has large errors and also requires a lot of time to cut a plane on the surface. The level does not have such disadvantages, so it is simply necessary for those who build, repair, lay tiles and lay communications.
This is interesting!
The disadvantage of levels is their high cost; only such financial costs are paid off very quickly, for example, by high-quality and fast repairs or construction of a house.
Making a laser cross with your own hands
This tool is convenient to use for various types of cladding work and installation of hanging furniture. For this reason, it is not only popular among professionals, but is also often an integral element in the toolkit of the owner of a city apartment or private house. To manufacture the device, the following parts are required:
- laser type pointer;
- tripod from a camera or video camera;
- outdated player;
- several unnecessary disks.
You will be required to follow the steps below.
- A rectangular cross is made from pointers, which is attached to the drive from the player. This ensures free rotation of the tool around its axis.
- Ensuring free lifting of the device to the required height.
- The discs are carefully glued together and installed on the drive from the player.
- A cross made of pointers is attached to the disks. You can use tape or other sticky material.
Where to start using the tool - preparation for work
The accuracy of the device's readings depends on its correct installation. The level must be leveled by placing it in a vertical position, and only after that can you begin leveling. To level the device, its design includes a special tripod, presented in the form of a tripod. Each leg of the tripod has the ability to be adjusted - it is implemented through sliding sliders, so there are no difficulties with leveling the laser level.
This is interesting!
Expensive models of laser levels have a built-in option for self-leveling or self-adjustment.
This is achieved due to the fact that the device is fixed at one point, and with deviations of up to 5 degrees, self-leveling is performed. For this purpose, the instrument mechanism is equipped with a gyroscope. You can make sure that the device is installed correctly by looking for air bubbles in the water flask. These are similar flasks that are used in water levels to detect deviations from a flat plane. Once the device is installed, you can begin to use it. If you use an expensive laser level equipped with a self-leveling option, then the instructions for setting it up are slightly different:
- Level the device using a tripod
- Turn it on and wait until additional adjustment or adjustment occurs, which ensures high accuracy of readings
- When self-leveling, the level emits corresponding signals (flashing or beeping), and as soon as they stop, the device is ready for use
- If the level cannot perform the self-adjustment option for a long time, this means that the deviation angle is more than 5 degrees, and it is necessary to make more precise adjustments to the tripod
If measurements are carried out in an open area and the device is installed on the ground, then the legs of the tripod should be firmly fixed in the ground. To do this, each leg has special protrusions for digging them in. The device is connected to the tripod using a special threaded connection. If the diameters of the threaded connections on the instrument body and the tripod are different, then you need to use an adapter.
Device design features
The device is compact and ergonomic. It can be easily placed in a pocket, mounting case or bag. The case is equipped with fastening elements. They may be:
- magnet;
- fastening straps;
- tripod.
The beam projected onto the marking surface is constructed along a plane or in a direction. Construction levels, used to indicate a certain direction, produce a projection in the form of a point. Devices for marking a plane are equipped with a special type of optical instrument that turns the beam into a straight line. Levels are divided into types:
- Rotary devices, due to rotation around their axis, are capable of producing a clear line (used when pouring floors and constructing ceilings);
- positional levels consist of 2 laser radiation sources to create a visible plane (used during finishing work indoors);
- self-leveling (can emit up to 5 beams and are equipped with a sight in the form of a simple cross and pendulums located inside the device).
The price of the presented equipment is several times higher than the cost of a conventional level based on liquid and air bubble.
Checking the device for correct installation
Much depends on the accuracy of the measurement results carried out by the device. If the plane for laying tiles is knocked off, then the evenness of the installation of the tool will affect the interior design. If the plane is checked during the construction of a house, then the installation of the level will affect the quality of construction and the reliability of this structure.
Each device (depending on the model and its cost) has corresponding error indicators. The permissible error values are indicated directly in the instructions for the equipment, which should be taken into account when purchasing a tool. Acceptable error values are indicated in the appropriate units of measurement, which are mm/m. Errors are not so important when using the device indoors, but they are extremely necessary when carrying out external work on beating a plane and leveling walls.
The error is one of the main technical parameters of the instrument, and some manufacturers indicate the magnitude of deviations not only in the technical documentation, but also on the body of the device. If the magnitude of the error is known, then the permissible deviation from the norm can be calculated. If the deviation value is higher than permissible, it is recommended to use a level with a smaller error value.
It doesn't matter if the laser level is being used to level a floor, wall or ceiling, but before taking the corresponding measurements, you will need to check the accuracy. The check is quite simple, for which the following steps are performed:
- First you need to put marks on two parallel walls in the room, according to which the check will be carried out
- One mark is placed on the wall that is closer to the device (at a distance of up to 1 meter)
- The second mark is placed on the opposite wall, located at a distance of more than 2 meters. The further the distance between the walls, the more accurately device deviations can be identified
- After marking with a marker or pencil on the wall, you need to move the level directly to the wall, which was further from the level
- Align the directional laser beam with the point that was marked. Then project the beam onto the opposite side and see if it matches the mark
- If it matches, then the instrument has an insignificant error (note that the greater the distance between the walls, the higher the error, and the smaller the gap between them, the correspondingly lower the error)
- If the laser beam does not coincide with the mark, then there is an error, and its magnitude is quite high. There are special adjustment screws in the device body, which also allow you to adjust the level, reducing deviations from the norm
Before using a laser level to level walls, you need to make sure that there are no large deviations, otherwise the indicators will not correspond to reality. Below is a video instruction and training on how to properly check the level for measurement accuracy.
Advantages of a homemade tool
Despite the fact that such a tool cannot provide high accuracy, it is quite profitable to use it in everyday life. In any case, the marking will be more accurate, and the process itself is much simpler than when using a water level. It is for this reason that such equipment is in demand among household consumers. The positive characteristics of the tool include:
- long beam length;
- minimum error;
- high marking speed.
The use of the equipment is fully justified for walls, floors, ceilings and other supports of a similar type with any type of surface. Alternative applications include marking the following objects:
- personal plots;
- fence structure;
- facade finishing.
Ingenuity, accuracy and strict adherence to the instructions described above will help to significantly save money and time. Before spending money on expensive equipment, a thrifty person should think about whether it’s worth making the device yourself, saving money? Moreover, its quality and ease of use in everyday life corresponds to an expensive device.
How to use a laser level, learning how to work
If you manage to install and check the accuracy of the tool, then using it to level the surface of the walls will not be difficult. How to operate this device correctly is indicated in the instructions. However, few people read the instructions, and refer to them only after discrepancies arise. Working with a laser level should be carried out in a calm environment, since this device is the foundation for subsequent actions. If possible, ask someone with experience to advise you, or better yet, show you how to use a laser level correctly. If this is not possible, then training is carried out independently.
Before using a laser level, you need to know that there are devices that have different functions. Almost all models are capable of building not only horizontal, but also vertical planes. There is also an option such as constructing two parallel vertical planes, however, the more additional functions, the more expensive the tool itself. In addition to the built-in options, additional devices will help expand the functionality and simplify the use of the tool, which are also useful to know about.
This is interesting!
When using a laser level, it will be useful to know that the device has three modes - vertical and horizontal plane construction, as well as a plumb line. A plumb line allows you to project points in two directions - onto the floor and ceiling, which is very convenient when you have to build a partition.
Principle of operation
The basic element of any device whose name includes the word “laser” is an emitter of highly targeted monochromatic (one-color) radiation. The phenomenon is based on forced radiation, which, depending on the power, is perceived differently.
Low-power laser emitters based on red, red-orange, yellow-orange and green diodes make it possible to produce a point or beam of light.
At a high level of pumped energy, a laser beam can turn into a weapon - it can set fire to materials that absorb radiation well.
Devices used in everyday life and construction and repair work operate on laser diodes of the red, yellow-orange and green spectrum; blue and violet ones are much less common (such models are much more expensive). To concentrate light radiation, biconvex lenses are used, as well as other optical devices that allow the beam to be converted into a plane.
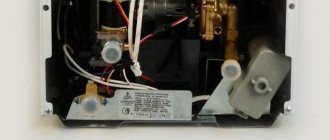
Household appliances have a standard circuit shown in the illustration. Design variations are related to the power of the emitter and additional accessories.
Laser-based level and level design
Laser levels and levels use the principle of directly indicating a target - a point or line on a surface. They can be tracked directly (in relatively low light) or through the eyepiece of the device.
- In addition to a point or line (the trace of the intersection of a light plane with a solid opaque surface), levels and levels allow you to obtain a cross-shaped pointer, as well as simultaneously use two or more emitters.
Due to the scattering of the laser beam into a plane, such devices are often called “laser plane builders”. In general, the set of functions of the device depends on the number of emitters and optical devices for concentrating or scattering the beam.
Substitutes for professional equipment
In homemade devices, a special laser emitter is replaced with a conventional laser pointer.
With sufficient power and quality, as well as the presence of two or more attachments that allow you to transform the laser beam, such a pointer is quite suitable for making a laser level with your own hands.
You just need to take care of sufficiently strong and convenient fastening and installation of the pointer in a strictly defined position with the possibility of displacement.
As can be seen in the illustration, a telescopic tripod with a convenient mount that allows the holder to be rotated is used to mount the professional device.
Since such tripods are often found in the households of amateur photographers, they can be easily adapted to make a tripod for a laser level with your own hands.
If you don’t have a tripod, you can make a simple stand based on a stick or timber with a support at the bottom, use a container of water or a hanging mechanism. These options will be discussed in detail below.
If you have a tripod and a construction bubble (“spirit level”) level, creating a device comes down to installing a tripod and attaching a level to it with a laser pointer fixed on it. The illustration shows a level with an existing groove for the pointer, but in fact the fastening is simply done using clamps, wire or even tape.
The most difficult part is the correct orientation of the laser beam. To do this, it is advisable to insert a piece of hard rubber or foam between the pointer and the surface of the level, securing it with clamps or elastic bands, as shown in the diagram.
Here 1 is a pointer, 2 is a piece of dense and moderately elastic material, 3 is clamps or elastic bands. After setting the bubble level strictly horizontally (this can be done on any flat surface), the laser pointer turns on.
By cutting the insert and tightening the clamps tighter or looser, we carry out a kind of adjustment of the level (of the future).
Once parallelism between the horizontal plane and the laser beam has been achieved, you can mount the resulting device on a tripod in any convenient way.
Support in the form of a rod, float device or suspension
As already mentioned, in the absence of a tripod, we use improvised means - a barbell made from a broom handle, a shovel or just a piece of timber, or a container of water.
The structure of the rod is very simple: a beam or stick is attached to a piece of board or OSB board (plywood) strictly vertically and so that the structure is stable.
You can check the angle between the support and the rod with a building square, but it is better to use a regular building level. Spacers can be used as support, as shown in the diagram below.
A block the size of a bubble level with an attached pointer is mounted to the top of the rod - and the device is ready.
If you place a large container on the floor, filled almost to the brim with water, and place a level with a laser pointer on a flat piece of foam, you will also get a quite suitable support for a homemade level. In addition, in a container with water, the device can rotate freely, “drawing” a plane along all the walls of the room.
Interestingly, for such a “float” level you don’t even need a bubble level. With an even piece of foam plastic on which the pointer is rigidly and strictly horizontally fixed, the laser beam will move only horizontally - due to the impeccable evenness and horizontality of the water surface.
Simple steps for making such a laser level with your own hands and its operation are shown in the video.
The suspension is even easier to install. A beam is attached to a chandelier hook or other similar mount on the ceiling of the room using a rope or thin wire.
A laser pointer is fixed on the beam so that the light beam is directed toward the floor (if floor markings are needed) or toward the walls. Next, by rotating the resulting level from the pointer, we obtain a light point or line on the desired surface.
In the illustration, a tripod is used as a mount for the hanging level, and the pointer itself is fixed in a hole drilled in a beam.
Additions to the homemade laser level device
Additional details and the use of not one, but two or more laser pointers will help increase the accuracy of the device.
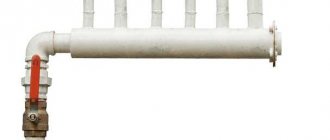
One of the simplest improvements is the use of a bubble level with two pointers, mounted on a rotating flange with markings, which will help you rotate the device to an arbitrary angle.
In order for the system to work properly, it is important to accurately align the axes of the laser beams and secure the flange strictly horizontally. The convenience of the system is that it can be mounted on a tripod or rod.
- By changing the position of the levels and the number of pointers, you can get a laser marker that provides a light cross.
If your household already has an optical level, you can use it as a stand to add a laser pointer. An example of such a design is shown in the photo.
- The scheme is extremely simple: a bar with a “bundle” of a construction bubble level and a laser pointer attached to it, rigidly mounted on the level’s stand.
- For those who have a tripod for a camera or video camera at their disposal, we offer a diagram of a do-it-yourself level made from a tripod with adjustable legs, brackets and the same “bundle” of level + pointer.
DIY laser level - video
Another very interesting manufacturing option is presented in the video.
Useful tips for creating homemade levels using laser pointers
Despite the convenience, compactness and low price of self-made devices, they have two main disadvantages: relatively low accuracy and a short period of operation with constant use of laser emitters.
Auxiliary options for laser levels
Levels are classified into two types: household and professional. Professional ones are also called construction ones, since they are mainly used in construction, electrical installation and geodesy. When carrying out repair work, household laser levels are used, which differ from their professional counterparts not only in price, but also in additional capabilities. As a rule, household levels have a primitive set of functions that allows them to satisfy the needs of the master when carrying out interior finishing repairs. To expand the functionality of the tool, additional equipment is used:
- A laser beam receiver is a special device that allows you to increase the range of the beam (increase its visibility over long distances). This equipment is very convenient when there is a need to use it outdoors. The receiver allows you to observe the projection of the beam not only over long distances, but also in sunlight. The receiver allows you to double the beam distance. When choosing such equipment, you need to take into account that they work clearly in conjunction with only one manufacturer, for example, Bosch. You also need to know that not all models of laser levels can work with receivers. If this is not possible, then you can increase the beam range using a reflective plate
- The target is another additional accessory that comes with many level models. The target is a plate on which markings are applied. Using such an auxiliary device, you can set the accuracy of measurements. An example of using a target is quite simple - instead of an inconspicuous point on the wall, you need to hang this plate, which is much easier and easier to navigate, especially when the distance is 20-30 meters
- The optical sight is another accessory that allows you to track the range of the beam even at a distance of up to 100 meters
- Rail - used in cases where several parallel lines must be drawn on the surface of a wall or other object, while maintaining the same distance. The staff also measures the height of the level attached to the tripod.
All these auxiliary devices make it easier to manipulate the operating device. Professional models of devices have the option of rotating the laser at an angle of 360 degrees. Such devices are especially valuable, since with their help you can make a projection not only on one wall, but throughout the entire room, which simplifies marking work. When all the nuances are known, it is necessary to move on to direct training in using laser levels.
Level made from a container of water and polystyrene foam
You will need the following items:
- convenient container;
- plaster or plasticine;
- laser pointer;
- Styrofoam.
Before you begin how to make a laser level with your own hands from the presented parts, you need to make sure your hands are clean and dry. If these rules are neglected, the materials will lose the desired properties. Next, actions are performed that do not require particularly large material and time costs. All of them are described below.
- A clean container (a large saucepan, bucket or bowl made of any material) filled to the brim with water.
- A laser-type pointer is attached to a prepared piece of foam. As a nozzle you need to use a regular point. The fastening can be a thick rubber band, plasticine or a clamp. The device should be mounted as evenly as possible, parallel to the mounting surface.
- Select the height required for marking and place a container of water there.
- The pointer, fixed to the foam, is placed in the reservoir.
- Turning on the pointer.
- By changing the position of the device on the surface where the marking is made relative to the axis of the central view, points are designated. They will be at the same level relative to the established horizon.
Elements must be of high quality and strength. This will ensure the longevity of the equipment. The presented design is far from ideal, but it gives fairly clear marking results. Thanks to this, such equipment is quite popular among budget or private builders.
How to use the level, instructions and lessons with examples
The capabilities of a laser level are great, and today many craftsmen do not even know what can be done with this device. Most specialists use the tool to perform certain jobs, not realizing that the laser level is also used to implement the following tasks:
- For leveling walls
- To level the floor and foundation
- To level the ceiling
- When plastering walls
- When laying tiles
- When erecting a fence
- When installing switches and sockets
Using the example of all these actions, we will consider how to use the level correctly in order to obtain accurate results.
Bottom line
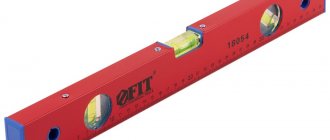
Great tool for home use. The eye, of course, is a diamond, but confirmation of this never hurts, and you can’t measure angles other than straight or straight, and even more so, “by eye.” The workmanship does not cause any complaints, the aluminum profile of the case is made without flaws - smooth and even. An accuracy of 0.2⁰ is just right for home (and not only) use. Two operating modes and calibration capability.
That's all. All the best!
Instructions for use when laying tiles and tiles
When laying tiles on a wall, a laser level is used to ensure that the tiles are positioned strictly at right angles. This depends on the interior design of the room. When laying tiles, the device must be switched to the cross-plane construction mode. At the same time, the level builds two planes - horizontal and vertical, which allows you to immediately install the tiles at a right angle.
Work can be carried out in two ways: with the level turned on, which directs projection rays onto the wall, and also by marking with a mark or pencil. Points are marked along the projection planes of the laser beam with a marker or pencil, and then the tiles are laid on their basis. In a similar way, you can lay tiles not only on the wall, but also on the floor. After turning on the device, it must be aligned parallel to the wall. The center of the cross should be aligned with the seams of the tiles, and the sides of the tiles should be aligned along the guide lines created by the rays.
Differences between a homemade model
A homemade laser level can be used for mirror and symmetrical markings over long distances during construction or repair . Of course, the homemade version has a short range of action: approximately 10-12 meters. But this is quite enough to complete most of the necessary notes. Professional devices are capable of creating marks, calculating angles and much more. But the big disadvantage of such devices is their price.
Some of the electronic models start at two hundred dollars, which is not that cheap. But in most cases, many of the proposed capabilities of professional equipment will not be needed, so you can get by with a homemade design. A homemade level will cost tens of times less, and you will need available materials to assemble it.
How to use a laser level when wallpapering
The tool is also useful when gluing wallpaper, when it is very difficult to focus on the evenness of the vertical line. In order for each subsequent sheet of wallpaper to be positioned evenly, it is necessary to turn on the laser level in the vertical plane projection mode. You can use this line as a guide when gluing wallpaper. If the wallpaper is glued in a horizontal direction, for example, then the horizontal projection mode is activated.
Using this useful measuring tool, you can check the quality of the work performed by the contractor. To do this, you need to turn on the tool and project the beam onto the wall. Deviations and unevenness in the arrangement of wallpaper sheets will be visible along the reference line. Based on such a check, you can achieve a reduction in the cost of services for the work performed or even come to the conclusion that the wallpaper will be re-glued, but at the expense of the contractor.
This is interesting!
When using the device, you must set it to zero. What does this term mean? Set the level to zero - this means the distance from the ground to the beam that the instrument projects. Setting the zero makes it easier to find the beam, especially when work is carried out outdoors over long distances. If, for example, the level zero point is 1 meter, and after 20 meters measurements show that the projection is at a level of 1.2 meters or 0.8 meters, then there are ground unevennesses. These deviations may be of smaller significance, which are almost impossible to visually identify.
How to check the horizon
In order to check the device horizontally, you need to purchase a hydraulic level. We also need two pieces of paper. A hydraulic level is two containers connected to each other by a transparent tube, which has special marks. This is the most inexpensive construction tool that can be bought at any specialty store.
The ideal horizon is set using a hydraulic level in the following way:
- stick two pieces of paper opposite each other on the wall, you can secure it with tape;
- pour water into the device so that it reaches the middle line in each vessel;
- secure the vessel to the first sheet of paper with tape and record the water mark in it;
- with the second flask you need to do the same manipulations, trying to ensure that the water mark is level in the two containers;
- as soon as the level is set, mark the marks on paper;
- Apply the bubble level strictly to the marks; if the bubble is exactly in the middle, the level is good.
How to use when installing furniture
This device is also used for leveling furniture in a room. Moreover, this applies not only to hanging furniture - cabinets, shelves, etc., but also to those located on the floor. If you need to hang a cabinet or shelf on the wall, then using a regular water level is extremely inconvenient. By turning on the level and setting the cross projection mode, you can safely hang a shelf or cabinet on the wall in your home. High accuracy and evenness of furniture arrangement plays an important role in interior design.
How to use a level to level a sofa, bed, refrigerator or electric stove. Kitchen cabinets also require a straight line arrangement, and an indispensable level will also help in this matter. Of course, you can take a water level, since its error is acceptable, but with an optical device it will be much easier to cope with the task.
The meter is switched to the mode of constructing a horizontal plane, and then the furniture is configured. To do this, there are adjusting screws on the furniture legs, with which you can achieve a straight position.
Purchasing levels from a reliable company
The Metronx company offers the purchase of modern high-precision levels of various configurations for all types of work. The presence of additional accessories and technical documents will ensure ease of use of the device. Our store's assortment includes both a budget device with a minimum number of functions and professional levels at a relatively high price.
If you have any difficulties making a choice, you can always contact our managers who will help you buy the best model for you. We deliver goods throughout Russia. We provide a guarantee for all our products, we have our own service center where you can return the equipment. Check out the range of MetronX's own levels
Instructions for leveling when installing partitions
Partitions in a house or apartment are constructed from plasterboard sheets. In order for the new wall to be level, it is necessary to take care of its alignment at the construction stage. Having chosen a suitable place where you want to build a wall, you need to position the device parallel to the wall, ceiling and floor, and then project a plane. Along the resulting lines, you should make marks with a pencil or marker every 20-40 cm, and then connect them with a ruler or rule.
To put it simply, the principle of leveling a plane from the floor to the ceiling is that the device is aligned with a mark on the floor and then transferred to the ceiling. Then the projection is transferred to the walls along these points, thereby obtaining a flat plane along which you can navigate when constructing partitions, walls, etc. A video lesson on how to properly use the matrix level is presented below.
Additional options and features
In addition to the main parameters, there are also some additional ones. They make things easier, so it's more about usability. After all, additional functions affect the final result only indirectly or partially.
Self-leveling
In order for the measurements to be correct, the level must be installed vertically upward. In simple models, their position is checked with simpler devices, usually a bubble level. In some models it is built into the body, in others it is not. Then you have to resort to ordinary construction, which is not entirely convenient. In addition, incorrect readings are possible - if during operation it changes position and you do not see it, the work will be performed incorrectly. To avoid such a situation, you have to double-check the position of the device several times.
Self-leveling (self-compensation of a small angle of inclination)
Some laser levels have a self-leveling or self-leveling feature. When deviating from the vertical by a small angle (usually up to 4°), they adjust the position of the mirrors and prisms so that all readings are correct. If the tilt exceeds the maximum permissible, they either make a sound/give a light signal, or turn off the beams. Operation is restored when returning to normal.
Having a laser level with this function makes it easy to set up the device at the very beginning of work. Also, during its use, you don’t have to worry that it has changed position - it will give a signal.
However, sometimes the level needs to be set at a certain angle. The presence of a self-leveling function will not allow this to be done. Therefore, it is advisable to purchase a model in which this function can be blocked.
Self-shutdown
This function allows you to save battery power. If the device does not move for 10-15 minutes, it turns off. On the one hand, this is useful, on the other hand, some jobs require more than 15 minutes and shutting down can be annoying. Whether you need this feature or not is up to you.
Automatic shutdown is not always good
Operating temperature
If you plan to work in the warm season or only indoors, the temperature does not matter. Basically, a laser level can be operated at temperatures from +5°C to +40°C, that is, they are only suitable for heated rooms or work in the warm season.
Most laser levels are designed to work in a heated room
If you need to choose a laser level for working outdoors with the possibility of operation in the cold season, there are “frost-resistant” models that can withstand temperatures down to -10°C. Even more frost-resistant ones must be looked for specifically; there are very few of them.
Mounting type
In addition to the standard installation of the laser level on a horizontal plane, there may be several additional options for mounting it:
- On a special tripod. Most often needed for outdoor work, but some work (drawing horizontal lines on walls when hanging furniture, for example) is also easier to do with a tripod. A tripod is sometimes included, sometimes purchased separately. When purchasing, pay attention to the diameter of the thread on the body of the level - the tripod must have the same one.
- On magnets. Some models have magnets soldered into the body. This makes it possible to attach it to any metal surface/part. The type of fastening affects ease of use
- On a special magnetic stand. Some models of laser levels come with a small plastic pad into which magnets are soldered. A platform is installed on a metal surface, and a level is placed on it.
- Self-tapping screw/nail. A special hole is made in the body of the level into which the head of a nail or self-tapping screw is threaded. Not the most convenient way of fastening, but still.
Everything is clear with these options. You can, of course, do without them, come up with your own way. These are simply opportunities for more comfortable operation.
What else you need to pay attention to is how close you can install the level to the vertical plane. The closer the beam can be located to the wall, the easier it is to level the surface of the wall, mark niches in the wall, etc. This depends on the design of the case - the slots for the rays to exit should either be level with the edge of the case, or even slightly moved beyond it.
Shockproof housing and the possibility of self-adjustment (adjustment)
It is very useful if the laser level has a shockproof housing. Construction or repair is a high-risk area for any tool, so it often falls. If the case is shockproof, there is a high probability that even after a fall it will survive.
A shockproof case wouldn't hurt
If dropped or carelessly transported, the level's settings may be lost and it may begin to lie. To eliminate this “phenomenon”, some devices provide the ability to independently configure. For this you will need to carry out certain manipulations described in the instructions.
Leveling a vertical surface or using a level when plastering walls
If you are working on plastering walls, then to achieve maximum evenness, you will need to use a laser level. For this, a device is used that is located along the surface of the wall. A laser beam is directed, which is a reference point for a straight surface. To find out if there are deviations from the norm, you will need a ruler to use for measurements.
The ruler is positioned perpendicular to the projected beam, and its scale indicates the level of deviation from the norm. Depending on the deviations, it is necessary to select the appropriate amount of plaster mixture for leveling. As you can see, checking the evenness of the walls in a house or apartment is not difficult if you have a good laser level at your disposal. The photo below shows the principle of determining deviations.
Basic materials
The simplest design can be made from unused items with your own hands. It’s not difficult to make a level with a laser pointer; you just need to prepare the necessary material and follow the instructions. Do not neglect the instructions and do it your own way; before implementing the change, you need to study the design, because The output parameters may become incorrect. For the simplest installation you will need:
- a regular laser pointer, sold in office supplies or children's toy stores;
- porous rubber of sufficient thickness, but small in size;
- a small, simple type bubble level, which is checked for accuracy before use;
- a wooden block, the size of a matchbox, pre-polished;
- support in the role of a level stick;
- plywood sheet 10×10;
- a metal clamp or thick plastic clamp corresponding to the diameter of the pointer;
- screws.
Materials for creating a laser level
After preparing the entire list of materials, you can begin the process of assembling the required product with your own hands.
How to use a level when building a foundation
If the principle of operation of the device is clear, then there will be no problems with projecting the surface for leveling. If a foundation is being built, then with the help of a level you can project a vertical line along which you can focus on the evenness of its pouring. It should be taken into account that it is necessary to focus on the vertical before constructing the frame on which the foundation is poured. If the frame is built according to the guideline, then the foundation will be poured correctly and evenly.
If the foundation has already been poured, then the sequence of actions will be as follows (vertical evenness is determined):
- First, the device is leveled, and it should be located in the center of the structure
- At the next step, you need to take a flat stick - a strip on which marks will be applied
- We measure the first corner of the finished foundation by making a notch on the strip used for marking. If the projected line is not visible, then the receiver should be used to identify the projected line
- Measure each corner of the constructed foundation in a similar way, making sure it is straight.
- Deviations in the evenness of the foundation should not be more than 3-5 cm. Discrepancies up to 2-3 cm are acceptable
If earlier simple tools such as a tape measure, ruler and water level were used to level planes, today a laser level can easily replace them. It allows you to simplify and speed up the work on projecting planes. The high cost of this device does not allow a complete transition to the use of such high-precision devices, and therefore they are used by construction teams who can afford to use equipment of this type. The estimated cost of the level in question is about 10-20 thousand rubles. This is a device that can be used to take measurements indoors and outdoors. There are cheaper and more expensive models, so when choosing them you need to understand for what purpose you plan to use them.
As a result, it should be noted that working with a laser level is not difficult, unlike outdated optical devices that are still used in geodesy. However, companies carrying out geodetic measurements are gradually switching from outdated devices to laser levels, which have become very popular in construction, geodesy and other areas where reliability and efficiency depend on accuracy and straightness.
Device of laser and optical levels
Levels are a budget type of equipment that is often used by craftsmen. They are quite accurate and reliable when working in different conditions.
The main component of the optical device is a telescope, which magnifies 20 times PHOTO: remoskop.ru
The device is equipped with a cylindrical level for horizontal alignment and an elevation screw for orientation in space. Before use, the level must be mounted on a tripod and leveled using lifting screws. The integrated bubble level will help you determine the correct position. The telescope is aimed at the installed staff using the sighting device and adjusted for sharpness by rotating the eyepiece ring.
Laser products have recently been replacing optical analogues, attracting buyers with their comfort, compact size, simple use and great functionality.
The devices make it possible to take fairly accurate measurements, as well as build straight lines in several planes at the same time. Laser levels are more focused on repair and construction work indoors; household appliances rarely cast a beam with a range of more than 30 m.
How to fix stuck buttons
If the laser level's buttons stick or stop switching, it is because they have been pressed too hard during regular use. You can carry out the repair yourself. You need to disassemble the device and solder the detached contact using a special device - a soldering iron.
Advice! To ensure that the solder does not fall off during further use, the work is performed using special solder. The main constituent substance is flux.
The laser level requires very careful handling. Therefore, if during use you find defects, you should immediately try to eliminate them. You can do minor work yourself. But in case of serious damage, contact a specialist. If you don't understand anything about this kind of repair, it will be better. Otherwise, you will not only not repair the product, but also worsen it. And buying a new one will cost much more than repairing it at a service center. In any case, it's up to you to decide. Good luck!
All plane builders have a certain error within the tolerance. Usually for cheap models it is 0.5mm/1m. For a 3-4 meter wall there is a 2-3mm run-up. And if you lay tiles in the bathroom, then at this level the discrepancy along the 4 walls will lead to a 5-6mm mismatch in the seams. More expensive models from 7-8 thousand. rubles have a smaller error, from 0.2 to 0.05mm/1m. Of course, they give a more uniform beam and a wider angle. But even a cheap level needs to be adjusted and this is very easy to do. Let’s look at the adjustment using the example of the cheapest Chinese level from Leroy, which did not even fall within the tolerance of 0.5mm/1m. There are adjustment screws at all levels. By tightening or unscrewing the screws, we change the position of the center of gravity of the pendulum and change the level setting.
It is very easy to disassemble. Unscrew the screws of the lower base. Remove the retaining ring using pliers. Can be stretched with threads. Unscrew the bottom and unscrew the body. For convenience, I screwed the bottom to one half and adjusted it that way. First of all, you need to check the level of the horizontal line. Place the device on a base or tripod. On the right side of the beam we make a level mark on the wall. Turn the device to the right so that the left edge of the beam hits this mark. If it diverges, then you need to adjust the horizon level using the side screw. After several iterations, the left and right edges of the ray should hit the same mark. The horizon is set. The second step is to adjust the plane of the beam. We take a large room, maybe a long corridor. From one wall we direct a horizontal beam to another wall. We put mark No. 1, turn the beam to the near wall and also put mark No. 2. Then we move the tripod to the opposite wall, set the height of the tripod to hit mark No. 1, then turn the device and look where the beam hits. The plane of the horizontal beam is adjusted by the front screw. After each adjustment, the marks are drawn again. The first marks are placed crookedly. Therefore, each time we make new marks and compare. We adjust until the beam hits both marks, from any wall. This way we have a guarantee that the tiles laid on opposite walls will be at the same height. The third step is to check the vertical beam. For me it was blocked and not perpendicular to the horizontal. We unscrew the screws securing the vertical sensor, loosen the glue and rotate the sensor in the desired direction. We tighten it and check it against the plumb line of the rope. It's more difficult to get here. It is difficult to turn hundredths of an angle by hand. But with some attempt you will be able to get there.
We tighten the screws and check the horizon again. I set mine with an accuracy of horizon 0.5mm/10m=0.05mm/1m, vertical 0.5mm/2.5m=0.2mm/1meter. The result was accuracy at the level of expensive devices.