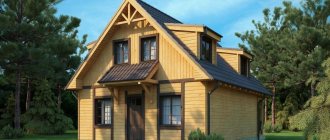
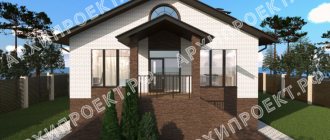
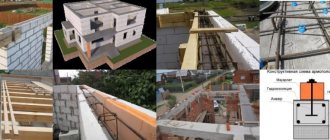
“I don’t have any useless space, I have as many as 100 square meters on the roof that can be used usefully,” says FORUMHOUSE member with the nickname victorborisov. His one-story house made of aerated concrete became popular on the Internet, and received the nickname “transformer booth” due to its flat roof, which is unusual in the Moscow region. Now on the roof of this “booth” there is an excellent lawn, a trampoline and solar panels are installed on it, and you can get there using an electric elevator.
The one-story house made of aerated concrete was immediately conceived as a “second apartment” outside the city - comfortable housing for year-round use, and it was actually built “in one helmet.” Looking back, Victor himself is surprised at the enormous amount of work he accomplished alone. This article talks about the design features and details of the independent construction of a legendary house made of aerated concrete.
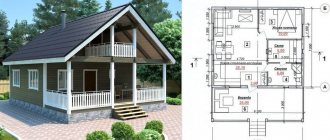
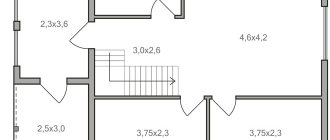
The simplest layout
The layout is extremely simple. In this case, the kitchen is separated from the room.
Sometimes an architect will draw a gorgeous layout, everything is functional, bright corridors, large rooms, a huge number of windows. It is very difficult to do this from the point of view of engineering solutions because large spans are always powerful floor structures, this is an unnecessary increase in cost.
In this project everything is different: it’s simple, cheap and can be built by almost any builder with minimal qualifications.
We have a vestibule that cuts off cold air when entering the house from the street. He's the hallway. It contains a wardrobe which is a wardrobe.
Then we find ourselves in a corridor from which we can go into a room with a kitchen and a combined bathroom.
The design solutions used in this house are the simplest and most affordable.
Conclusion
The total cost obtained at each stage is called the total estimated cost. In practice, it is very difficult to “fit” into the estimated calculations. In order not to disrupt general calculations, some builders reduce costs where technology allows, directing the required amounts to other areas. Sometimes it is necessary to increase the estimate in agreement with the customer. For clarity, we provide an example of estimated estimates for some of the main sections for the construction of a one-story residential building with an attic with a total area of 120 sq.m. (f 6-11). The drawings were made based on the information given here.
Foundation - slab
The foundation of this house is a monolithic slab. It is also a subfloor. The slab is suitable for almost all soils. Tape will be cheaper. But without knowing the soil, it is dangerous to make a strip foundation.
The slab is made according to all the rules: we remove the plant layer of soil, make geotextiles, make a sand cushion. Next comes the insulation, 2 reinforcement meshes. A double mesh of reinforcement is required and nothing else.
I am an opponent of such slabs when they make widening in places of load-bearing walls, and where you have a floor, a slab with single reinforcement is usually poured 10 centimeters thick. The way the stove works is not exactly how I like it.
In terms of savings, there is none. Where you decrease the height of the concrete slab, you increase the height of the insulation. Penoplex currently costs 4,200 rubles per cubic meter. Concrete with delivery currently costs 4,200 rubles per cubic meter. I don't see any savings. If the conversation is about how this creates a larger layer of insulation, therefore warmer, I will not agree here. If we carry out thermal insulation correctly, then we insulate the entire blind area and insulate the perimeter of the house. It doesn't make any sense in this house.
order the construction of a house from gas silicate blocks from us!
Work on projects is carried out by specialists who lead the project from start to finish, coordinating all actions, which allows you to be confident in the professionalism of each team member. This option of houses is suitable for those who want to save money, time, and at the same time build a good house that meets all the characteristics and safety precautions. When you turn to professionals, you receive a range of high-quality services for building a house, so it is better to choose a reliable company like ours, which has extensive experience.
Box cost
Estimate for materials.
Our slab is 250 thick with double mesh. Reinforcement will cost us 112,000 in terms of materials alone. Walls made of aerated concrete blocks will cost us another 120 thousand rubles. These are external walls with a thickness of 400 millimeters and an internal partition with a thickness of 100 millimeters. The materials for the roof will cost us a little more than 60,000 rubles. It includes completely wooden floors and a rafter group. All necessary films, insulation and metal roofing. Since we have a budget house, we do the cornice hemming with a regular, simple inch board.
After the box is assembled, all we have to do is install windows and doors. I don’t recommend saving on doors. This element must be bought for normal money - at least 22,000 rubles. These are the cheapest doors that are suitable for private construction. We also have three more windows measuring 1.2 x 1.5 meters. Of these, two are opening and one window is solid. Therefore, let’s take the average cost of 6,200 rubles per window.
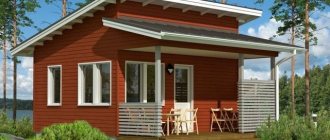
Exterior finishing
There are entire methods for studying aerated concrete structures. They say that aerated concrete is not destroyed by precipitation. I don’t agree with this, so I include the cheapest siding in the estimate. If you don’t have the funds now, you can, for example, leave it unfinished for the first winter. But next summer, after you have spent the winter in an aerated concrete house, I still strongly recommend sheathing it.
Delivery
Only 5,000 rubles are allocated for delivery. The cost of delivery of aerated concrete blocks, the cost of delivery of concrete, the cost of delivery of reinforcement is included in the cost of the product itself. Therefore, we spend 5,000 rubles on the delivery of lumber to the roof, on the delivery of metal tiles, films and insulation.
Tools
My last two favorite points are unaccounted expenses, which I included in this estimate at 10,000 rubles. These are the little things that I either didn’t want to highlight separately, or simply forgot.
And the second point is equipment and tools - 8,000 rubles:
- Rent a vibrator for one day for pouring a monolithic slab.
- Set of spatulas for laying aerated concrete blocks.
- Screwdriver for installing metal tiles
- and of course you will need several buckets, hammers and other small things.
Builders' work
If you do not have the opportunity to build it yourself or do not want to do this, then the cost of specialists installing the frame of your house with such a configuration will be 133,000 rubles.
the total cost
The cost of material for the construction of a house box 6.8 by 6.8 meters with siding trim and a metal tile roof with load-bearing walls made of aerated concrete blocks and a monolithic slab foundation will cost us 383,000 rubles. This is at prices for 2021.
If you don’t build it yourself, then 36 square meters of a bare box for year-round use will cost a little more than 500,0000 rubles.
How to fasten aerated concrete blocks - mortar or glue?
Cement and glue
As mentioned earlier, one of the advantages of a gas block is that it can be fixed either using a regular solution or using a special glue. What material should I choose for the job? It should be borne in mind that each of them has both certain advantages and disadvantages.
There are the following advantages to using glue:
- perfect joints;
- very smooth wall masonry;
- no cold bridges;
- it is simpler and easier to work with.
But it is important to consider that:
- during operation, the glue will release various toxins;
- its price is much higher than that of the solution.
An ordinary solution consists of water, cement and sand. Of the minuses, it should be noted that laying is somewhat more difficult than using glue, since you constantly need to monitor the evenness of the masonry. But it is much easier to correct these irregularities using a solution.
There are no specific rules or laws when choosing. Based on the above, you can determine for yourself which material to use.
Turnkey house
Let's estimate the cost of such a turnkey house. Electrical, plumbing, ventilation, water supply and the cheapest finishing costs another 122 thousand rubles.
For heating there are 5 radiators of different power, some pipes and an electric boiler. We will have to pay another 80,000 to the specialists for the work. As a result, the cost of such a turnkey house is 718,000 rubles.
Let's add external work here:
- To dig a septic tank - three concrete rings. With a reserve, this is about 50,000 rubles.
- Plus drilling a well - another 100,000 maximum.
- And eyeliner for the house RUB 10,000.
- Final cost: 878,000 rub.
Well, let’s add the cost of the plot.
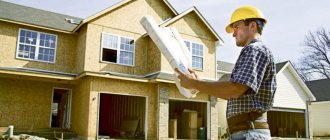
Preparatory work
Where to start building a private house
To build a house from aerated concrete, the first thing you need to do is do some preparatory work, without which construction will not begin:
- first of all, you need to provide electricity at the construction site so that there is light and tools can be connected;
- organize a place for storing aerated concrete;
- prepare a place that will serve as a warehouse for consumable construction materials;
- deliver the necessary inventory, tools and equipment to the site;
- bring the material necessary for the work (aerated concrete, cement, sand, crushed stone) for at least a week of work;
- carry out geodetic preparation;
- study the building plan, methods and methods of conducting work and organize the safety of the workplace.
Laying should be done at temperatures from 5 to 25ºC. If the ambient temperature is above 25ºC, then when performing work, the aerated concrete must be constantly moistened with water.
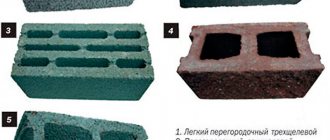
Advantages and disadvantages of aerated concrete buildings and the main features of the material
In order for the conclusions to be as impartial as possible, let’s try to take a rational look at the qualities and properties of the material, relying not on subjective data, but on exact test values.
Advantages and disadvantages
Aerated concrete has a number of positive characteristics. Depending on the manufacturer, they may vary slightly in quantitative terms, but there will be no deviations from the requirements, which means that the properties will be preserved.
Among the advantages it is worth highlighting the following:
- Aerated concrete belongs to the class of lightweight concrete. It is lightweight, which reduces the load on the foundation. But at the same time, the strength of aerated concrete houses leaves many competitors behind.
- The products have a low thermal conductivity coefficient, which will undoubtedly affect the ability of the walls of a future building to retain heat.
- The blocks are very easy to handle; armed with a hacksaw or saw, you can give it any desired shape and easily cut it to the desired size.
- Due to the ability to vapor permeate, a comfortable microclimate will be established in the building. The fact is that an aerated block, with high air humidity, tends to absorb it. Otherwise, give it away.
- The material is environmentally friendly and, most importantly, safe.
- The cost of construction will be relatively inexpensive.
- The frost resistance indicator is quite enviable. It ranges from 35 to 100 cycles.
- Due to the impressive size of the products, the process of constructing the wall occurs in the shortest possible time. And thanks to the almost ideal geometry of the block, the number of cold bridges is reduced to a minimum.
- Increased biological and climatic resistance make the buildings virtually invulnerable to any changes in climate.
This number of advantages is probably a compelling argument for most consumers. But, since everyone has different requirements for a set of properties and qualities, it is worth analyzing the possible disadvantages. Moreover, some of them may not meet the necessary conditions of the developer.
- Aerated concrete is more capable of absorbing moisture than many representatives of lightweight concrete. On the one hand, the porosity of the structure is a plus, but on the other hand, it is a minus. In the winter season, absorbed moisture necessarily crystallizes under the influence of negative temperatures. Thus, having a destructive effect on the structure.
- The block is quite fragile. This is especially noticeable during transportation and work. Even due to slight mechanical stress or shrinkage of the foundation, it can crack.
- A small negative point is the inability of aerated concrete to reliably hold fastening elements.
Corner cracked
Distinctive characteristic
Having considered the main positive and negative characteristics, many future home owners may have a question: why a gas block? After all, many materials intended for the construction of walls have similar properties. And indeed it is.
It would be fair to compare the gas block with other products that are its main competitors in the construction industry.
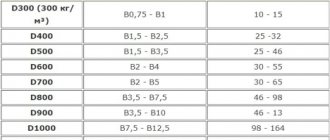
Table 1. Comparison of aerated concrete with other materials suitable for wall construction:
| Indicator name | Aerated concrete for walls | Foam concrete for walls | concrete wall | Brick | Tree |
| Thermal conductivity | 0,115 | 0,25 | 0,3-0,4 | 0,52 | 0,14 |
| Density | 600-800 | 1000-1200 | 900-1200 | 1500-1900 | 500 |
| Frost resistance | 35-100 | 35-50 | 50 | 25 | — |
| Shrinkage | 0.3 mm/m2 | 0.33 mm/m2 | 0.4 mm/m2 | To 10% | |
| Required wall thickness | 0,4 | From 0.4 | From 0.4 | From 0.5 | Up to 1m |
| Environmental friendliness | + | + | + | + | + |
| Fire hazard | Does not burn | Does not burn | Does not support fire | Does not burn | fire hazard |
| Price | Average price category | average price | More expensive than other types of concrete blocks | High price | average price |
As can be seen from the table, aerated concrete leaves behind almost all materials in many respects. It may not be possible to build an apartment building from it, but it seems possible to erect a building up to 3 floors. And since we have dealt with the products, it’s time to proceed to the next stage on the construction path.
Comparison of aerated concrete
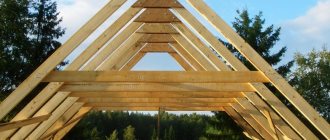
Armopoyas
Reinforced belt for aerated concrete
When the masonry of the walls comes to an end, the last row needs to be strengthened by organizing an armored belt. Thanks to it, the integrity of the structure can be ensured. To fill the armored belt, formwork must be formed from 10 cm thick blocks around the perimeter of all walls, laying them parallel to each other. You need to lay reinforcement into the resulting groove. Then prepare the concrete and pour everything around the perimeter.
To simplify the task of installing the Mauerlat for the roof, threaded metal studs can be inserted into the armored belt. They can be welded to the fittings. It is important to adhere to the exact dimensions so that they rise at the same level. Having done this, it will be much easier to install the Mauerlat.
Interior decoration
Decorating the inside of a house can be done with any materials that match the properties and characteristics of an aerated concrete block. Plaster mixtures and screeds must be selected from highly specialized raw materials, and finishing materials must meet all the requirements stipulated by GOST and SNiP.
First, you need to decide what you want to see in the end. Let's consider the possible options.
Search for design solutions and a brief description of the progress of work
For clarity, we will use the method of stage-by-stage planning of the design of individual parts of the premises.
Table 3. Alternative designs for interior decoration of the house:
| The ceiling in a house can be finished in several ways: by plastering and subsequently painting, or by installing plasterboard boards. In the second case, the choice of design options is extremely large. With the help of gypsum plasterboards it is possible to create complex multi-level ceilings with specialized lighting of any desired shape. Drywall is attached to a pre-assembled frame. Plastering will not be necessary, but insulation will be quite important. |
| First, before applying the finishing layer, the walls should be plastered and leveled at the same time. Priming and laying the reinforcing mesh is mandatory, since the adhesion of aerated concrete does not allow the materials to be reliably fastened together without additional impact. Next, the finished surface should be painted, covered with wallpaper or covered with textured plaster. Individual areas can be decorated with artificial stone or any other material. The emphasis can be placed on the corners, window openings of the room, as well as highlighting certain areas of the room. |
| One of the most common options is laying laminate, parquet and linoleum. Ceramic tiles and porcelain tiles are used more often than usual in bathrooms, kitchens and hallways. The device begins with the installation of wooden logs. Next, the floors are insulated and, as an option, covered with floorboards. |
| With the help of gypsum boards you can diversify the interior with arches. Since drywall is easy to process, you can create even the most incredible designs and shapes. |
Installing jumpers
Installation of formwork for lintels
As things move along, you will need to install a lintel over the door and window openings. To do everything right, you need:
- Place a board over the window.
- Lay blocks 15 cm thick outside.
- Inside there are blocks, 10 cm thick.
- In the center is a block 15 cm thick, sawn in half.
- Make a frame from Ø12 mm reinforcement.
- Install the finished structure between the blocks.
- All that remains is to fill it with concrete.
You can make doorways in the same way, although there are other options for constructing a lintel. It can be made from reinforced concrete, metal corners and filled with concrete, making formwork.
You can buy ready-made jumpers that are easy to install.
Installation of formwork and laying of reinforcement
Formwork installation
Shields need to be assembled from boards, plywood or other wooden materials. You can connect the elements together with self-tapping screws or nails. If you live in areas with a harsh climate, raise the formwork 40–50 cm above ground level so that the walls do not freeze under the thick snow. And when the climate is not so harsh, the base can be made even 30 cm. Then stretch the fishing line around the perimeter so that it corresponds to the level of pouring concrete into the foundation.
This stage includes not only the installation of formwork, but also the necessary communications. After all, if you do not do this in advance, holes for sewerage or water supply will need to be made in the finished foundation.
To strengthen the foundation, you need to place a reinforcing mesh in it. It will be placed in formwork. To make such a frame, you will need Ø14 mm reinforcement rods and flexible steel wire. The rods need to be tied into a mesh with wire. When making cells, it is not necessary to adhere to certain dimensions. On average, these are cells 20x20 cm in size, equal to the size of the trench.
In order for the concrete to completely cover the reinforcing mesh, it must be installed not flush with the top of the trench, but 5–10 cm lower.
Now everything is ready to pour the concrete.
Window sills and windows
Reinforcement
Where the window opening will be, you need to cut two parallel lines. Their size should be 30 cm larger than the size of the window frame, 15 on each side. Clean the grooves from dust with a brush and place Ø8 or 10 mm reinforcement in them and cover everything with the solution. When laying, do not block openings. It's better to do them right away. There is an option to cut them out later, but this is a waste of material and effort.