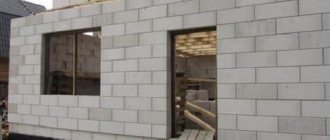
Aerated concrete block is a popular modern material in the construction market. Some people prefer it due to its many positive qualities - it is warm, light, environmentally friendly. Others are neutral, arguing that cracks appear on the walls over time. But this nuance requires separate consideration, since in most cases cracks arise due to non-compliance with construction technologies. Despite this, aerated concrete blocks are chosen more often than other types of building blocks for building houses. It turns out that its advantages are the best, and its disadvantages are perfectly solved by well-designed design solutions.
What stages are involved in building a house from aerated concrete, the positive and negative aspects of the material, whether it is harmful to health, and what is better: aerated concrete or foam block. We will look at all this in this article.
Which aerated concrete blocks are suitable for building houses, their choice
When asked how to build a house from aerated concrete, professionals answer - strictly according to technology and adhering to the project, in which all the necessary calculations of the elements of the house have been made. But first you need to choose a gas block, namely, decide what density, thickness, and height it will be. Let's look at it in order.
| Criterias of choice | Explanation |
| Autoclave or non-autoclave | The first version of the blocks is manufactured only on factory equipment, which is certainly an advantage. The autoclaved gas block has excellent geometry, uniformity and high strength. Deviation in dimensions is no more than 1 mm in both directions. |
| The second version of the blocks is very often made in a half-garage environment. As a result, the geometry is seriously affected, the structure is loose, heterogeneous, and there is a high probability of shrinkage compared to an autoclaved aerated block. The quality leaves much to be desired. | |
| Thickness | The level of thermal conductivity and load-bearing capacity depend on the selected block thickness. With the same density indicators, the higher the density indicator of aerated concrete, the more reliably it retains heat. And at low density, the material is better able to retain heat. To reduce heating costs, experts recommend building thicker walls. |
| Height | The higher the block, the less glue will be required on the seams and the number of rows will decrease. But there is also a minus - tall blocks have a higher mass, so difficulties may arise with masonry, namely lifting. |
| Density (kg/m3) | If we are talking about low-rise construction, then aerated concrete blocks with a density of D300-D600 are suitable. The lower the density, the warmer the block, but it is less durable. |
| Strength | The number of floors is the strength class of the aerated concrete block, respectively: 1-1.5 – B1.5 1.5-2.5 – B2 2-3 – B2.5 Up to 5 – B3.5; AT 5 |
On a note! The lowest permissible wall resistance to heat loss for the central part of the Russian Federation is considered to be 3.5 m2/W*K. Thus, the optimal block thickness options range from 300-600 mm (D300-D600), respectively.
Despite the indicators in the table, today you can find companies in Moscow producing D300 aerated concrete with excellent strength characteristics and compression class B2 (instead of the previously indicated B1). As for the occurrence of cracks, they can indeed arise due to incorrectly chosen density. Professionals recommend choosing autoclaved building materials with a density of D 400 and higher.
What to pay attention to when reinforcing window openings?
When the window opening exceeds 1.8 m, the penultimate row of masonry is reinforced. Make 2 grooves 50 cm longer than the openings. Subsequently, the grooves are filled with adhesive or cement mortar.
Is it possible to spend the winter without heating? Sometimes it is not possible to complete construction work completely within a season. The box is left for the winter without connecting the heating system. The following measures will help prevent the appearance of cracks on the walls in the spring:
- If groundwater is close, drainage is needed.
- It is necessary to carry out waterproofing and insulate the foundation and plinth.
- Insulate the blind area around the structure.
- Insulate floors in the basement.
Thanks to the above measures, freezing of the soil under the foundation can be avoided. It is recommended to additionally maintain the temperature in the basement above zero.
Stages of building a house from aerated concrete blocks
Stage 1. Preparatory work
Construction of a house from aerated concrete at this stage involves the development of a project, a general plan, calculations of building elements, and materials. The general plan means marking the boundaries of the pit and the bottom.
Stage 2. Excavation work
Each region has its own standard soil freezing depth. This information can be found in the building regulations. Soil development using an excavator or front-end loader is carried out as soon as possible. To ensure that the ground thaws as early as possible, experts recommend taking measures related to preventing soil freezing, for example, insulating the surface of the ground with sawdust. If deadlines are running out and the soil is frozen, you can resort to using special equipment (hydraulic hammers).
Stage 3. Foundation work
What kind of foundation you will have depends on several reasons: a cottage or a small country house, with year-round living, visits, type of soil, terrain, presence of a basement, number of storeys in the house, etc. Simply put, it is selected based on a feasibility study. The simplest and most affordable option is to build a house from aerated concrete on a pile-grillage foundation.
A strip foundation is still considered optimal. It is ideal for houses with a basement. There is also a slab foundation, but it is much more expensive than others. In order to make a choice and select the optimal and cost-effective option for your suburban area, you need information about engineering and geological surveys of the building site. In this case, the risk of cracks due to uneven shrinkage of the house is reduced to zero.
Stage 4. Walls made of aerated concrete blocks
The first step is to prepare the base. The initial row of blocks is laid on the waterproofing layer. A cement-sand mixture is used as a solution for the first row. It is this that makes it possible to level the foundation before laying the starting row of blocks. There is no need to moisten the surface. Installation of aerated concrete blocks is carried out from the corners, between which the beacon passes. Not everyone has a level, but a rope is a classic and will serve as a guide for the time of laying.
On a note! To prevent the rope from sagging, it is recommended to make intermediate beacons.
After installing the first row, they check it for evenness and take a break for 3-4 hours so that the solution has time to dry. If the initial row is laid out correctly, then the further work of building a house is greatly simplified. Subsequent masonry is performed with bandaging of the seams. The optimal block displacement rate is 50%, the smallest is 80 mm.
Stage 5. Reinforcement of masonry
It is carried out in order to increase the load-bearing capacity of the structure in the horizontal and vertical directions. The reinforcement step is 1 meter or every 3rd row when the height of the aerated concrete block is over 300 mm, the 4th row is when the block height is 250 mm. The number of grooves depends on the thickness of the aerated concrete. The thicker it is, the more rods, for example, with a block width of 250-500 mm, 3 rods will be required. An alternative to rods is a perforated strip. Its advantages:
- no need to knock down walls
- the construction period of a house is reduced
- significantly less dust
Next, the partitions and internal walls of the doma are laid from aerated blocks. After this, the interfloor coverings of the building are made. They can be wooden or monolithic. The first option is the most popular.
Stage 6 Roofing
The rafter system is installed based on the type of roof and the selected finishing material. It is not recommended to choose heavy roofing materials. Because the vibration amplitude of the house structure increases. Important point! A pitched roof should be attached to aerated concrete exclusively using a Mauerlat. When constructing a roof, the following coatings are often preferred: corrugated sheets, soft tiles, and metal tiles.
Stage 7 Facade
When performing facade work, it is important to focus on such a parameter as vapor permeability. This indicator for the selected finishing material must not be lower than the vapor permeability level of aerated concrete. If you adhere to this rule, the building will not become damp and collapse. To build a house from aerated concrete blocks, it is allowed to use ceramic tiles (locally), brick, wood trim, and plaster as facing materials. It is prohibited to use gypsum-based materials.
Stage 8 Interior decoration of the house
To finish aerated concrete blocks from the inside, it is allowed to use various plasters and sheet materials. Before starting work, it is necessary to prime the walls of the building. Otherwise, there is a high probability of a large number of cracks appearing. In other situations, the decoration of walls made of aerated concrete blocks is in many ways similar to classical building materials.
How to winter without heating
If the house has already been built, but the connection to the central heating or gas line is not expected until next year, you need to prepare for the winter.
Measures to help you survive the winter without losses:
- drain water from all systems;
- close windows and doors tightly or secure two layers of thick film in the openings;
- insulate the foundation, plinth and blind area with polystyrene foam slabs.
For one or two winters the building can be left without exterior decoration. Frost resistance of aerated concrete is 50-100 cycles. The material can withstand this amount of freezing and thawing without changing its properties.
It is not recommended to throw aerated concrete for a long time without protection from precipitation. It has a water absorption of 20-25% by weight, and is prone to waterlogging and destruction at subzero temperatures.
Advantages of aerated concrete
In fact, there are many more advantages than the same foam concrete. Let's look at them in order.
- environmentally friendly - this is confirmed by laboratory indicators. Radiation background is 6 times lower than normal
- affordability – one of the inexpensive and high-quality materials on the market. Many people can afford to build a house from an aerated concrete block. Statistics show us this. The price of a brick is 3 times higher.
- easy to work with due to its low weight and size. Aerated blocks are convenient to transport and install without any labor or preparation.
- excellent thermal insulation qualities
- high level of vapor permeability - aerated concrete blocks easily remove moisture from the house to the outside
- aerated block construction does not require major insulation
- opportunity to build a house in record time
- leader in fire safety, as it does not burn and does not support combustion
- excellent geometry - building a house with aerated blocks takes place without any difficulties regarding alignment. Autoclaved aerated concrete material has ideal accuracy in this regard.
- ease of processing, cutting
- good level of sound insulation - buildings made from such material are especially relevant in megacities
Building a house from an aerated block will cost 30-40% less than a brick, provided that the “hand” of a professional is involved in the work, that is, a competent estimate is drawn up and a project is developed. Scope of application - mainly used in private low-rise construction, during the construction of various outbuildings.
Pouring the foundation
This stage of work can be divided into several steps:
- Determining the required volume of concrete. To calculate how much mixture will be used for pouring, there is a formula: V=S×L, where: V is the required volume of concrete, L is the length of the foundation, S is the cross-sectional area. And to find out the area, just multiply the height of the tape by its width. For example, the length of the foundation strip is 44 m, height 1.3 m, and width 0.5 m. To determine the cross-section, multiply the height by the width: S = 1.3 × 0.5 = 0.65 m2. After which: V=44×0.65=28.6 m3. It turns out that to fill your foundation you will need 28.6 m3 of concrete solution.
- Now you need to decide whether to order concrete from a construction company or make it yourself. The easiest way is to order the solution - it will be quick, without extra effort, but the service costs more. If you want to save money, you can make the concrete yourself, which is a more labor-intensive process. It is better to have a concrete mixer, because mixing such a large volume by hand is unrealistic. To ensure high-quality concrete, strictly adhere to the proportions: 1: 1: 3 - cement, crushed stone, sand. Water must be added until the mixture reaches the required consistency.
- If you have never poured concrete, you should know that it is wrong to dump all the concrete into the trench. It is important to pour concrete in an even layer of 20–30 cm so that the concrete comes out monolithic. There is no need for haste in this matter, since the foundation is the foundation and support of the house, which allows it to stand for a long time.
- It is important to expel the air from the concrete by tamping each layer. To do this, use a vibrator. If this is not available, simply compact the concrete with a stick or reinforcement. Continue pouring until you reach the line level. To better compact the concrete, tap the formwork with a mallet from the outside.
- After finishing the pouring, the surface of the foundation must be leveled using a trowel.
The concrete needs to be covered.
The foundation is poured. The cement will dry in 3–5 days, but it will only be able to reach the desired “condition” and gain strength in a month. To prevent precipitation from falling on the surface and eroding the concrete, the entire surface should be covered with something, you can use plastic film. If you are building in the summer and it is hot outside, the composition needs to be moistened from time to time so that the concrete does not crack. After 10 days you can remove the formwork.
Foundation waterproofing
Before you start building walls, you need to carry out waterproofing work. The base can be coated with bitumen and several layers of roofing material can be laid.
Features of the technology of building houses from aerated block
Construction of a cottage does not require the use of special equipment. It can be built in conditions without electricity. Due to its simplicity, low weight, ease of installation and high speed of construction, the material has become widespread. When working with a gas block, it is important to take into account all the requirements that apply to it. If you have not previously dealt with this type of building block, it is recommended to obtain professional advice or involve experienced specialists in the construction. This increased attention to technology lies in the low level of strength, as well as the hygroscopicity of the product. Another feature when constructing a building is that it is necessary to exclude the occurrence of cold bridges so that the block does not become wet in the future.
It is best to contact experienced builders. When building a turnkey structure, they will comply with all GOSTs and SNIPs, which is important. The cost of the finished building will be much cheaper if you build it in advance, armed with all the necessary information about the gas block, its features, etc.
Is a plinth needed?
The building material is characterized by high hygroscopicity. High humidity negatively affects the heat-insulating properties; when left in water for a long time, the material is destroyed.
An aerated concrete house requires a base and good waterproofing. During construction, the groundwater level and geological research data are taken into account.
Foam block or gas block, which is better for building a house?
Sometimes these two types of block are confused. Let's figure it out. Both products are classified as cellular concrete. It is difficult to make an aerated concrete block using homemade methods, which cannot be said about foam concrete.
Which is stronger?
The strength of foam concrete does not exceed B1.5 when aerated concrete has a range of B1.5-B7.5. Thus, foam concrete can be used exclusively for unloaded structures.
What's easier?
The gas block is light in weight due to its homogeneous structure and the presence of large quantities of voids. The same block size of 300 mm weighs differently. Gas block - 18.5 kg, foam concrete from 35 kg.
What's warmer?
Aerated concrete - due to lower weight and humidity.
Convenience in construction
It is much easier to build a cottage from aerated block, thanks to the ideal geometry and low weight of the product. Laying with a thin seam is not possible when using foam blocks, which reduces the strength of the masonry. Also, foam concrete gives greater shrinkage - up to 3 m/mm, while for the second type of cellular concrete this figure is only 0.4 m/mm.
Installation of floor slabs
When building a multi-story building, you need to make a ceiling separating the floors. It can be made from wood, metal, concrete and reinforced concrete slabs. The ceiling must be supported by an armored belt. If the walls of the house are separated from each other by less than 6 meters, you can use aerated concrete slabs, which have the same properties as aerated block walls. The slabs are installed on a reinforced belt, the joints between the slabs are filled with mortar. The ends of the slabs from the outside must be covered with ax blocks.
It is clear that you cannot lift the concrete slabs yourself, so for the work you will need heavy equipment - namely a crane that will lift the slabs to the required height. You need to guide the slab to position it correctly.
Covering the house with wooden beams
Another flooring option is to use wooden beams. Their height can be 150–300 mm, and their width – 100–250. Their ends need to be cut at an angle of 60–80˚, treated with an antiseptic and tarred. After which these ends are wrapped in roofing material and placed in niches to a depth of 150 mm. In this case, the gap between the beam and the wall remains 30–50 mm. They need to be installed in increments of 600–1500 mm. Then the sheathing is made and the flooring is laid.
There are different types of such coverings:
- basement - the ceiling between the basement and the first floor;
- interfloor – separating floors;
- attic - floors between the floor and the attic;
- attic – separates the floor of the house from the attic.
Before making a roof, you need to make an attic or mansard floor, depending on the type of roof.
Pros and cons of aerated concrete houses
| Advantages | Flaws |
| High service life, durability | Façade finishing required |
| Low weight hence little load on the foundation | Due to its popularity, there are many fakes, which means the risk of purchasing low-quality material increases. |
| Safe for health, environmentally friendly | The likelihood of cracks occurring if construction technology is not followed (Cause - incorrect load on the block) |
| Zero fire safety class - a reliable degree of fire protection | Hygroscopicity (moisture saturation). Again, if technology is not followed |
| Excellent thermal insulation qualities | |
| Wide range of architectural options |
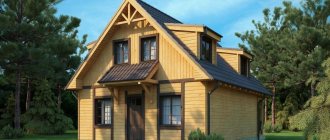
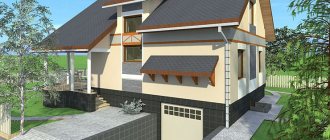
No. 3. Project "Zephyr Nova"
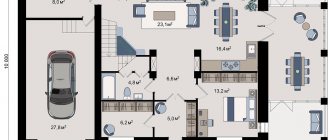
This project involves the construction of a spacious house with three bedrooms, a terrace and a garage - what is needed for a large family . On the ground floor, according to the project, there is a combined living room and dining room, as well as a partially isolated kitchen area. The peculiarity of the house is its large glass area . Thus, in the dining room and living room there are corner floor-to-ceiling windows, which allows us to talk about a high level of natural light from morning until late evening. From the dining-living room there is access to a terrace, the territory of which can be organized at your discretion: put a dining table, several sun loungers or just armchairs with sofas for relaxing in the fresh air.
The ground floor has its own bathroom, and a separate block has a garage with an adjacent utility room. The attic floor is a spacious living area. Here you can equip a bedroom with a huge dressing room, and two children's or guest rooms. There is space for an office, but if necessary it can be turned into another bedroom. Conveniently, there is a private bathroom on the second floor. Total area 161 m2 .
No. 10. Project "Modern"
If the classic style does not suit you, and you want something very modern and unusual, then you should like this project. The house is designed to accommodate a large family or a large group of people. Half of the first floor is occupied by a garage for two cars , from which you can enter the house by passing through the technical room. The second half of the first floor is a huge living room (45 m2) with a fireplace and access to the terrace. The living room is combined with a dining area and kitchen. The highlight of the project is the large glazed area of the living room and additional access to the terrace . The second door is located directly next to the kitchen to provide owners with ease of outdoor dining. Also on the ground floor there is a pantry for storing kitchen utensils and provisions, a small dressing area, a bathroom and an office.
On the second floor there is a large bedroom with its own bathroom, dressing room and access to a spacious balcony, which can serve as a full-fledged relaxation area. There are two other bedrooms on the floor, which are distinguished by their royal scope and access to a common huge balcony (almost 30 m2), where you can organize parties, get-togethers, sunbathe, you can organize a cinema there, a dining room - there are a lot of options. One of these bedrooms received its own dressing room. If there is not enough space for things, there is a shared dressing room on the floor. The rest of the space is occupied by the bathroom. The total area of the house is 325 m2 . This is luxury, comfort and maximum free space.
No. 8. Project "Malina"
The project will appeal to those who care about the condition of their car and do not want to leave it in the open air for a long time. A significant part of the first floor is occupied by a garage , the rest of the space is given over to the kitchen, the area of which is sufficient to accommodate both a dining table and a bar counter. The kitchen received corner glazing, so there is no need to worry about a lack of light. The living room features two exits to two separate terraces : one can be used for dining, the other for sunbathing. The ground floor will also accommodate a toilet and technical room.
On the second floor you can place three bedrooms, or two bedrooms and an office - whatever you like. Two rooms have access to a common balcony. Naturally, the second floor has its own bathroom. An excellent option for both permanent residence and for building a country house for holidays. Total area 141 m2.
No. 5. Project "Calypso"
Luxurious, chic, huge - these are the epithets that come to mind when looking at the project. The house will appeal to lovers of modern style and connoisseurs of maximum comfort. Such a mansion can easily accommodate a huge company and a large family can live. Traditionally, on the ground floor there is a living room with a dining area and access to the terrace. The living room is lit from almost all sides, there are corner windows, part of the glazing is from floor to ceiling, so there will definitely be no problems with a lack of lighting. There is a separate fireplace area , part of which is located in a bay window with continuous glazing. The authors of the project suggest using the bar counter for small snacks. It will also serve to separate the kitchen area from the living room. There is a small storage room near the kitchen. The ground floor has its own bathroom, and a huge part of the area is occupied by a garage for two cars.
The second floor has four huge bedrooms, each with a dressing room and access to a balcony. The floor has its own bathroom, and there is also a separate bathroom in one of the bedrooms. The bay window on the second floor can be used as a small recreation area . Such a house would be an excellent place for a large family to live permanently. Total area 227 m2.
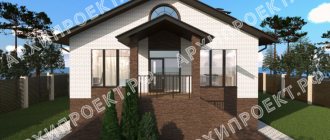
No. 7. Project "Domino"
The project involves the construction of a one-story house with three bedrooms , a living room, a kitchen and a technical room. The layout compares favorably with the presence of two bathrooms , more precisely a toilet room and a bathroom. The area of the latter is sufficient to accommodate not only a bath or shower, but also a sink with a toilet, so you can avoid queues for the toilet, and when there are three bedrooms in the house, this is important.
The living room flows smoothly into the dining room and kitchen. The project includes a fireplace that can be admired while sitting on the sofa or at the dining table. There is space for a pantry , and there is access to the terrace from the living room. An ideal solution for a family with several children. Total area 98 m2 .
No. 6. Project "Grace"
This is the simplest possible house, without any architectural frills, with a regular gable roof. It is great for small and narrow areas , and thanks to the correct finishing of the facade, the house will look advantageous. The project amazes with the thoughtfulness of its layout: here each of the 105 m2 is used with maximum benefit. On the ground floor it is proposed to place a kitchen and a living room with a fireplace. These rooms are actually separated, there is no separate dining area, but if you combine the rooms, the dining table can be removed from the kitchen area - it all depends on your wishes. The living room has access to the terrace. On the ground floor you can place a boiler room, a bathroom and a small living room (office, guest room, children's room).
On the second floor there are three bedrooms, two of which have access to a balcony. There is also a bathroom here, which, interestingly, also has access to a balcony, so comfortable water treatments followed by relaxation in the fresh air with a cup of coffee are guaranteed. The house is small, but it has everything necessary for household members and guests.