Here you will learn:
- Installation of electric convectors
- General requirements
- Installation process
- Installation of gas convectors
- General requirements
- Installation process
Convectors are becoming increasingly popular heating equipment. They are extremely compact and highly efficient, quickly heating rooms without the help of electric boilers and batteries. Heaters are mounted under windows and on blank walls, where they successively pass almost all the air in the rooms through themselves, heating it. Let's see how to install a convector on a wall. Moreover, we will touch upon not only electric, but also gas appliances.
General requirements
Installing a convector on a wall begins with studying the requirements for its placement. They should be specified in the passport for a specific device. If you don’t have a passport, then there’s nothing wrong with that. To begin with, let's make the following recommendations:
Some craftsmen make additional improvements to the design of the convector to increase its efficiency. This is absolutely not worth doing - any such intervention can lead to a breakdown or short circuit.
- The optimal distance from the floor is at least 20 cm;
- The distance to the window sill is at least 45-50 cm;
- The distance to the nearest walls is at least 30 cm.
Please note that in front, at a distance of half a meter, it is also undesirable to place any objects - cabinets, bedside tables, sliding tables, armchairs and much more.
The diagram for connecting the convector to the electrical network is as simple as three kopecks. In most cases, equipment is connected to the network via a wire with a plug. Therefore, next to each electrical appliance you need to install sockets - we mount them side by side on the wall and connect them to the house network. They should be located neither below nor above, but on the side, where they will not overheat from the radiated heat. The optimal installation distance is at least 20-30 cm from the place where the convector is mounted on the wall.
It is best to get rid of sockets by installing the convector on the wall and connecting it through a junction box.
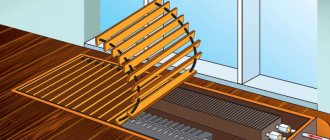
Decorative frame
Many manufacturers offer convector framing , this is necessary primarily in order to close the joints; often tilers do not perfectly fit the tiles to the convector and gaps and cracks remain, and in such cases the framing is installed. It comes in two types: U-shaped and F-shaped. The U-shaped one is less noticeable because it does not lie on the floor covering. The F-shaped one lies on top and is 1-2 mm wide, thereby completely hiding the joint between the convector and the floor, but in this case the grille is slightly higher than the floor, that is, a slight rise is formed. If without a frame, then the floor, convector and grille are on the same level.
Installation process
Let's see how to install a convector with your own hands - no help from specialists is needed here. First, you need to remove the device from the box and tear off the polyethylene packaging from it. At the next stage, we get acquainted with the instructions - a mandatory requirement, but ignored by 99% of users (nothing can be done - this is how the mentality of the Russian person manifests itself, who turns to the instructions only when nothing really helps).
Next you need to figure out how to hang the convector. For this, in most cases, special brackets are used that are attached to the walls - they are similar to the brackets used to install LCD TVs. The next stage involves working with a drill; you need to go through four holes in the wall, push plastic dowels into them and hang brackets on them using self-tapping screws. The length of the dowels used is 40-50 mm.
Installing the convector on a wooden wall is done using ordinary self-tapping screws 40-45 cm long. Some experts advise placing a piece of heat-insulating material between the heater and the wall.
Next, we install the convector on the brackets placed on the wall - we simply hang the device on the appropriate hooks. Now everything is ready for launch and operation. Connect the equipment to the outlet, set the desired temperature using the thermostat and wait until the electric heater warms up the air in the room - this may take 1-2 hours, depending on the volume.
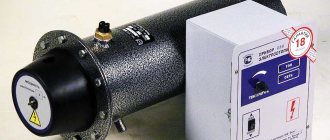
Idea N3: Oil heater
Since technical oil has good heat transfer functions, it is widely used in heaters. You can assemble this oil heater yourself at home. To do this, you will need an old heating radiator (cast iron or bimetallic battery, register or other tubular structure), a tubular heating element, the oil itself as a coolant, sealed plugs for placing the heating element.
Rice. 11: Example of using a register control unit
To maximize the safety of the oil device, it can be supplemented with a heating sensor, the open contacts of which are connected to the power circuit.
The manufacturing process of an oil cooler is as follows:
- Take the old radiator, it is important that it is replaced due to the modernization of the system, and not due to a violation of the integrity of the case. It is advisable to verify this yourself by adding liquid or at least through an external inspection.
Rice. 12: Take an old radiator - Prepare two holes in the heater - for the heating element and for filling the oil. The first hole must be equipped with a thread and located in the lower part so that the heated masses rise upward. It is more convenient to place the second hole in the upper part; when putting the heater into operation, it will also have to be sealed. In addition, holes can be made for draining the oil and for the emergency pressure relief valve.
Rice. 13. Prepare two holes - Screw the heating element into the hole on the radiator. When choosing a specific heating element model, it is important to make sure that the thread diameter matches the hole diameter, and that the kit includes oil-resistant rubber gaskets.
Rice. 14: screw the heating element into the bottom hole
Another important point is that the diameter of the heating element must be such that it never touches the walls of the radiator. For sealing, linings, special compounds and tow are used.
- If you left necks for oil drainage and for installing sensors, install the appropriate equipment in them. Seal all holes that will not be used in the future, leaving only the neck for filling the oil.
- Fill the heater with technical oil approximately 85% of the total volume. A margin of 15% is necessary for the free space that the liquid will occupy after heating and thermal expansion. Never fill oil too close. Close the oil filler neck.
Rice. 15: Close the oil filler neck - Ground the heater to a ground loop.
It should be noted that to increase the service life of such a device, the heating element should be selected in accordance with the housing material. Otherwise, due to the large difference in the output voltage of the particles of these metals, destruction of the elements will occur. Also note that the heater will have a decent weight, so it is advisable to ensure it is securely fixed in space or make a structure for ease of movement.
Rice. 16: Wheeled design
Installation of gas convectors
Installing a gas convector, of course, is more difficult than an electric one, but there is nothing complicated in this process - the main thing is to strictly follow the instructions and tips from this article.
Electric convectors have one important drawback - they consume a huge amount of electricity. Thus, the cost of heating a household with an area of 100 square meters. m. can amount to up to 30 thousand rubles, depending on the air temperature outside. In the southern regions, costs will be more or less acceptable, in the northern regions – less modest. But in any case, heating with electricity is very expensive - gas is several times cheaper.
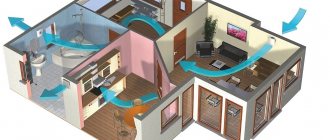
Is the fan closer or farther from the window?
The position of the in-floor radiator fan in relation to the window opening depends on the intended purpose of the device . If the convector is installed only as a thermal curtain , the fan should be located closer to the room and direct the flow of warm air onto the glazing.
If the main function of a floor-standing convector is heating the room , then the fan must be installed closer to the window opening so that it directs cold air from the glazing through the heat exchanger into the room.
We recommend that you always install the fan closer to the glazing . Thanks to the increased power of these devices in this position, they will cope with both functions: heating and cutting off cold air.
General requirements
In some cases, the best way out of the situation will be to install a gas convector. This heating device is mounted on the wall and is powered by a gas cylinder. The possibility of power supply from the main line is also provided. If gas appears in your locality in the near future, purchase gas convectors. The following requirements apply to their installation:
- Mandatory maintenance of distances to the nearest objects and walls in accordance with the installation instructions;
- The gas pipe is supplied along the street;
- When installing in a household with wooden walls, it is necessary to consider thermal insulation;
- The convector should not be installed at a great distance from the floor, as this will reduce the efficiency and intensity of the convection process.
Let's see how to install such a convector on a wall.
Idea N4: Heater with a spiral
The classic version of a spiral-type heater involves connecting heating coils to the network. Heat-resistant dielectrics were used as the basis for installing the spiral in such models. But these are quite simple options, so in this article we will look at the principle of manufacturing a device whose characteristics are not inferior to a gas heater. It uses the same principle as a heat gun, but with less heat output.
To make it, you will need a heating coil, an electric fan, a metal pipe or box for the housing, a dielectric heat-resistant frame, and a power cord. The heater manufacturing process includes the following steps:
- Cut the asbestos cement pipe to the required length (in this example it will be used to make the supporting frame).
Rice. 17: Cut the pipe to the required length - Drill several holes in the pipe from different sides so that you can insert a nichrome spiral into them.
- Insert a spiral into the holes, in this example they are made in the form of a lattice, but this is not important, it is important that the heating elements have a different angle of inclination.
Rice. 18: position of the spiral in the pipe
If you are assembling several pieces of spiral, connect them together on the outside of the pipe.
- Place a fan on one side of the pipe to force air flow. The direction of the blades should ensure the movement of air towards the spirals stretched in the pipe. The distance from the fan to the heating element must ensure safe operation so that the blades do not melt. For additional cooling, the fan and asbestos pipe can be separated in the housing.
Rice. 19: separation of fan and pipe with heater - Insulate the electrical connections both from the fan to the power cord and from the nichrome spiral. To insulate the spiral joints, you can use micanite tape, which is wound directly onto the asbestos surface.
- Place the finished heater in the most suitable housing. In this example, to protect against accidental contact with the spiral, an additional grill is installed in front of the pipe.
It should be noted that the fan power should not be too high so that the coils have time to warm up. In practice, you should achieve a blowing effect, and the heating performance can be adjusted by the length of the spiral. It is also advisable to coat the inside of the asbestos pipe with heat-resistant varnish to prevent asbestos particles from entering the air. It would be a good idea to ground the heater body to a ground loop.
Advantages and scope of application
Before praising floor heating convectors - water and electric, let us highlight the main drawback of these devices - the lack of infrared heating. What happens: the air in the room warms up quickly, but objects remain cold. Only after a few hours the surfaces will reach air temperature and people will feel comfortable in the room.
The remaining disadvantages of convectors are insignificant or far-fetched. For example, stories about drafts being created (is convection so intense?) or increased dustiness. Our opinion on the disadvantages: not all users will like the appearance of convection floor heaters. But this is a matter of taste.
Now about the real advantages of convectors:
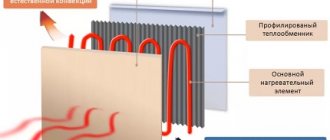
- convection - slow air circulation - promotes uniform heating of the room;
- the device quickly enters the heating mode; at a water supply temperature of 45...50 °C, a warm air stream is felt above the grate;
- the convection radiator casing does not heat up and does not pose a risk of burns to children;
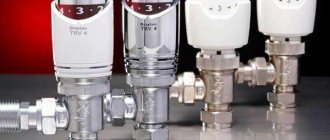
- the heater can be easily adjusted manually or automatically using a valve + thermal head assembly (in electric versions - a thermostat);
- relatively small size and weight;
- the homeowner can order the desired body color from the standard RAL line (applies to water heaters).
Convection radiators can be safely hidden behind the screen, the heat transfer of the device will decrease slightly
Addition. If you don’t like the design of a wall-mounted convector, but are happy with the price, you can hide the device behind plasterboard sheathing or a screen. Heat transfer will decrease by 10% - the same amount of infrared radiation that will block the drywall. But it is necessary to install a convection grille for air passage, as shown in the photo.
Where can convectors be used:
- for general heating of country houses and apartments;
- on closed terraces of cottages, in office premises with stained glass windows instead of an outer wall;
- in kindergartens and other preschool institutions;
- in industrial premises with ceilings up to 3 m.
Maintenance of a convective device comes down to cleaning the heat exchange plates, between which dust accumulates. The operation is performed as soon as the heater becomes dirty.
Gas supply: main stages
The installation of the gas convector has been completed, now we need to get started with the gas supply. This stage is quite complex and responsible at the same time. To supply gas, do the following:
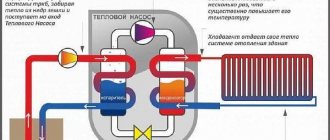
Scheme of operation of a gas convector.
- According to regulatory documents, the pipe leading to the convector must go along the street. There are two options here: the first is that the pipe has a pre-installed threaded connection, the second is that there is no such connection. If there is a thread, then you can screw on the gas valve yourself, which will shut off the gas supply to the convector. If there is no withdrawal, one must be made. To do this, call professional gas welders from your local Gorgaz or similar office.
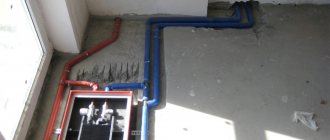
- After installing the gas tap, it is necessary to run a metal-plastic pipe to the convector itself. Using a tape measure, calculate the length of the pipe, simultaneously determining the presence of fittings.
- You need to buy pipe and fittings. The principle of purchase is that the seller must clarify the availability of a certificate of conformity of these pipes and fittings for this type of work.
- Lay the pipe, secure it with clips every m. To install the clips, you need to drill holes in the wall.
- When installing the necessary fittings, carefully lubricate the pipe and the fitting itself with silicone, which will provide additional sealing. Silicone will also serve as a lubricant and will make pipe installation easier.
As a result of the work, you should receive a convector mounted on the wall with a gas pipe connected to it.
Now the last stage of installation remains. A test run is required.
Gas convector installation diagram.
Before starting, open the gas tap and go over all fitting joints and threaded connections with a brush moistened with a water solution of soap or shampoo. This way you will be able to notice inflated bubbles (if any), which indicate gas leaks. If this happens, immediately turn off the gas supply valve. After checking the joints, start the convector. To do this, hold down the gas button for one minute. This way the gas will have time to pass through the pipes and enter the combustion chamber. Press the piezo igniter, a spark should ignite the gas. A blue flame will flare up in the firebox.
Adjust the operation of the convector by setting a comfortable temperature. During the first few hours of operation, you may smell an unpleasant odor of burning oil. This is normal, since the convector is new and the combustion chamber burns out. If the smell lingers for a long time, then you should turn off the gas and check all joints and threaded connections again.
It is advisable that all work on the installation of gas convectors be carried out by a professional who has sufficient experience in performing such work. This is also due to the fact that installing a convector yourself may void your warranty on the device. The gas convector must be accepted into the balance sheet by Gorgaz. You must have a documented permit for the tie-in. In addition, all installation decisions, as well as the conclusions of the commission for acceptance of the device into operation, must be documented and signed in the appropriate manner.
Troubleshooting
As you can see, there is nothing complicated in the design of a gas convector. Due to its simplicity, this equipment serves for a long time and with high quality. But sometimes it happens that incomprehensible interruptions arise in its work. If you notice that the flame burns unevenly or is difficult to ignite at all, the problem is often a clogged nozzle.
Simply put, the hole through which the gas escapes becomes clogged with soot or other contaminants. In this case, you can easily clean it yourself. All you need for this is a thin needle. Use it to carefully clean the hole.
Very important: before starting work, be sure to shut off the supply of blue fuel to the equipment. For this purpose, a special tap is provided on the supply pipe.
It is absolutely forbidden to work with the device when gas enters it!
It is absolutely forbidden to work with the device when gas enters it!
If after cleaning the problem does not disappear, then the most reasonable option for further action would be to call a specialist from a specialized organization. Remember that gas equipment has a high fire hazard. All more or less serious work with it should be carried out only by craftsmen who have the appropriate license.
If you decide to repair the gas convector yourself, but do something wrong, this is fraught not only with subsequent fines from the gas service, but also with the possibility of a fire. You should not take such responsibility upon yourself; be sure to invite specialists to troubleshoot serious problems. Good luck and a warm home!